Merging Branches
The Branch Merging feature enables you to merge changes between two branches using various available merge strategies. When merging two branches, you select a base branch where changes will be merged and a compare branch that contains the changes to be merged.
Note: The Merge feature currently only merges differences between content type and global field modules and is only available via Content Management API and CLI commands.
The default behavior when merging will create a backup of the branch you are merging into for safety. You can use this to quickly revert your site if there is an issue with the merge via an alias.
Note: You can create an additional revert branch beyond the established maximum limit of branches per stack. For instance, if you already have reached the maximum limit of branches in your stack, you can perform a merge operation, provided that you manually delete the backup branch or any other branch before attempting the next merge.
Strategies to Merge Branches
You can merge two branches using the following strategies:
Warning: Make sure to select the correct strategy for your merge operation.
| Strategy | Description |
|---|---|
| Prefer base | Add changes from the compare branch to the base branch. In case of conflicts, keep changes in the base branch and ignore changes in the compare branch. |
| Prefer compare | Add changes from the compare branch to the base branch. In case of conflicts, keep changes in the compare branch and discard changes in the base branch. |
| Overwrite with compare | Completely replace the base branch with changes from the compare branch. Any items in the base branch not present in the compare branch will be lost. |
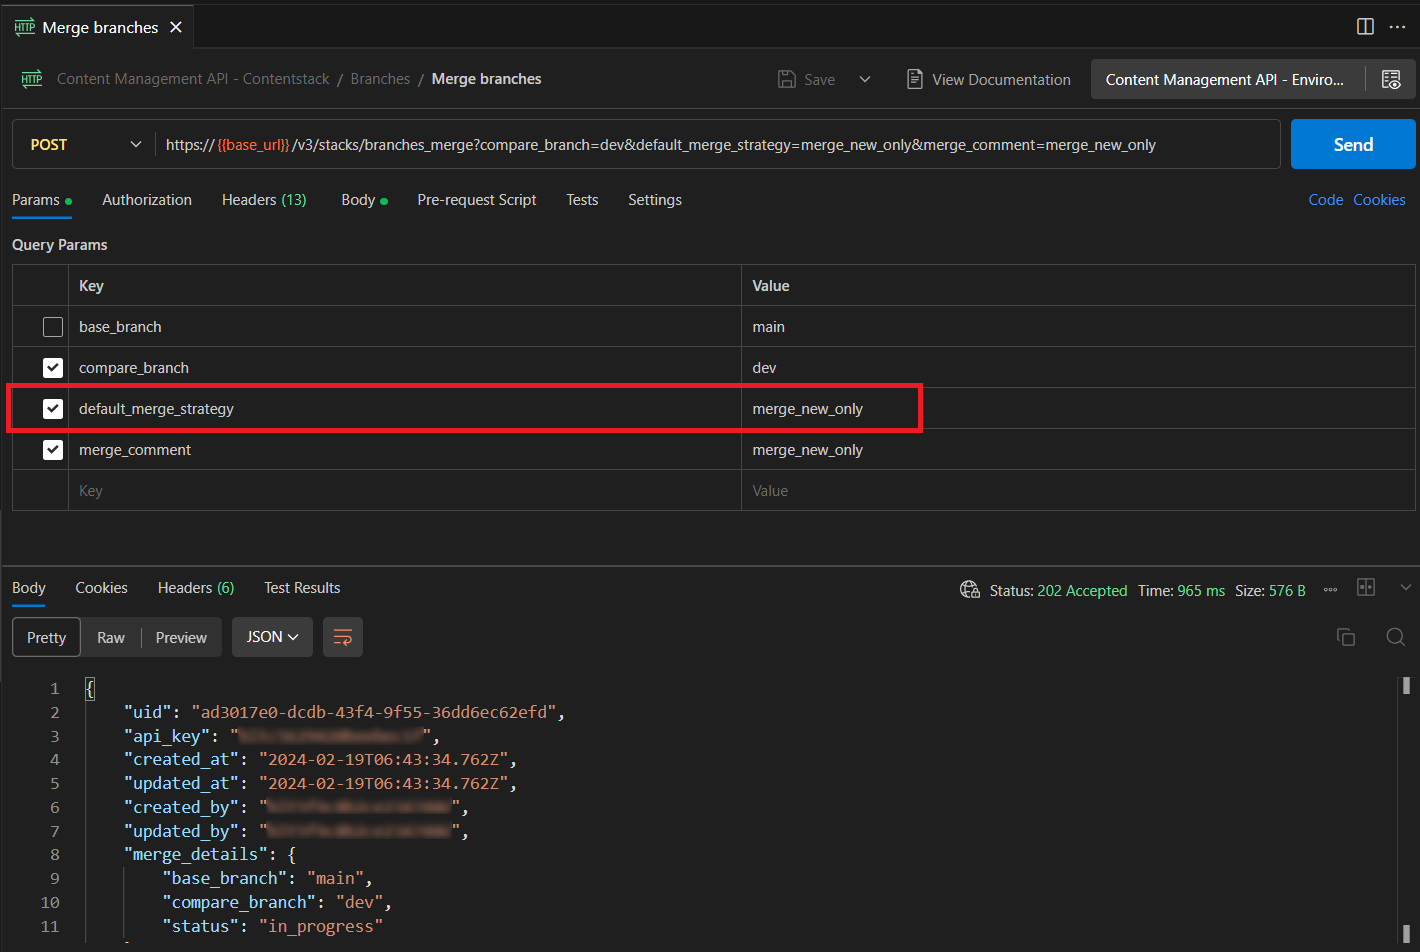
| Merge new only | Merge only new changes from the compare branch to the base branch, ignoring any modified changes in the compare branch. |
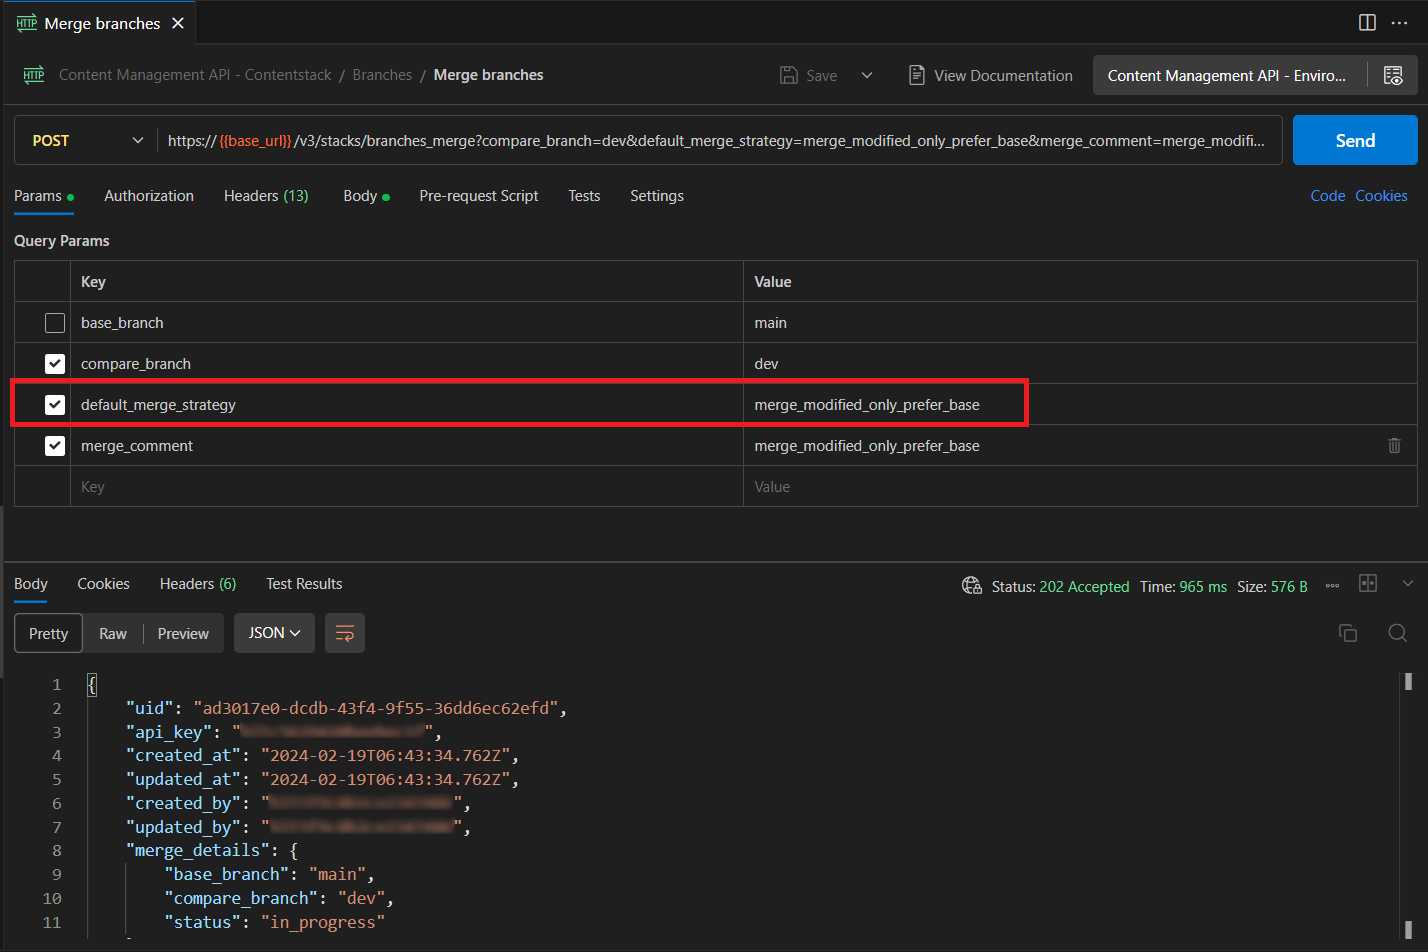
| Merge modified with prefer base | Add only modified changes from the compare branch to the base branch. In conflicts, keep modified changes of the base branch and ignore modified changes of the compare branch. |
| Merge modified with prefer compare | Add only modified changes from the compare branch to the base branch. In conflicts, keep modified changes of the compare branch and ignore modified changes of the base branch. |
| Ignore | Ignore all changes from the compare branch, keeping the base branch unchanged. Can be used to ignore specific changes or all changes to merge only specific changes. |
Note: You can use ignore as the default merge strategy and different merge strategies for all or specific content types and global fields.
Use-Cases of Merging Branches
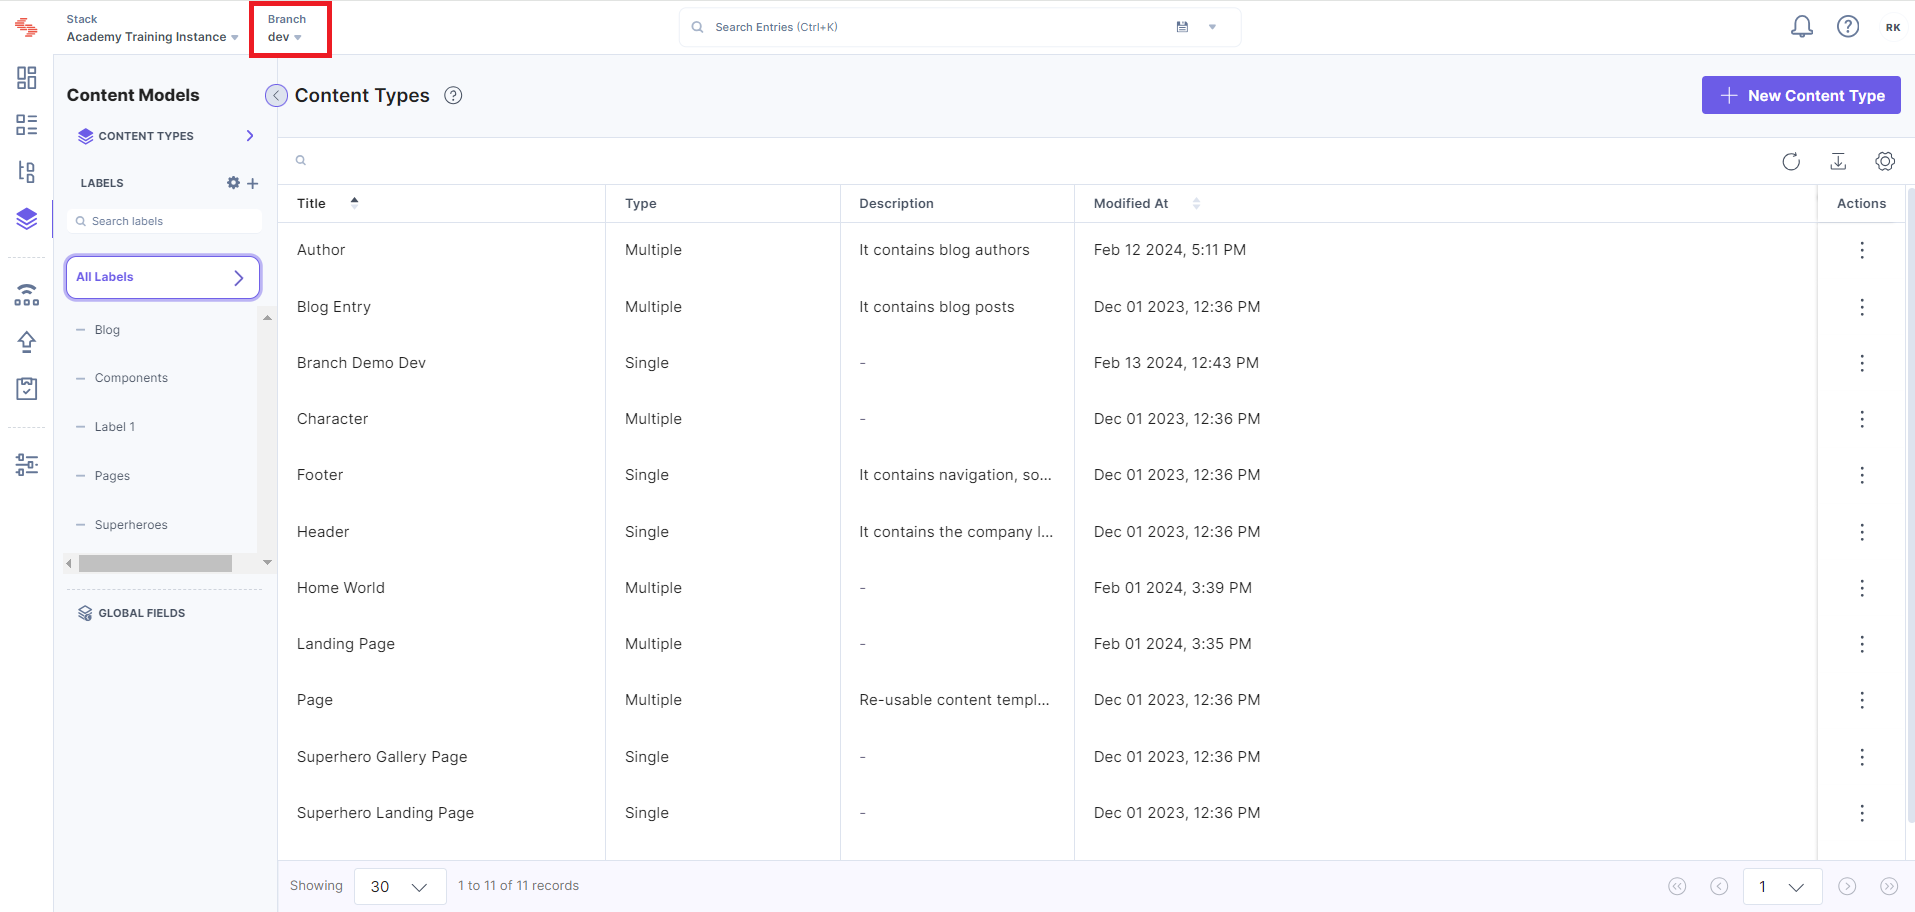
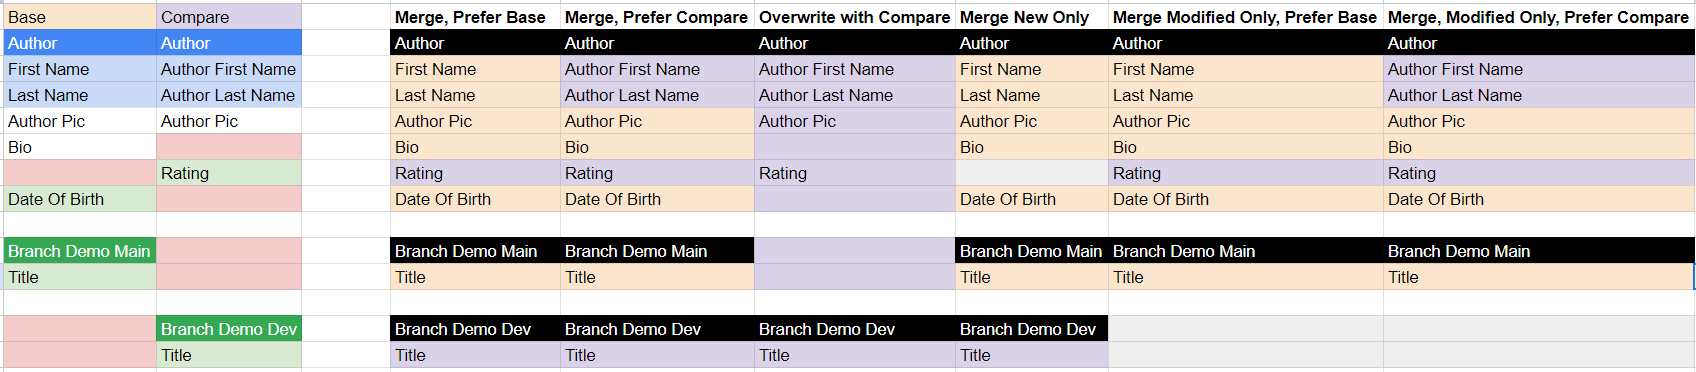
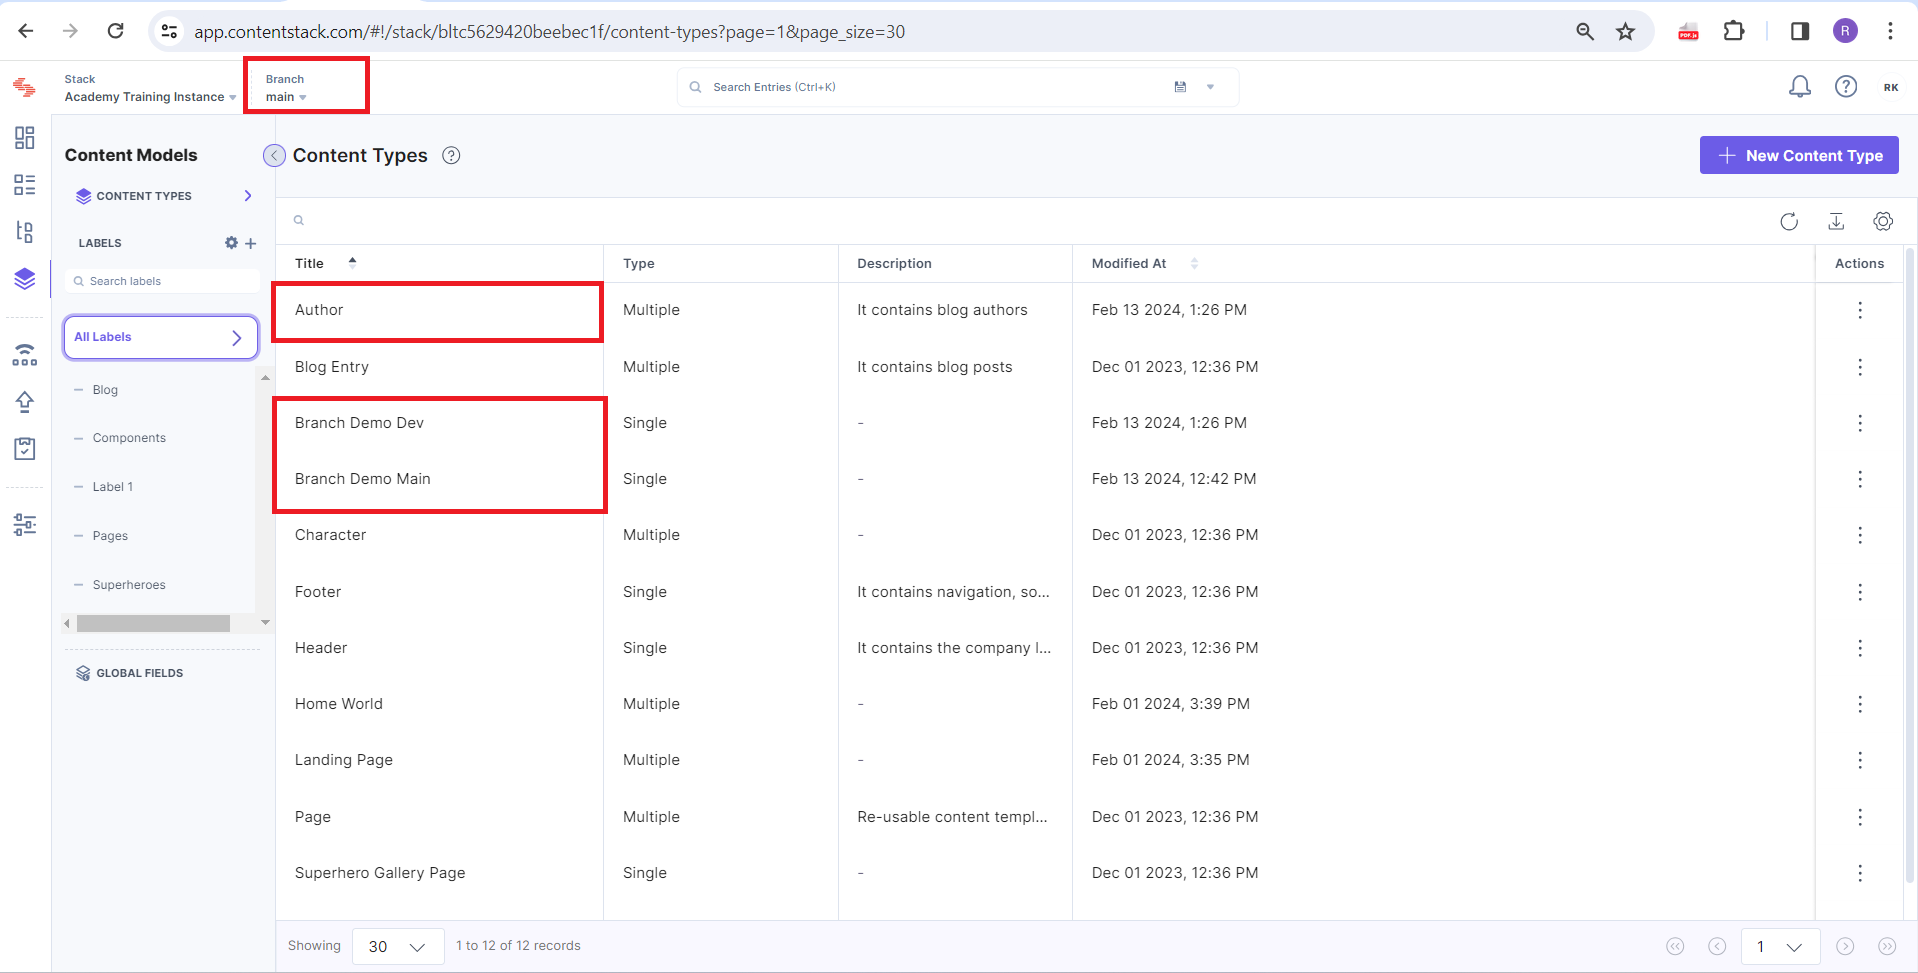
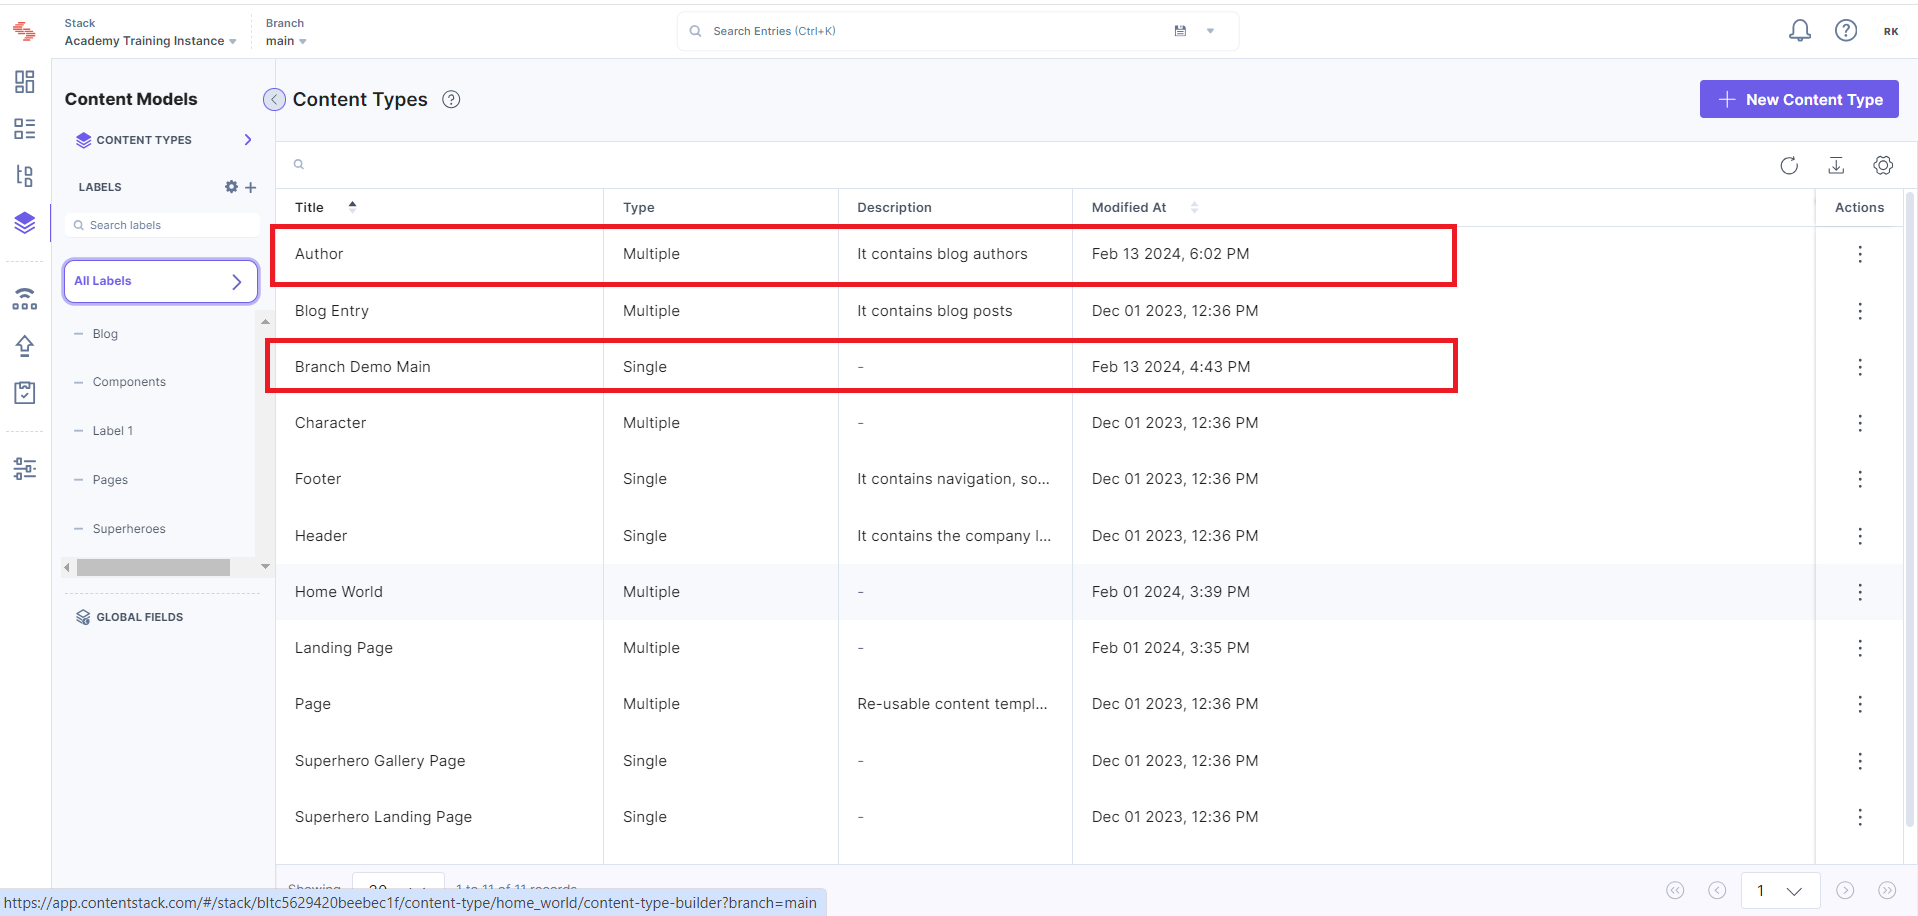
Consider a scenario in our academy training instance consisting of the following content types:
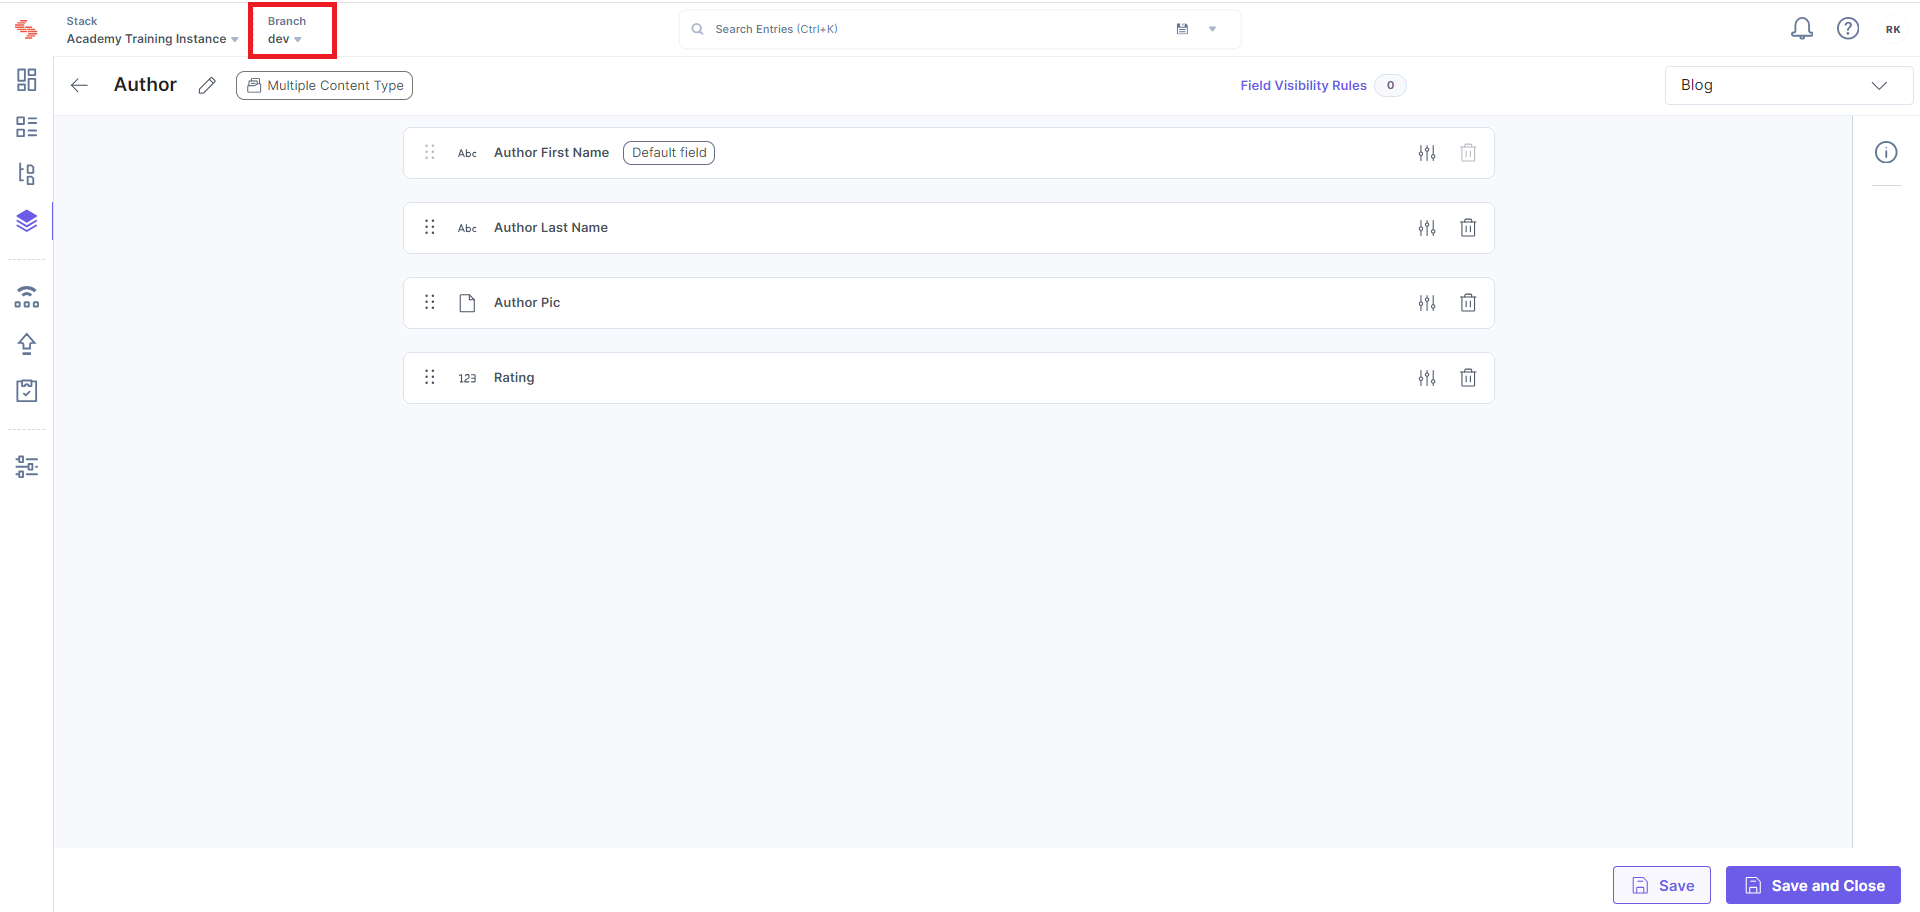
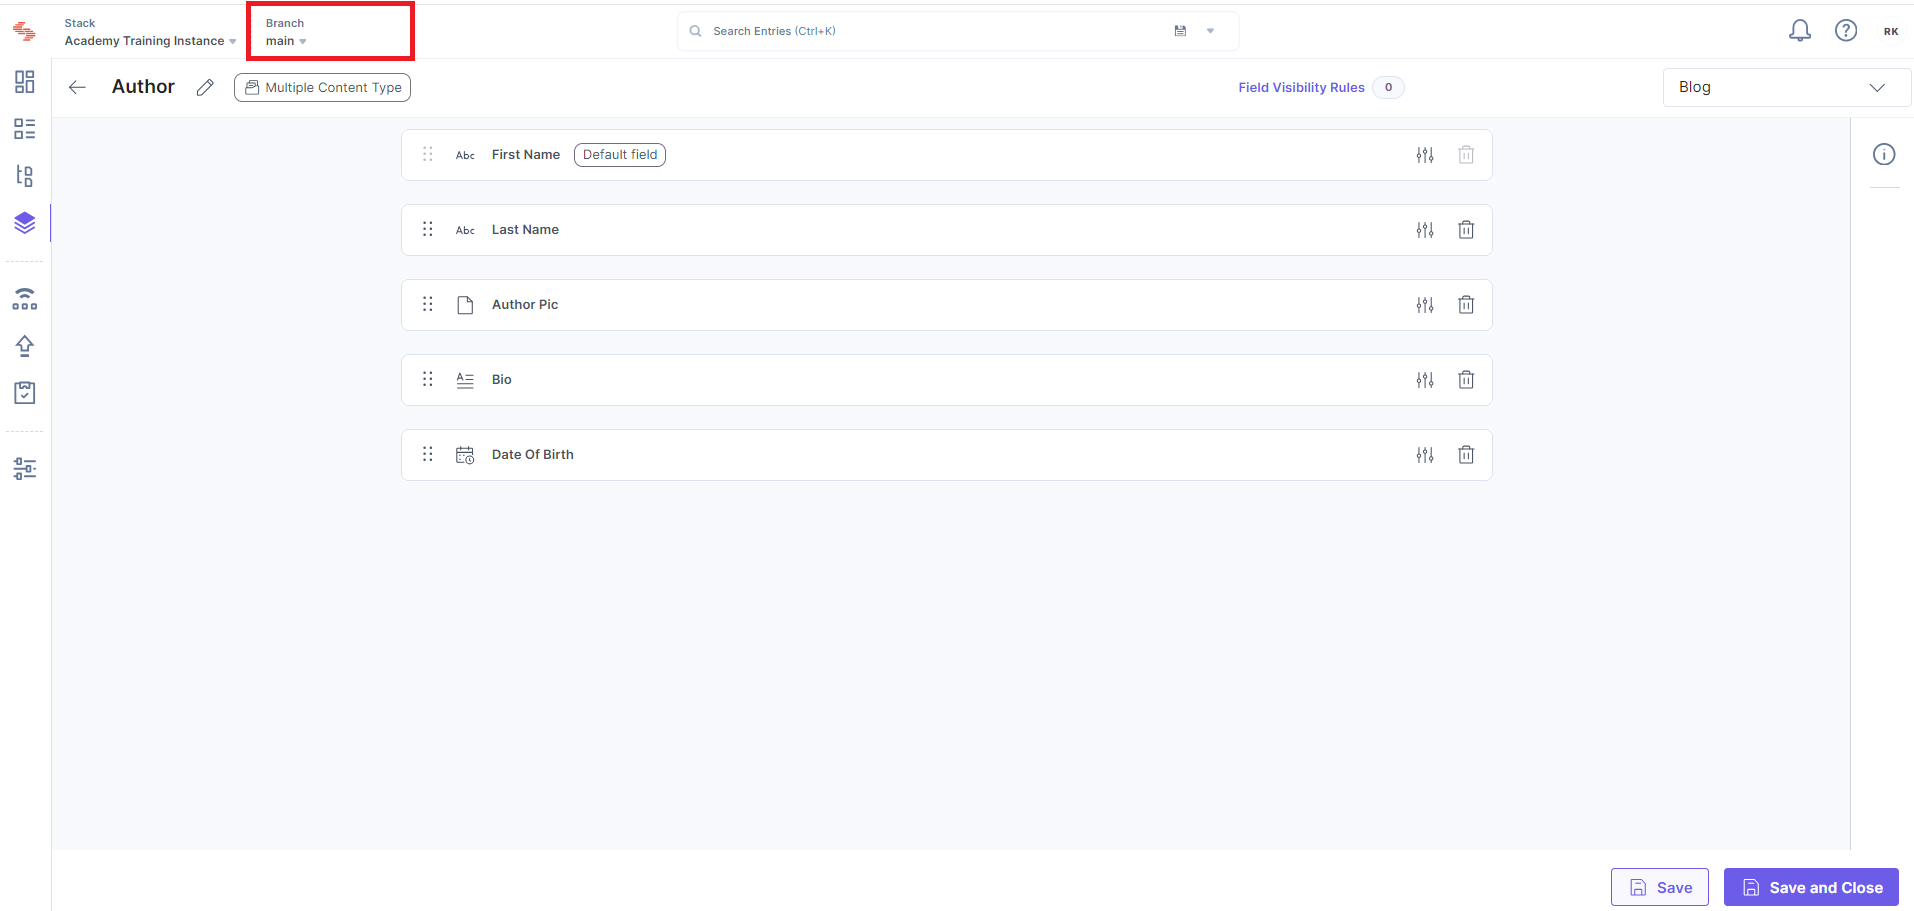
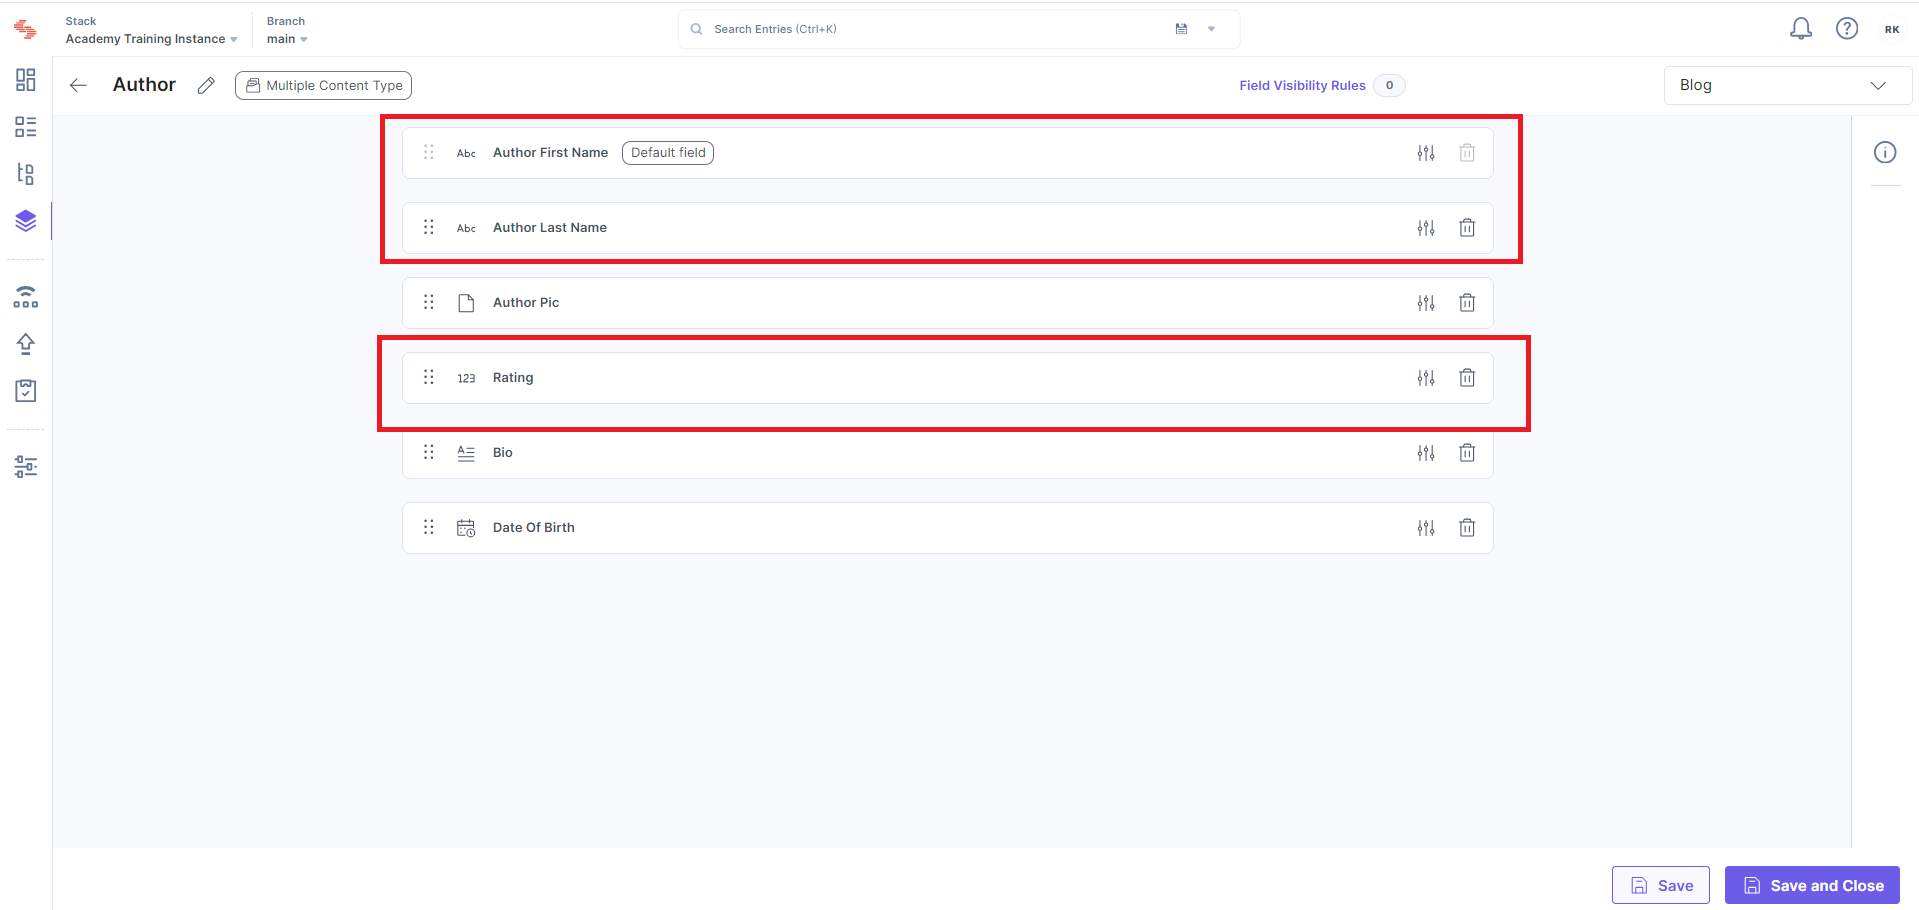
Author: with fields "First Name," "Last Name," "Author Pic," "Bio"

Now, we plan to redesign our website and create a branch called dev that copies all of the above-mentioned content types from the main branch and their current content. You make the following structural changes to the content types within the child branch:
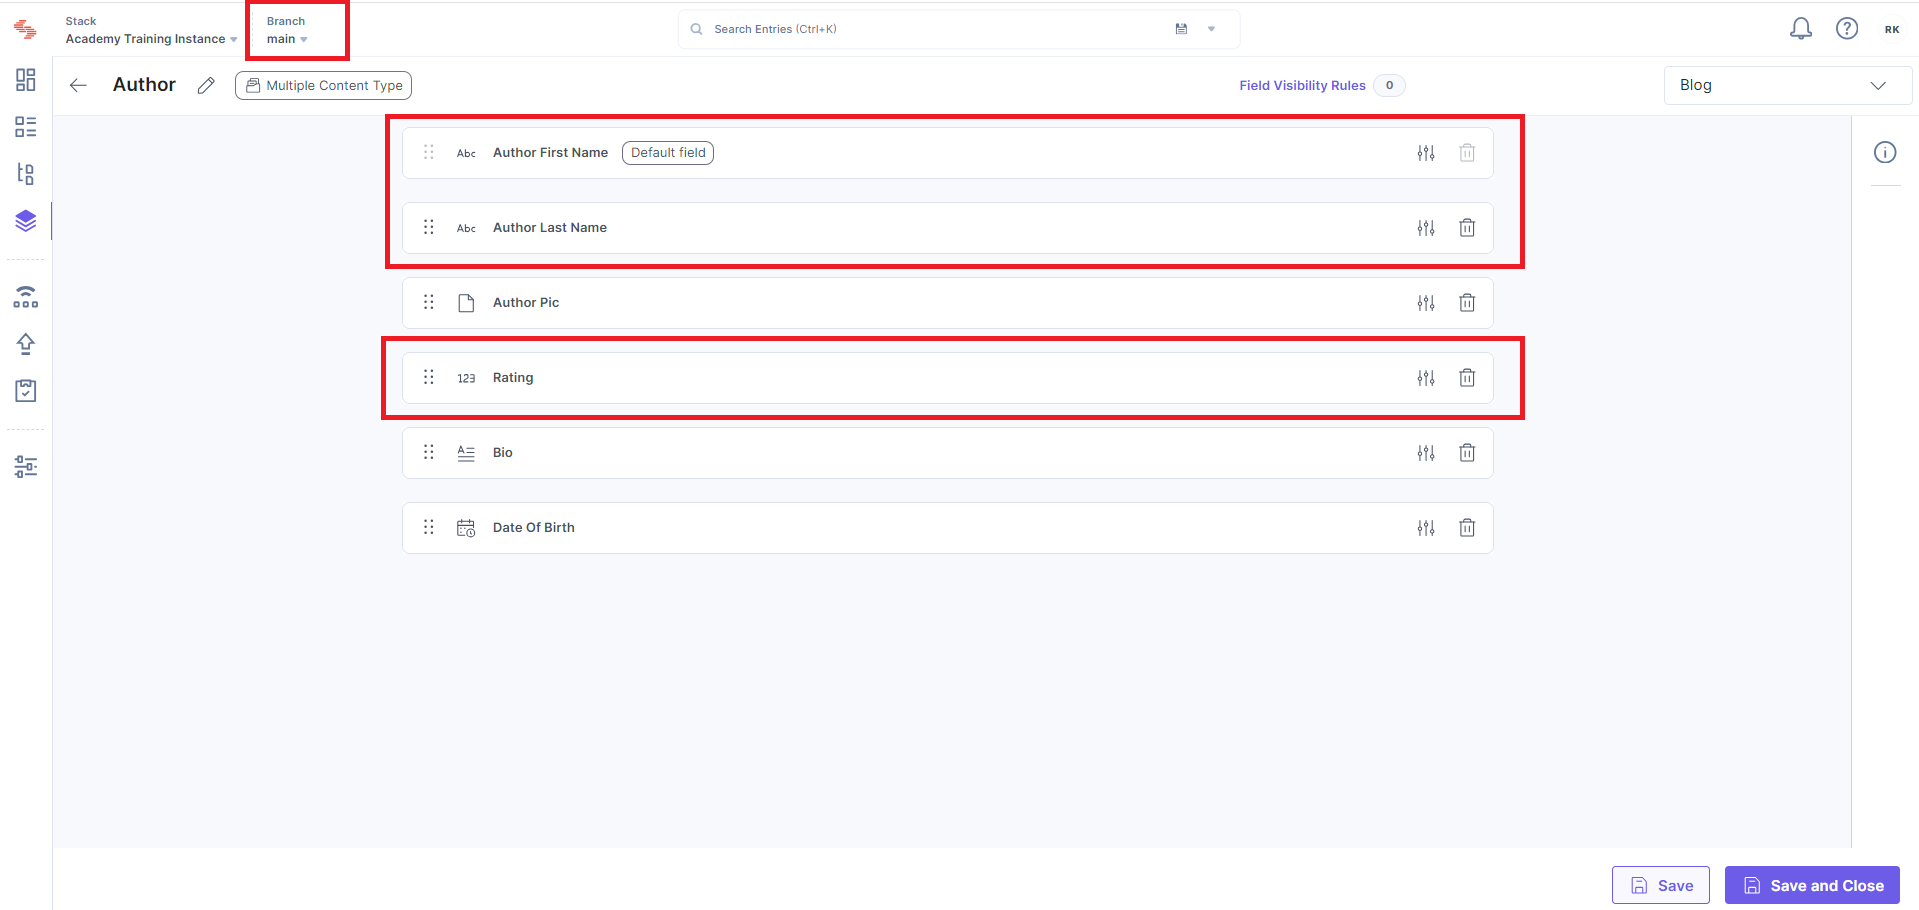
Author: with the “Rating” (new) fields (and the “Bio” field removed) and First Name and Last Name is changed to Author First Name and Author Last Name.
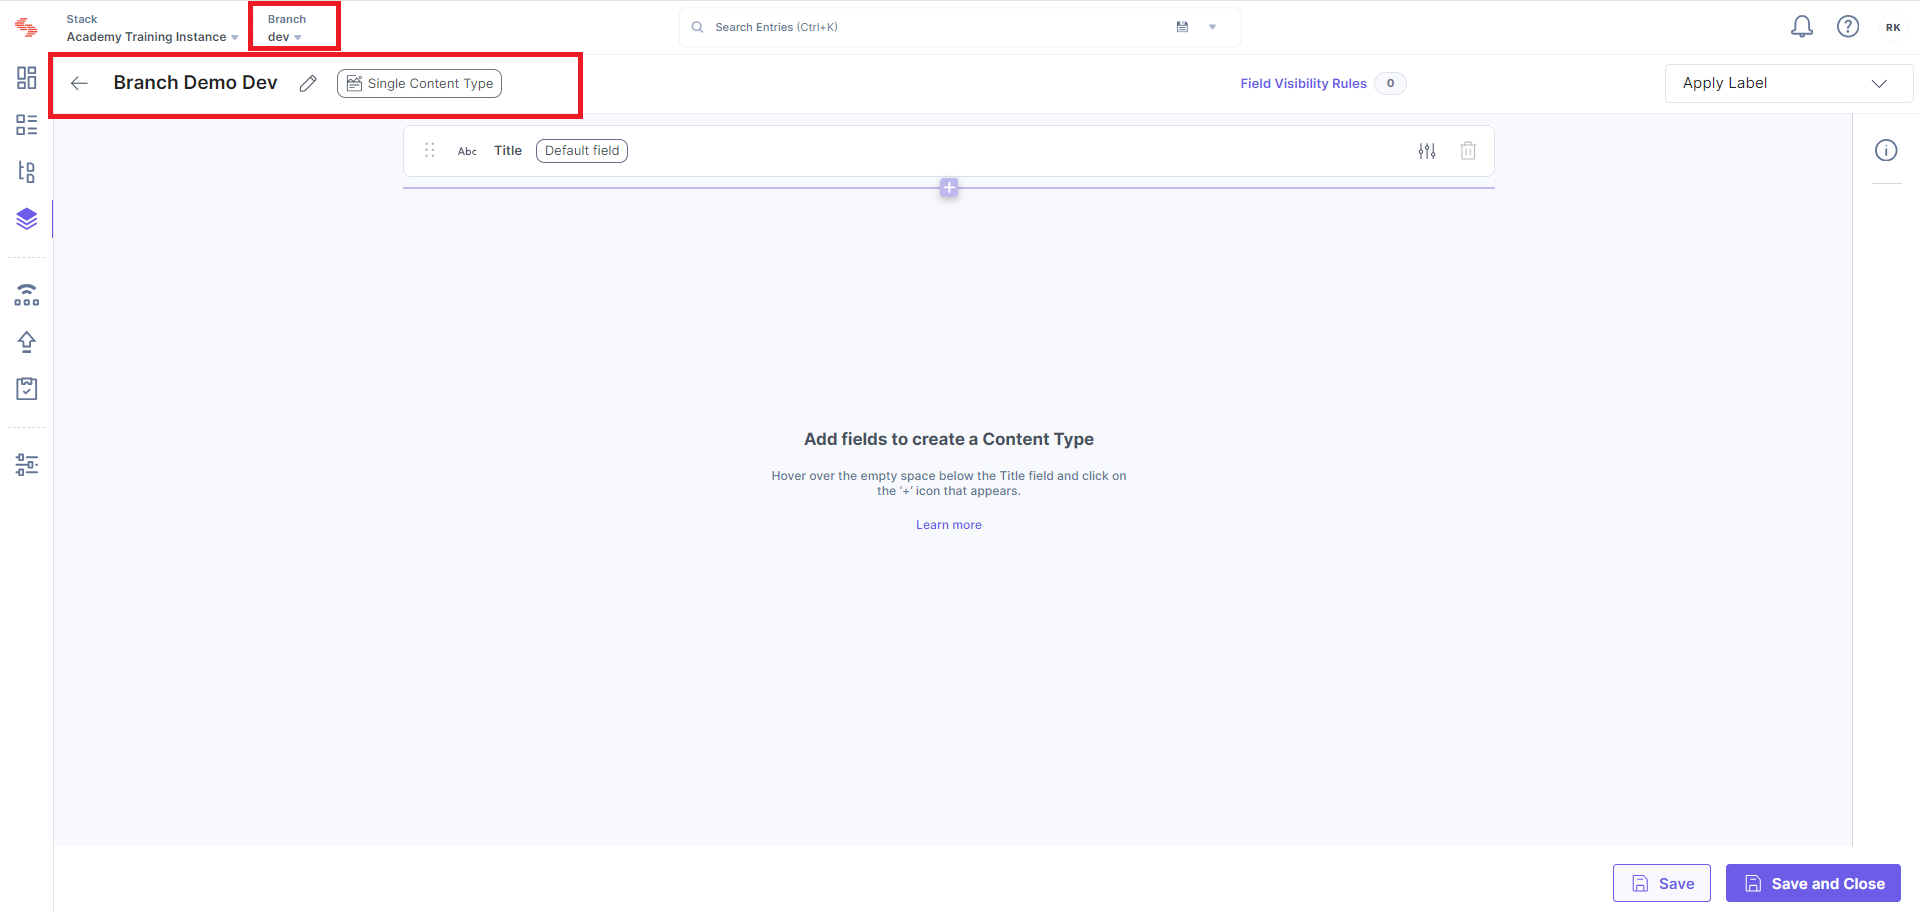
Branch Demo Dev: with field "Title"
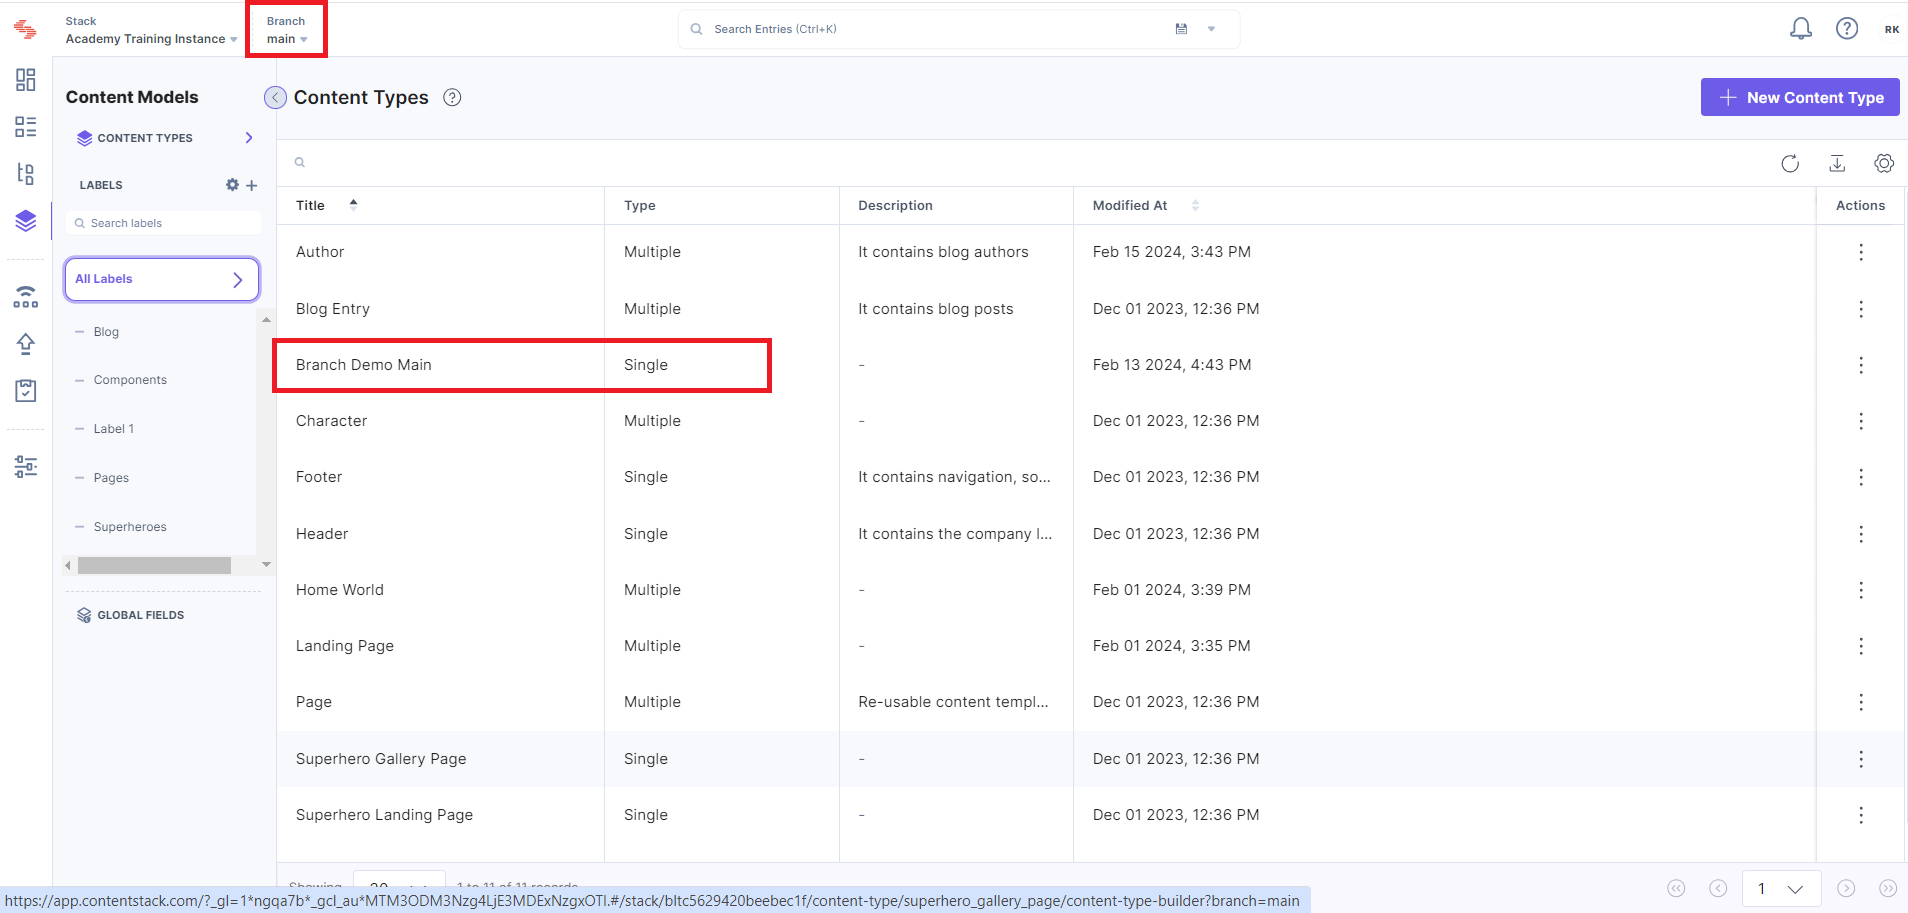
While the main branch will add the new content type
We will add a new content type named "Branch Demo Main," with the field "Title" and a new field named "Date Of Birth."
Let us understand how each of the strategies affects our merge function individually.
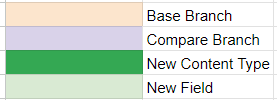
Please consider the color codes.
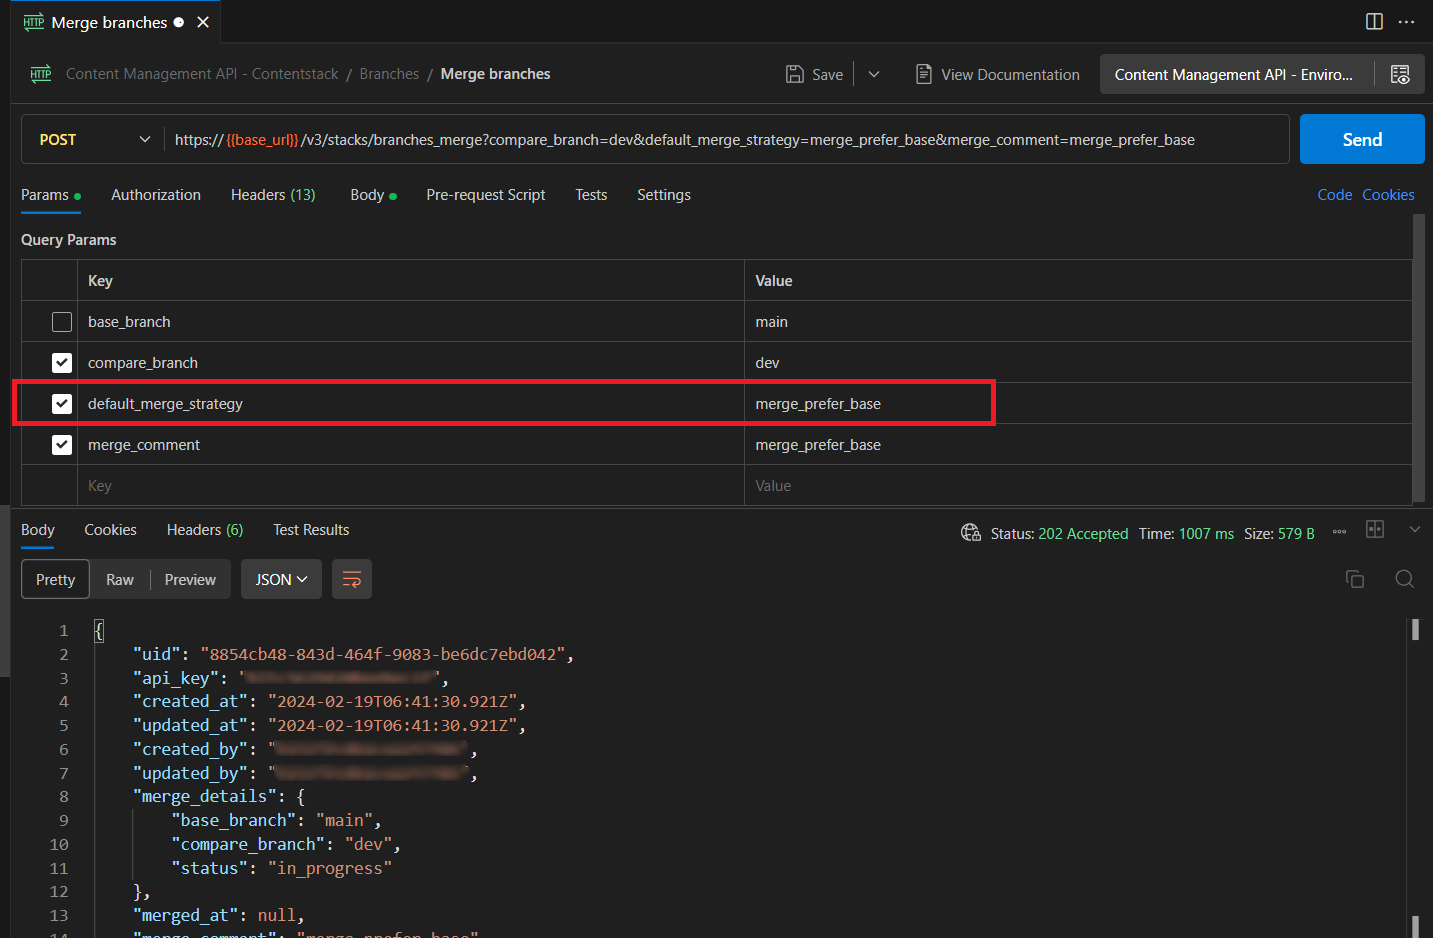
We will merge branches using Contentstack Management API
Merge Using Prefer Base
Since this strategy allows you to add changes from the compare branch to the base branch, and in case of conflicts, prefer to keep content from the base branch intact. Your new merged main branch will be as follows (items in bold came from the compare branch):
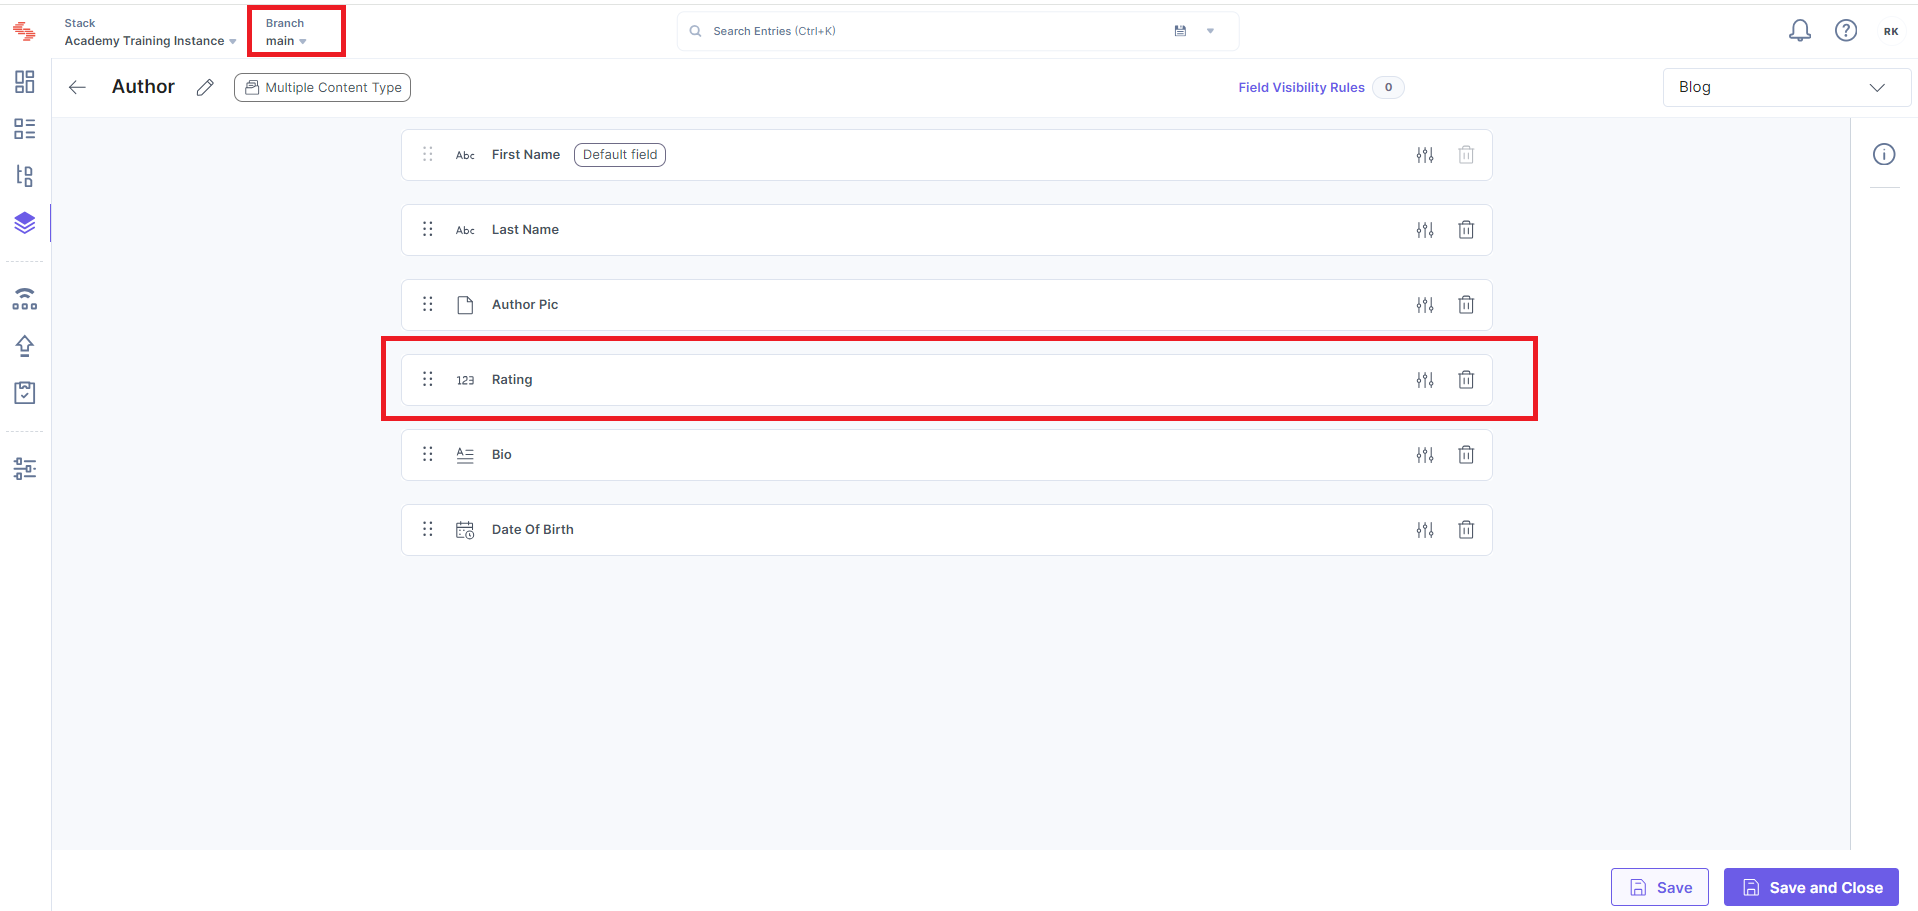
Author: with fields "First Name," "Last Name," "Author Pic," "Bio," "Rating," "Date Of Birth."
Branch Demo Main: with field "Title"
Branch Demo Dev: with field "Title"

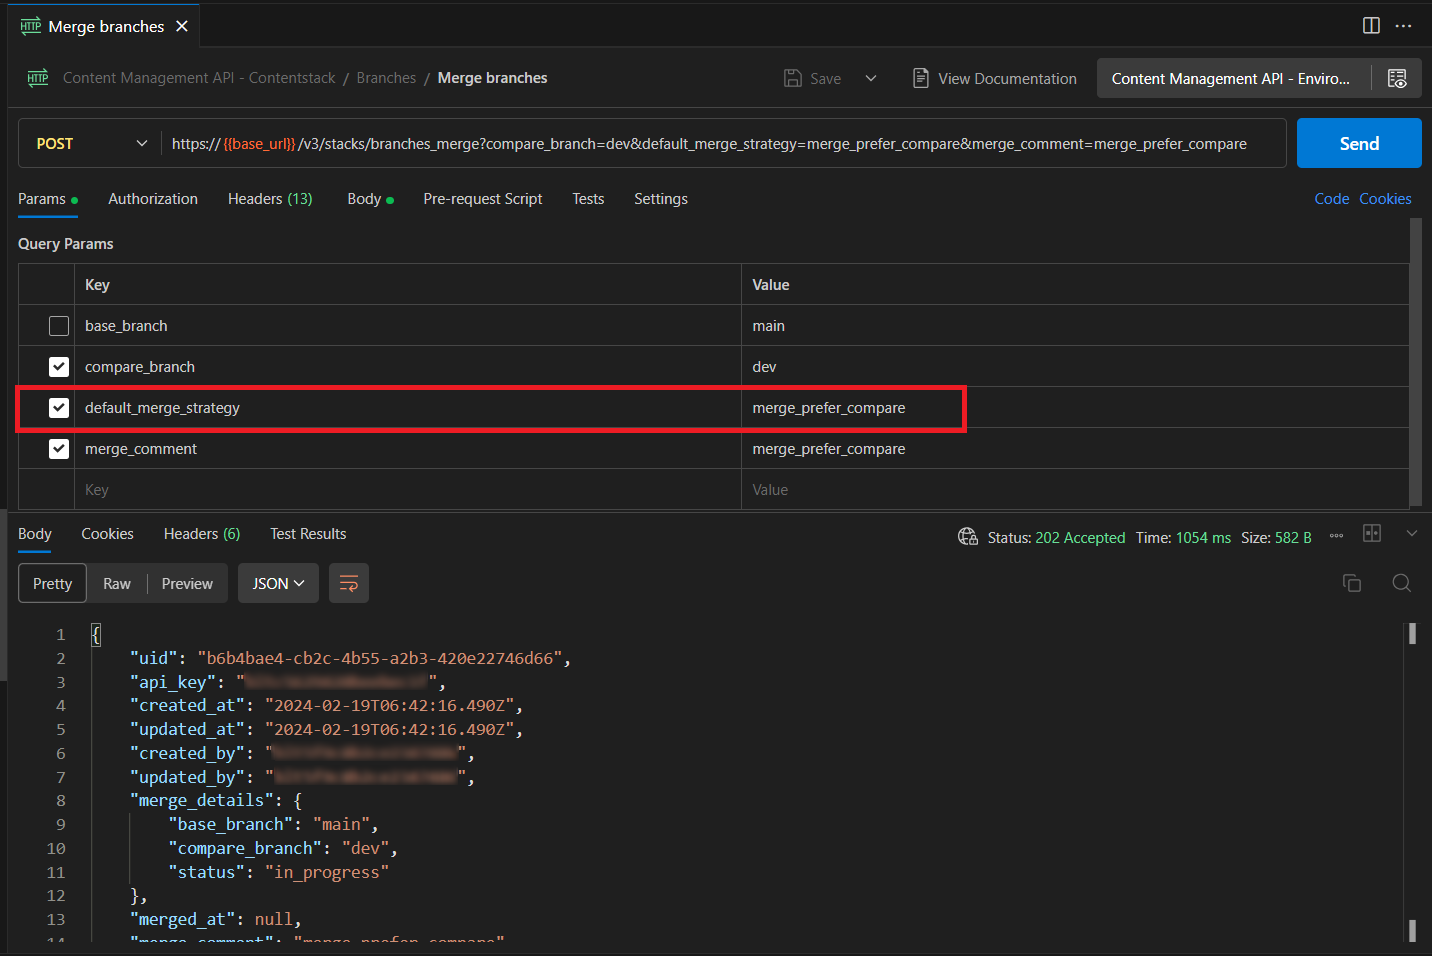
Merge Using Prefer Compare
Since this strategy allows you to add changes from the compare branch to the base branch, and in case of conflicts, prefer to keep content from the compare branch intact. Your new merged main branch will be as follows (items in bold came from the compare branch):
Author: with fields "Author First Name", "Author Last Name," "Author Pic," "Bio," "Rating," "Date Of Birth."
Branch Demo Main: with field "Title"
Branch Demo Dev: with field "Title"

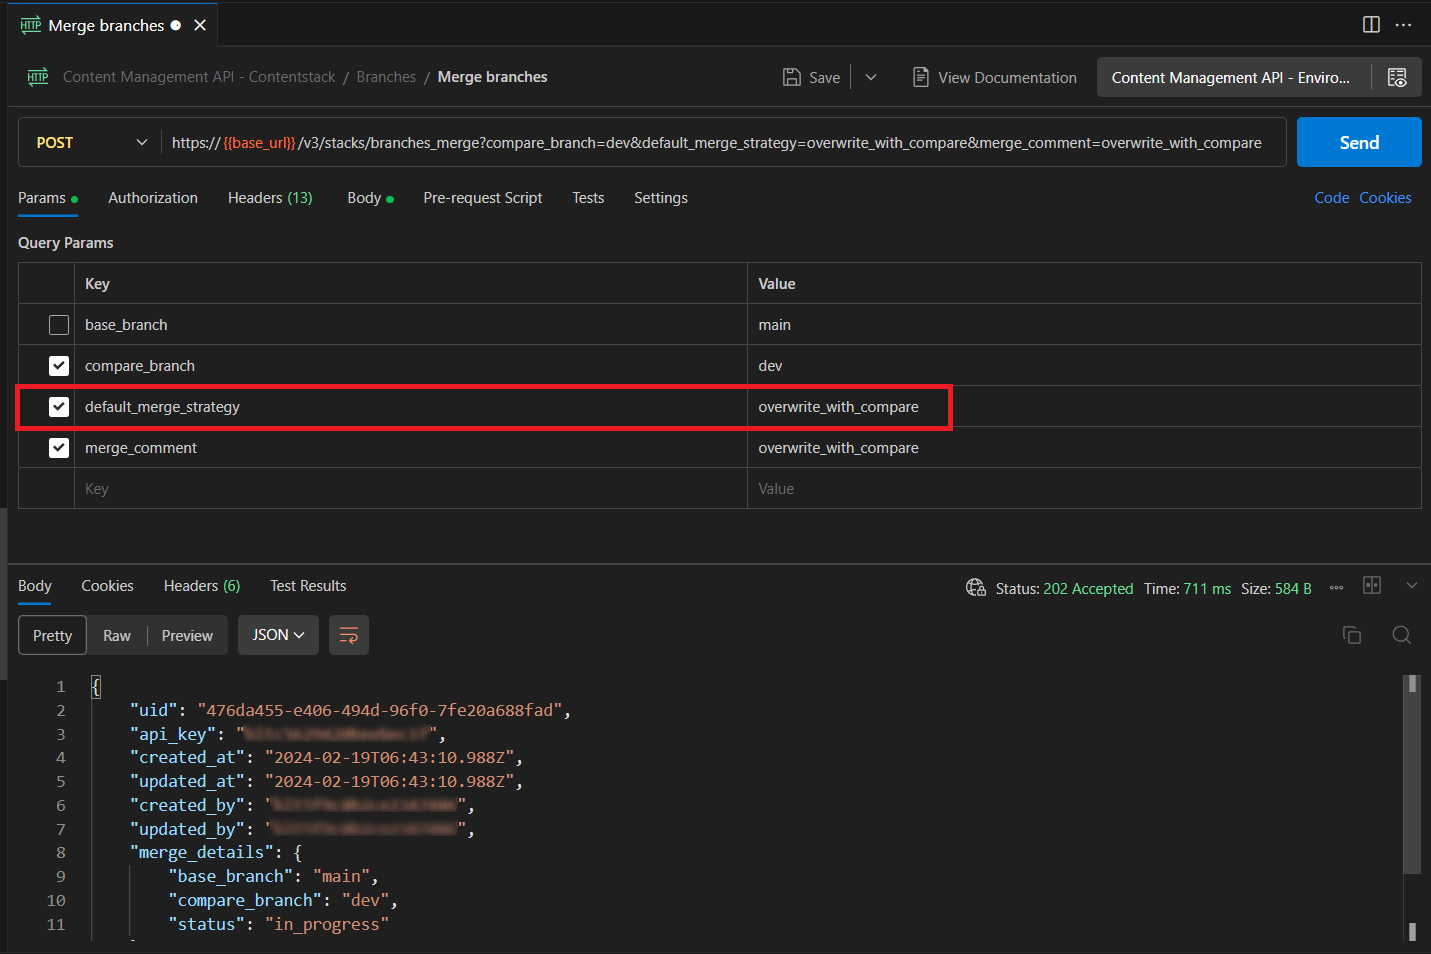
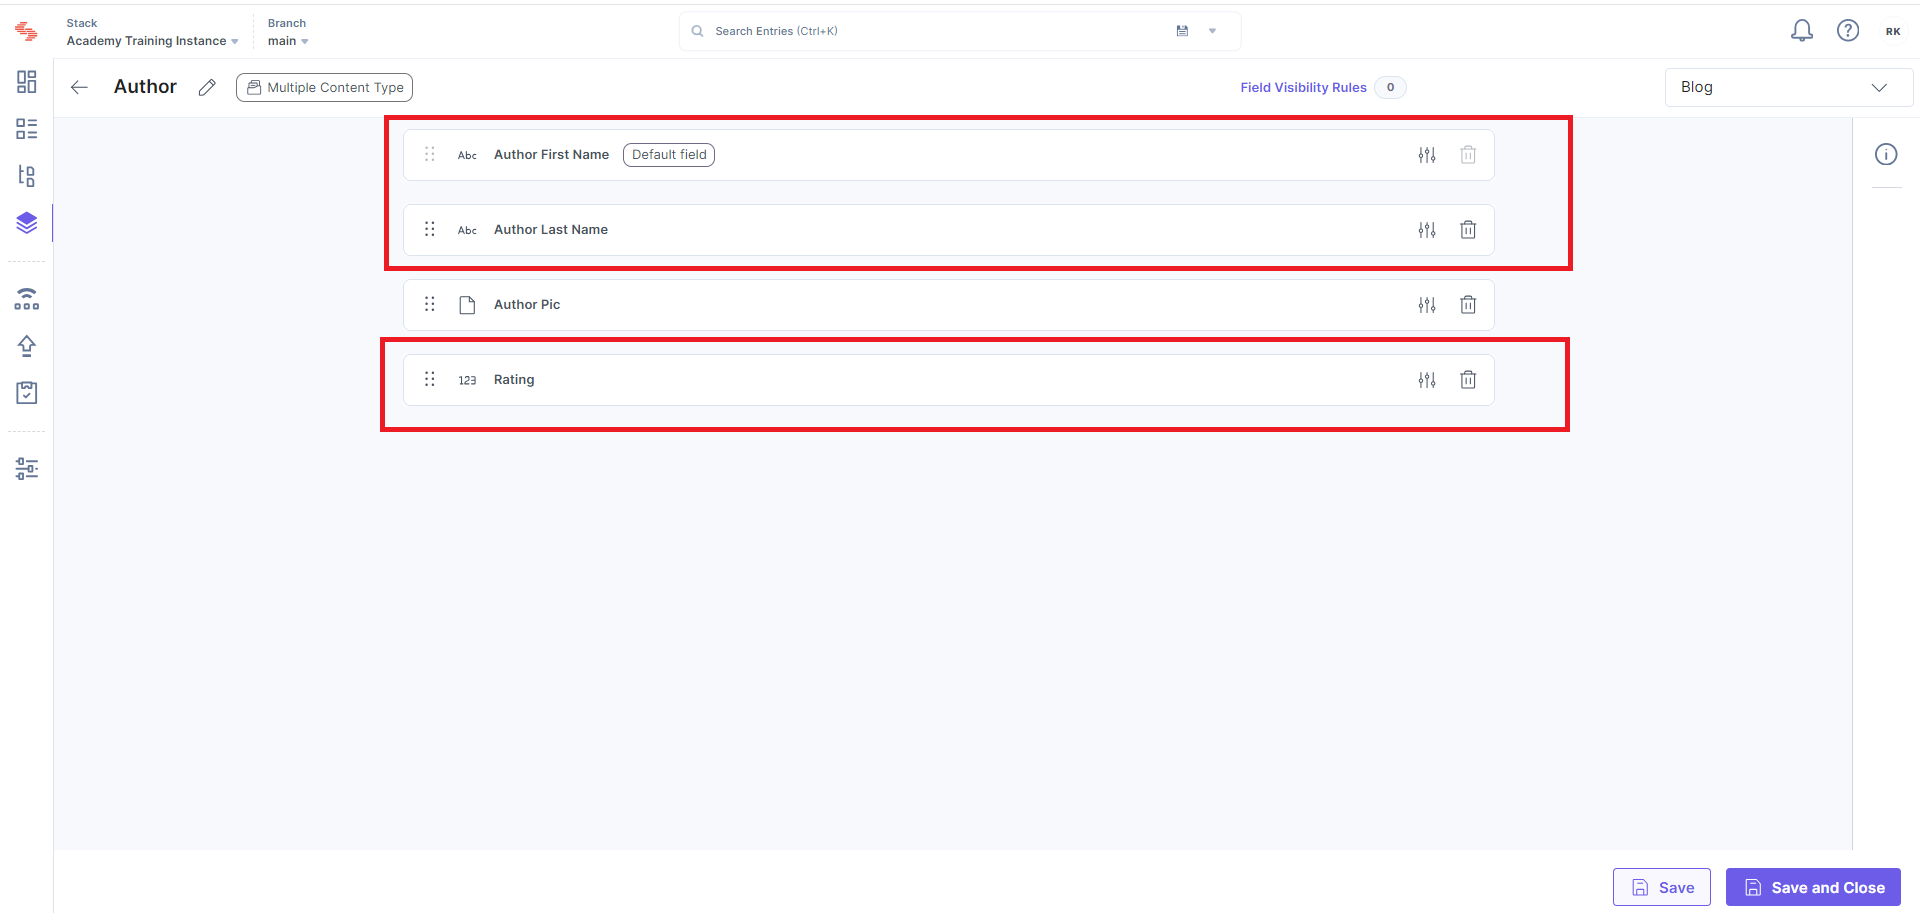
Merge Using Overwrite with Compare
This strategy allows you to completely overwrite the base branch with the changes from the compare branch. Your new merged main branch will be as follows (everything comes from the compare branch):
Author: with fields "Author First Name", "Author Last Name," "Author Pic," "Rating,"
Branch Demo Dev: with field "Title"

Merge Using New Only
This strategy allows you to add only new changes from the compare branch to the base branch. Your new merged main branch will be as follows (items in bold came from the compare branch):
Author: with fields "First Name," "Last Name," "Author Pic," "Bio," "Date Of Birth."
Branch Demo Main: with field "Title"
Branch Demo Dev: with field "Title"

Merge Using Modified With Prefer Base
Since this strategy allows you to add only modified changes from the compare branch to the base branch, and in case of conflicts, prefer to keep content from the base branch intact. All newly added items are ignored during the merge. Your new merged main branch will be as follows (items in bold came from the compare branch):
Author: with fields "First Name," "Last Name," "Author Pic," "Bio," "Rating," "Date Of Birth."
Branch Demo Main: with field "Title"

Merge Using Modified With Prefer Compare
Since this strategy allows you to add only modified changes from the compare branch to the base branch, and in case of conflicts, prefer to keep content from the compare branch intact. All newly added items are ignored during the merge. Your new merged main branch will be as follows (items in bold came from the compare branch):
Author: with fields "Author First Name," "Author Last Name," "Author Pic," "Bio," "Rating," "Date Of Birth."
Branch Demo Main: with field "Title"

Merging using the CLI
You can refer to a complete reference documentation over here
Usage
csdx cm:branches:merge
or
csdx cm:branches:merge --stack-api-key --base-branch --compare-branch
Options
-k, --stack-api-key=stack-api-key: Stack API key.
--base-branch=base-branch: Base Branch.
--compare-branch=compare-branch: Compare branch.
--comment=comment: Pass a comment.
--export-summary-path=export-summary-path: Export summary file path.
--use-merge-summary=use-merge-summary: Path of merge summary file.
--no-revert=no-revert: If passed, will not create the new revert branch.
Examples
csdx cm:branches:merge --stack-api-key bltxxxxxxxx --compare-branch feature-branch
csdx cm:branches:merge --export-summary-path file/path
To merge feature-branch with the base branch for a stack.
To merge branches and export the results summary to a file path.
Steps to Merge Branches
Follow the steps below to merge two branches:
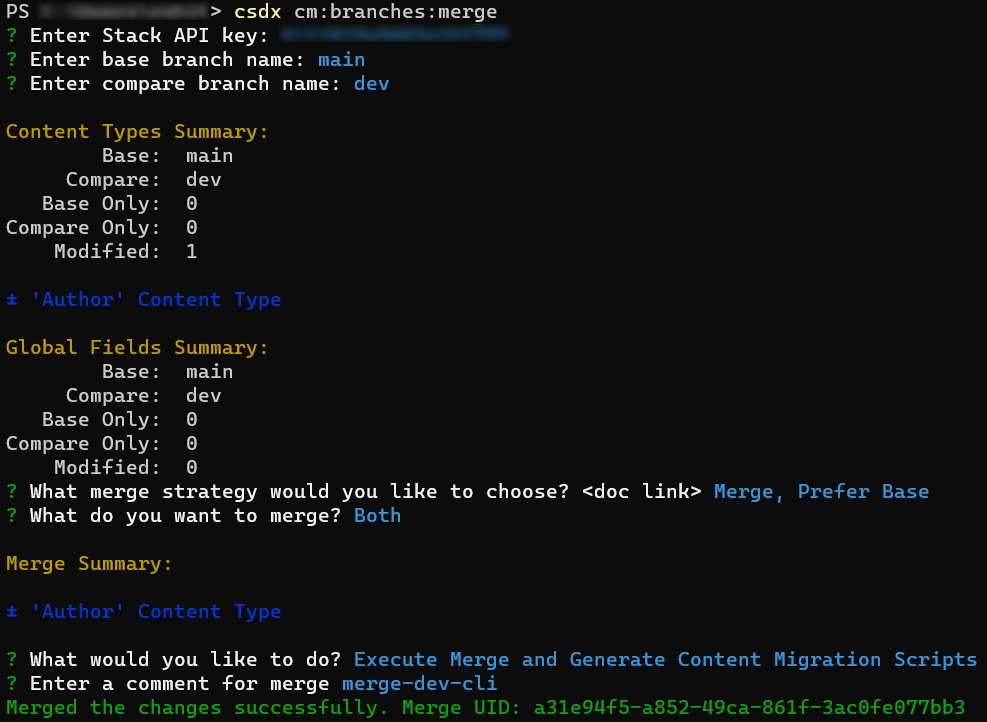
1) Enter the following command to merge two branches:
csdx cm:branches:merge
2) Enter the Stack API key where you want to merge the branches.
3) Enter the name of the compare branch.
By default, the current base branch will be automatically used.
Alternatively, you can pass the Stack API key, base branch, and compare branch in the command as given below: csdx cm:branches:merge --stack-api-key --base-branch --compare-branch
Note: If you want to choose a different base branch other than the default one, you must specify the flag for the base branch as given in the command above.
The branches' compare results will be displayed as Content Types Summary and Global Fields Summary for individual modules.
4) Choose a merge strategy from the displayed list.
Merge, Prefer Base: Adds all changes from the compare branch to the base branch. In case of any conflicts, the preference goes to the base branch.
Merge, Prefer to Compare: Adds all changes from the compare branch to the base branch. In case of any conflicts, the preference goes to the compare branch.
Merge, Ask for Preference: Asks you to choose how to merge every difference individually at the content type or global field level.
Overwrite with Compare: Replace the base branch with the compare branch. Anything in the base branch that is not in the compare branch is removed.
5) If you choose Merge, Prefer Base or Merge, Prefer Compare from step 4, choose what you want to merge from the following list:
New in Compare Only: Adds only new items from the compare branch to the base branch. All the items that are modified are ignored.
Modified Only: Only modified items are added from the compare branch to the base branch. All the new items are ignored.
Both: Adds both new and modified items from the compare branch to the base branch.
Go Back: This takes you back to the previous step.
Start Over: This takes you back to step 4.
6) If you choose Overwrite with Compare from Step 4, or New in Compare Only, Modified Only, or Both from Step 5, choose what you want to do next from the following list:
Execute Merge: Executes the merge action and exports the merge result summary to the specified location.
Export Merge Summary: Exports the merge result summary to the specified location but does not execute the merge action. This can be used to apply the merge later. \
Execute Merge and Generate Content Migration Scripts: Executes merge action, exports merge result summary to the specified location, and generates the entries migration script.
Export Summary and Generate Content Migration Scripts: Exports merge result summary to the specified location and generate the entries migration script. Go Back: This takes you back to the previous step. Start Over: This takes you back to step 4.
7) If you choose Execute Merge and Generate Content Migration Scripts or Export Summary and Generate Content Migration Scripts from Step 6, choose what you want to do next from the following list:
Both existing and new: Generates script for both new and modified entries.
New only: Generates script for the new entries.
Existing only: Generates script for the updated entries.
Ask for preference: If you choose this option, the following table displays:
Choose what you want to do next from the following list:
Merge New Only: Generates script for the new entries.
Merge Modified Only: Generates script for the updated entries.
Merge Both: Generates script for both new and modified entries.
Ignore: Ignores entries from a particular content type.
8) If you choose Merge, Ask for Preference from step 4; follow the steps below:
Select the content type changes for merge from the provided tabular column. With this, you can modify/add/remove only those content types from a selected branch during the merge operation.
Select the global field changes for merge from the provided tabular column. With this, you can modify/add/remove only those global fields from a selected branch during the merge operation.
In the next step, choose what you want to merge from the following list:
Execute Merge: Executes the merge action and exports the merge result summary to the specified location.
Export Merge Summary: Exports the merge result summary to the specified location but does not execute the merge action.
Execute Merge and Generate Content Migration Scripts: Executes merge action, exports merge result summary to the specified location and generates the entries migration script.
Export Summary and Generate Content Migration Scripts: Exports merge result summary to the specified location and generate the entries migration script.
Go Back: This takes you back to the previous step.
Start Over: This takes you back to step 4.
If you choose Execute Merge and Generate Content Migration Scripts or Export Summary and Generate Content Migration Scripts from the above step, follow the steps in step 7.
Note: If you want to ignore the changes in the compare branch for a specific content type, select the Ignore(Use Base) option for that content type.
Tip: Use the arrow keys to move along the table cells and then hit the spacebar to make the selection.
Note: If you want to ignore the changes in the compare branch for a specific global field, select the Ignore(Use Base) option for that global field.
1. merge prefer base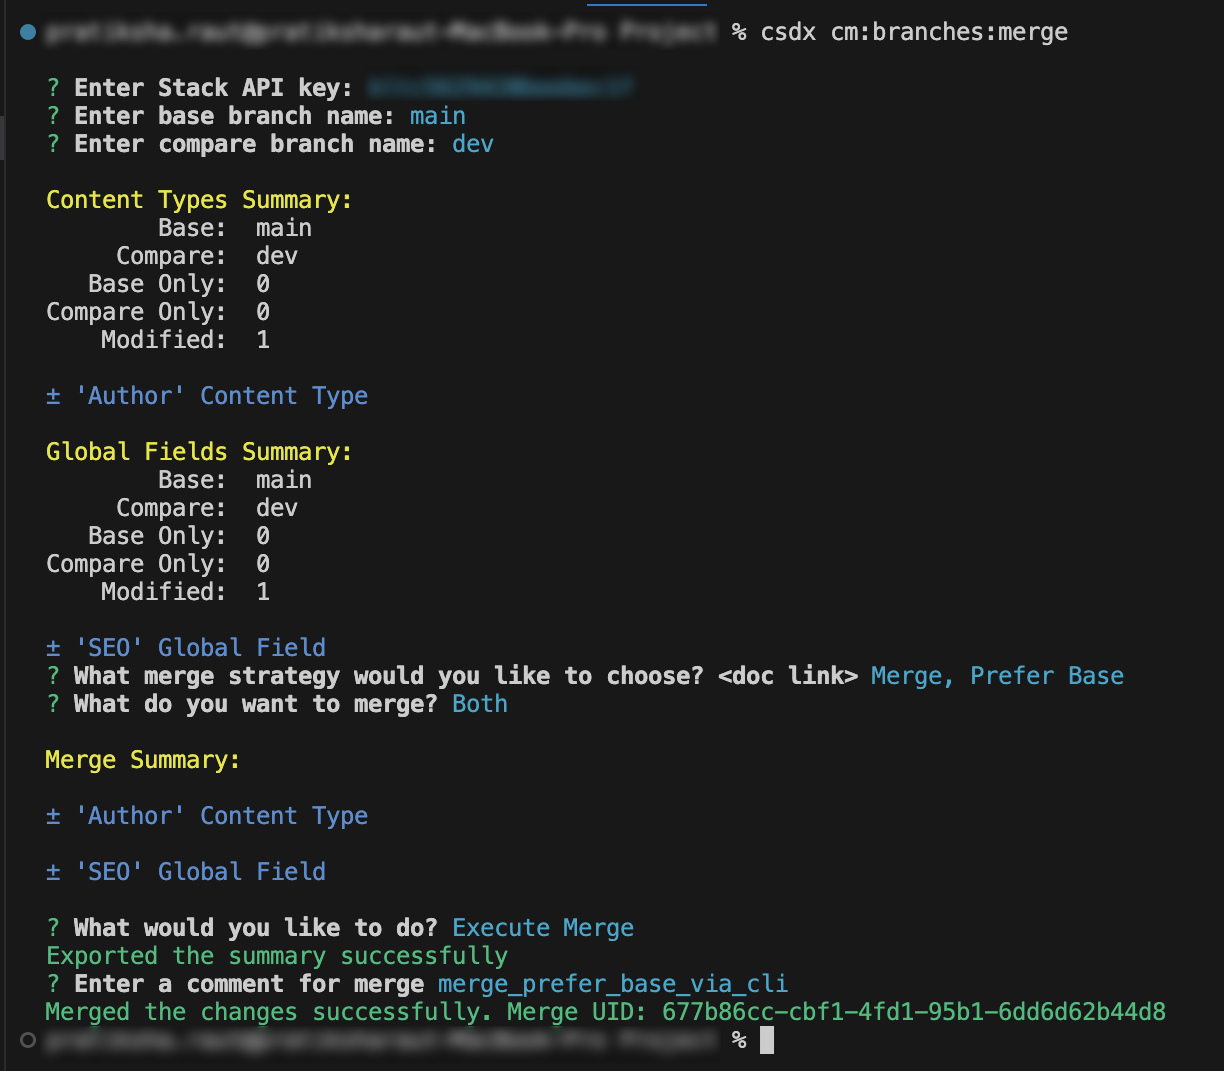
2. merge prefer compare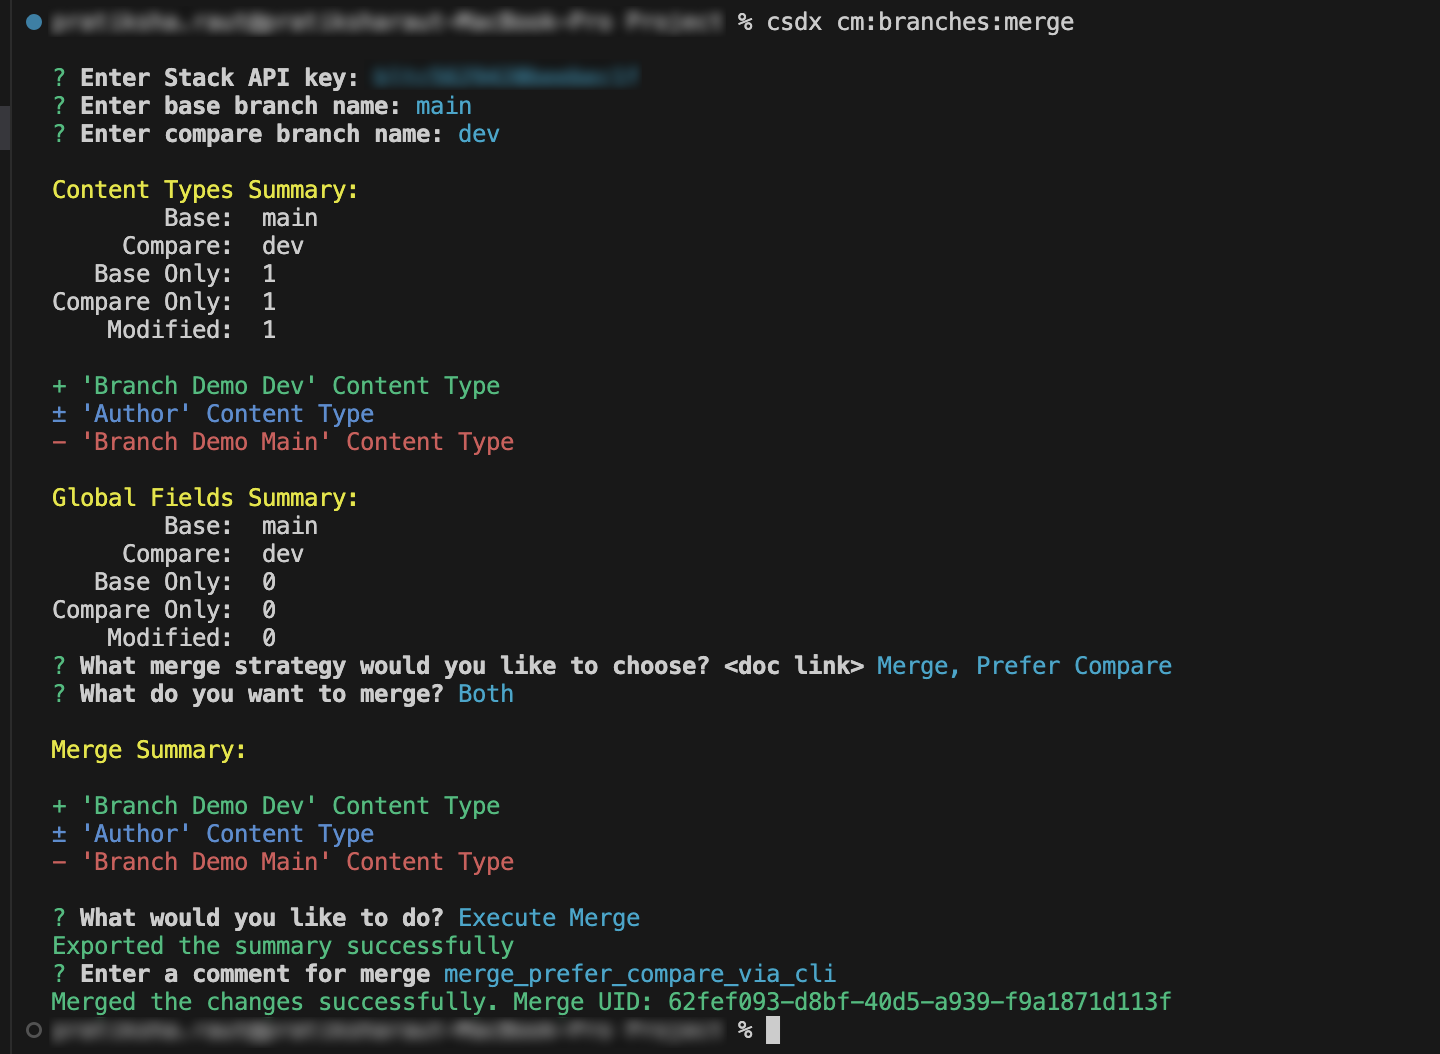
3. overwrite with compare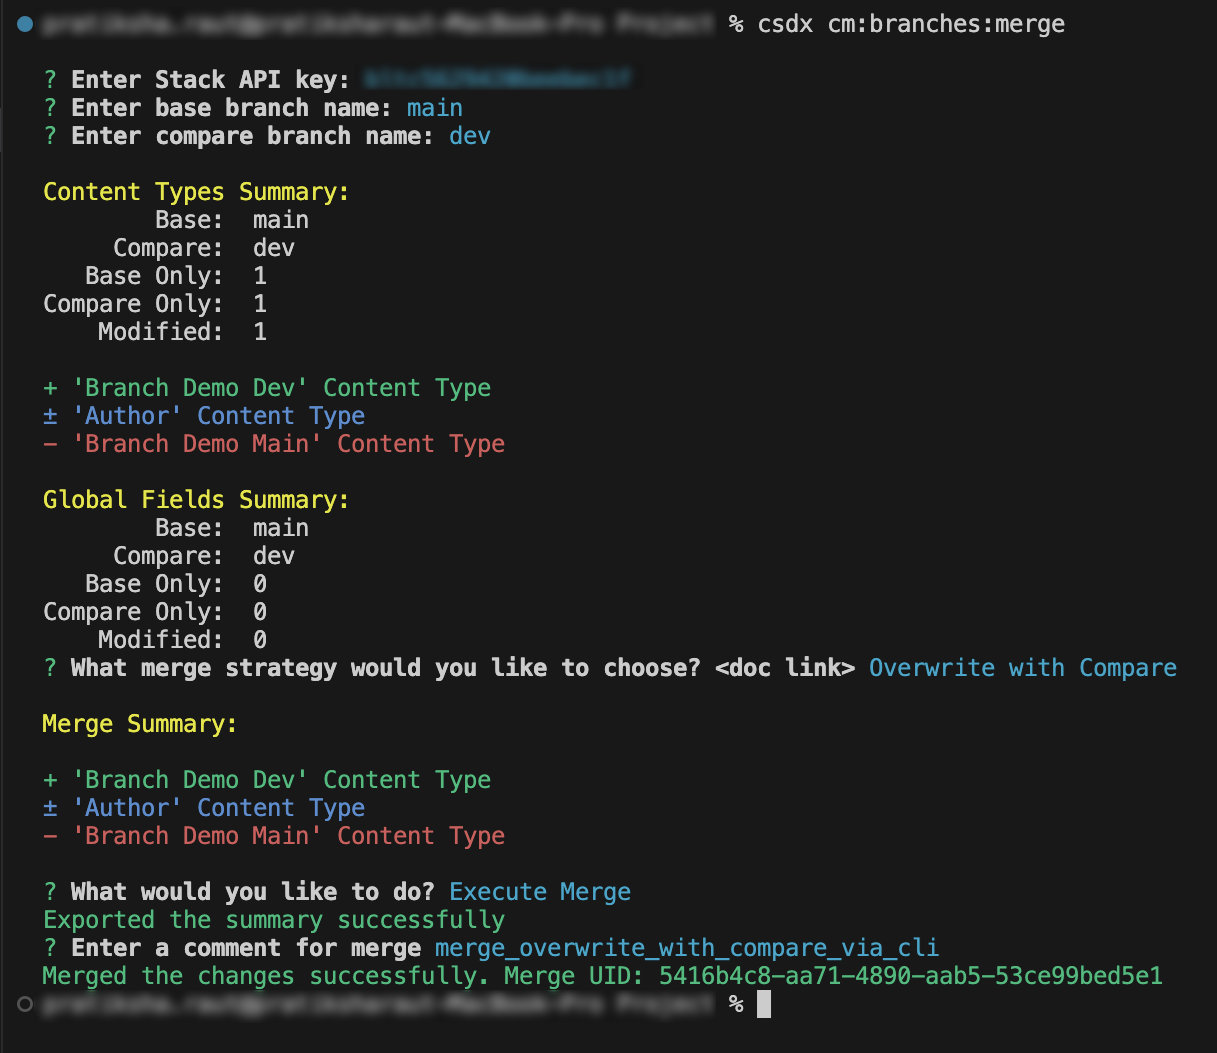
4. merge new only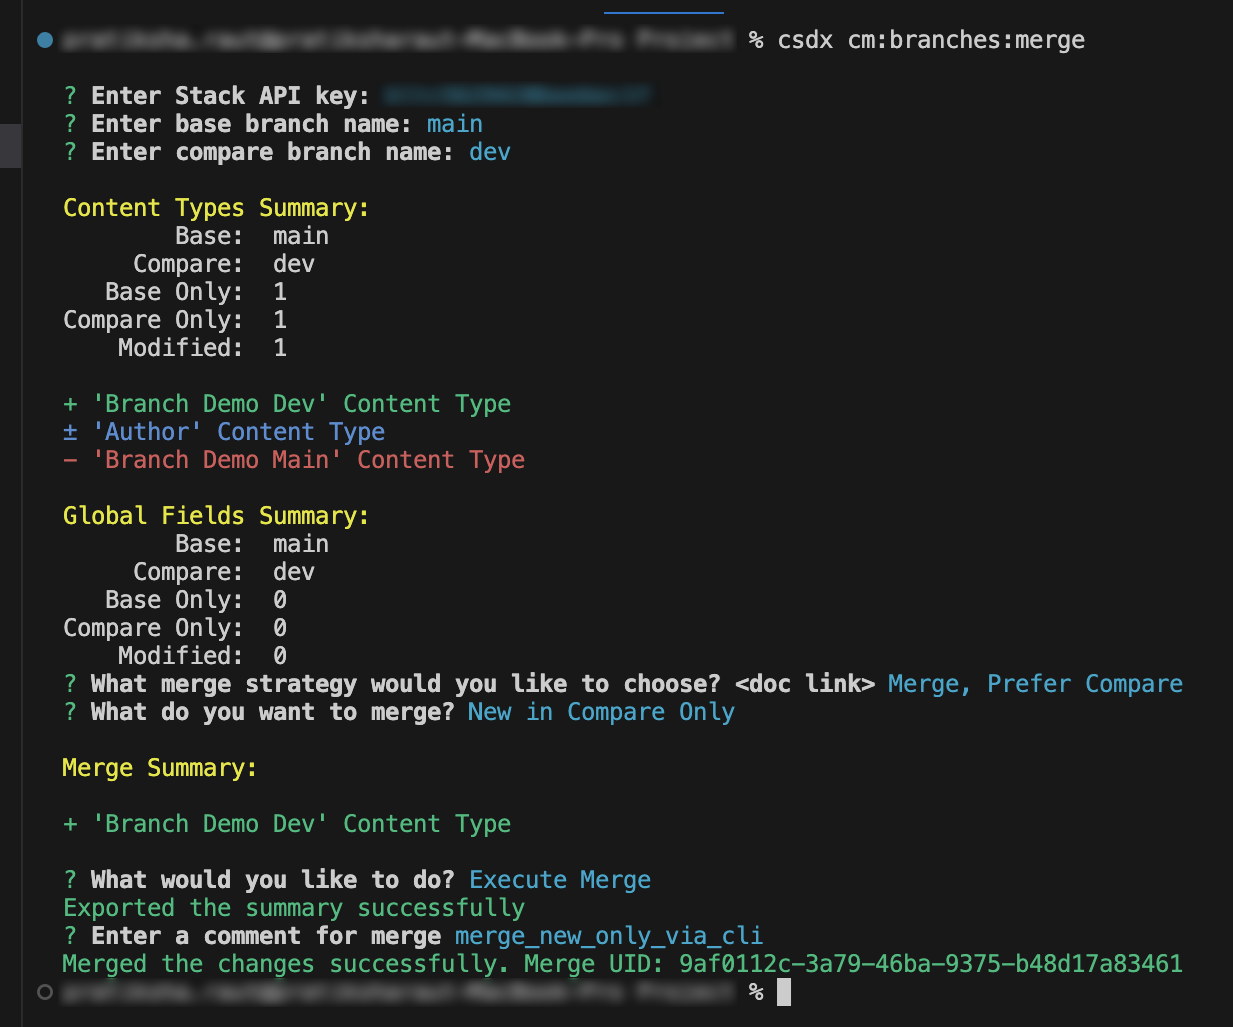
5. merge modified only prefer base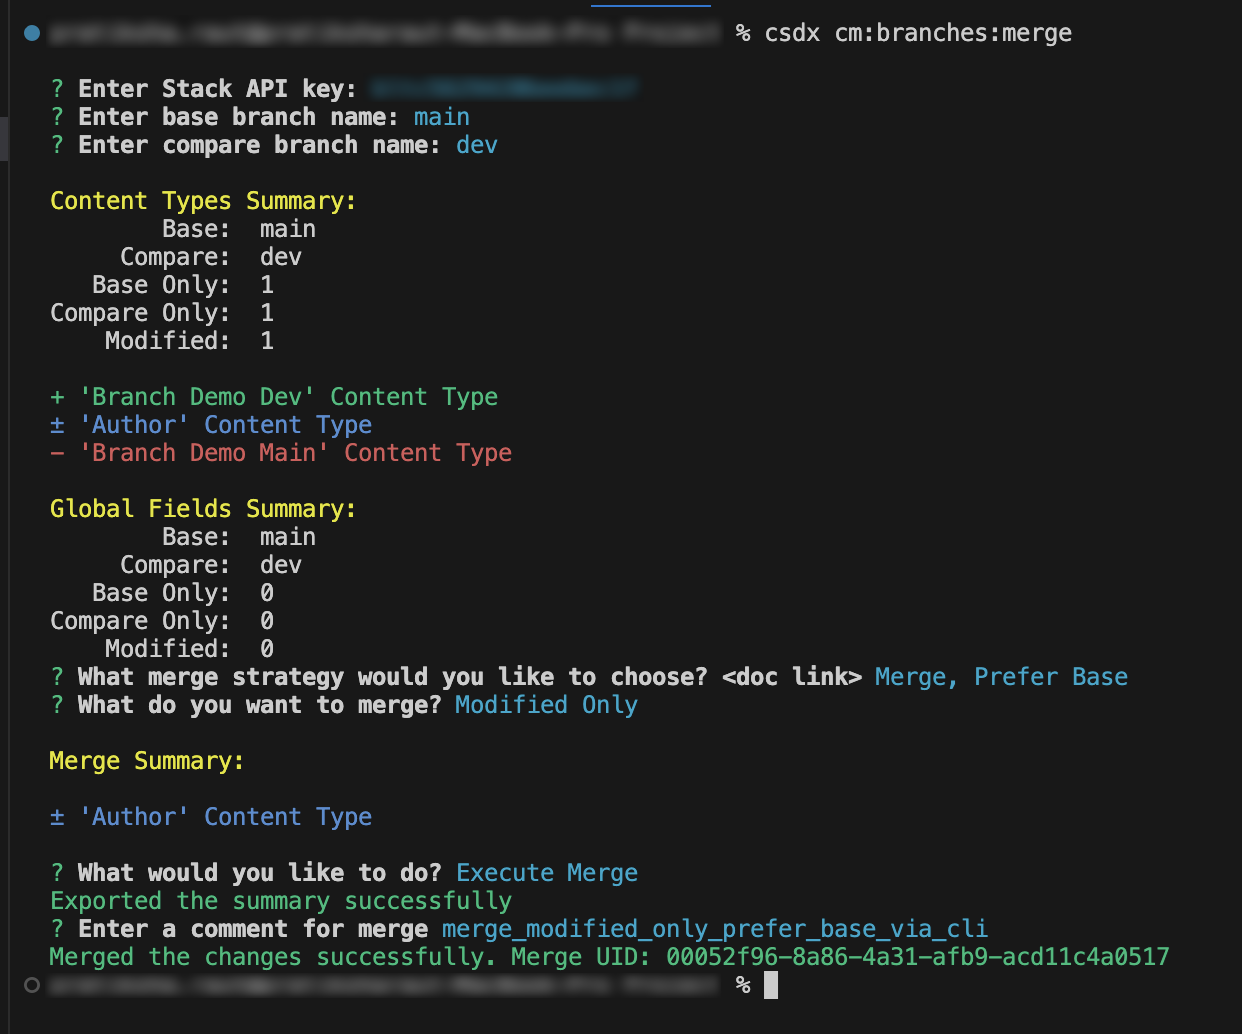
6. merge modified only prefer compare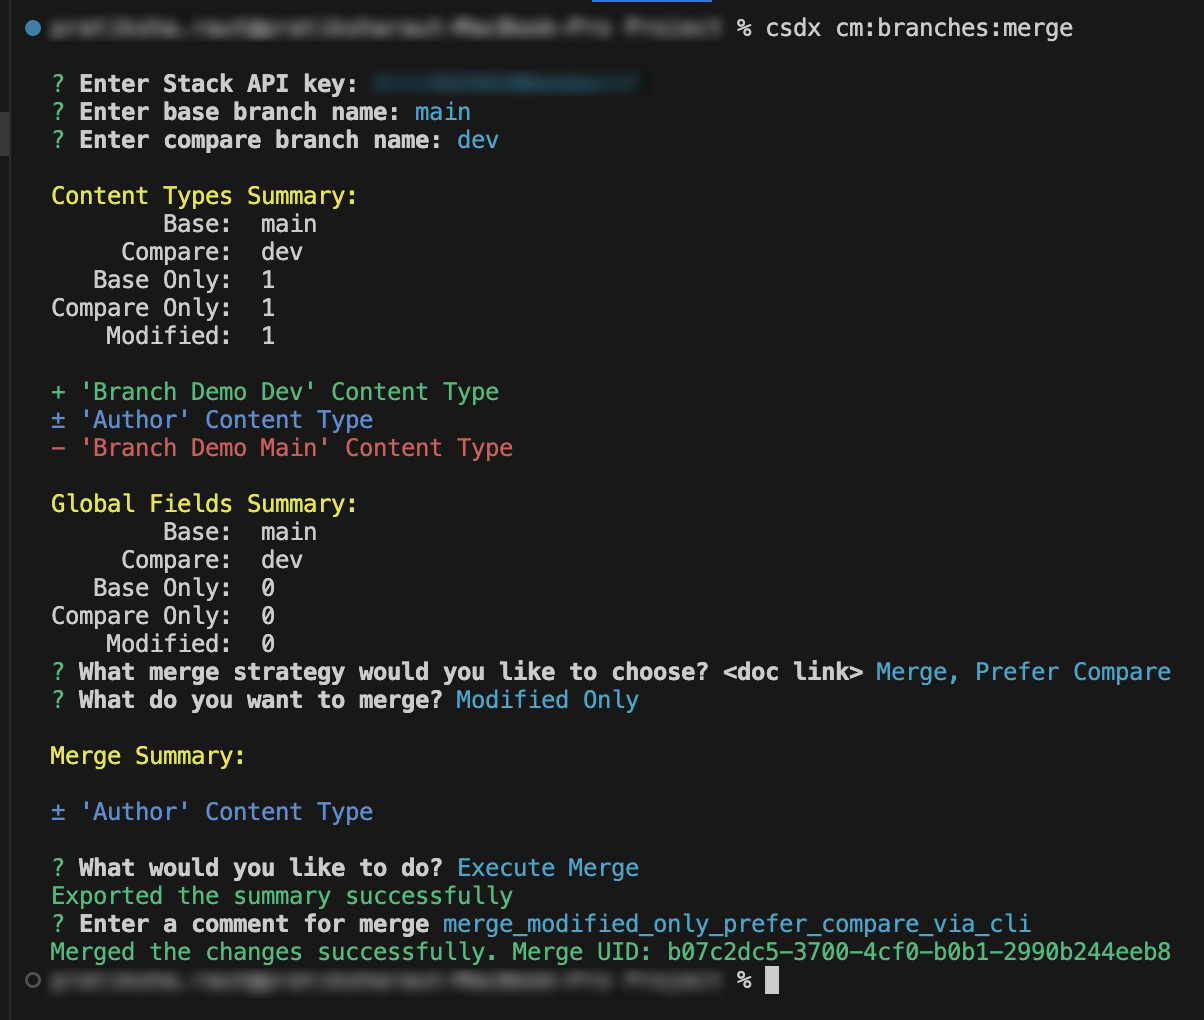
Merging Entries and Assets - Using Content Migration Script for Entries
Note:
Only newly created or modified entries and assets belonging to modified or newly created content types will be migrated to the base branch, based on the strategy chosen during branch merging. Ensure that these changes align with your migration strategy and review the generated scripts accordingly.
Keep in mind that the behavior of the CLI may vary across different platforms and machines. Be aware of any platform-specific nuances or differences in CLI behavior that may affect the merging and migration process.
For Windows OS, please run the following commands first:
npm link lodash
npm link marked
npm link @contentstack/cli-utilitiesPlease execute the generated script from the same location where the Contentstack CLI is installed to ensure proper execution and avoid any path-related issues.
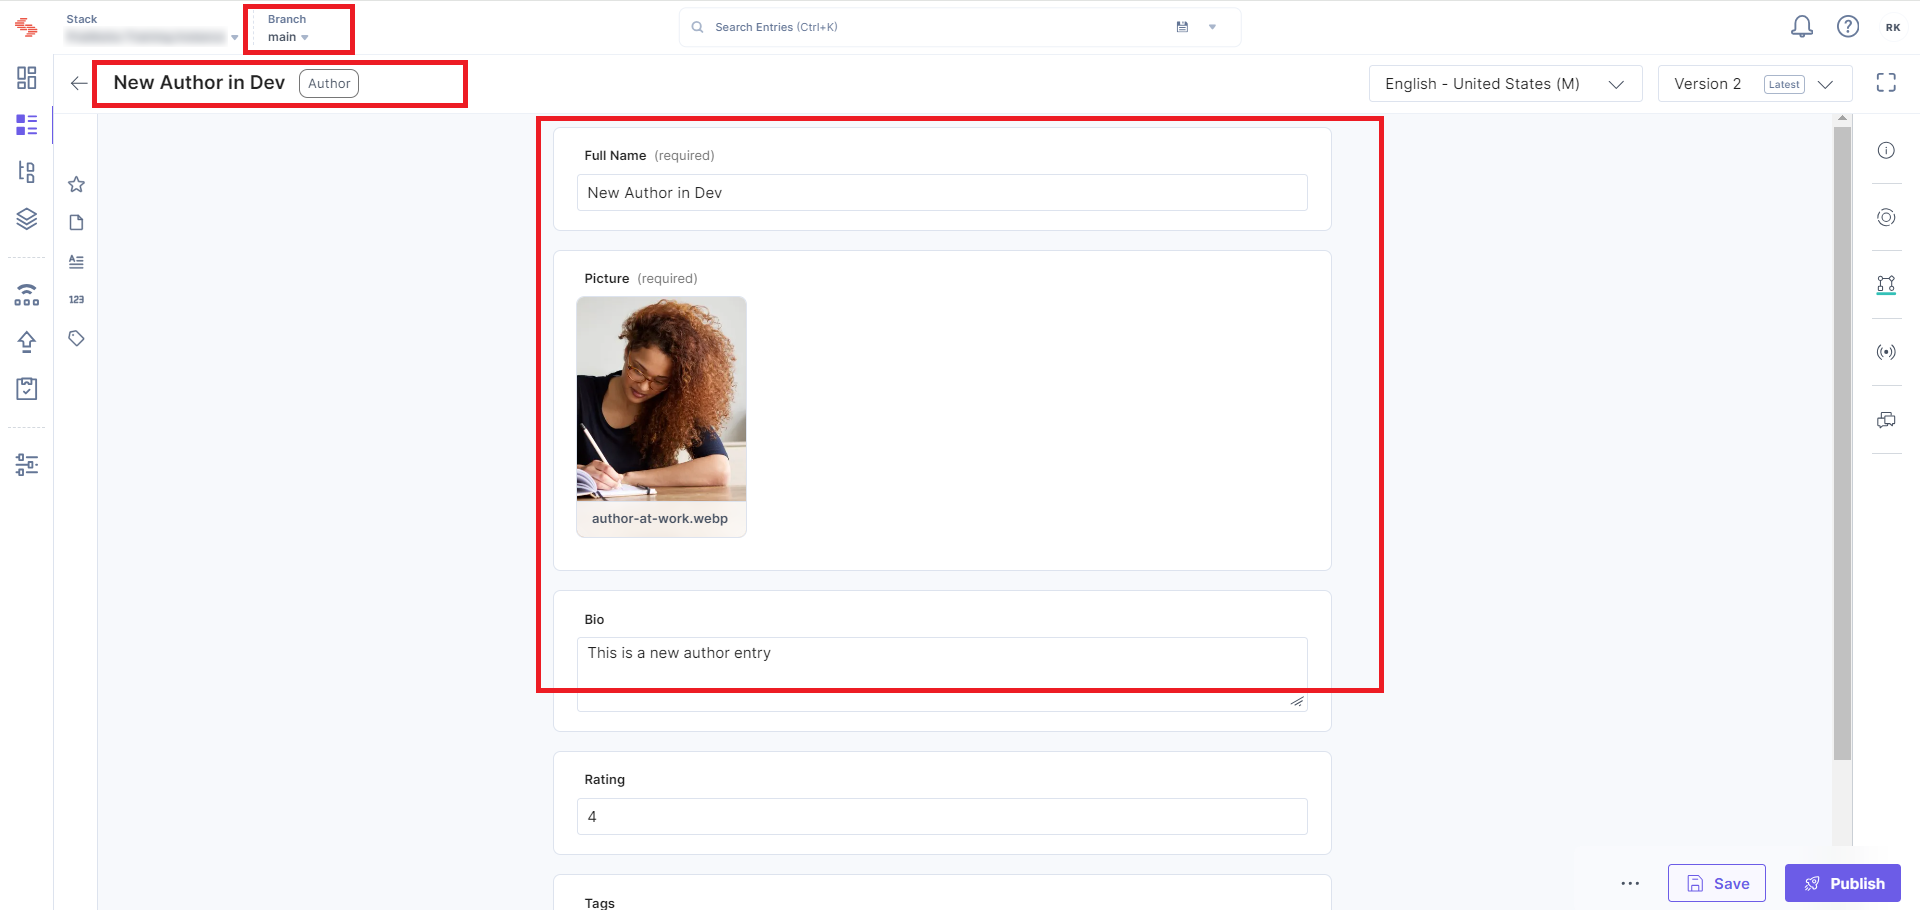
1. Create Dev Feature Branch:
- Create branch "dev" from your Contentstack main branch.
2. Make Changes in the "dev" Branch:
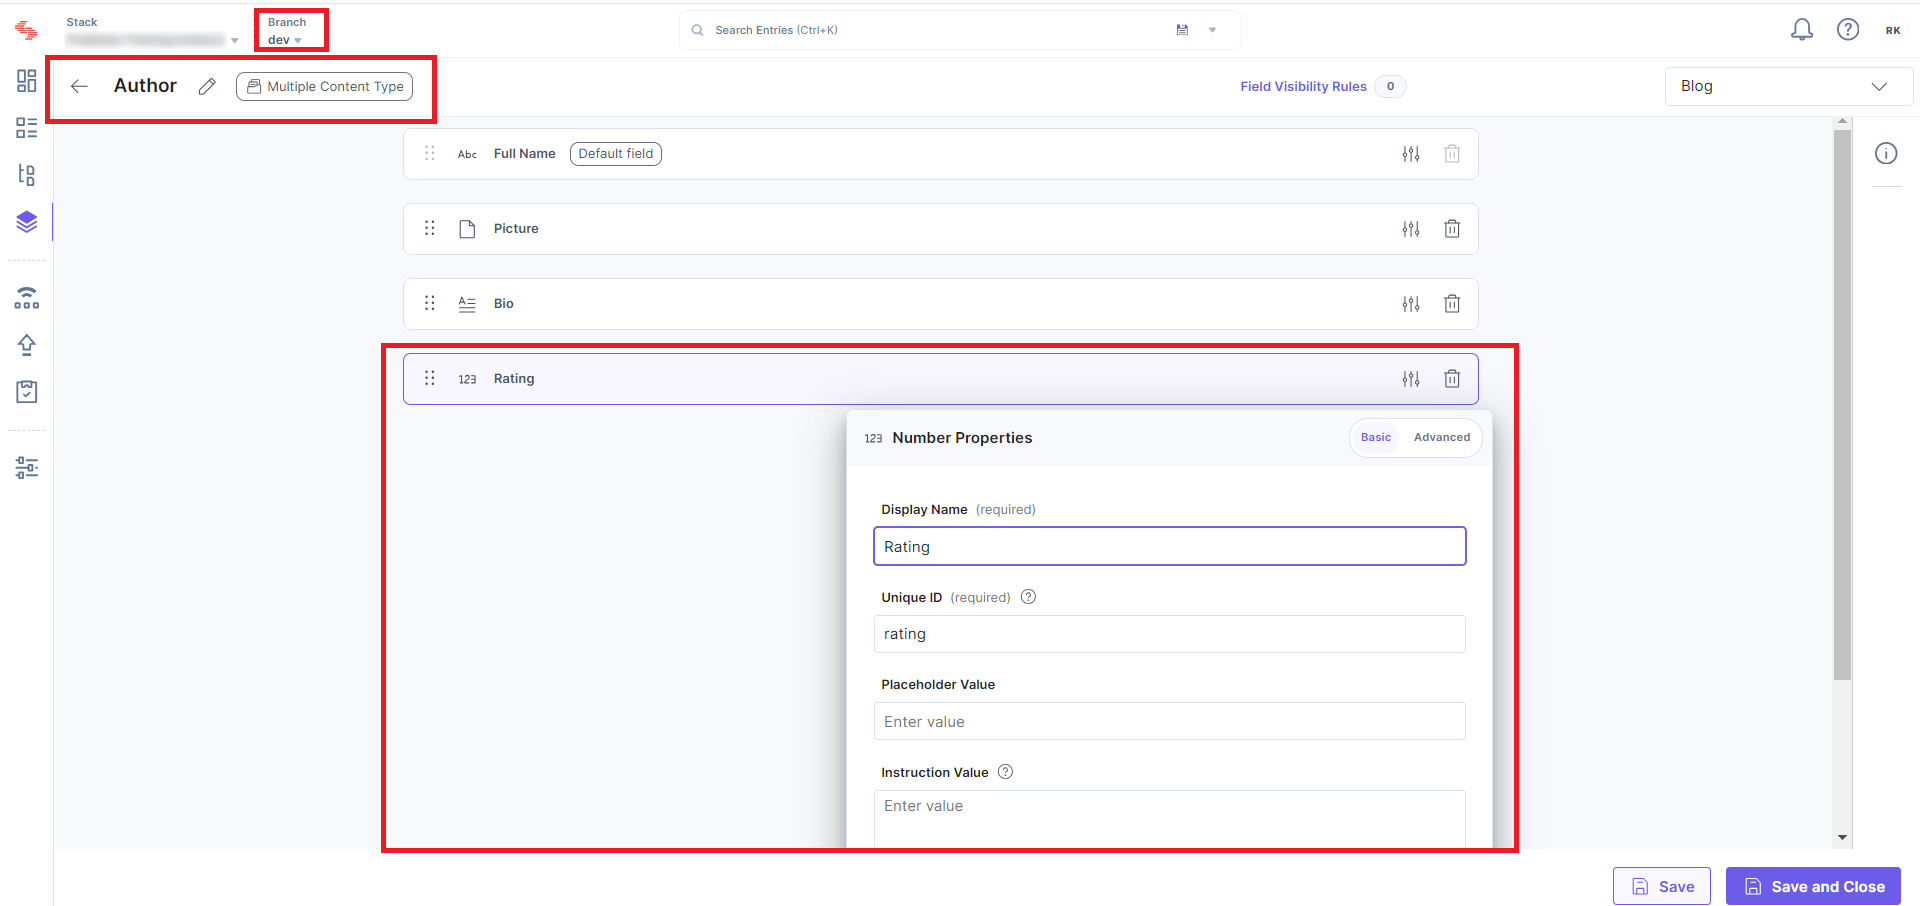
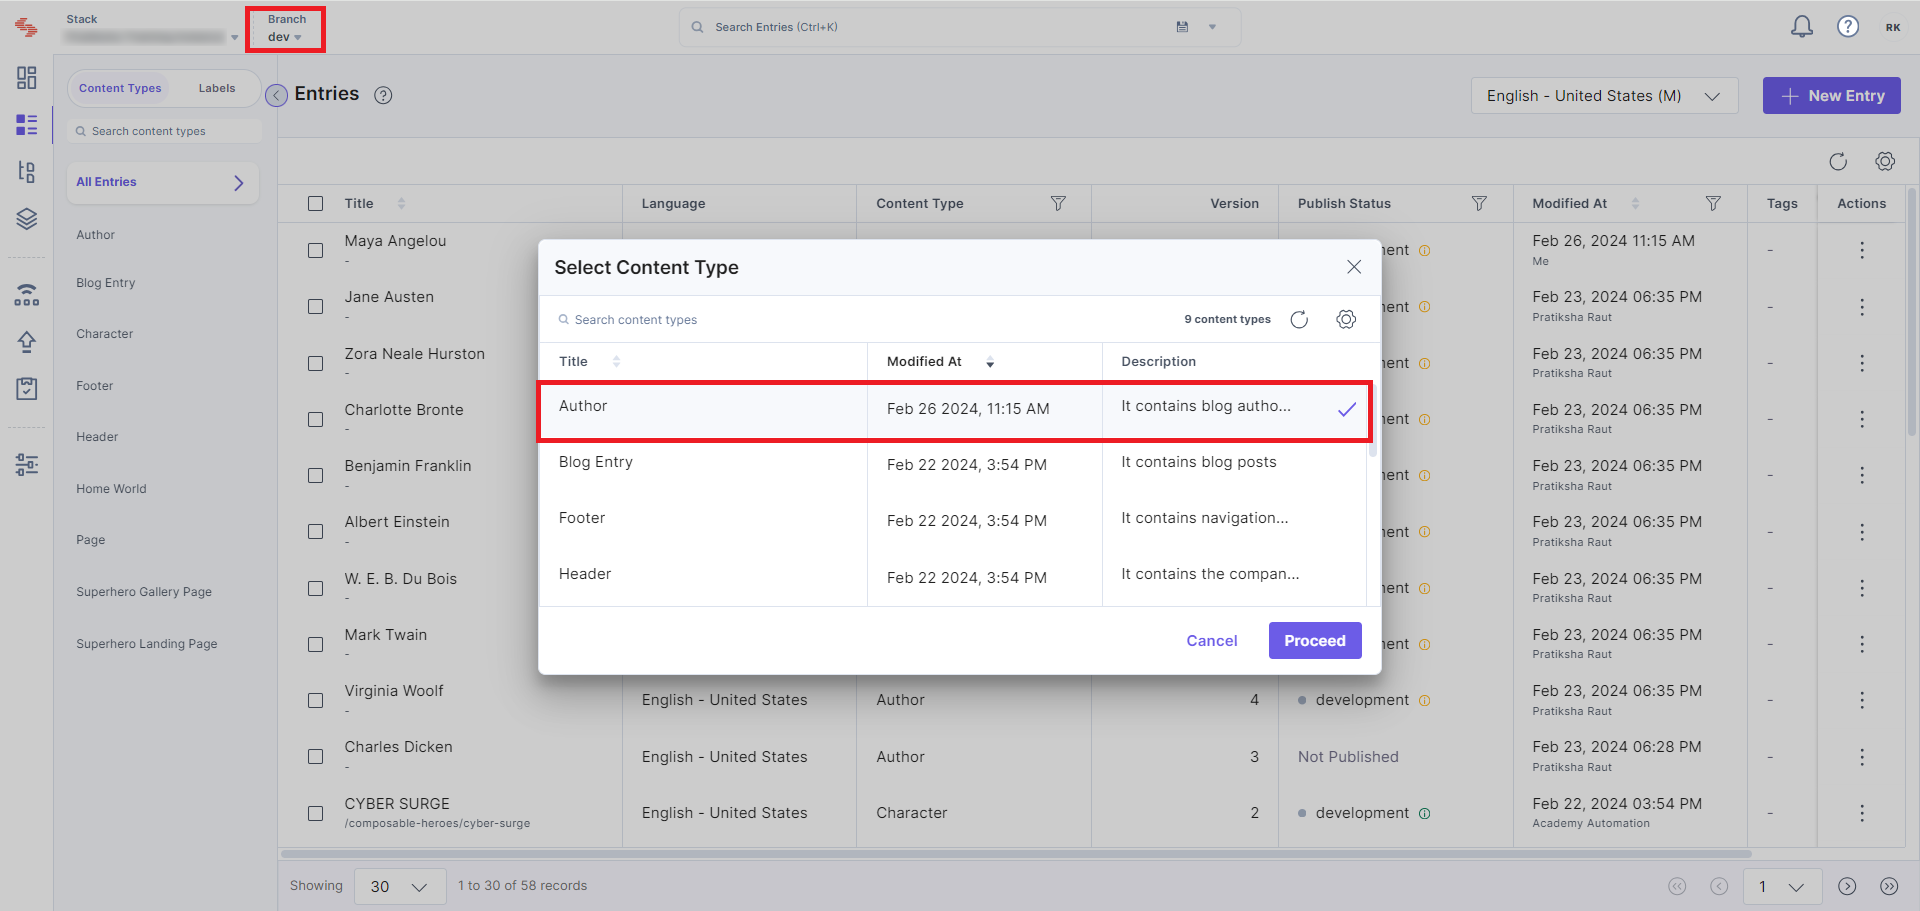
- Inside the "dev" branch, navigate to the Author content type.
- Add a new field named "Rating" to the Author content type.
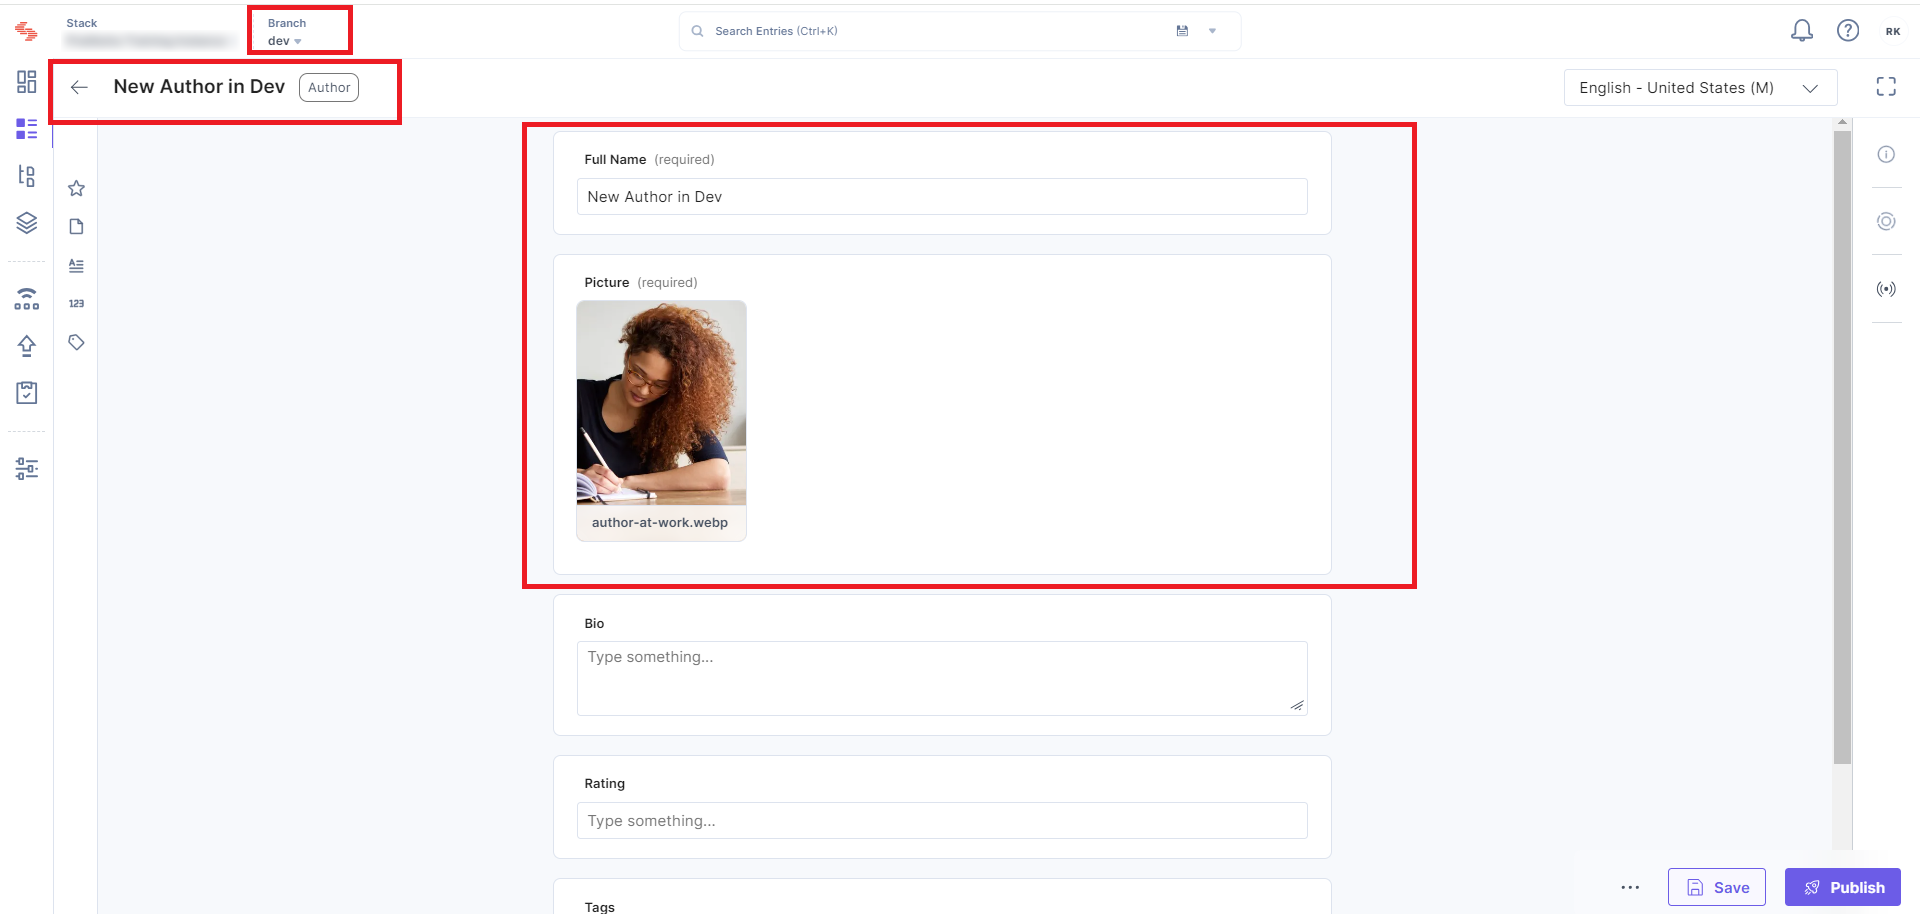
- Update an existing entry in the Author content type by adding a rating value.

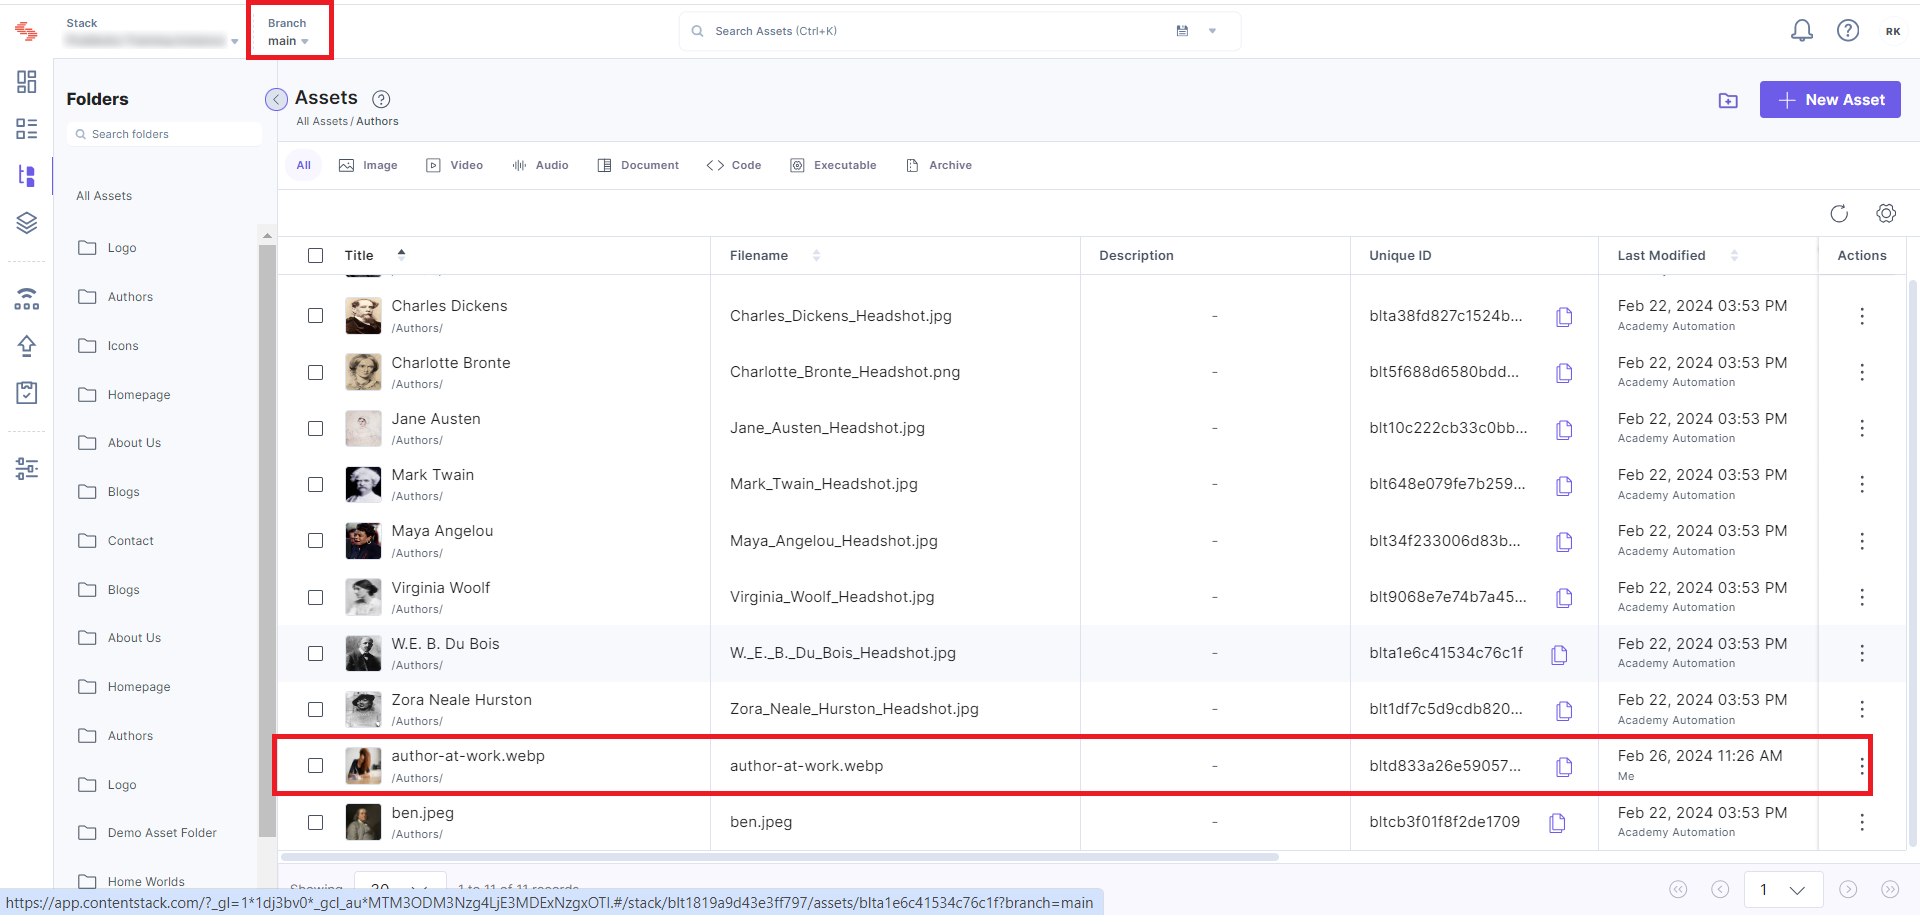
- Create a new entry in the Author content type that includes a new asset.
3. Merge "dev" into "main" with Merge Prefer Base Option:
- Initiate the merge process from the "main" branch.
- Use the "Merge Prefer Base" option to ensure that conflicts are resolved by favoring the changes in the base (target) branch.
- If using the CLI, execute the merge command with the appropriate options.
4. Generate Content Migration Scripts:
- If prompted, choose the option to execute the merge and generate content migration scripts or export summary and generate content migration scripts.
- The CLI will generate scripts based on the changes between the "dev" and "main" branches.
5. Review and Execute Scripts (If Applicable):
- Review the generated content migration scripts to ensure they reflect the desired changes accurately.
- If executing the merge and migration scripts separately, follow the instructions provided by the CLI to execute the scripts.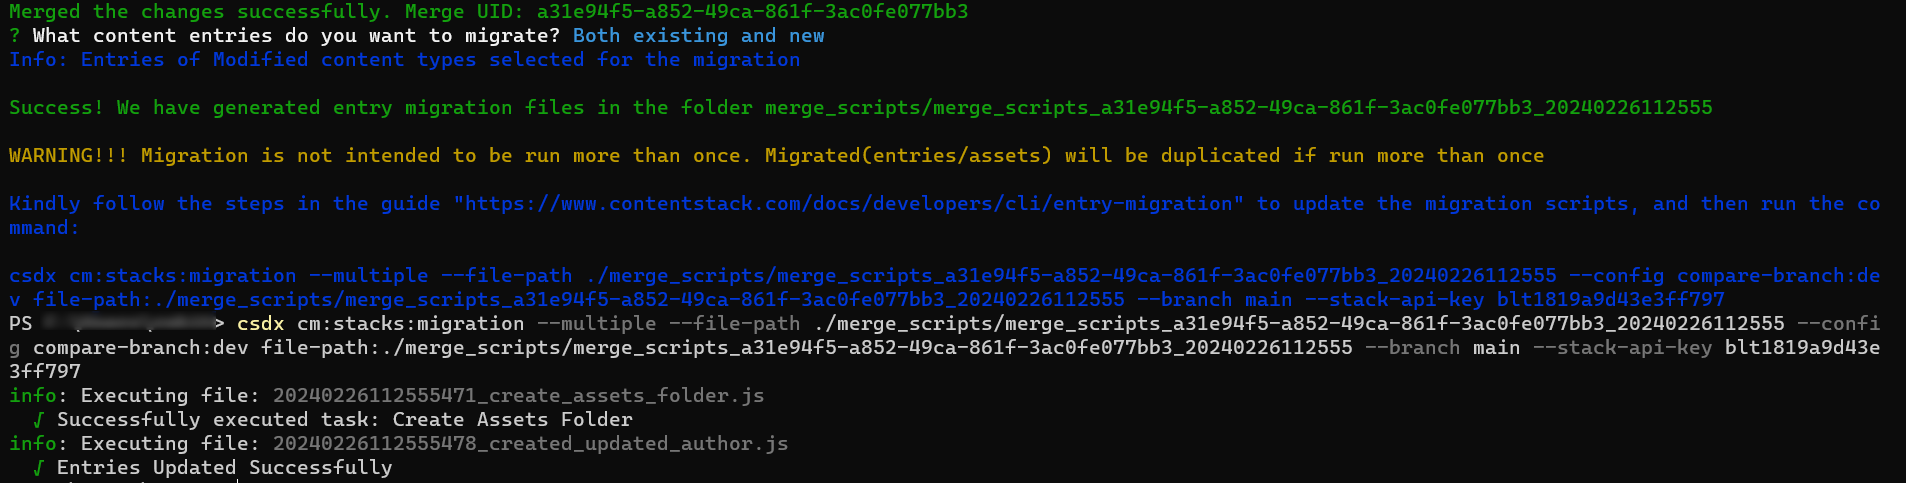
6. Verify Changes in the "main" Branch:
- Once the merge process and content migration are complete, switch to the "main" branch.
- Check that the changes from the "dev" branch, including the new field, updated entry, and new entry with the asset, are successfully reflected in the "main" branch.
Changes in Assets
Changes in Entries
1) Newly created entry
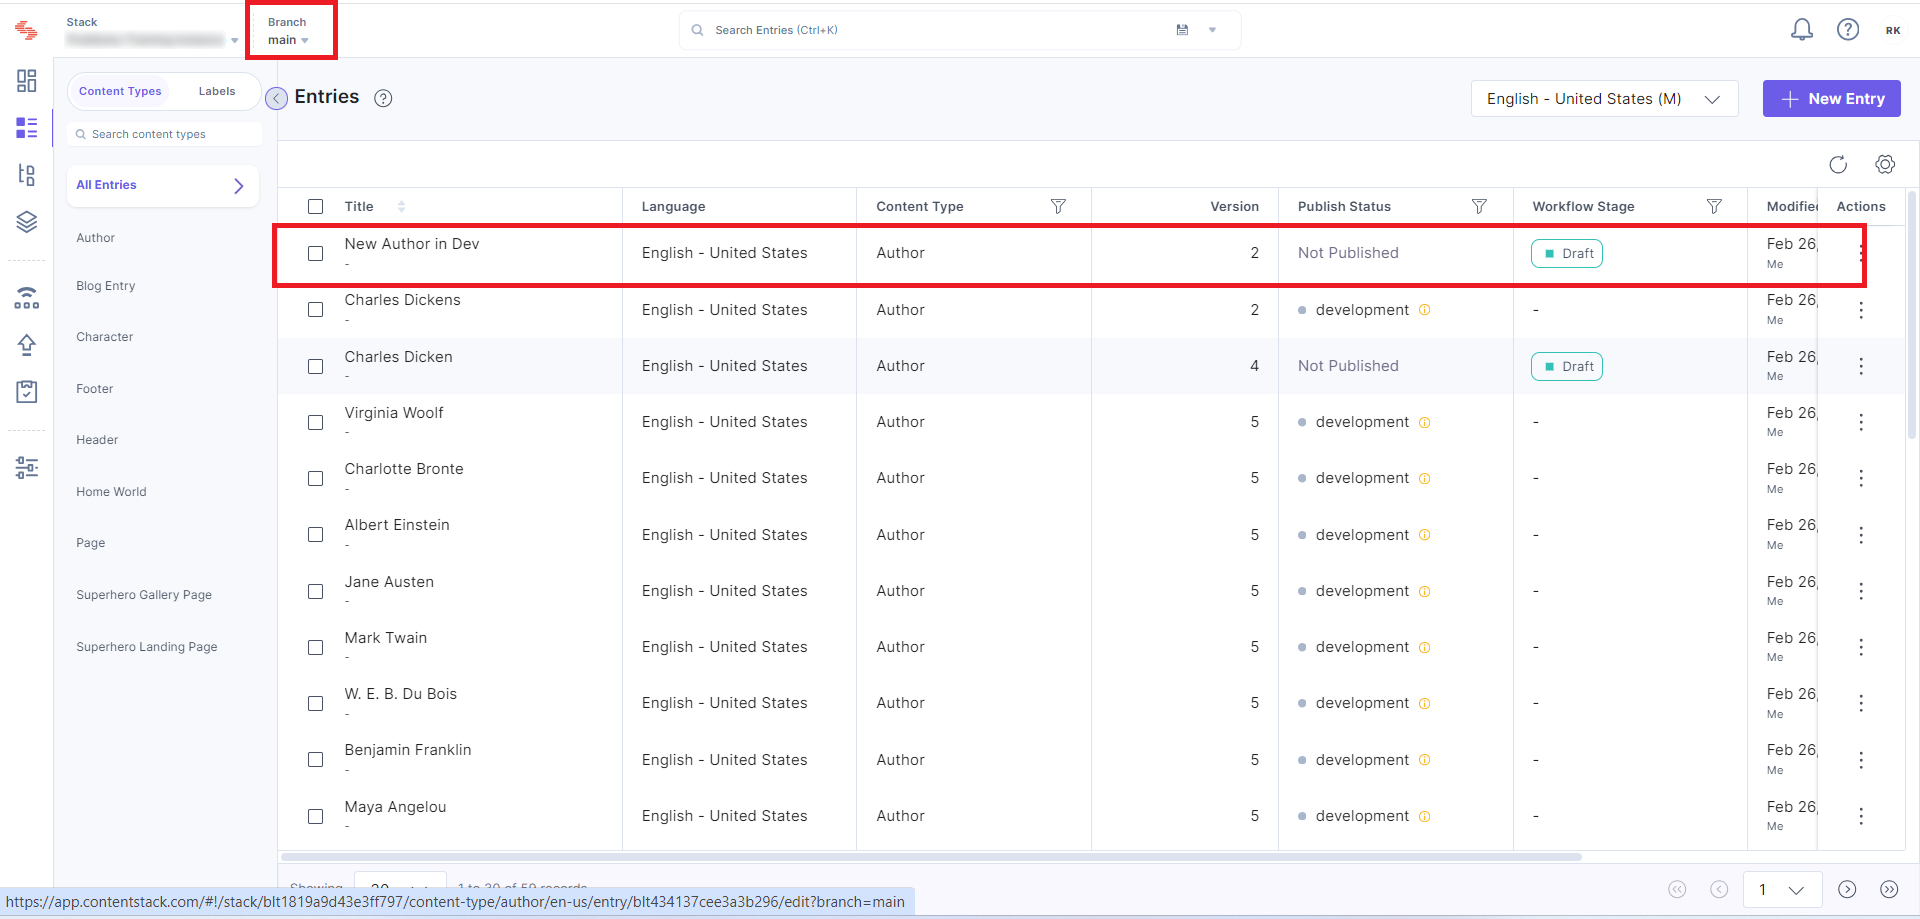
2) Updated Entry 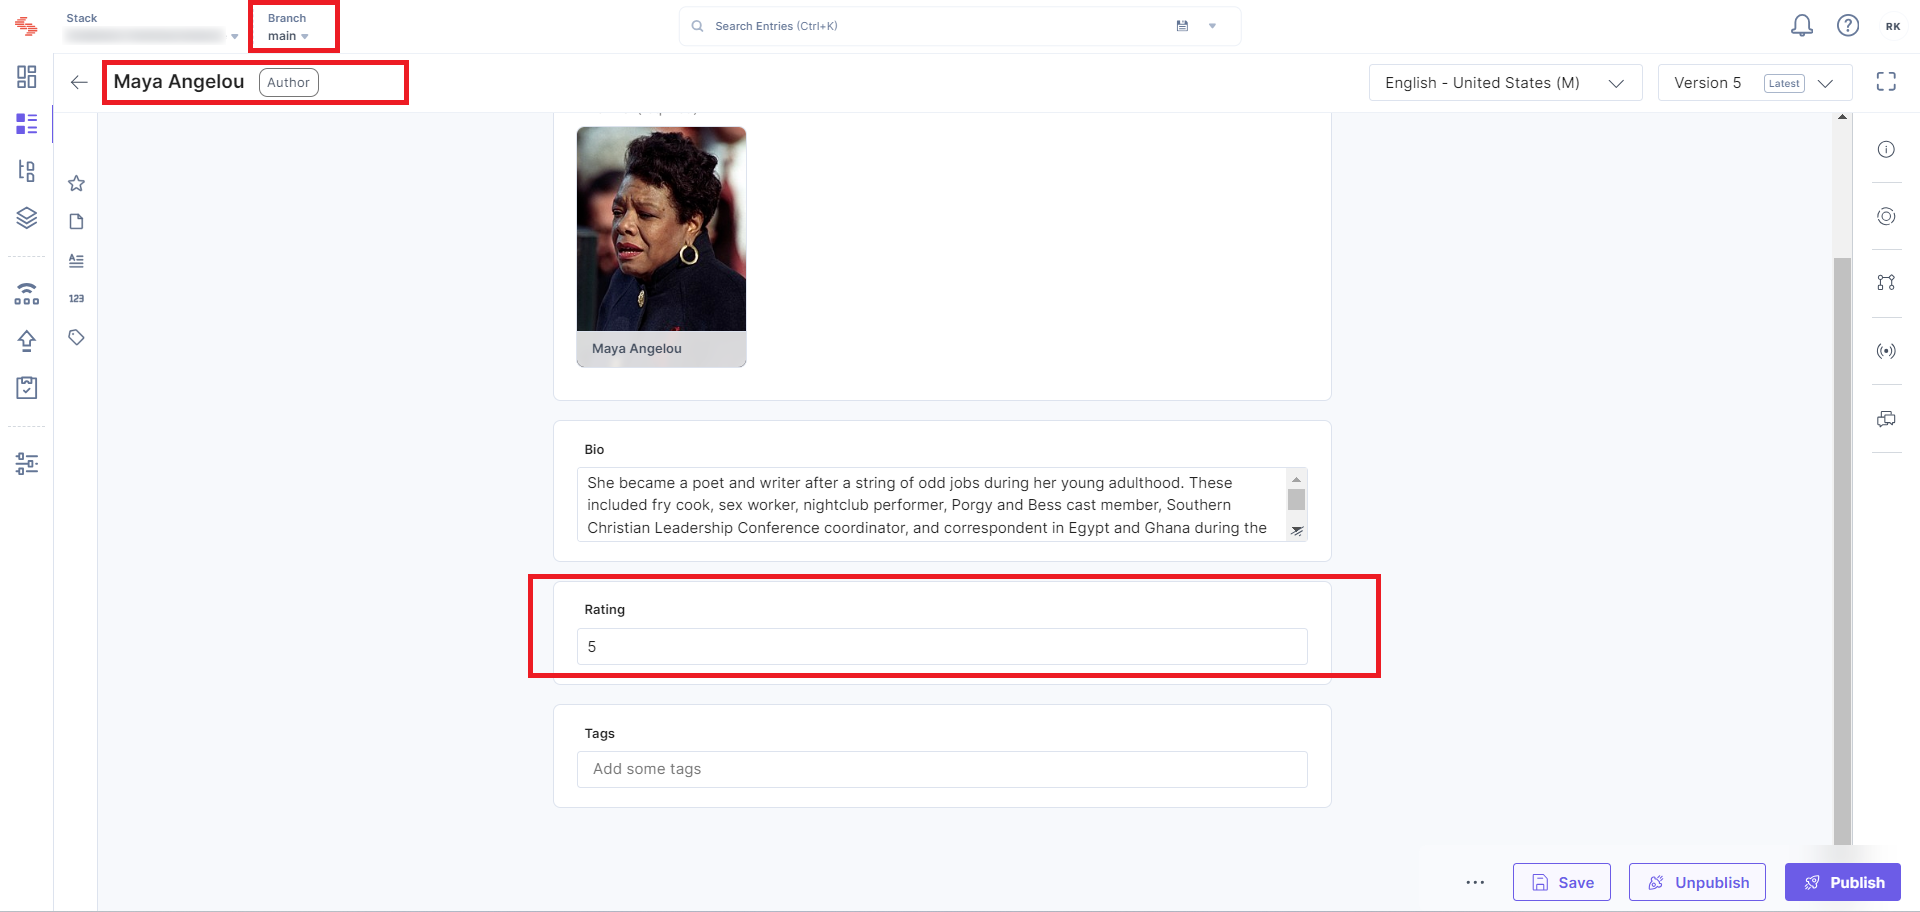
7. Cleanup (Optional):
- Once changes are successfully merged and deployed, you can optionally delete the "dev" branch if it's no longer needed.