

Set Up Shopify Live Preview
Note: The Shopify Live Preview is a plan-based feature and may not be accessible to all users. For more information or to request access, contact our support team.
Shopify Live Preview connects Contentstack with Shopify Liquid themes, enabling editors to preview changes in real time, without publishing or reloading the page. This reduces errors, accelerates workflows, and helps validate storefront updates before deployment.
To configure Shopify Live Preview, log in to your Contentstack Account and perform these steps:
Install the Shopify Live Preview App
Install the Live Preview app to connect Contentstack with your Shopify storefront.
- Navigate to the Marketplace.
- In the Apps panel, search for Shopify Live Preview.
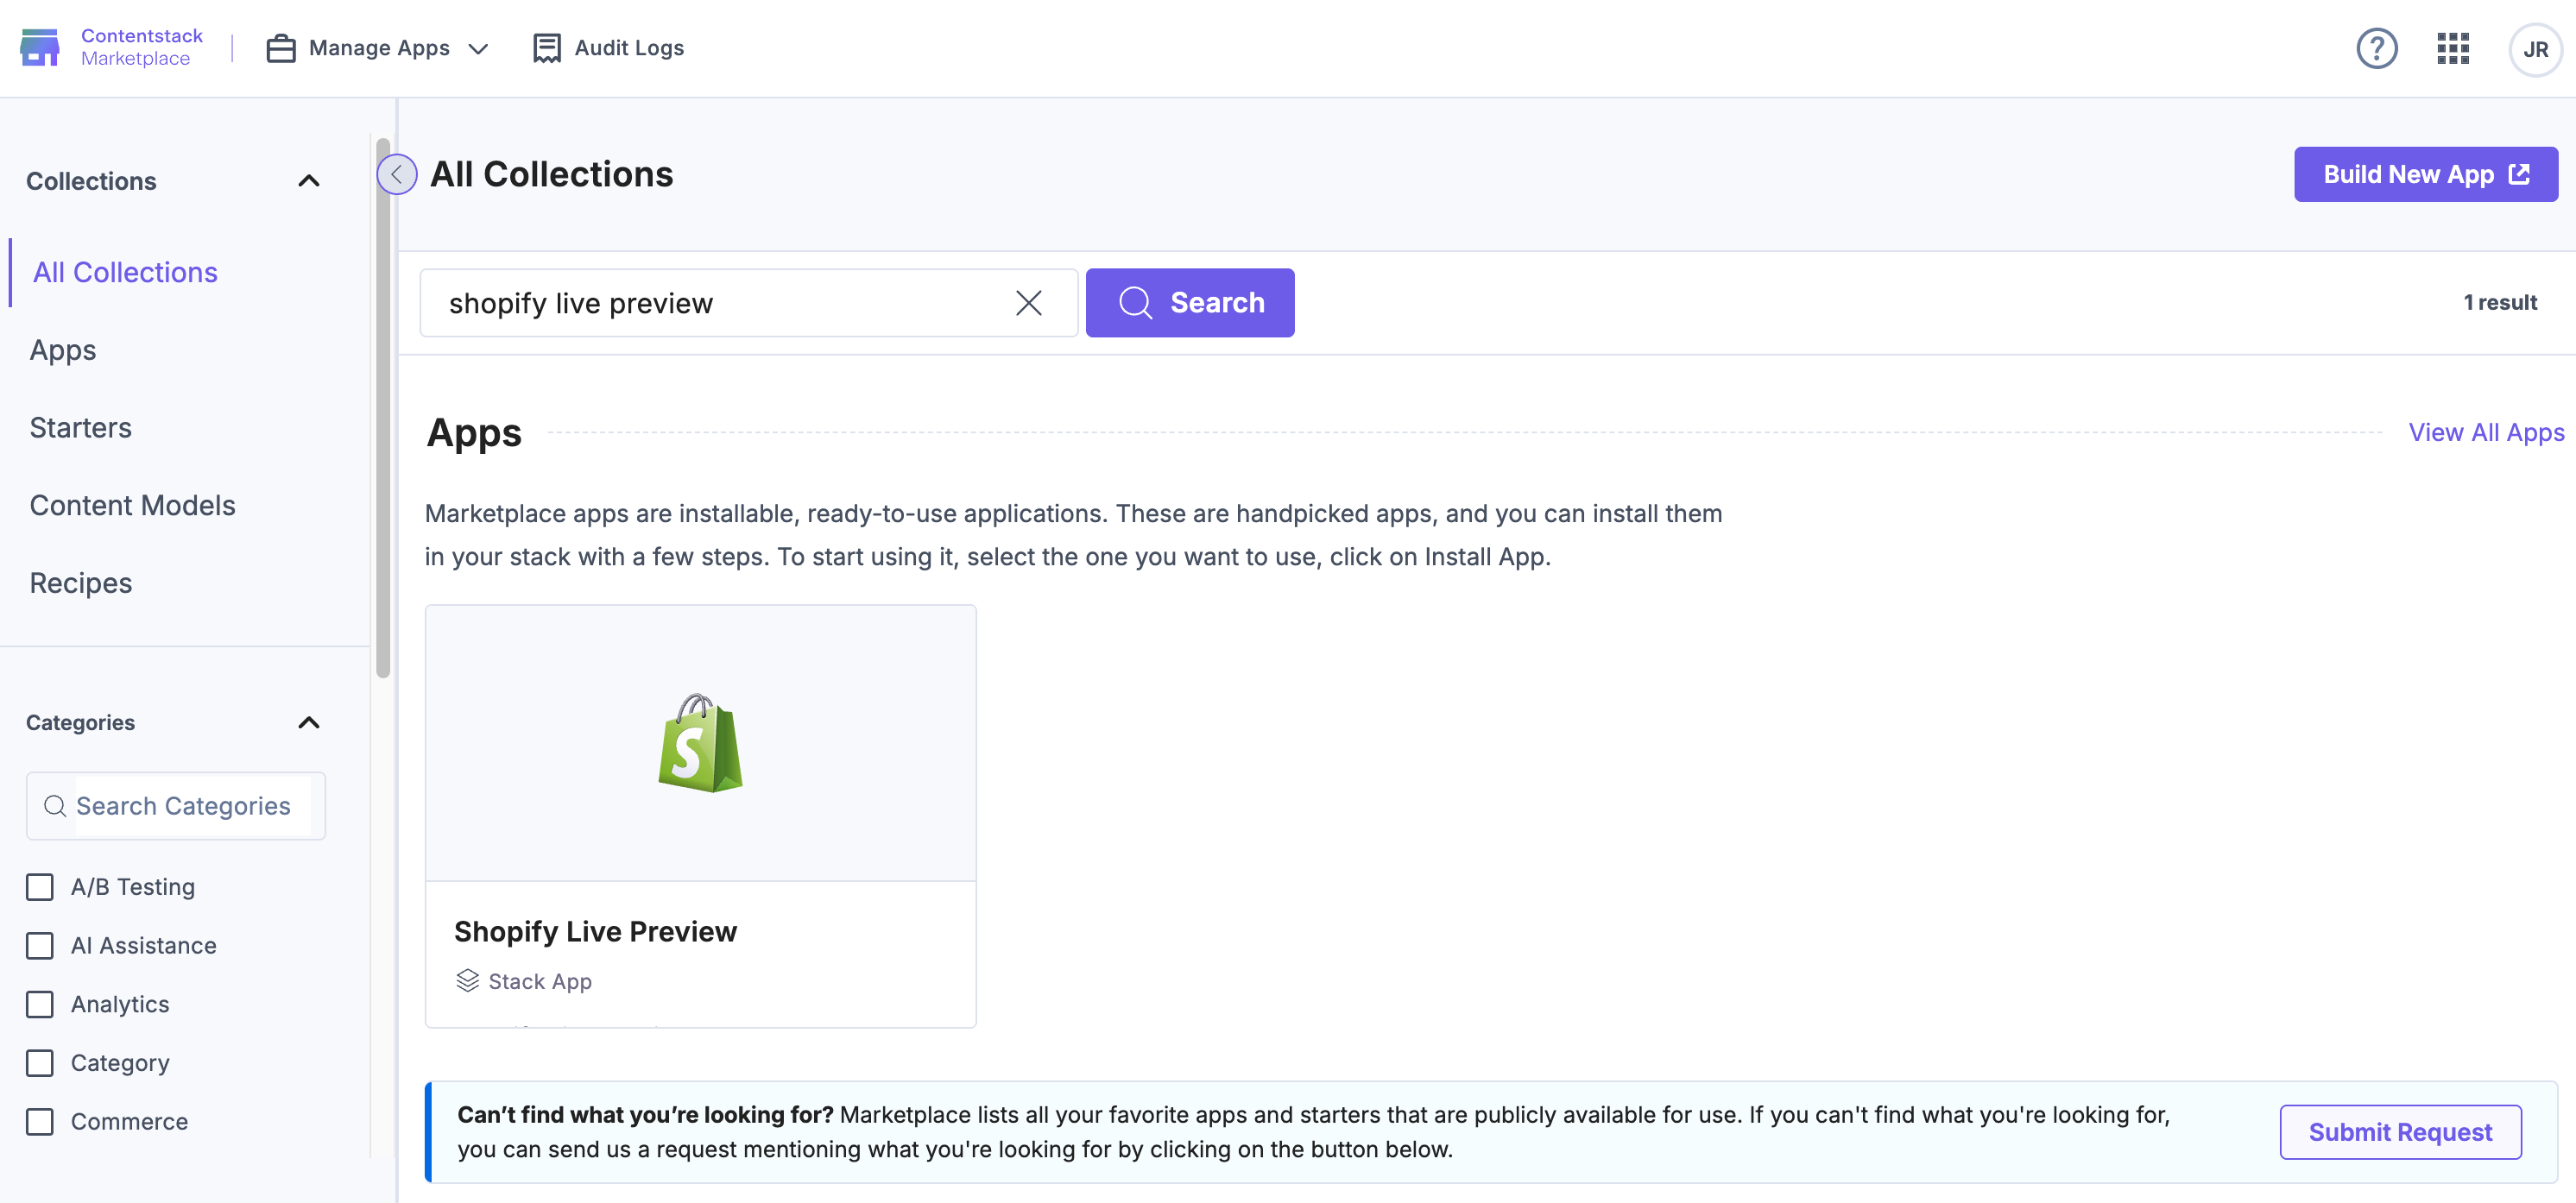
- Click Install.
- In the pop-up, select the stack where you want to install the app, accept the Terms of Service checkbox, and click Authorize & Install.
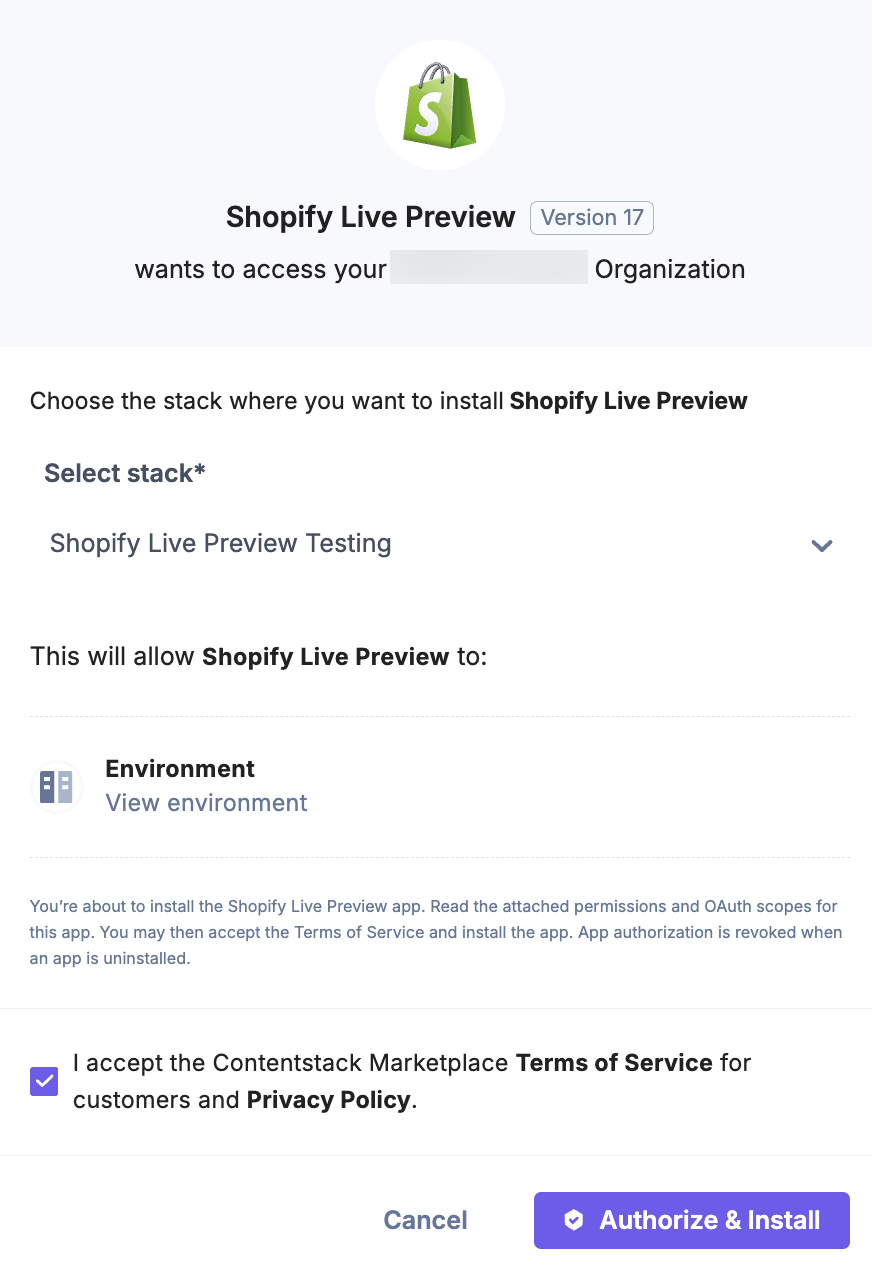
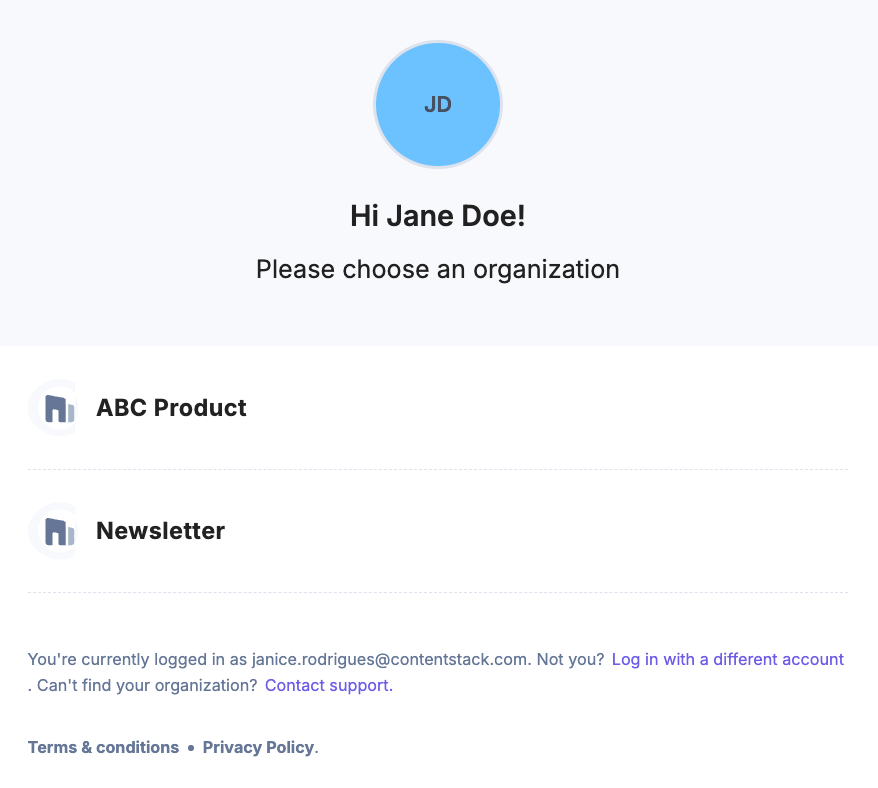
- Choose your Organization and authorize user access.
Deploy the Node.js Middleware on Launch
The Node.js middleware enables live syncing between Contentstack and Shopify.
- Select the Environment for Live Preview.
- Choose the Delivery Token.
- Click Deploy on Launch.
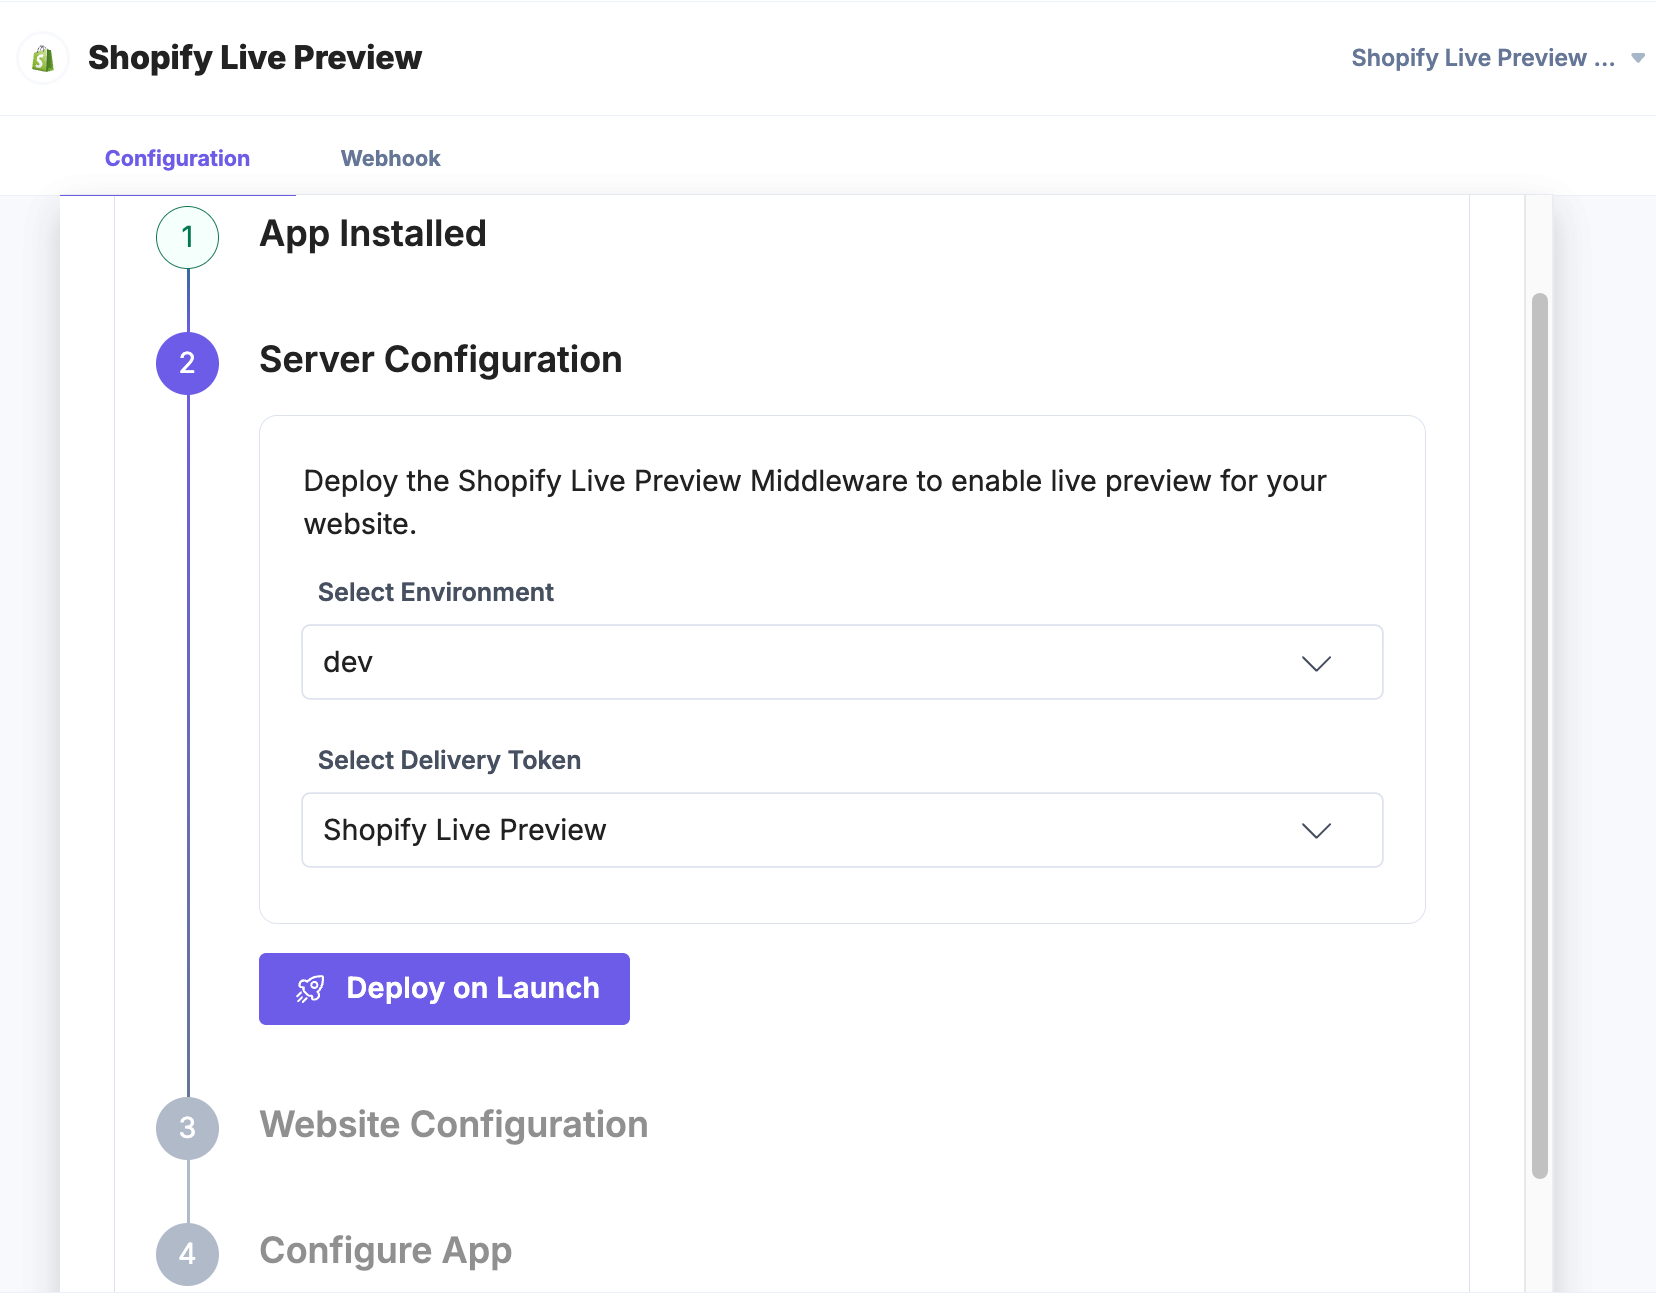
- After deployment, copy the Live Preview Middleware URL displayed.
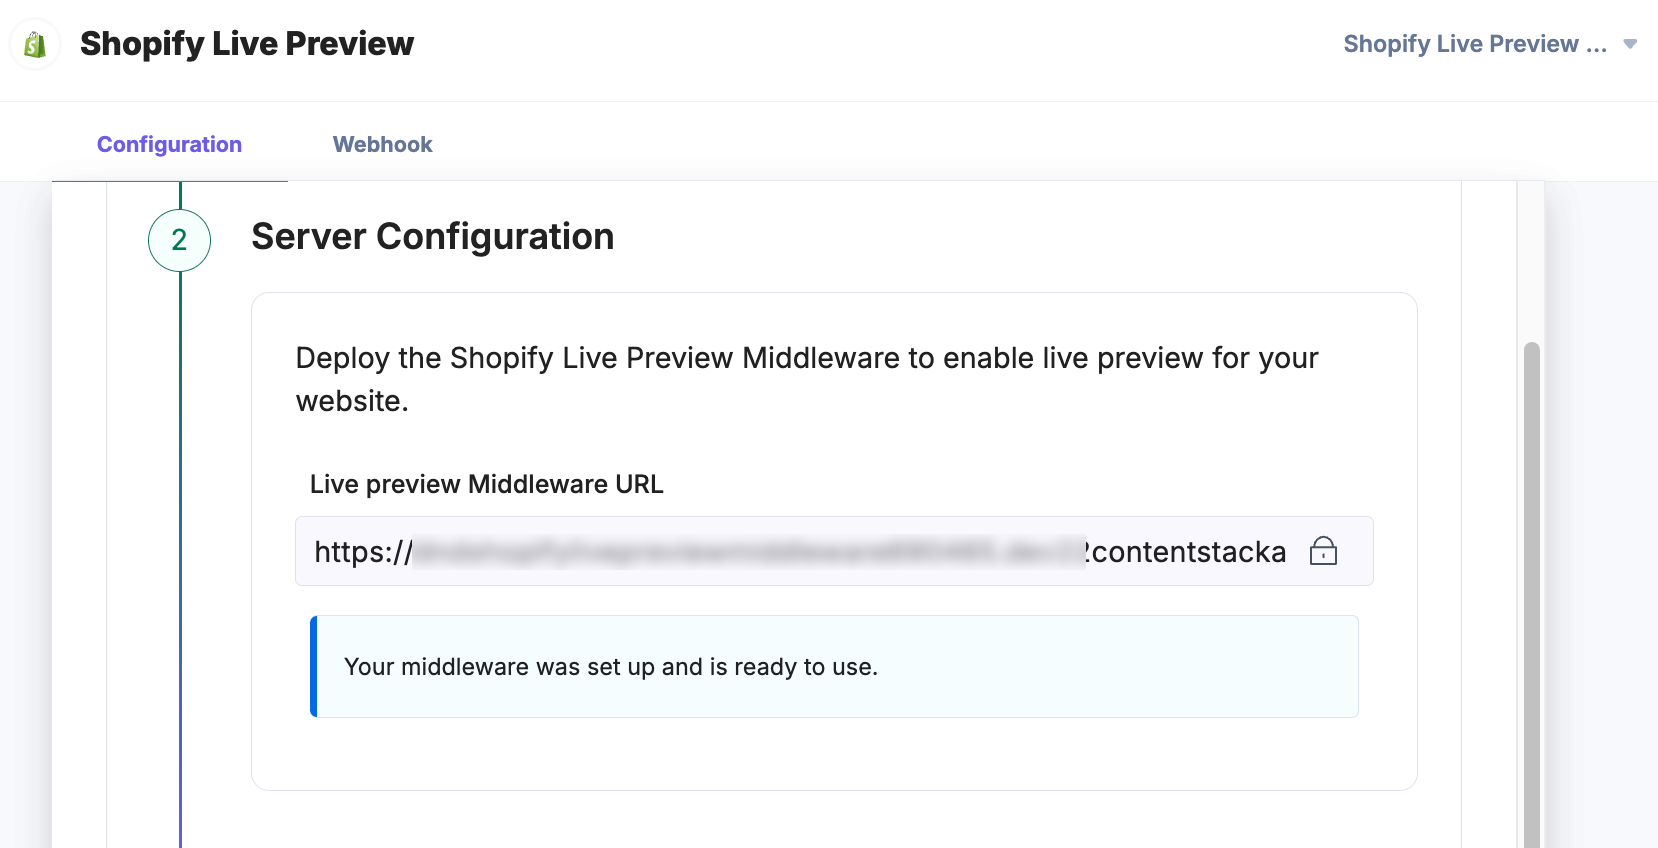
Note: You can add this URL in your Shopify theme's cs-lp-script.liquid file.
Add Live Preview Files to Your Shopify Theme
To sync Contentstack with Shopify:
- Copy the code from cs-lp-script.liquid and paste it into your Shopify theme's snippets folder.
- In the file, replace your_middleware_url with the copied middleware URL.
- Copy the code from data-cslp-tags.liquid and paste it into the same folder.
Note: Keep original file names unchanged, cs-lp-script.liquid and data-cslp-tags.liquid, to ensure proper syncing.
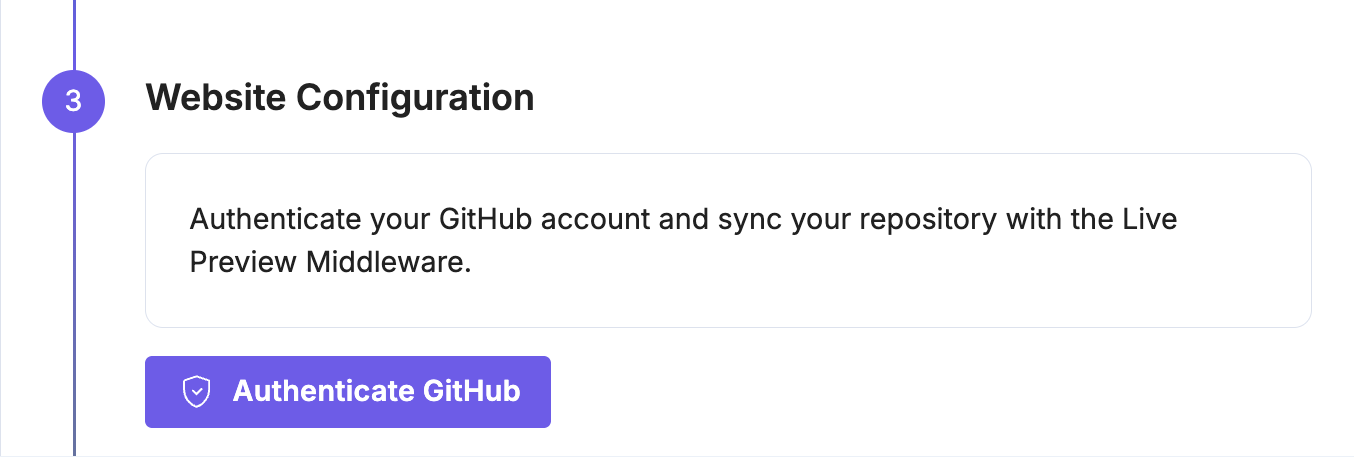
Authenticate with GitHub
Click Authenticate GitHub and grant Contentstack permission to access your GitHub repository.
Sync Your Theme Repository
Link your theme files with the middleware to enable real-time rendering.
- Select your Repository and Branch.
- Click Sync GitHub.

Note: A copy of your Shopify theme is stored in the middleware and re-rendered with each update.
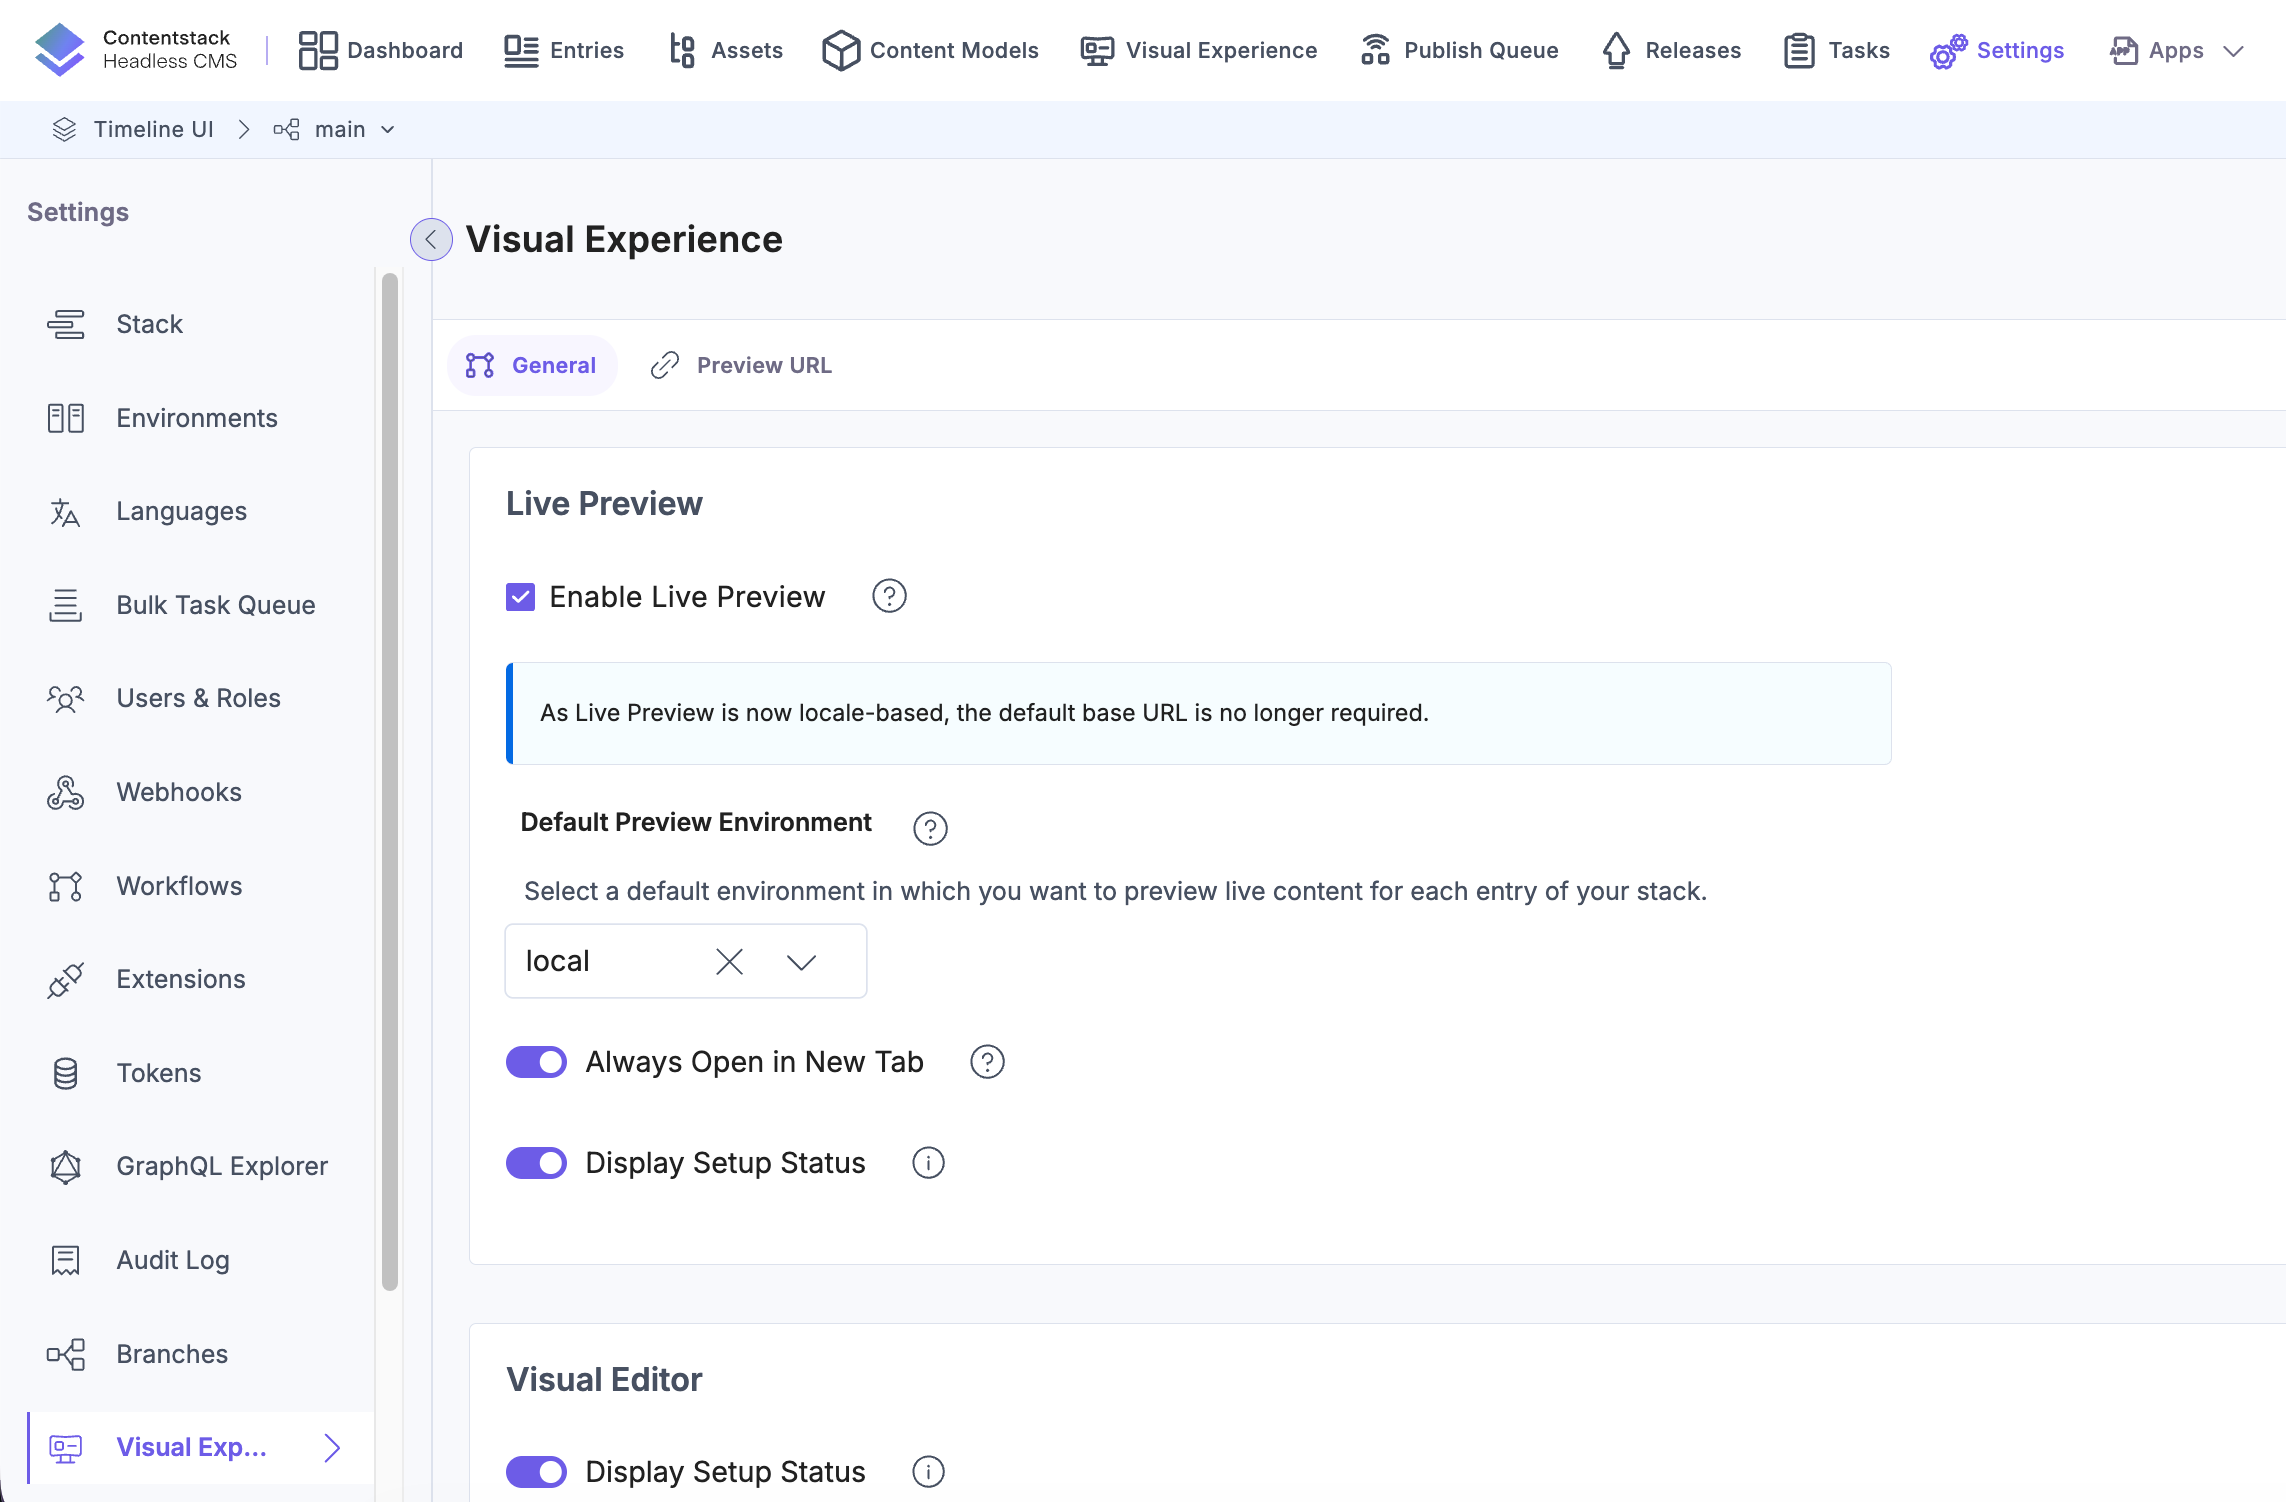
Enable “Always Open in New Tab”
For easier access, you can configure Live Preview to open in a new tab.
- In your stack, go to Settings and select Visual Experience.
- In the General tab, enable the Always Open in New Tab toggle.
- Click Save.
Extend Live Preview to Non-Product Pages
By default, Shopify Live Preview is optimized for Product pages, where associated Metaobjects are automatically available in the Liquid file. However, on non-Product pages, such as Home, Collection, or custom pages, Metaobjects are not pre-populated. Each Metaobject must be manually referenced using its type and handle.
Why this matters
Without automatic Metaobject resolution, implementing Live Preview across your storefront becomes more complex and error-prone. Each Metaobject must be hardcoded, increasing the risk of inconsistencies and making it harder to maintain as content grows or changes.
To simplify this process and create parity with Product pages, we recommend creating a Master Metaobject. This Master Metaobject references all required Metaobjects, enabling you to fetch and manage them through a single entry.
Benefits of using a Master Metaobject
- Consistent data access across templates
- Simplified maintenance as Metaobjects evolve
- Seamless integration with Live Preview on non-Product pages
This approach creates a scalable, reliable setup for your entire storefront and helps both developers and content editors work more efficiently with Contentstack data in Shopify.
Create Definition and Entry for Metaobject Mapping
To connect Shopify with Contentstack Live Preview, you’ll need to create a definition and an entry that stores the Metaobject information generated by the Contentstack App. This setup ensures accurate mapping and avoids configuration issues.
To sync Shopify with Contentstack Live Preview:
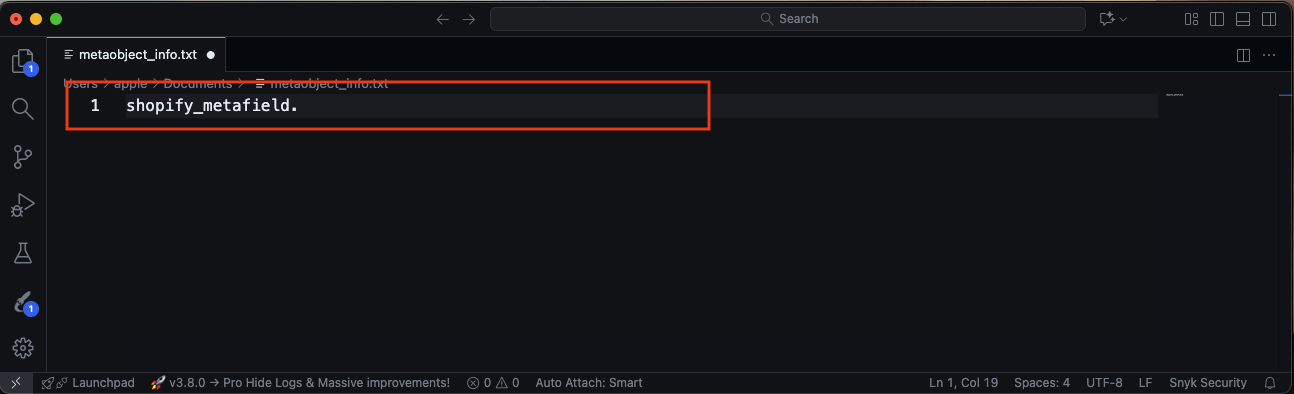
- Create a new text file in your code editor.
- Log in to your Shopify store using a browser.

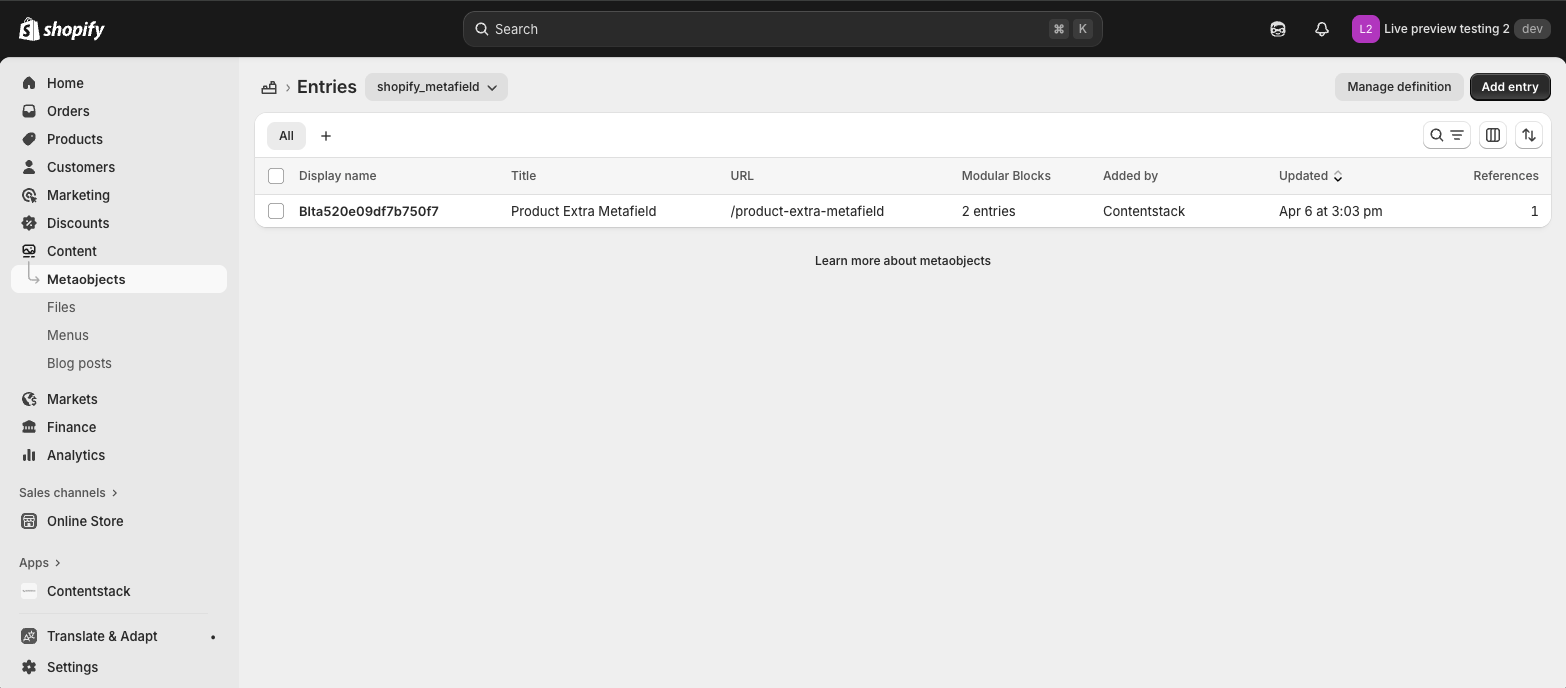
- In the left panel, click Content. The Metaobjects page will open by default.
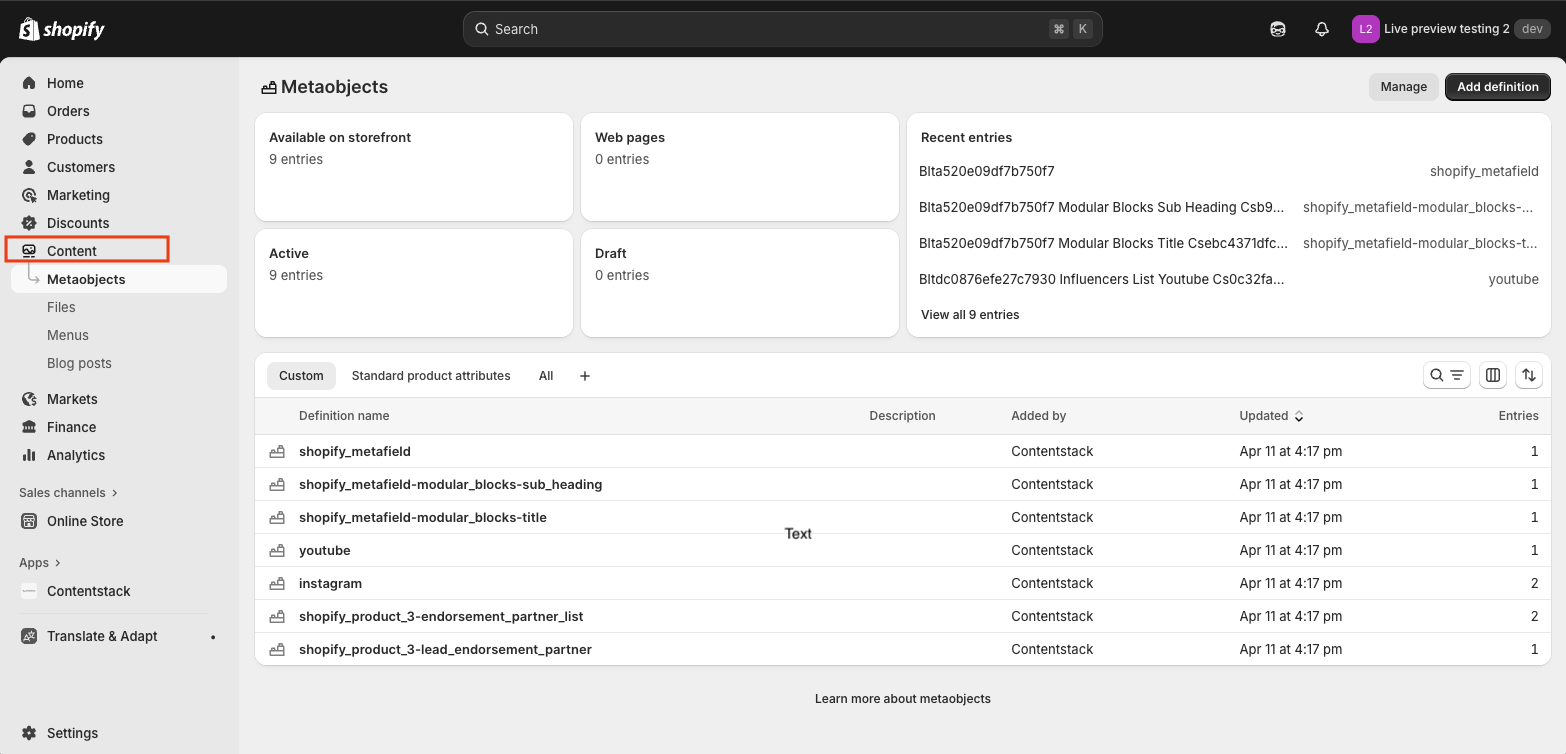
- Select or click the first Metaobject that was added by Contentstack.
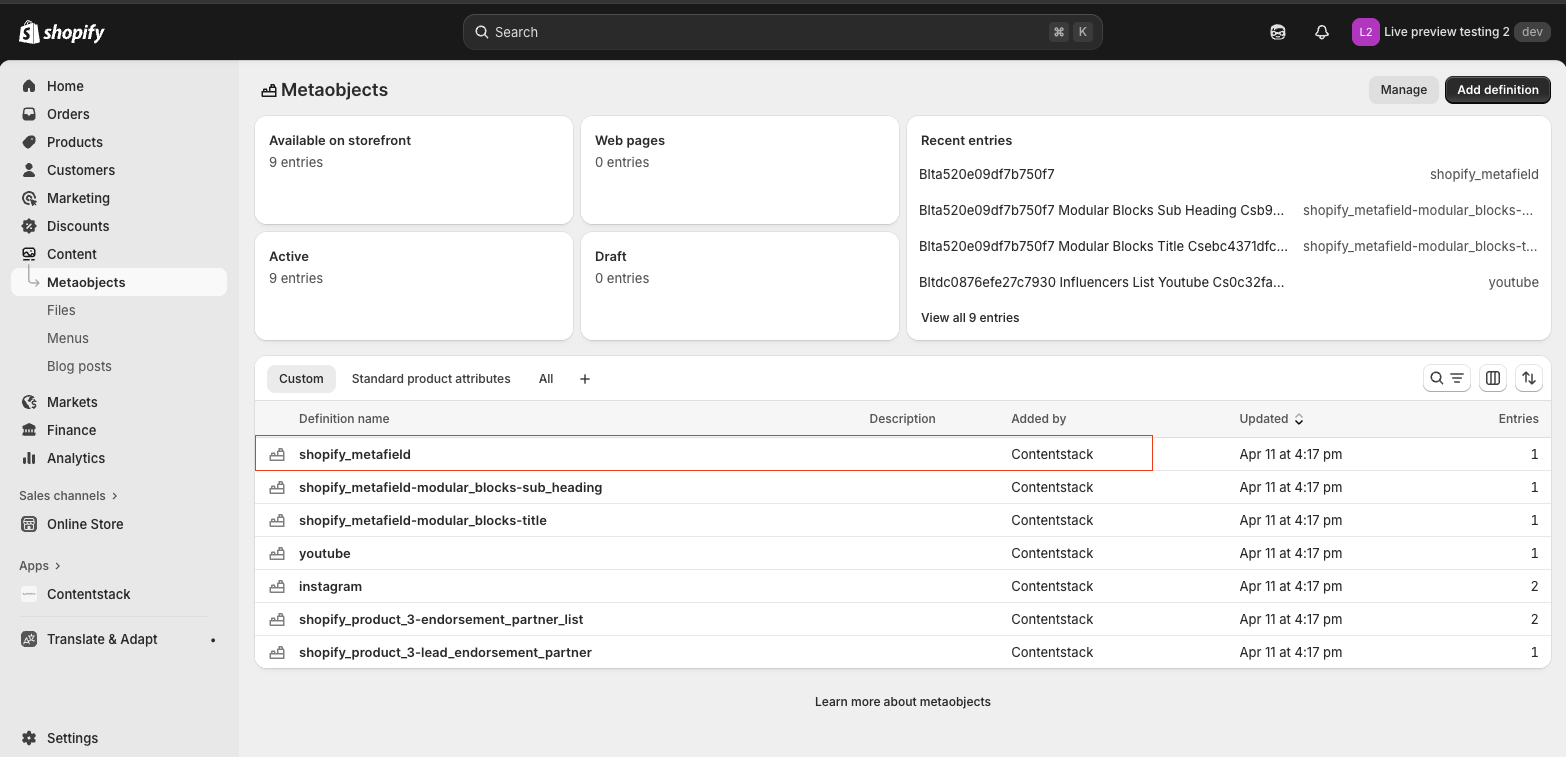
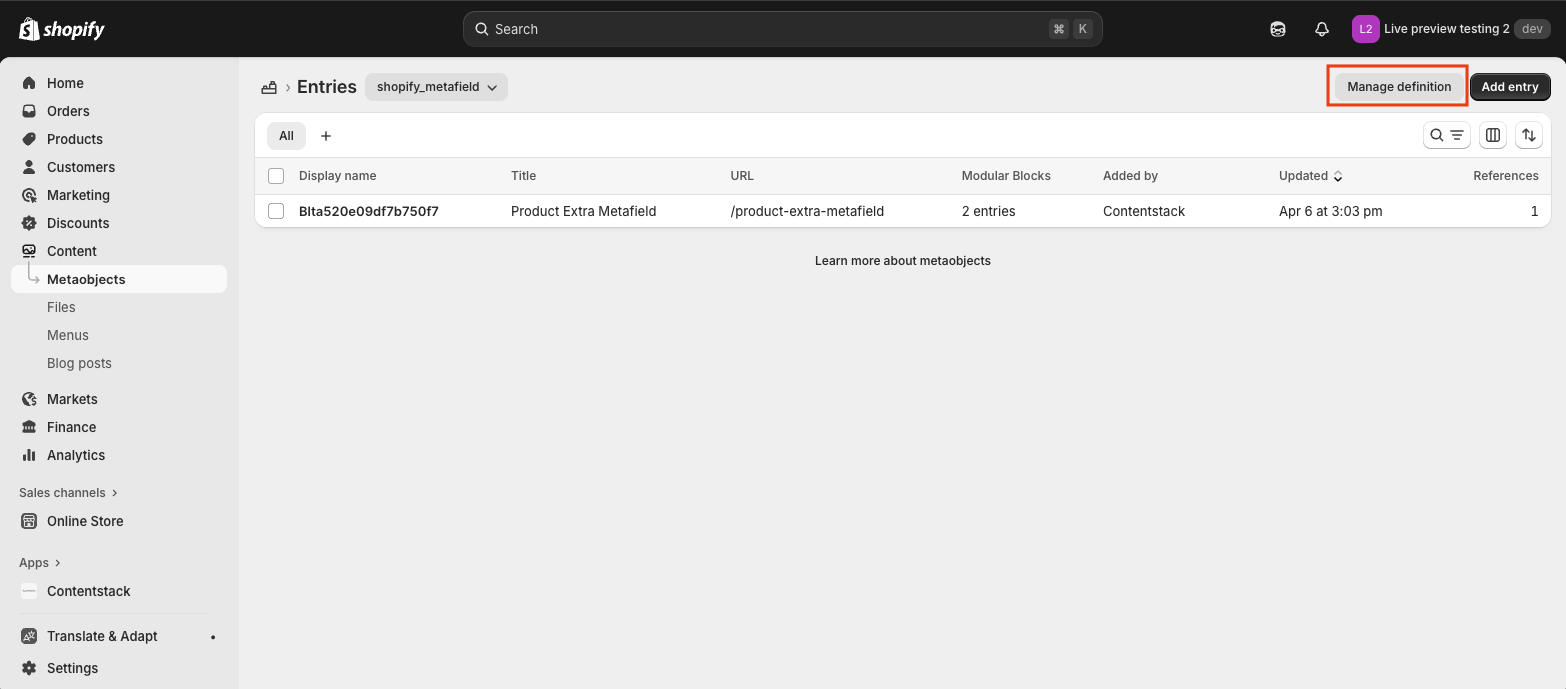
- Click the Manage definition button.
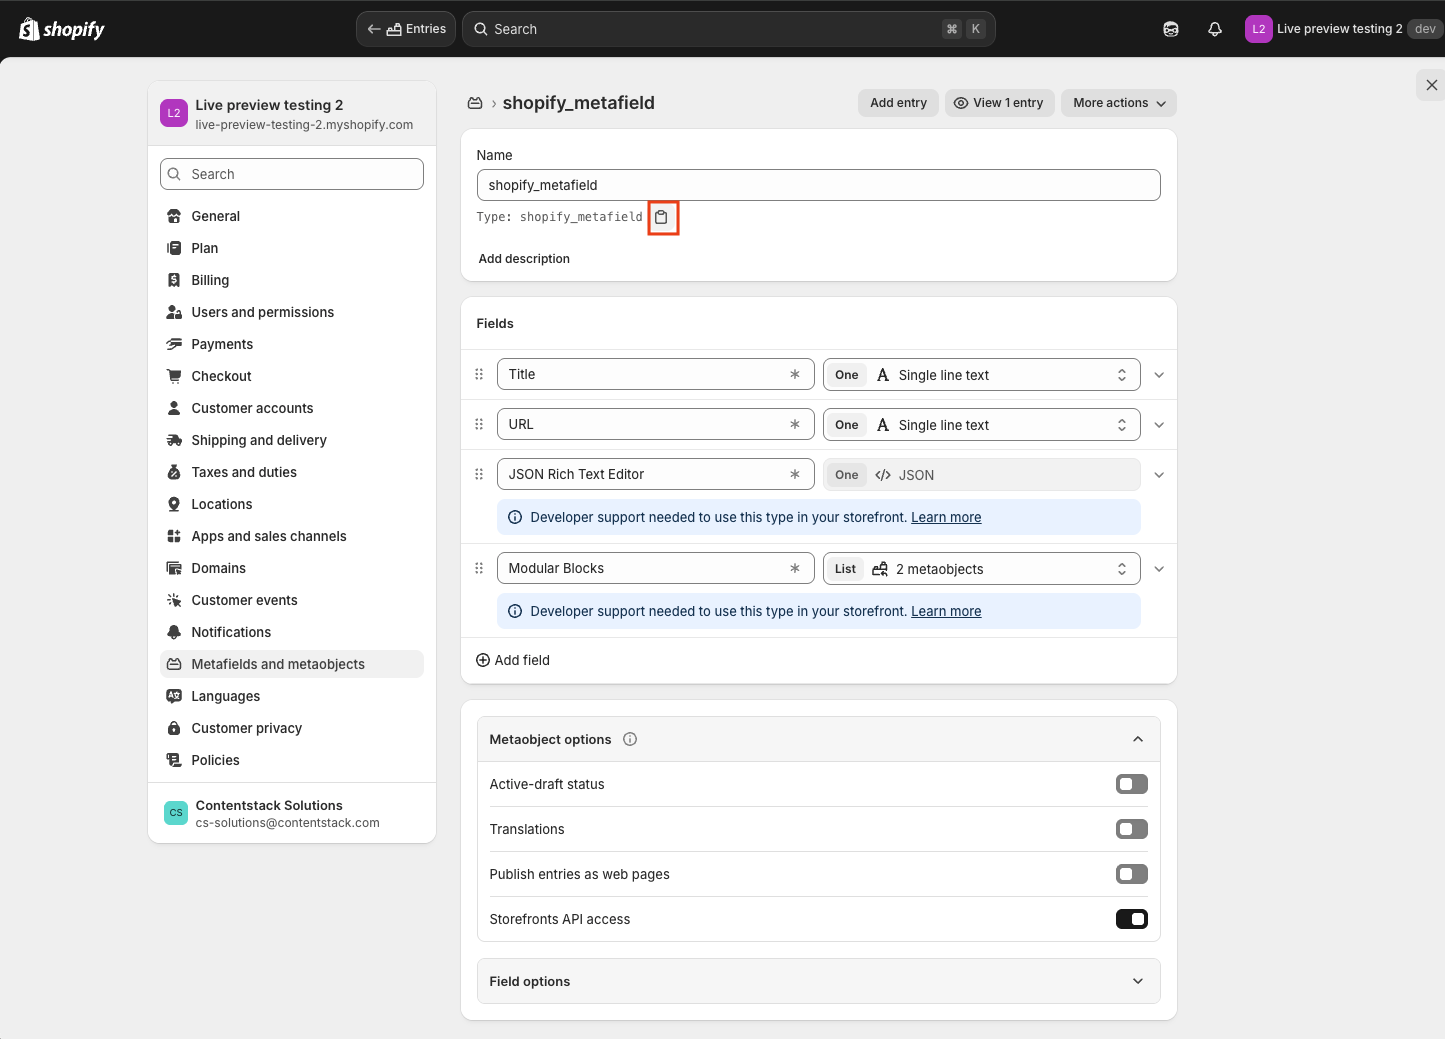
- Click the Copy icon to copy the Metaobject type.
- Return to the text file you created and paste the copied type.

- After pasting, add a period (.) to the end of the type, followed by the handle to form the type.handle format.
- Go back to the Metaobject page by pressing the browser Back button.
- Click the first entry of the Metaobject.
- On the entry page, hover over the Handle section to display the Copy icon. Click it to copy the handle.
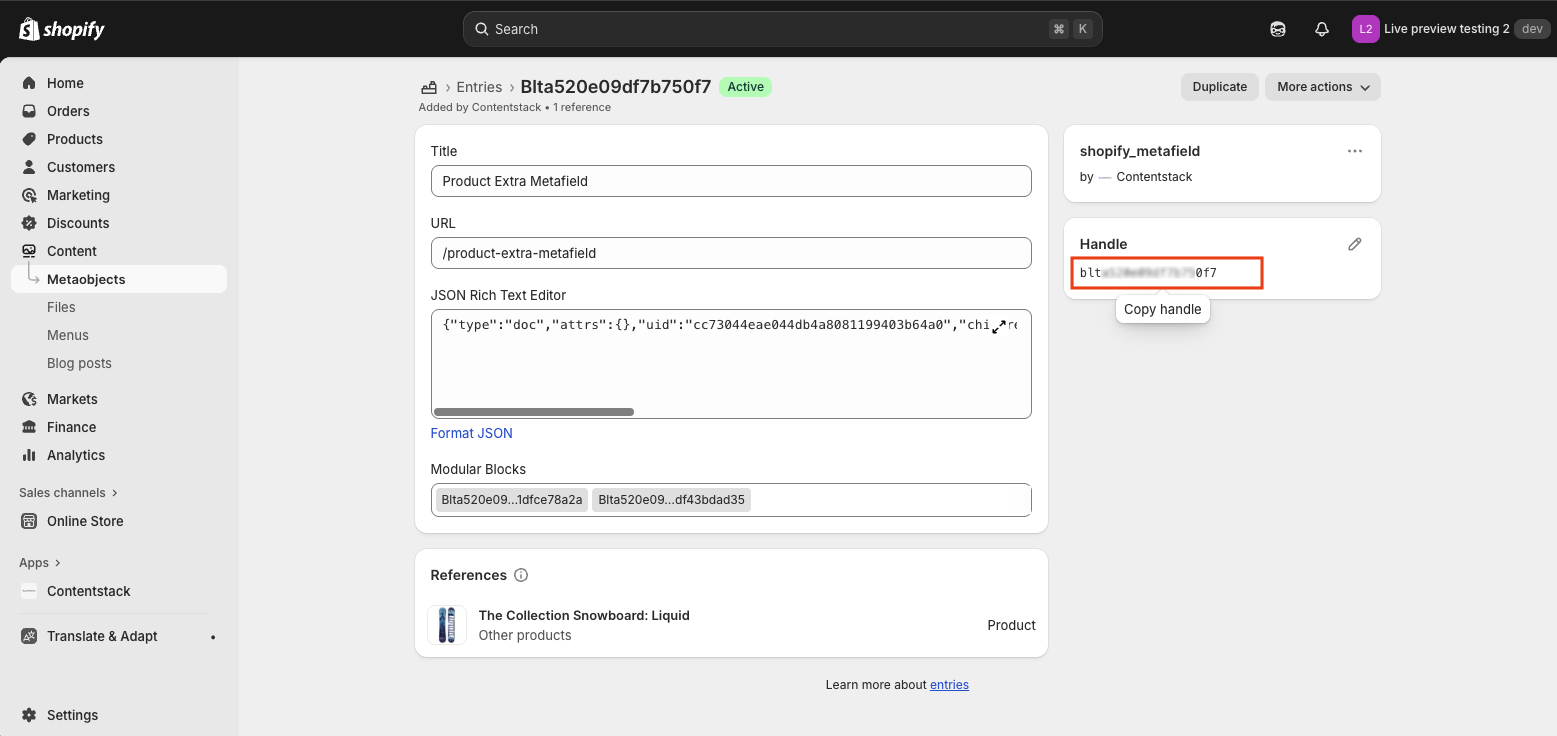
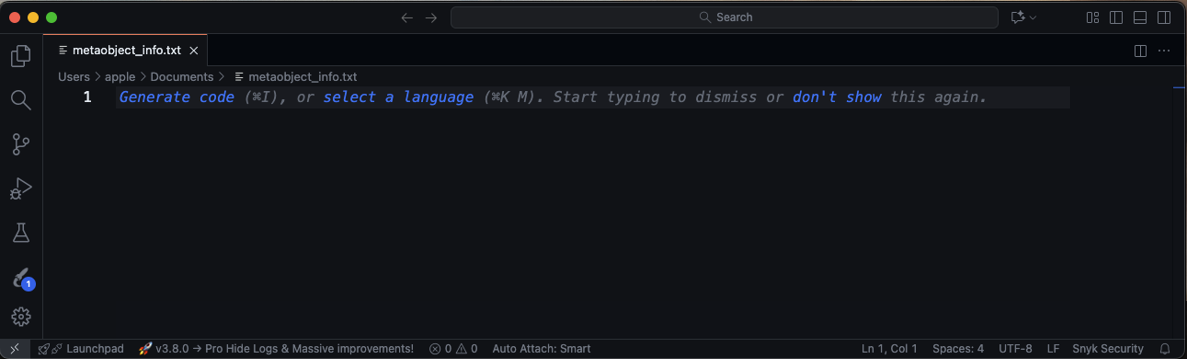
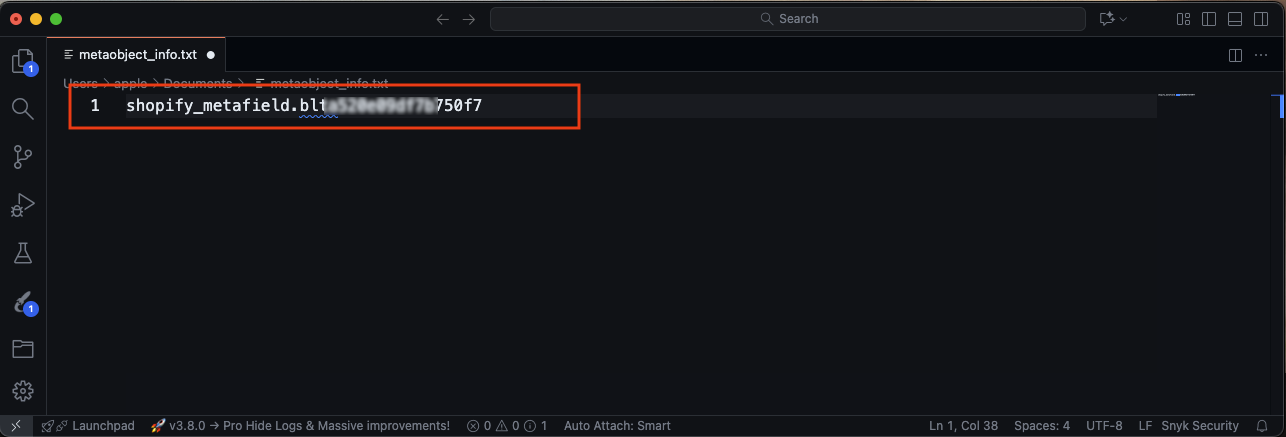
- Paste the copied handle into your text file after the corresponding type. Your text file should now display one complete type.handle string.
- Repeat steps 3–13 for all Metaobjects used outside of Product pages that were added by Contentstack during the app sync.

Note: Ensure the format strictly follows type.handle as shown in the steps above. Once completed, your text file will resemble the reference screenshot provided.
Now your text file is ready to be used later in the process.
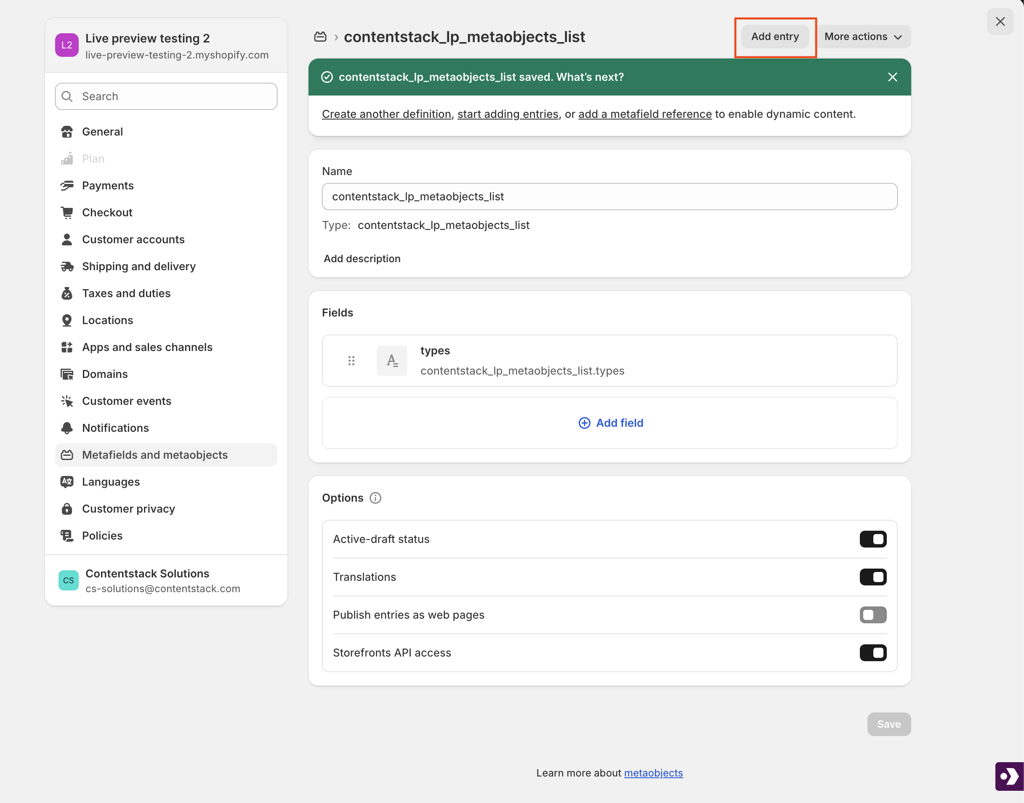
Create a New Definition
Create a new Metaobject definition in Shopify to hold your identifiers:
- Go to Settings > Metafields and Metaobjects in your Shopify store.

- Click Add definition.
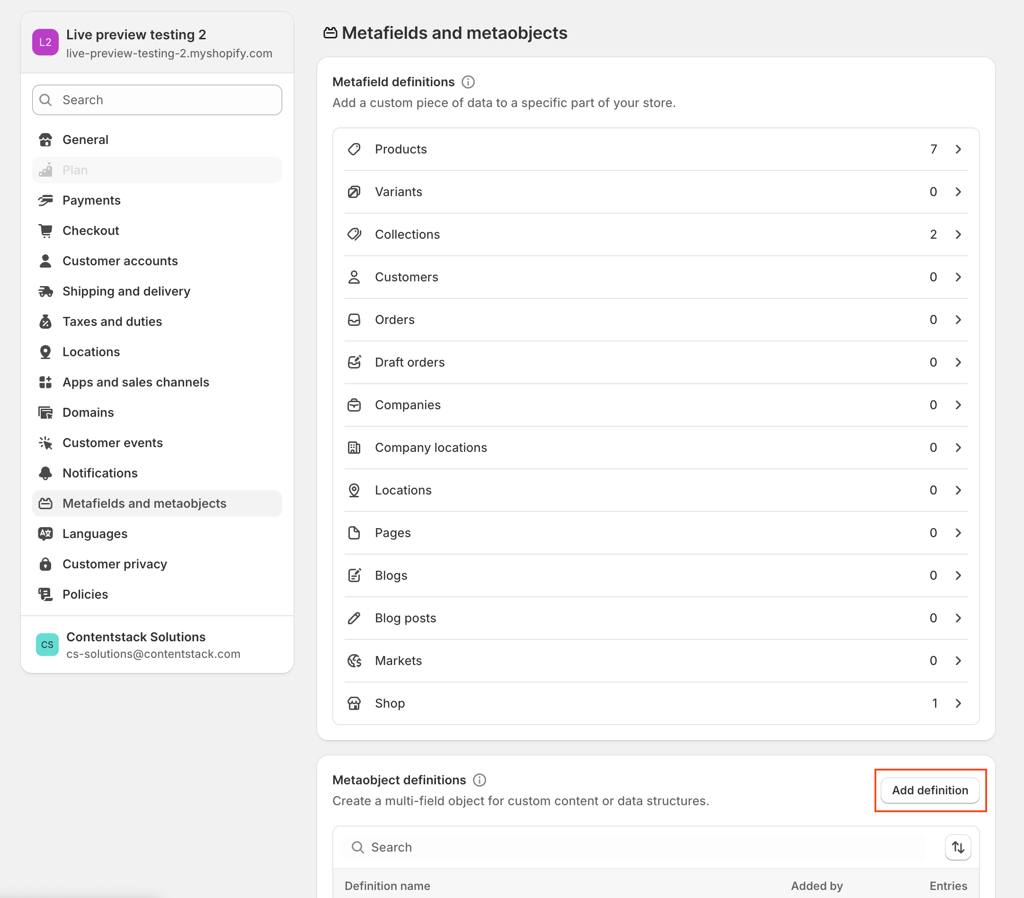
- In the Name field, enter contentstack_lp_metaobjects_list.
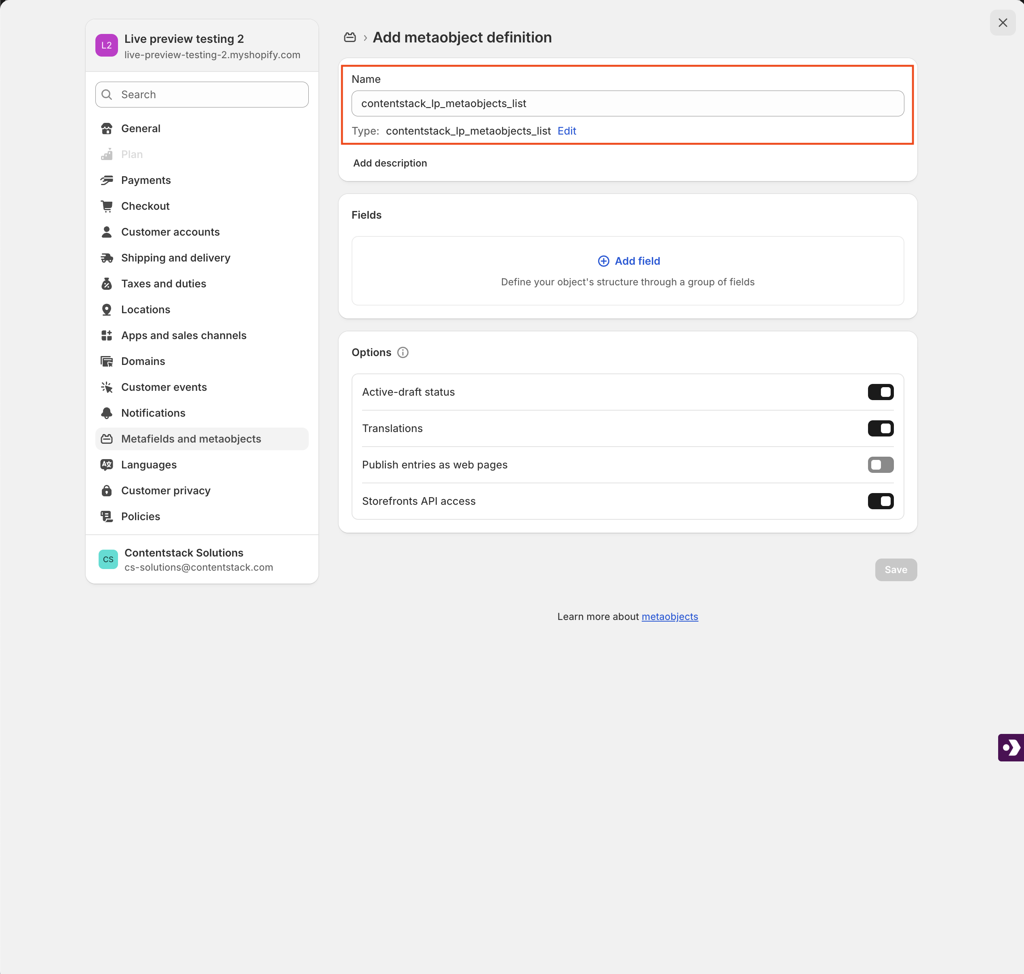
- Click Add field and select Single line text.
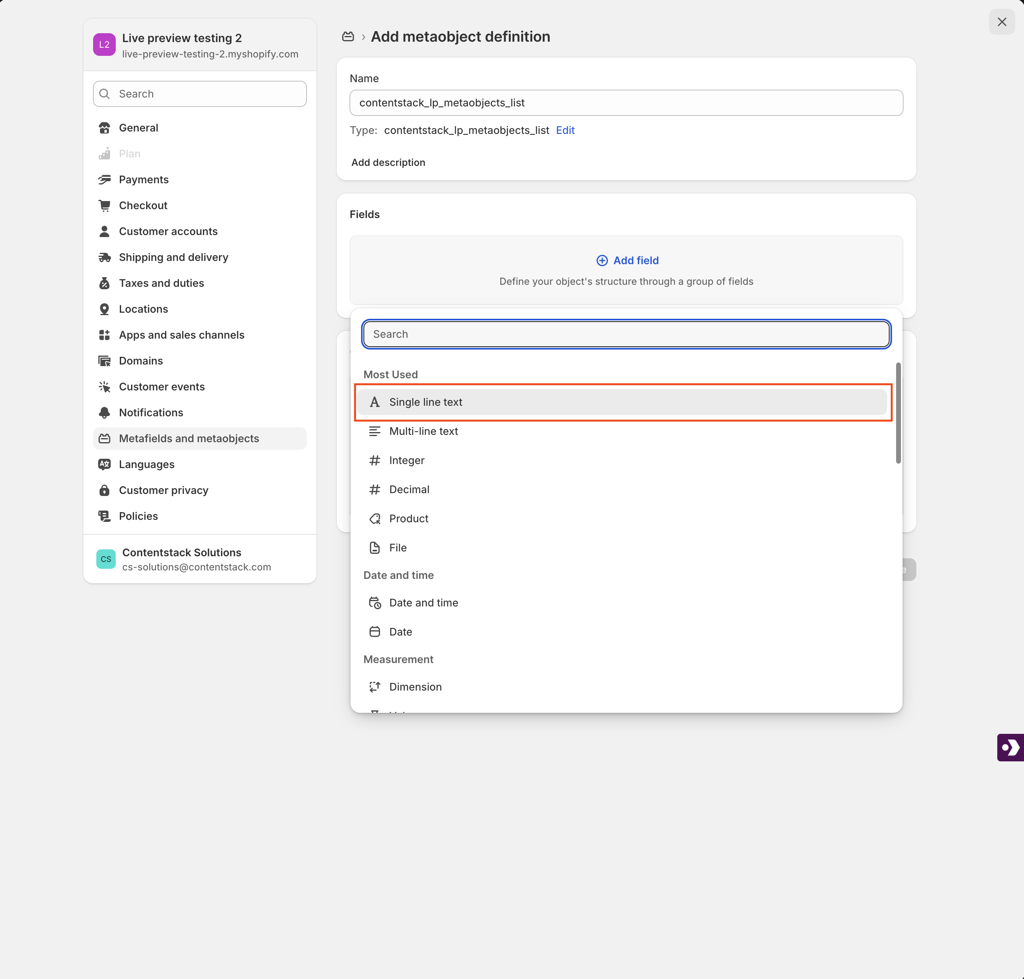
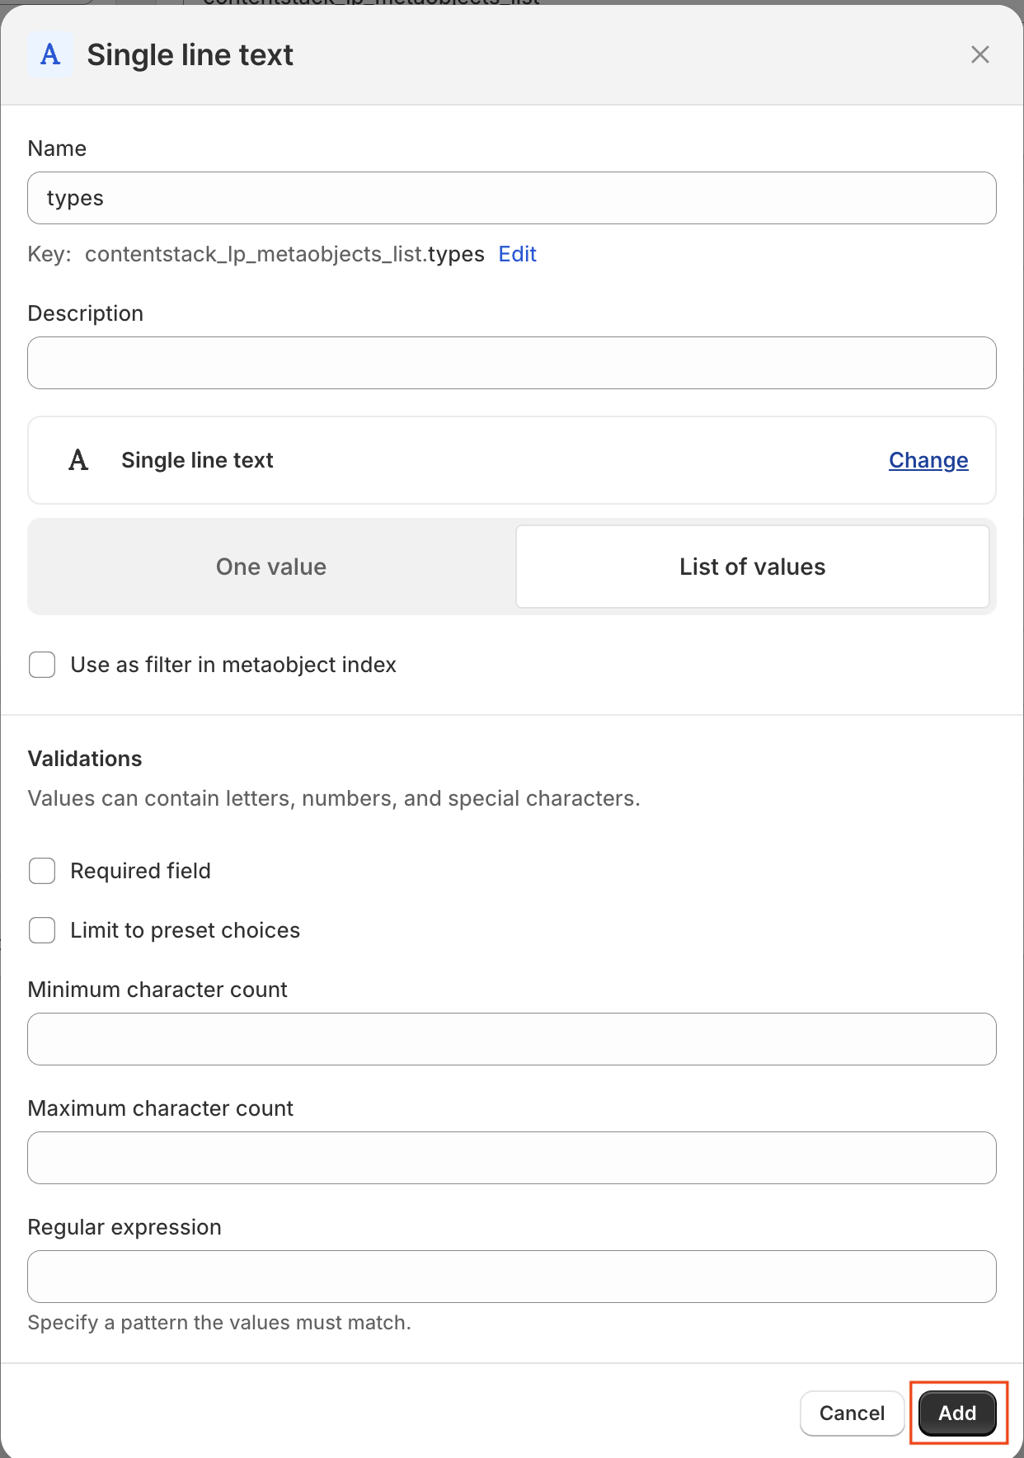
- Enter type as the field name.
- Select List of values as the input type.
- Click Add, then click Save to finalize the definition.
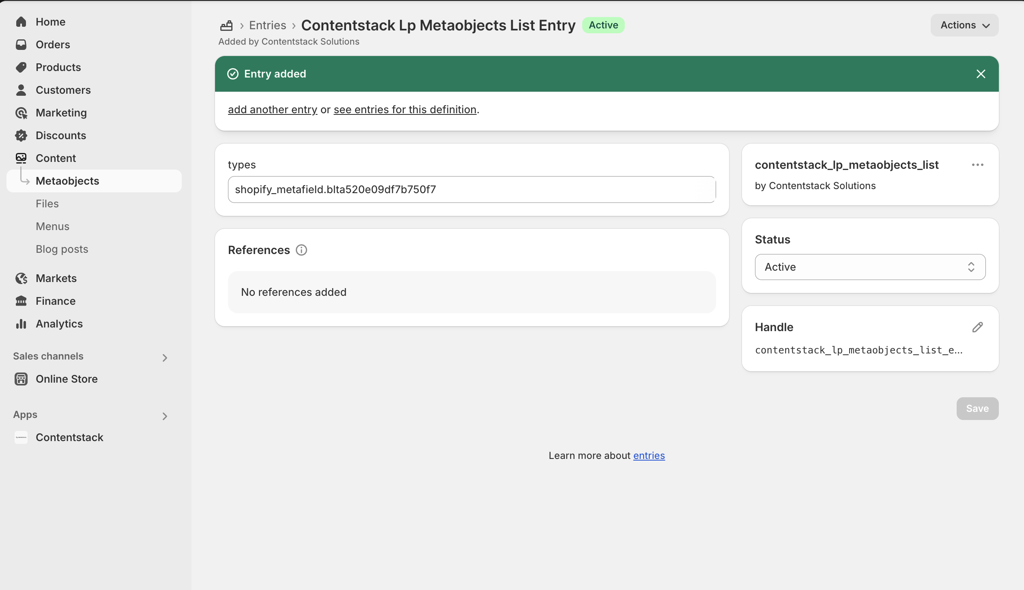
Create a New Entry
Now, use your text file to populate the new entry:
- Click Add entry to create a new entry for the definition you just made.
- In the Handle section, click Edit.
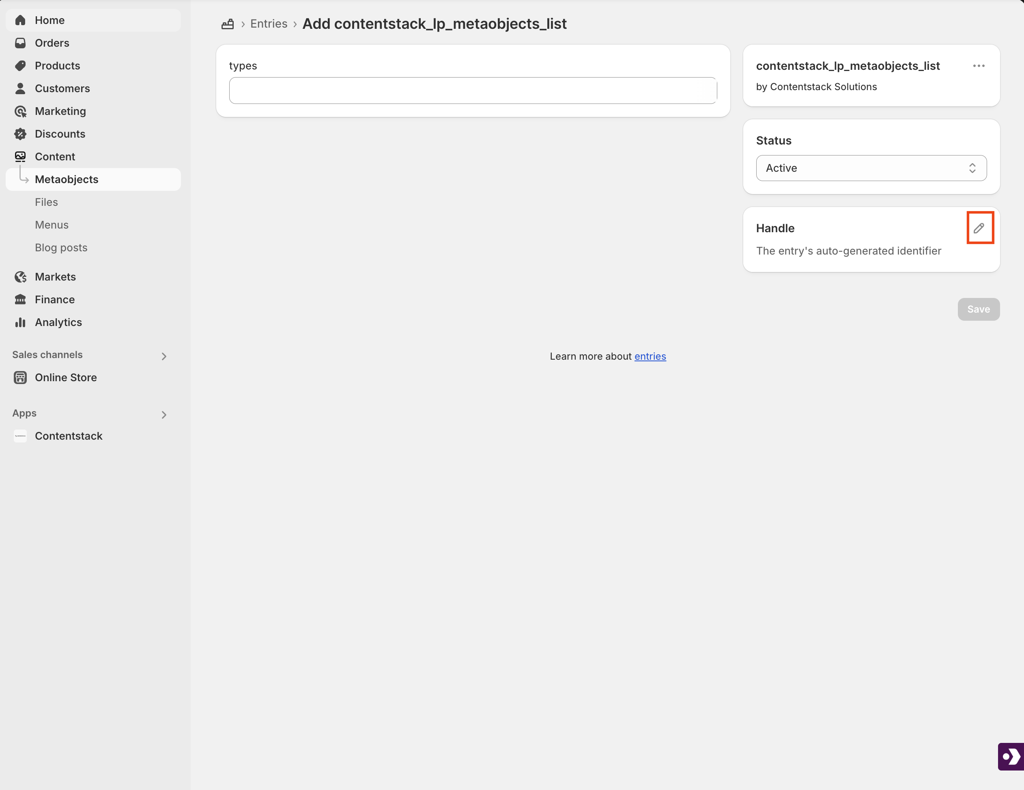
- Set the handle name to contentstack_lp_metaobjects_list_entry.
- In the Types input field, add your first type.handle value from the text file.
- Click Add item to include more values from your list.

- Click Save.
Warning: Use the exact field names, contentstack_lp_metaobjects_list and contentstack_lp_metaobjects_list_entry. Any deviation will result in a failed setup.
With these configurations in place, any changes made in Contentstack are reflected in real time on your Shopify storefront, even on non-Product pages.
Shopify Live Preview in Contentstack enables seamless, real-time updates between your CMS and Shopify storefront, eliminating the need for manual publishing or page reloads. By following the steps outlined in this guide, you can configure a scalable, reliable preview experience for both Product and non-Product pages.
More articles in "Work with Live Preview"
