

Set Up Live Preview with GraphQL for CSR
Use GraphQL APIs to preview content in real time with Live Preview. This guide explains how to configure Live Preview with GraphQL for a Client-side Rendering (CSR) website.
Prerequisites
- Contentstack account
- Access to stack settings
- Preview token
- IFrame-compatible website to avoid CORS errors
Follow these steps to configure Live Preview with GraphQL for your CSR website:
Set Up the Website
To enable Live Preview on your website, begin by setting up the essentials—create a preview token, install the Live Preview Utils SDK, and configure your GraphQL requests to support real-time updates.
Generate a Preview Token
Create a preview token by navigating to Settings > Tokens > Delivery Tokens (press “Alt + O” for Windows or “Option + O” for Mac).
Note: It is recommended to use a preview token for Live Preview instead of a previously utilized, read-only management token.
Each preview token is associated with a delivery token and shares access to the specific environment. If a delivery token doesn't exist, create one and enable the Create Preview Token toggle. For an existing delivery token, use the + Create Preview Token option and copy the generated token.

Install and Initialize Live Preview Utils SDK
Use the Live Preview Utils SDK to listen for content updates and fetch real-time preview data on the client side.
Install the SDK using one of the following methods:
Via npm:
Install the Live Preview Utils SDK package via npm by running the following command:
npm install @contentstack/live-preview-utils@contentstack/utils
Initialize the SDK using the init() method to set up event listeners for content updates:
import ContentstackLivePreview from "@contentstack/live-preview-utils";
ContentstackLivePreview.init({
  ssr: false,
  enable: true,
  // Recommended: Enables Edit Tags
  editButton: { enable: true },
  stackDetails: {
    apiKey: "your api key",
    environment: "your environment value",
    branch: "your branch",
  },
  clientUrlParams: {
    protocol: "https",
    host: "app.contentstack.com", // Use region-specific host if applicable
    port: 443,
  },
});
Note: To avoid configuration reset errors due to rerendering, place the initialization code in a separate JavaScript file.
Via script:
Install the SDK using a script tag in your HTML:
<script type='module'>
import ContentstackLivePreview from "https://esm.sh/@contentstack/live-preview-utils@3.0.1";
ContentstackLivePreview.init({
  enable: true,
  ssr: false,
  // Recommended: Enables Edit Tags
  editButton: { enable: true },
  stackDetails: {
    apiKey: "your api key",
    environment: "your environment value",
    branch: "your branch",
  },
  clientUrlParams: {
    protocol: "https",
    host: "app.contentstack.com", // Use region-specific host if applicable
    port: 443,
  },
});
</script>
Update the GraphQL URL and Headers
To enable Live Preview in the preview panel, update the GraphQL API’s hostname dynamically based on the presence of a hash.
Example: Basic configuration for GraphQL requests
//utils.js
const graphqlUrl = new URL(
  `https://graphql.contentstack.com/stacks/${REACT_APP_CONTENTSTACK_API_KEY}?environment=${REACT_APP_CONTENTSTACK_ENVIRONMENT}`
);

function getHeaders() {
  const headers = new Headers();
  headers.append("Content-Type", "application/json");
  headers.append("access_token", REACT_APP_CONTENTSTACK_DELIVERY_TOKEN);
  return headers;
}

export const gqlRequest = async (gql) => {
  const headers = getHeaders();
  const res = await fetch(graphqlUrl.toString(), {
    method: "POST",
    headers: headers,
    body: JSON.stringify({ query: gql }),
  });
  return res;
};
This example configures the GraphQL endpoint and defines the getHeaders() function to provide the required headers. The gqlRequest() function retrieves data from Contentstack’s GraphQL API.
Example: Conditional configuration for Live Preview
//utils.js
import ContentstackLivePreview from "@contentstack/live-preview-utils";

const graphqlUrl = new URL(
  `https://graphql.contentstack.com/stacks/${REACT_APP_CONTENTSTACK_API_KEY}?environment=${REACT_APP_CONTENTSTACK_ENVIRONMENT}`
);

const GRAPHQL_HOST_NAME = "graphql.contentstack.com";
const LIVE_PREVIEW_HOST_NAME = "graphql-preview.contentstack.com";

function getHeaders() {
  const headers = new Headers();
  headers.append("Content-Type", "application/json");
  headers.append("access_token", REACT_APP_CONTENTSTACK_DELIVERY_TOKEN);
  return headers;
}

export const gqlRequest = async (gql) => {
  const hash = ContentstackLivePreview.hash;
  const headers = getHeaders();

  if (hash) {
    headers.append("live_preview", hash);
    headers.append("include_applied_variants", "true");
    headers.append("preview_token", REACT_APP_CONTENTSTACK_PREVIEW_TOKEN);
    graphqlUrl.hostname = LIVE_PREVIEW_HOST_NAME;
  } else {
    graphqlUrl.hostname = GRAPHQL_HOST_NAME;
  }

  const res = await fetch(graphqlUrl.toString(), {
    method: "POST",
    headers: headers,
    body: JSON.stringify({ query: gql }),
  });

  return res;
};
In this example, ContentstackLivePreview.hash detects when the website runs inside the preview panel. When this value is present, it switches the hostname and adds both the live_preview and preview_token headers to enable Live Preview.
Note: Always use a preview token for Live Preview instead of a read-only management token. For region-specific hostnames, refer to the Base URLs for Live Preview section.
Configure Live Preview across Each Webpage
When you update an entry, the onEntryChange() method detects the change and runs your defined logic to fetch updated data. In a React-based setup, each page typically includes a function that retrieves data and updates the component state.
In the example below, an updateData() function handles the data fetch and state update. Pass this function to onEntryChange() inside a useEffect() hook to automatically refresh the data whenever the entry content changes.
// Blog.js
import React from "react";
import ContentstackLivePreview from "@contentstack/live-preview-utils";

import { gqlRequest } from “./utils.js”

const Footer = () => {
    const query = `
        query MyQuery {
        all_page(where: {url: "/blog"}) {
           items{
           title
            seo {
                enable_search_indexing
                keywords
                meta_description
                meta_title
            }
        }
      }
    }
    `;

    const [data, setData] = React.useState({});

    const updateData = async () => {
const fetchedData = await gqlRequest(query);
setData(fetchedData);
};

    React.useEffect(() => {
       ContentstackLivePreview.onEntryChange(updateData);
    }, []);

    return <div>{data.all_page.items[0].title;
};
Host the Website
To host a website, you can simply use launch or any other website hosting service.
Update Stack Settings
To set up Live Preview for the entries of your stack, perform the following steps:
- Navigate to Settings and select Environments.
- Set the base URLs for different locales, and click Save.

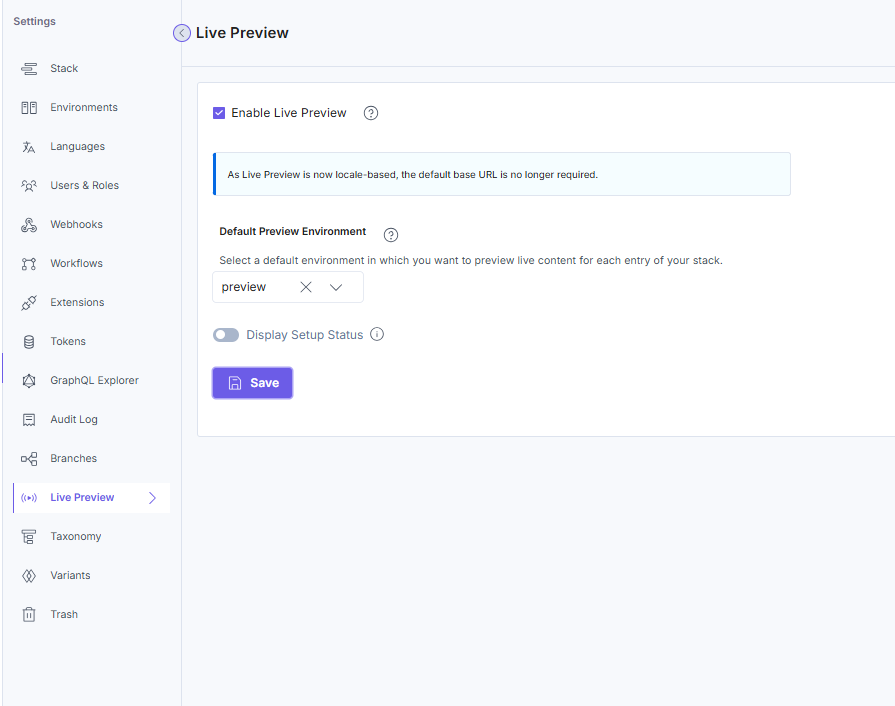
- Select Visual Experience from the stack settings.
- In the General tab, select the Enable Live Preview checkbox.
- Set the Default Preview Environment and click Save to save the settings.
Tip: You can also update the preview URL and environment from the preview settings available on the entry page.
- Enable the Display Setup Status toggle to display the configuration status.
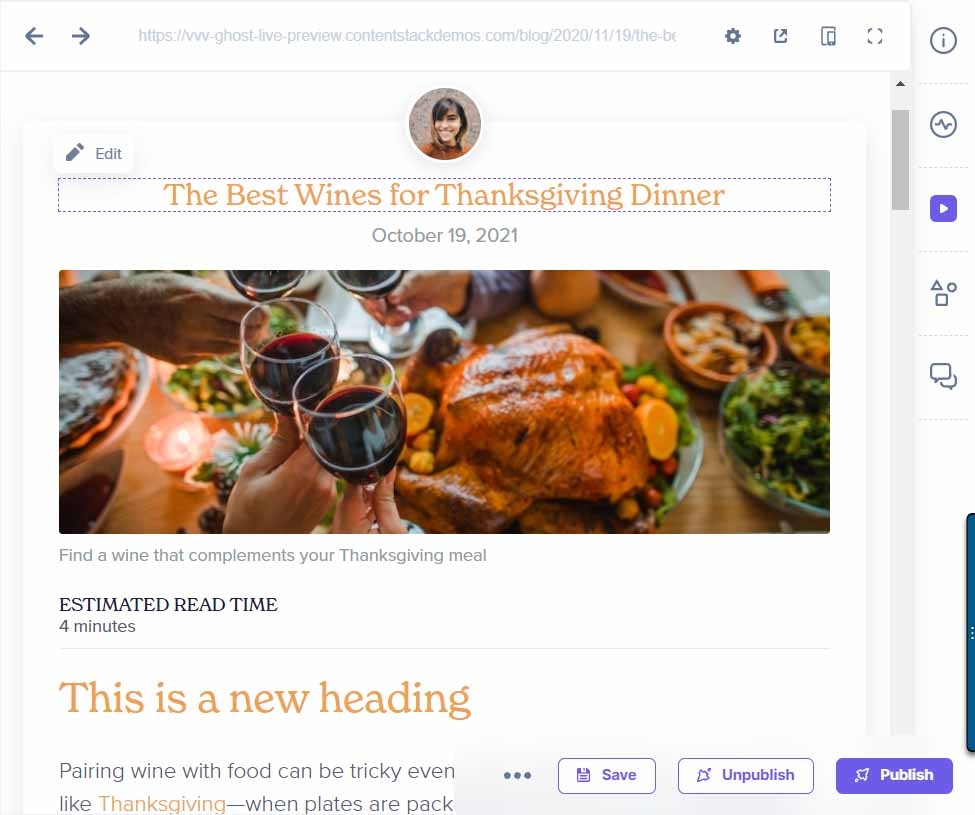
You can now see the Live Preview icon within all the entries of your stack and the feature previews data from the hosted website.
Live Edit Tags for Entries (recommended)
Live Edit tags allow editors to jump directly from the Live Preview pane to the relevant content fields in the entry editor. Clicking the Edit button opens the appropriate field. If the field references another entry, the editor is redirected accordingly.- Process entry for live editing
Locate the section of your website's code responsible for fetching content from Contentstack. To ensure proper functionality of live editing, it's crucial to retrieve system {uid} from GraphQL at the root of the query and system {uid, content_type_uid} for all references.
Here is an example of the gqlRequest() method for your reference:
const query = `
  query HeaderQuery {
    all_header {
      items {
          page_Connection {
           edges {
             node {
               ... on Page {
                 title
                 system {
                   uid
                   content_type_uid
                 }
               }
             }
           }
         }
      system {
        uid
      }
    }
  }
}

let entry = await gqlRequest(query)
Next, include _content_type_uid and uid alongside system, and assign the values from system.content_type_uid to _content_type_uid and system.uid to uid. As a result, the final output will appear as follows:
{ "all_header": { "items": [ { "page_referenceConnection": { "totalCount": 1, "edges": [ { "node": { "title": "Home", "url": "/", "uid": "blt336e63b68a71c1cb", "_content_type_uid": "page", "system": { "uid": "blt336e63b68a71c1cb", "content_type_uid": "page" } } } ] }, "system": { "uid": "bltf9961a71ea3fd917" }, "uid": "bltf9961a71ea3fd917" } ] } } - Import the addEditableTags() method
Install Contentstack Utils from npm using the following command:
npm i @contentstack/utils
After obtaining your data, make sure to import the addEditableTags() method from the Contentstack SDK.
import {addEditableTags} from "@contentstack/utils” Generate edit tags for previewed entry content
After retrieving data from Contentstack, pass the resultant entry within the addEditableTags() function to add edit tags to the previewed entry content:
addEditableTags(entry, content_type_uid, tagsAsObject, locale)Here, entry is the actual entry you get from the SDK, content_type_uid is the unique ID of the current entry’s content type, and tagsAsObject determines the format in which the edit tag would be added.
Note: The addEditableTags() method does not return any value. It only modifies the entry passed as the first argument to the method.
By default, tagsAsObject is set to false, and it appends data-cslp in the form of a string as follows:
'data-cslp=path.to.field'Note: This option is provided for React-based apps as you cannot directly add any attributes in string format. Instead, you need to destructure an object.
If tagsAsObject is set to true, the data-cslp attribute is returned in object format as follows:
{ 'data-cslp': 'path.to.field'}Here's a sample that shows how the code would look once you add the addEditableTags() method:
let entry = gqlRequest(request)
addEditableTags(entry[0][0], "content_type_uid", false)
When you use the addEditableTags() method, a new key-value pair is returned at every level in the existing entry schema. This pair is known as the edit tag and is denoted by a dollar sign ($).
For example, consider that you passed the following entry schema against the first parameter in the addEditableTags() method:
{
    "name": "John Doe",
    "description": {
        "occupation": [{
            "name": "Plumber",
            "since": 1920
        }],
        "height": "5ft"
    }
}
Once the addEditableTags() method is executed, the entry passed against the first parameter is updated as follows:
{ "name": "John Doe", "$": { "name": "profile.blt8tvsk328dbw258.en-us.name" }, "description": { "$": { "occupation": "profile.blt8tvsk328dbw258.en-us.description.occupation", "height": "profile.blt8tvsk328dbw258.en-us.description.height" }, "occupation": [{ "$": { "name": "profile.blt8tvsk328dbw258.en-us.description.occupation.name", "since": "profile.blt8tvsk328dbw258.en-us.description.occupation.since" }, "name": "Plumber", "since": 1920 }], "height": "5ft" } }- Set up the Live Preview Utils SDK
Live Preview requires the stack API key and host URL to perform appropriate redirection to the relevant stack.
ContentstackLivePreview.init({
    …
    enable: true,
    ssr: false,
    stackDetails: {
       apiKey: "your api key",
       environment: “your environment”,
   },
   clientUrlParams: {
              host: "app.contentstack.com",
   },
})
Here, the clientUrlParams key is optional and is set for the North America region.
For other Europe region, you can use the following configurations for clientUrlParams:.
{
   host: "eu-app.contentstack.com"
}
For Azure NA region, use the following config:
{
   host: "azure-na-app.contentstack.com"
}
For Azure EU region, use the following config:
{ host: "azure-eu-app.contentstack.com" } - Configure live edit tags for each webpage
Now, navigate to the section in your website's front-end HTML code where you need to pass the edit tags as attributes. To access an edit tag, fetch the path to a field in the entry and add a dollar sign ($) before the last field in the field depth hierarchy.
For example, if the path to your entry data is data.description.height, then the corresponding edit tag will be data.description.$.height.
Once you add the edit tag, content managers will be able to see the "Edit" icon whenever they hover over the corresponding content block on the website.
<header class="text-center">
    <div class="author">
        <img {{ data.author.profile_image.$.url }} src="{{ data.author.profile_image.url }}" alt="{{ data.author.title }}"/>
    </div>
    <h1 {{ data.author.$.title }}>{{ data.author.title }}</h1>
    <h2 class="author-job" {{ data.author.$.job_title }}>{{ data.author.job_title }}</h2>
    <p class="author-bio" {{ data.author.$.biography }}>{{ data.author.biography }}</p>
    <div class="author-social">
        <a href="mailto:{{ data.author.social.email }}"><ion-icon name="mail-outline"></ion-icon></a>
        <a href="https://www.twitter.com/{{ data.author.social.twitter }}"><ion-icon name="logo-twitter"></ion-icon></a>
        <a href="https://www.instagram.com/{{ data.author.social.instagram }}"><ion-icon name="logo-instagram"></ion-icon></a>
    </div>
</header>
For React-based applications, you can generate edit tags by setting the tagsAsObject parameter to true. When set to true, this parameter returns the edit tag in object format. You need to destructure the object while passing it within the JSX element.
Here is an example of an edit tag that is returned in object format:
<h1 {...data.$.name}>{data.name}</h1> <p> {...data.description.$.height}>{data.description.height}</p>Note: This setup only works for generic websites that use basic JavaScript frontend code. For websites working on other programming languages, you need to provide the entire path to the specific field.
- Add CSS to display edit buttons in the project
Note: This step is not required for Live Preview SDK version 2.0.0 and above.
The styles for the live edit tags are available in the @contentstack/live-preview-utils/dist/main.css file. You can import these styles in your Gatsby pages or your layout components as follows:
import "@contentstack/live-preview-utils/dist/main.css";Alternatively, you can directly import the CSS within the HTML using the following code:
<link rel="stylesheet" href="https://unpkg.com/@contentstack/live-preview-utils@1.4.3/dist/main.css">
Once you have configured the settings, you will be able to see the Edit icon whenever you hover over a content block in your preview panel.
- Process entry for live editing
More articles in "Set up with GraphQL"
