

Contentstack MCP Server
Note: This document is provided for informational purposes only. While the Contentstack MCP Server is available for internal experimentation and review, it is not yet a recommended or officially supported tool. Please proceed accordingly and consult the relevant teams if needed.
The Contentstack’s Model Context Protocol (MCP) Server acts as a bridge between Contentstack’s APIs, such as, Contentstack Delivery API, Contentstack Management API, Analytics API, Brand Kit API, Launch API, Lytics API, Personalize API, Developer Hub API, and AI systems. It implements the Model Context Protocol (MCP) to enable natural language-based content operations, making content workflows smarter and more conversational.
Key Capabilities
- Content Operations: Create, update, delete, publish, unpublish, or retrieve content via natural language commands.
- Analytics API Integration: Comprehensive usage analytics and monitoring capabilities including API usage, CDN usage, device statistics, URL tracking, status code monitoring, cache performance, and SDK usage insights.
- Analytics with Lytics: Classify content, manage audiences, and gain insights into engagement.
- Brand Kit Integration: Use AI to generate brand-consistent content with your voice profiles.
- Launch Deployment: Complete deployment platform integration with environment management, deploy hooks, deployments, and CDN cache revalidation for hosting Contentstack-powered websites.
- Personalize API Integration: Advanced personalization capabilities with audience segmentation, A/B testing, experience management, and analytics for optimizing user engagement.
- Developer Hub Integration: Complete Marketplace app lifecycle management with capabilities to create, update, delete, retrieve Marketplace apps, and manage app installations across stacks and organizations.
Additional Resource: To explore more about the key capabilities, go through the MCP Server document.
Prerequisites
Authenticate
To explore or test the MCP server, you must connect it with an MCP client, such as Claude or Cursor.
- Run the following command in the terminal or command prompt:
npx @contentstack/mcp --auth -y
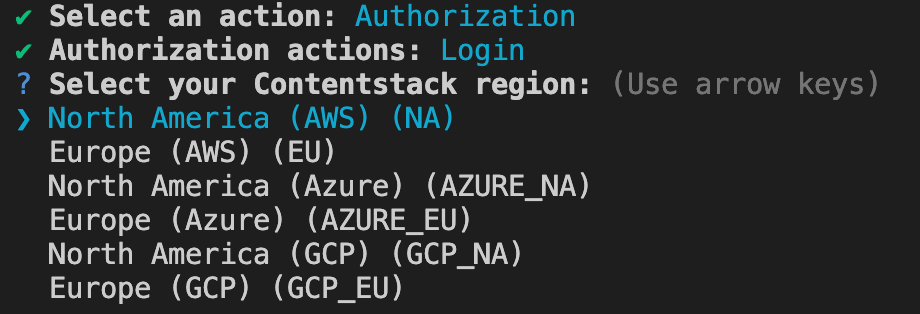
- Select Authorization action from the list.
- Select Login from the list of Authorization actions.
- Select your preferred Contentstack region. Here, we have selected the North America (AWS) (NA) region.
Note: This step is mandatory for accessing Content Management API (CMA), Analytics API, Brand Kit, Launch API, and Personalize API tools.
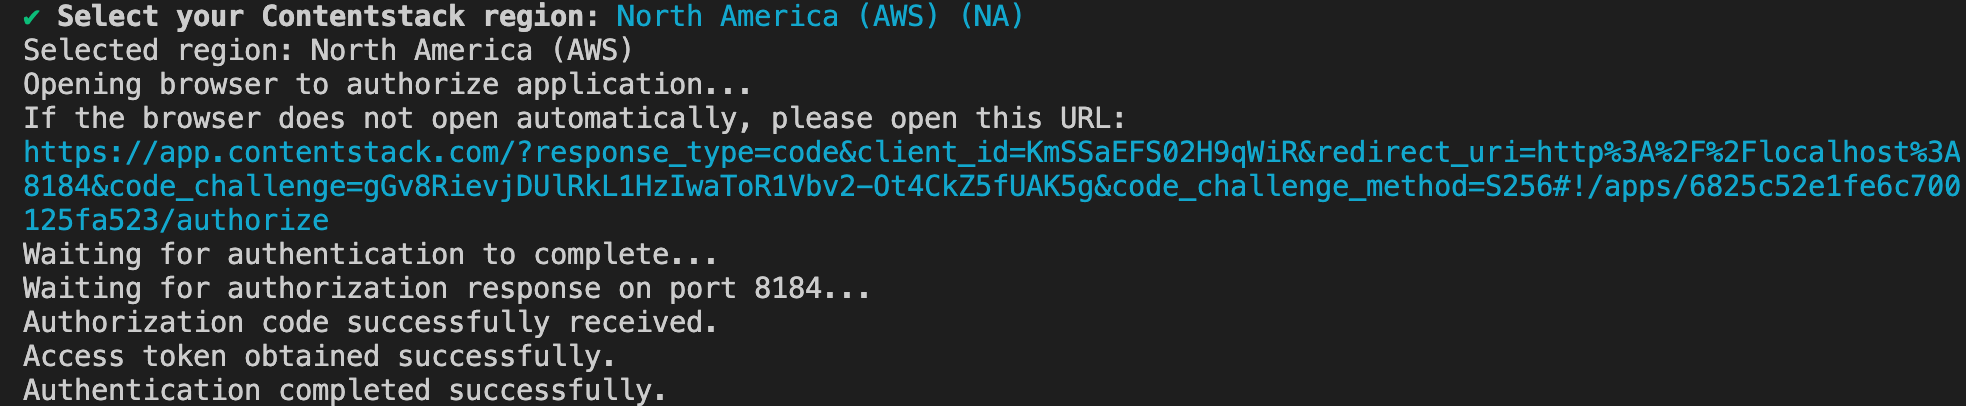
- You will be redirected to the browser to authenticate your Contentstack account. Select your Organization and authenticate your account.
Once done, you will get the success message as shown below:
Configure MCP Using Claude
After authentication, let’s see how to configure the MCP Server for the Claude client.
- Open Claude Desktop.
- Click the Claude icon in the top-left corner of the window.
- Select Settings from the dropdown menu.
- In the Settings pop-up, go to the Developer tab.
- Click the Edit Config button to open the claude_desktop_config.json file where you can update the Claude configuration based on your requirement.
Update your claude_desktop_config.json with the required values.
{
  "mcpServers": {
    "contentstack": {
      "command": "npx",
      "args": [
        "-y",
        "@contentstack/mcp"
      ],
      "env": {
        "CONTENTSTACK_API_KEY": "<your_stack_api_key>",
        "CONTENTSTACK_DELIVERY_TOKEN": "<your_delivery_token>",
        "CONTENTSTACK_BRAND_KIT_ID": "<your_brand_kit_id>",
        "CONTENTSTACK_LAUNCH_PROJECT_ID": "<your_launch_project_id>",
        "CONTENTSTACK_PERSONALIZE_PROJECT_ID": "<your_personalize_project_id>",
        "LYTICS_ACCESS_TOKEN": "<your_lytics_token>",
        "GROUPS": "<comma_separated_groups>"
      }
    }
  }
}
- CONTENTSTACK_DELIVERY_TOKEN: Only needed for delivery API tools (CDA).
- CONTENTSTACK_API_KEY: Required for all the tools except Data & Insights (Lytics).
- CONTENTSTACK_BRAND_KIT_ID: Required for Brand Kit related tools.
- LYTICS_ACCESS_TOKEN: Required for Data and Insights (Lytics) analytics tools.
- CONTENTSTACK_PERSONALIZE_PROJECT_ID: Required for Personalize tools.
- CONTENTSTACK_LAUNCH_PROJECT_ID: Required only for Launch tools.
- GROUPS: Specifies a comma-separated list of API groups to enable. Allowed values are cma (default), cda, analytics, brandkit, launch, Data and Insights (lytics), personalize, and all.
Let’s understand the GROUPS variable in detail.
The GROUPS environment variable is optional and controls which API tools are exposed by the MCP server.
- Default Behavior
If the GROUPS variable is not specified, the MCP server will default to exposing only the CMA tools.
- Enabling All Tools
To enable all 126 available tools, the user should set the environment variable as:
GROUPS: "all" - Enabling Specific Tool Groups
To enable a subset of specific API tool groups, users can define a comma-separated list (with no spaces) in the following format:
GROUPS: "cma,cda,launch"Accepted group names include cma, cda, launch, and others as required.
- Purpose of GROUPS
The GROUPS variable is used to validate and activate only the specified API tools during runtime. This helps streamline the toolset based on the application's needs and restricts unnecessary services from being exposed.
| Group | Authentication | Required Inputs |
| CMA | OAuth | Stack API Key |
| CDA | Token | Stack API Key and Delivery Token |
| Analytics | OAuth | Stack API Key |
| Brand Kit | OAuth | Stack API Key and Brand Kit ID |
| Launch | OAuth | Stack API Key and Launch Project ID |
| Lytics | Token | Lytics Access Token |
| Personalize | OAuth | Stack API Key and Personalize Project ID |
| Developer Hub | OAuth | Stack API Key |
Start the Server
Once configured, launch your client (for example, Claude Desktop or any MCP-compatible app), and the server will begin operating in the background.
Configure MCP Using Cursor
After authentication, let’s see how to configure the MCP Server for the Cursor client.
- Open Cursor Desktop.
- Click the Settings icon in the top-right corner of the window.
- From the left navigation panel, click the MCP section. Click the Add Custom MCP button. A JSON file will open.
- Paste the following code in the JSON file.
{
  "mcpServers": {
    "contentstack": {
      "command": "npx",
      "args": [
        "-y",
        "@contentstack/mcp"
      ],
      "env": {
        "CONTENTSTACK_API_KEY": "<your_stack_api_key>",
        "CONTENTSTACK_DELIVERY_TOKEN": "<your_delivery_token>",
        "CONTENTSTACK_BRAND_KIT_ID": "<your_brand_kit_id>",
        "CONTENTSTACK_LAUNCH_PROJECT_ID": "<your_launch_project_id>",
        "CONTENTSTACK_PERSONALIZE_PROJECT_ID": "<your_personalize_project_id>",
        "LYTICS_ACCESS_TOKEN": "<your_lytics_token>",
        "GROUPS": "<comma_separated_groups>"
      }
    }
  }
}
Once configured, save the file and the server will begin operating in the background. You will be able to perform all the operations using Cursor.
Go to the Chat interface and start interacting with the server.
Integration Scenarios
Some practical ways to use the MCP Server with various tools and environments.
- Claude Desktop: Configure it to route commands to the MCP server.
- Custom AI Agents: Connect to Claude, Cursor IDE, or custom LLMs.
Licensing
This tool is open-source under the MIT License. You are free to use and extend it as needed.
More articles in "More about Automate"
