

Building a Multi-Language Website Using Contentstack and Next.js i18n


Delivering content in a single language is no longer sufficient. Users expect personalized experiences that literally "speak their language" with cultural context or localization. Contentstack Community Author Mike Sullivan explores how to build a multilingual blog site using Contentstack and Next.js, a React framework that handles language-based routing out of the box. In this tutorial, Mike will connect Next.js and Contentstack to build a simple blog with support for multiple languages. By the end, you'll know how to build Next.js apps and use Contentstack effectively.
As we move into a more connected world where people around the world have access to content, products, and digital experiences, delivering content to your users in a single language is no longer enough. From startups to e-commerce, users expect a personalised experience that "speaks their language" literally.
Internationalization (i18n) refers to designing your application so it can easily adapt to different languages and regions (without requiring engineering changes). Localization (i10n), on the other hand, is the actual process of translating and adapting the content to a specific locale, this includes language, date formats, currencies, and even cultural nuances
Supporting multiple languages isn’t easy. From routing logic to keeping different languages in sync, it can be intricate and time consuming, unless of course you use the right tools.
In the following article you will learn how to build a multi-lingual blog site using Contentstack and Next.js (a React framework that handles language-based routing out of the box).
What is Contentstack
Contentstack is a DXP (Digital Experience Platform) that contains a CMS and suite of products for personalization, automations, and AI integrations. It enables you to save, manage, and deliver content via APIs without having it tightly coupled to a frontend. This allows you to quickly spin up a backend admin dashboard where you can manage your content and have it available via REST or GraphQL APIs. As that content lives independently from how it's displayed, you can choose whatever frontend technology you like. The data living independently also enables omnichannel delivery, so you can power multiple frontends (web, mobile, billboards).
Contentstack's localization features allow you to define multiple locales, manage translations within the same content structure, and deliver content dynamically based on user language or region.
What is Next.js
Next.js is a React framework for building fast and scalable web applications. It strives to make developing with React easier and adds essential features like server-side rendering (SSR), static site generation (SSG), file-based routing, API routes, automatic code splitting, and internationalization (i18n), all with minimal configuration. This makes it great for sites that require high performance, good SEO, and internationalization. Paired with a DXP like Contentstack, Next.js allows you to pull in structured content at build or request time, and render dynamic, localized pages with speed.
Multi-language website tutorial
The following tutorial will show you how to connect both Next.js and Contentstack to build a simple blog which has support for multiple languages. By the end of the tutorial you will know how to build Next.js apps and the basics of how to use Contentstack.
1. Project setup
Prerequisites
-
You will need to have Node v22 or greater installed on your computer
-
You will need to create a Contentstack account
-
Basic Next.js skills would be helpful, but not required.
Initializing your Next.js app
Before you create a stack in Contentstack to host your content, or configure nextjs i18n, you need to create a new Next.js app. If you would like to download the code here is the complete code repository. If you would like to follow along run the following command in the terminal in a directory of your choice:
npx create-next-app@latest my-contentstack-blog && cd my-contentstack-blog
Make sure to choose the following options during the setup wizard:
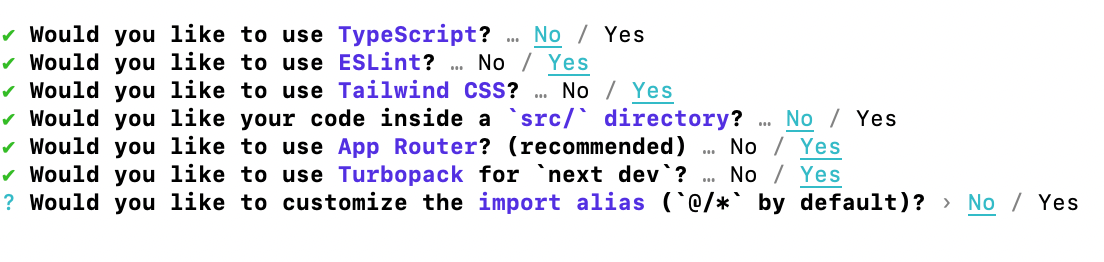
If you look at the file structure, the app folder is where all of the application's routes will live, and page.js is the current home page with some example content.
Setting up UI components
In the root of the project create a folder called components, this is where you'll store shared UI elements.
Next let's create a couple of simple UI components for the blog, create a Header component in the components folder with the following code:
Now replace the code in page.js:
Previewing the Home page
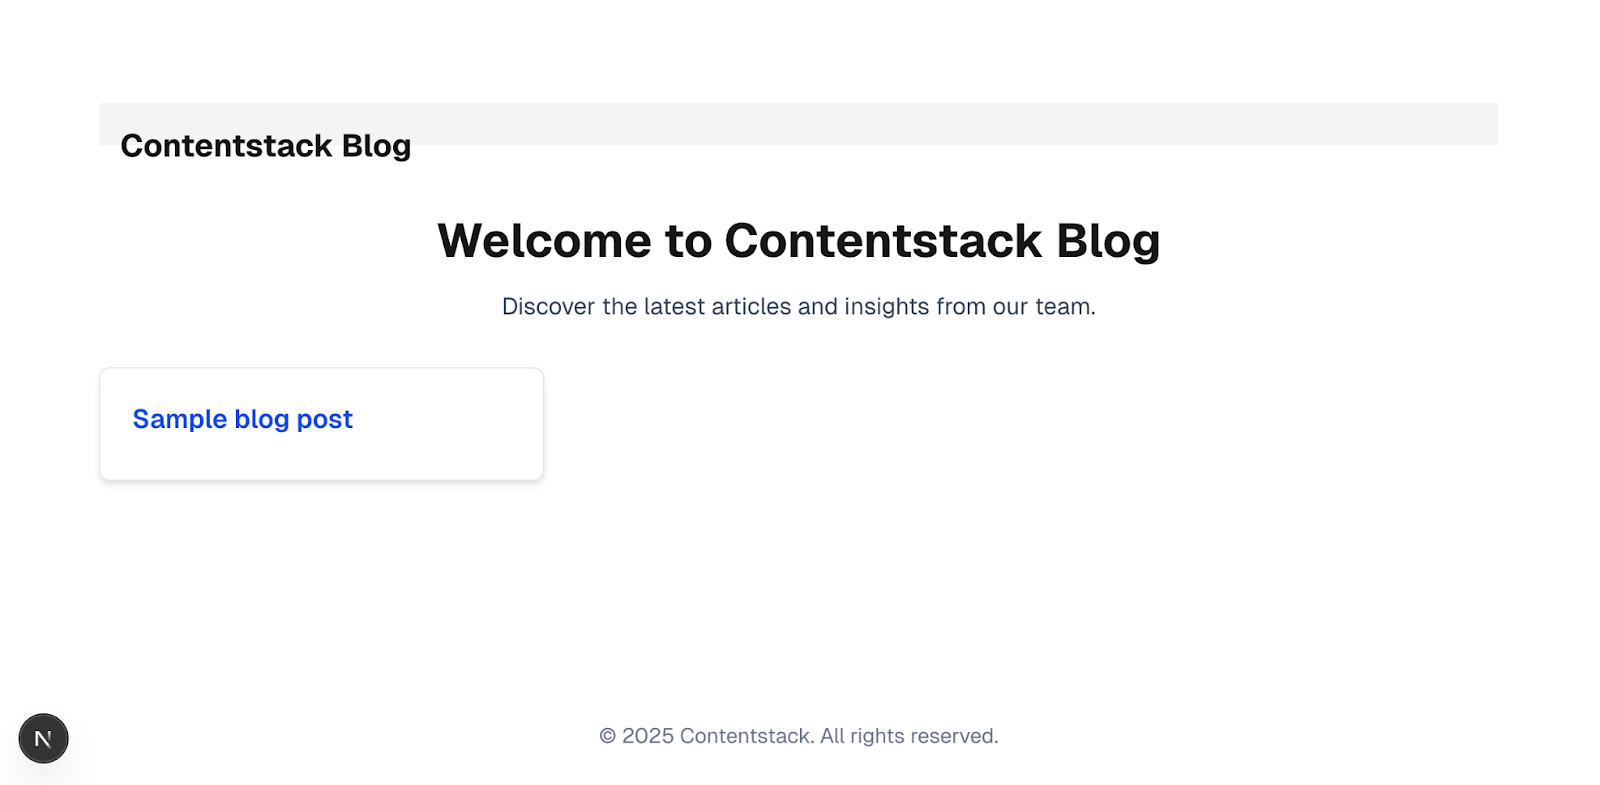
The above code just serves as a home page to display the header and the articles once we have them delivered from Contentstack, if you run npm run dev and visit http://localhost:3000/ you should be able to view the home page as below:
2. Configuring localization in Contentstack
Creating a new stack
Once you have created an account with Contentstack you should be presented with a dashboard as below:

From this dashboard you can create a new stack which acts as a project space to hold all of your content types, entries, and localization settings.
Enabling multiple languages
Once you have created your stack and given it a name, click settings in the bottom left corner, then choose Languages and select Spanish.
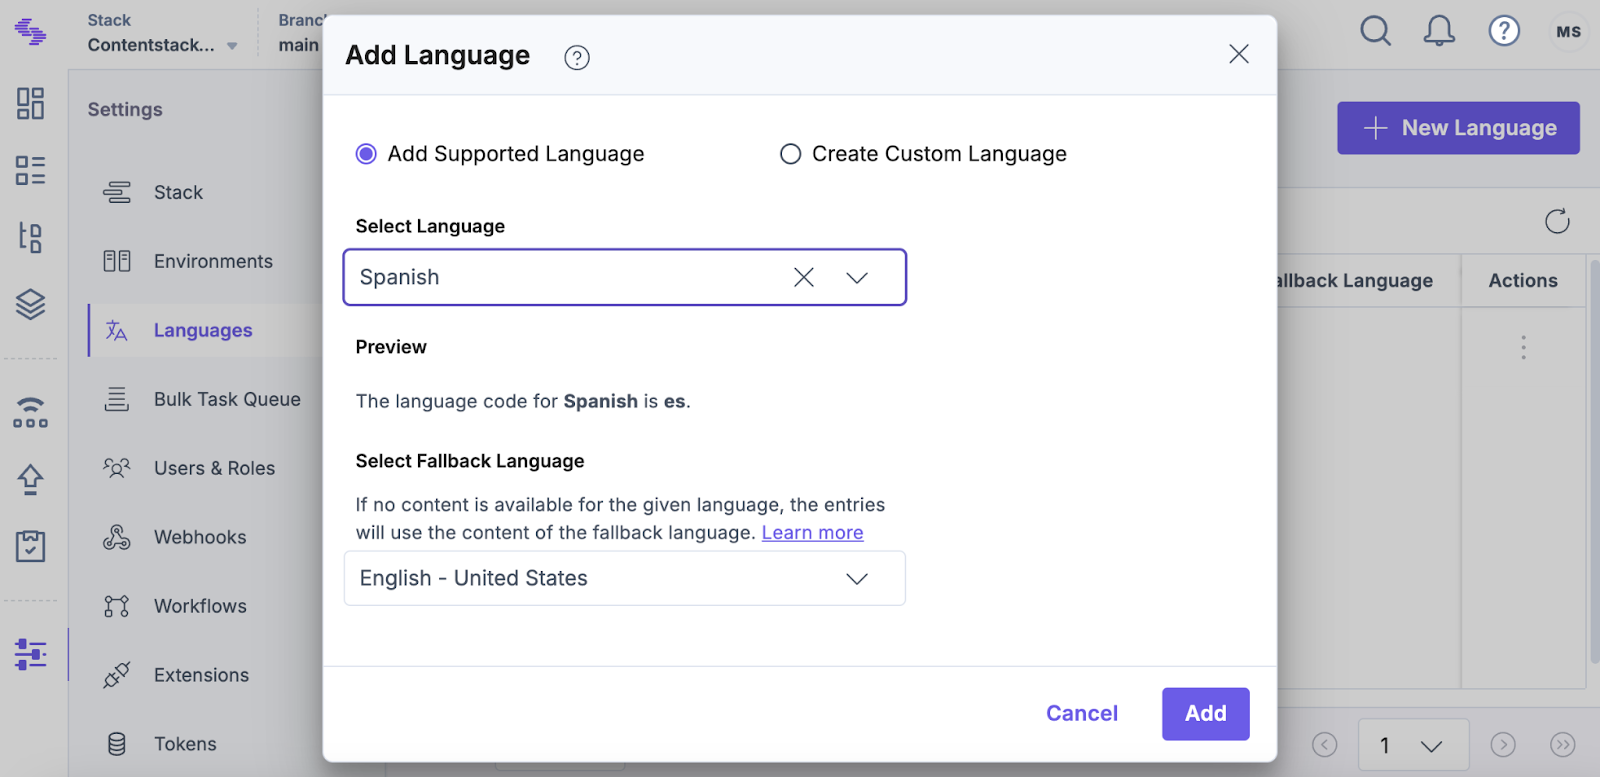
Click to add, and your language dashboard should now have two languages, English and Spanish (with fallback language set to English)
Creating an Environment
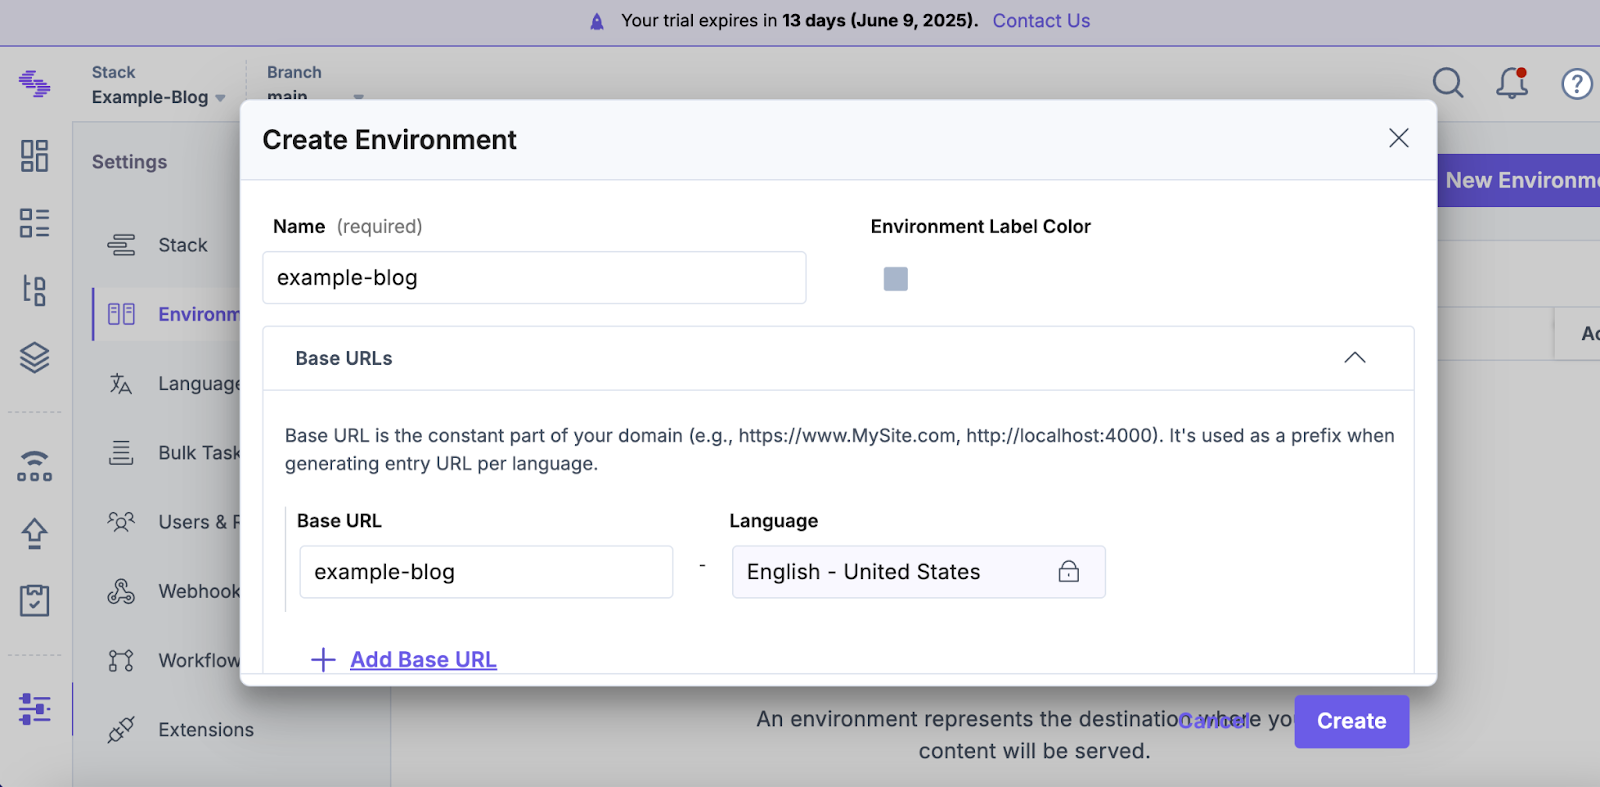
To publish content on Contentstack you will need to create an environment, so click Environments from the side menu, and create a new one named example-blog:
Now that you have enabled multiple languages and created an environment to publish content to, it's time to create a content type so you can add information to the database.
3. Defining content types and add entries
Creating content types
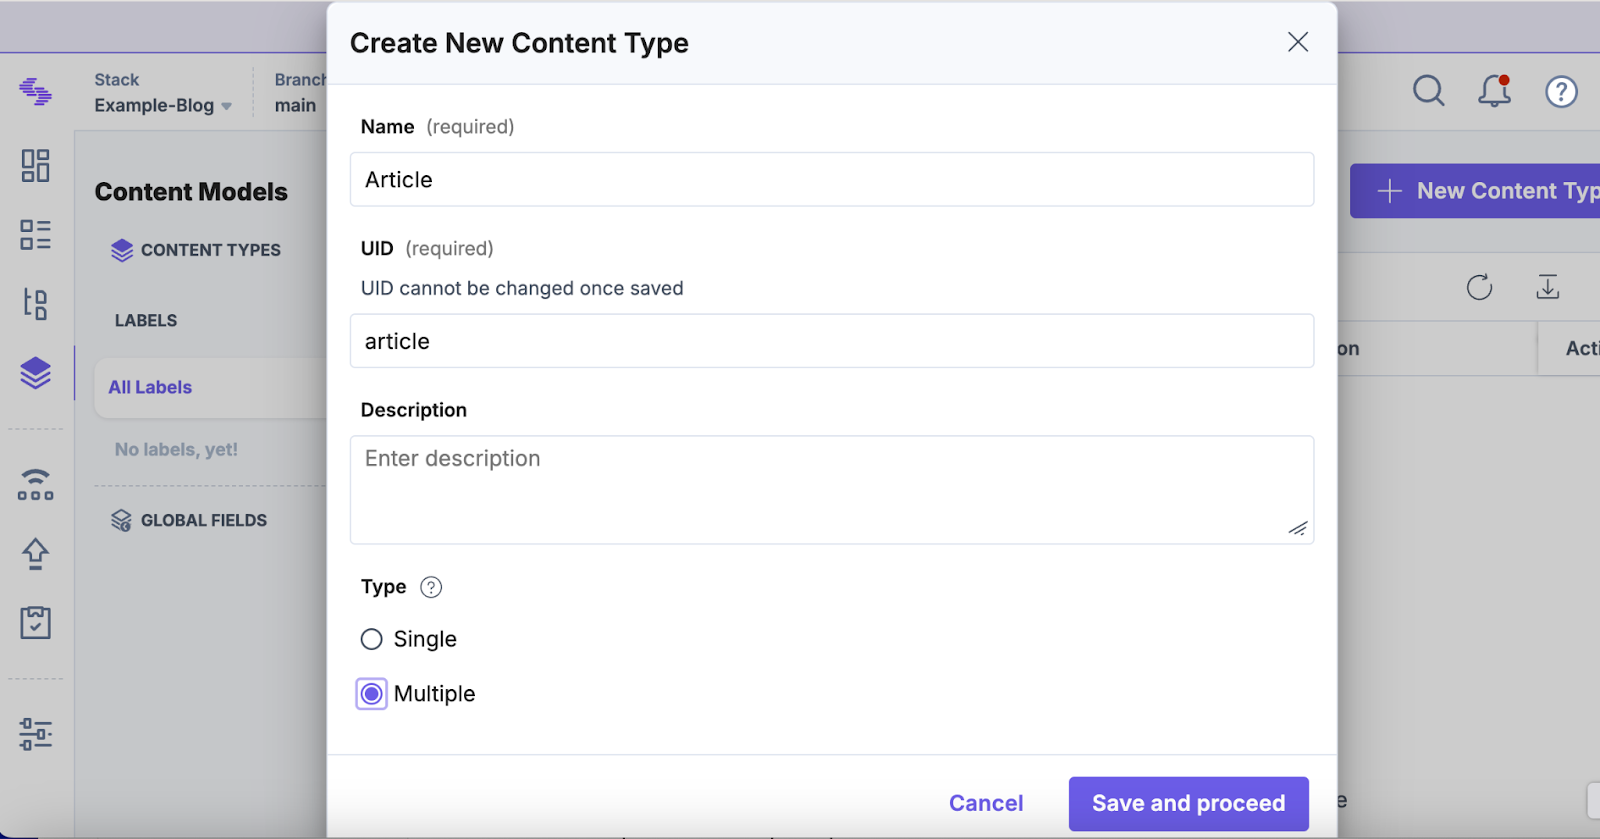
To be able to save information to the database, you will need to create a content type which provides a schema that describes the shape of your content. To create an Article content type select Content models from the left hand side menu, then click New content type in the top right hand corner, This will open up a modal where you can enter the name of the content type and make sure to select Multiple for type as this type is for a blog post so we want to be able to create multiple instances:
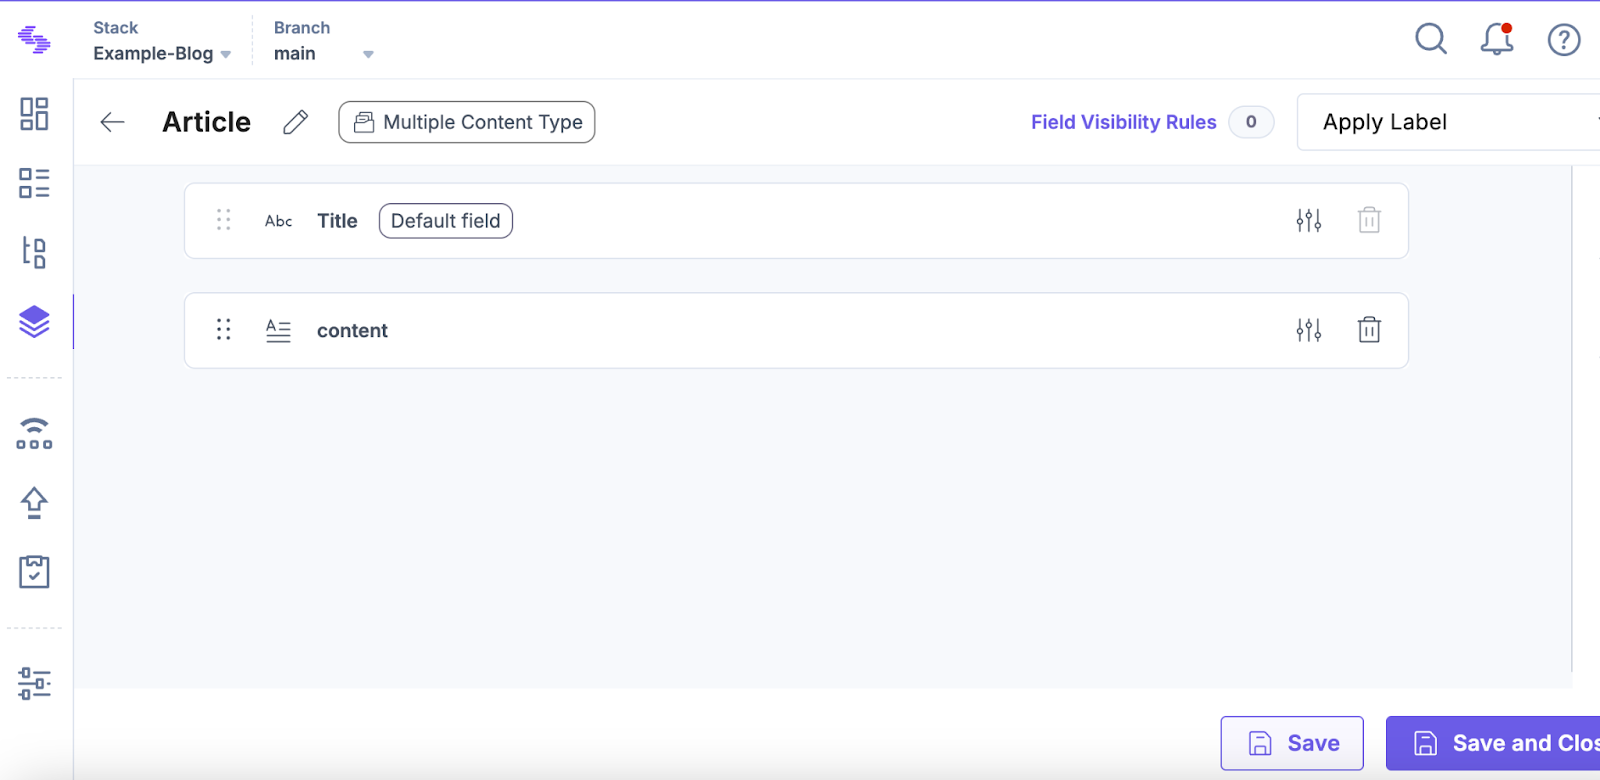
Click Save and proceed to move on to the next screen where you can click to add fields to your model, you will see that the model comes with a default field of title and we will just add a multi line textbox field called content, click to save and close. With the content model made it's time to add some sample entries in different languages.
Adding sample entries in multiple languages
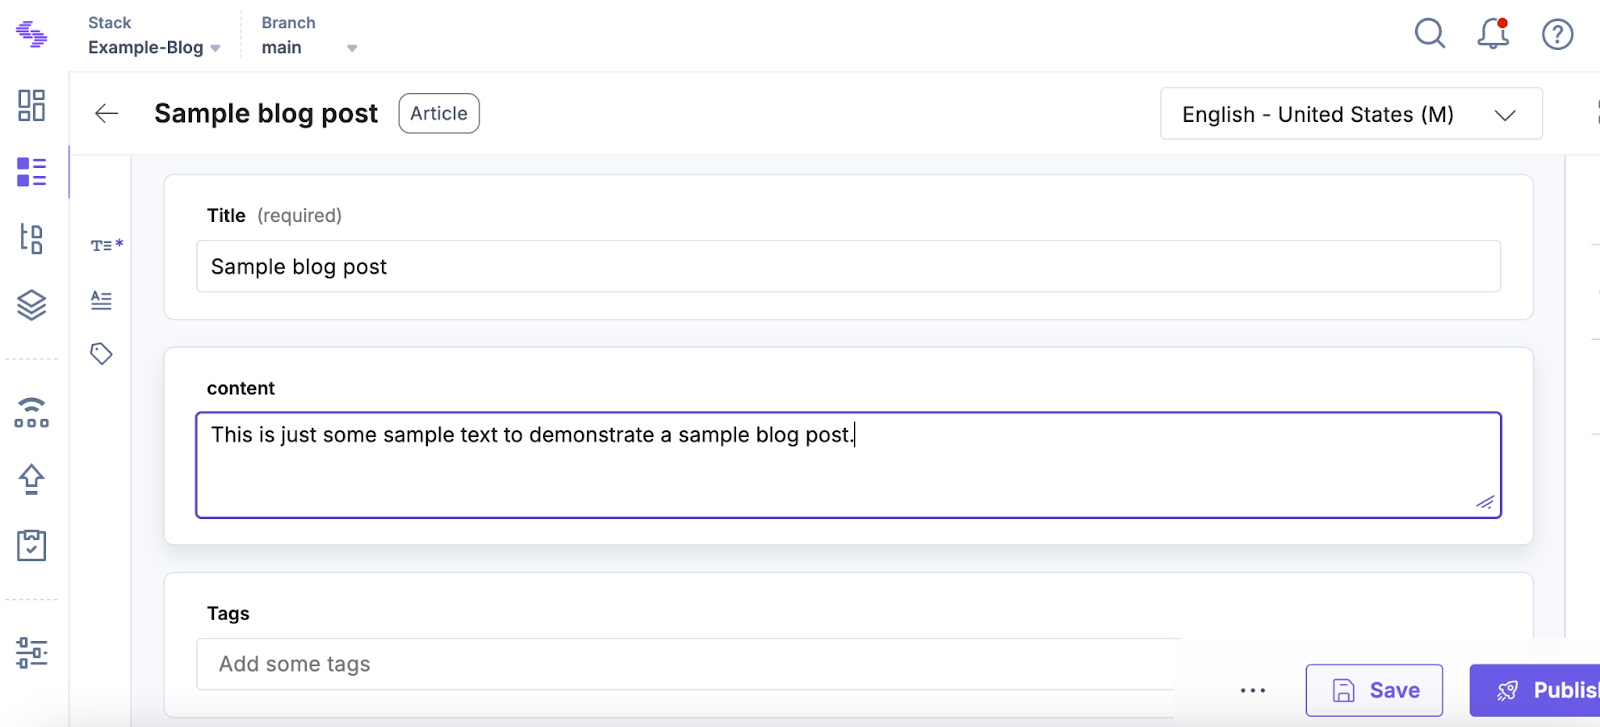
Click to navigate to Entries from the left hand side menu, then select New entry from the top right. Now proceed to create a blog post in the default language, enter a title and some content.
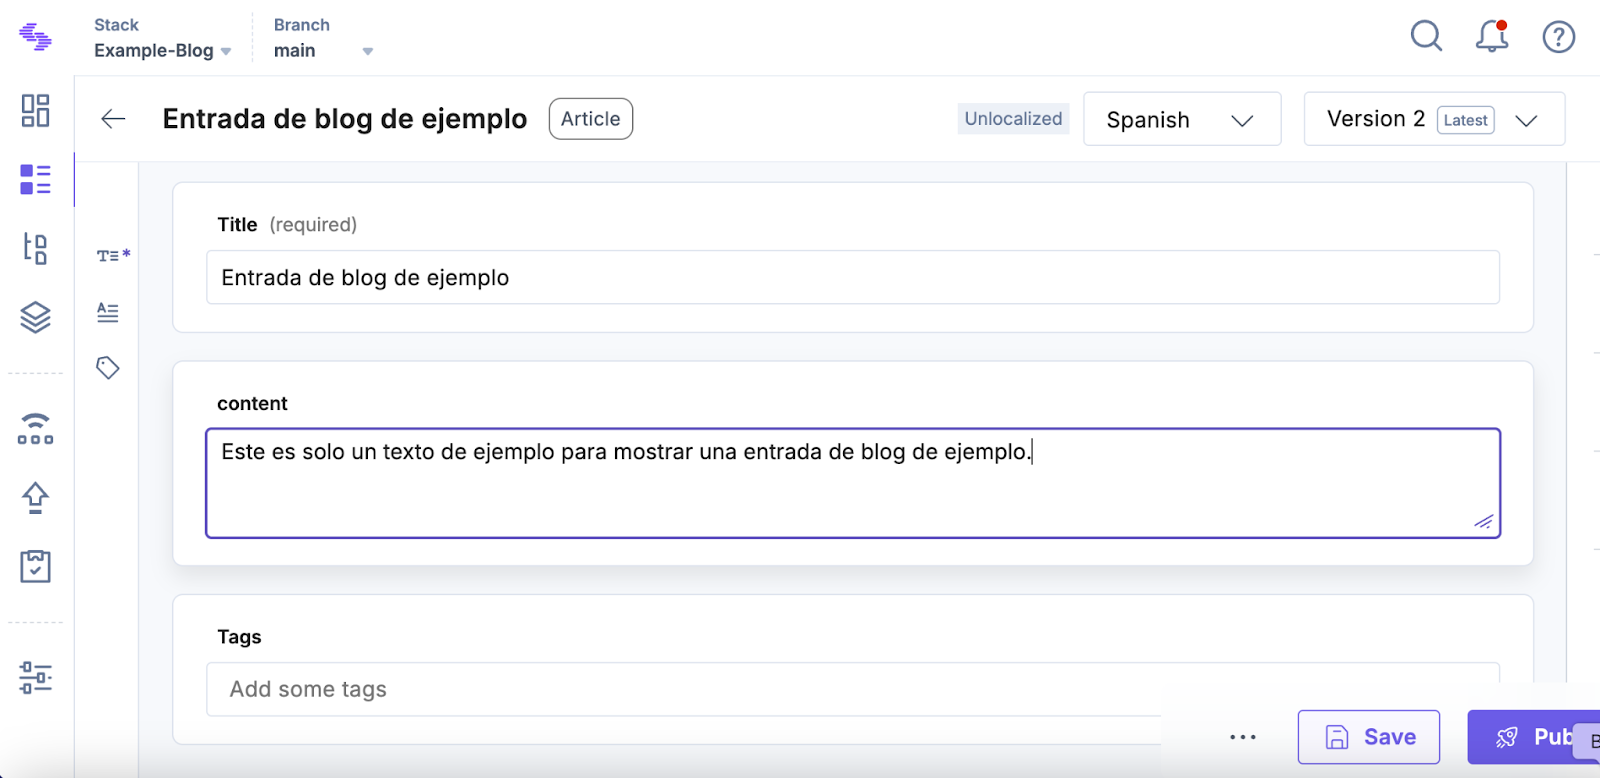
Now you can select the language from the dropdown menu above to add some content for the Spanish version:
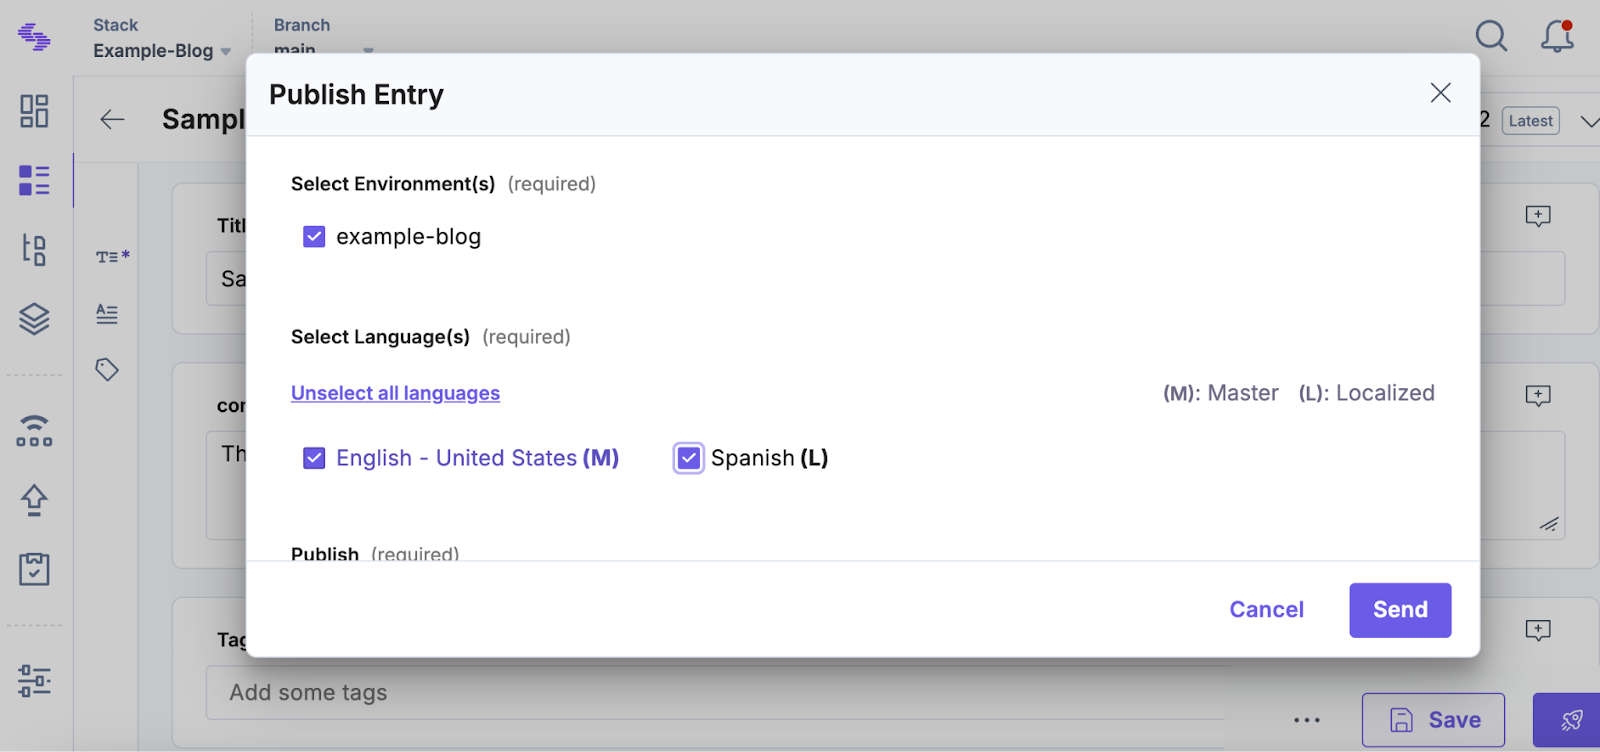
Click to save and then agree to localize the entry, once localized click to publish, select all languages and then click send to confirm the publication.
Now the API is set up ready to be called with some example content which has been localized, let's move back to Next.js to set up localized routing.
4. Setting up i18n in Next.js
Using App router for localization
We will use the app router strategy which allows you to easily create different locales with the folder structure of the app, in the app directory create a new directory called [lng], this represents the users language en/es, and will be used to route requests. Move the already existing home page called page.tsx inside of the [lng] directory, and also create a [blogId]/page.tsx to display each article, so the folder structure will look like this:
- 📁 app/
  - 📁 [lng]/
    - 📄 page.tsx
    - 📁  [blogId]/
      - 📄 page.tsx
5. Connecting Contentstack with Next.js
When connecting to Contentstack you have two main options, you can connect with their javascript SDK, this is good for quick setup and gives a clean JS API, or you can use the REST API directly, this is good if you prefer to use fetch or want more control. For the following we will assume you're using the JavaScript SDK.
Installing and configure SDK
First you will need to install and set the SDK up:
npm install contentstack
Now create a lib directory in the root of your project and create a contentstack.js file inside with the following code to initiate the SDK:
Make sure to create a env file and add those credentials, you can find information on how to get the API_KEY and CONTENTSTACK_DELIVERY_TOKEN here.
Handling locale mapping
Because Next picks up ISO 639-1 language codes ("en", "es" etc), we need to create a mapper just so we pass the correct country codes to Contentstack (which requires full country codes):
export function toContentstackLocale(locale) {
  return locale === "en" ? "en-us" : locale;
}
This will just return "en-us" for "en" and ISO 639-1 codes for the rest, which is sufficient for this example.
6. Fetching and display content
Now in the same directory you can create a helper function called fetchArticles to fetch the articles from Contentstack, notice we pass in the locale so we fetch the correct localized content:
Implementing middleware for language detection
To make the site more user friendly we will also want to detect the users language settings and redirect them to the correct version of the site. You can do this by using a Next middleware function, which will intercept the code before anything is rendered. Create a file in the root of your project called middleware.js with the following code:
This uses the helper function we created earlier to get all articles passing in the locale from params, and then renders them out as styled links using a map function. The links will route to the route [lng][blogId] which we pass in with the locale from params and the uid from Contentstack.
Now if you visit http://localhost:3000/en it should render the home page as below:
7. Creating Article pages
To enable the functionality to click on the blog post and be redirected we first need to create another helper function. Create a helper function file called fetchSingleArticle with the following code:
This function takes the articleId and the locale and fetches the correct article from Contentstack.
Building the blog post page
Now update the code in [blogId]/page.js to the following which uses the helper function to render the content:
8. Preview and test application
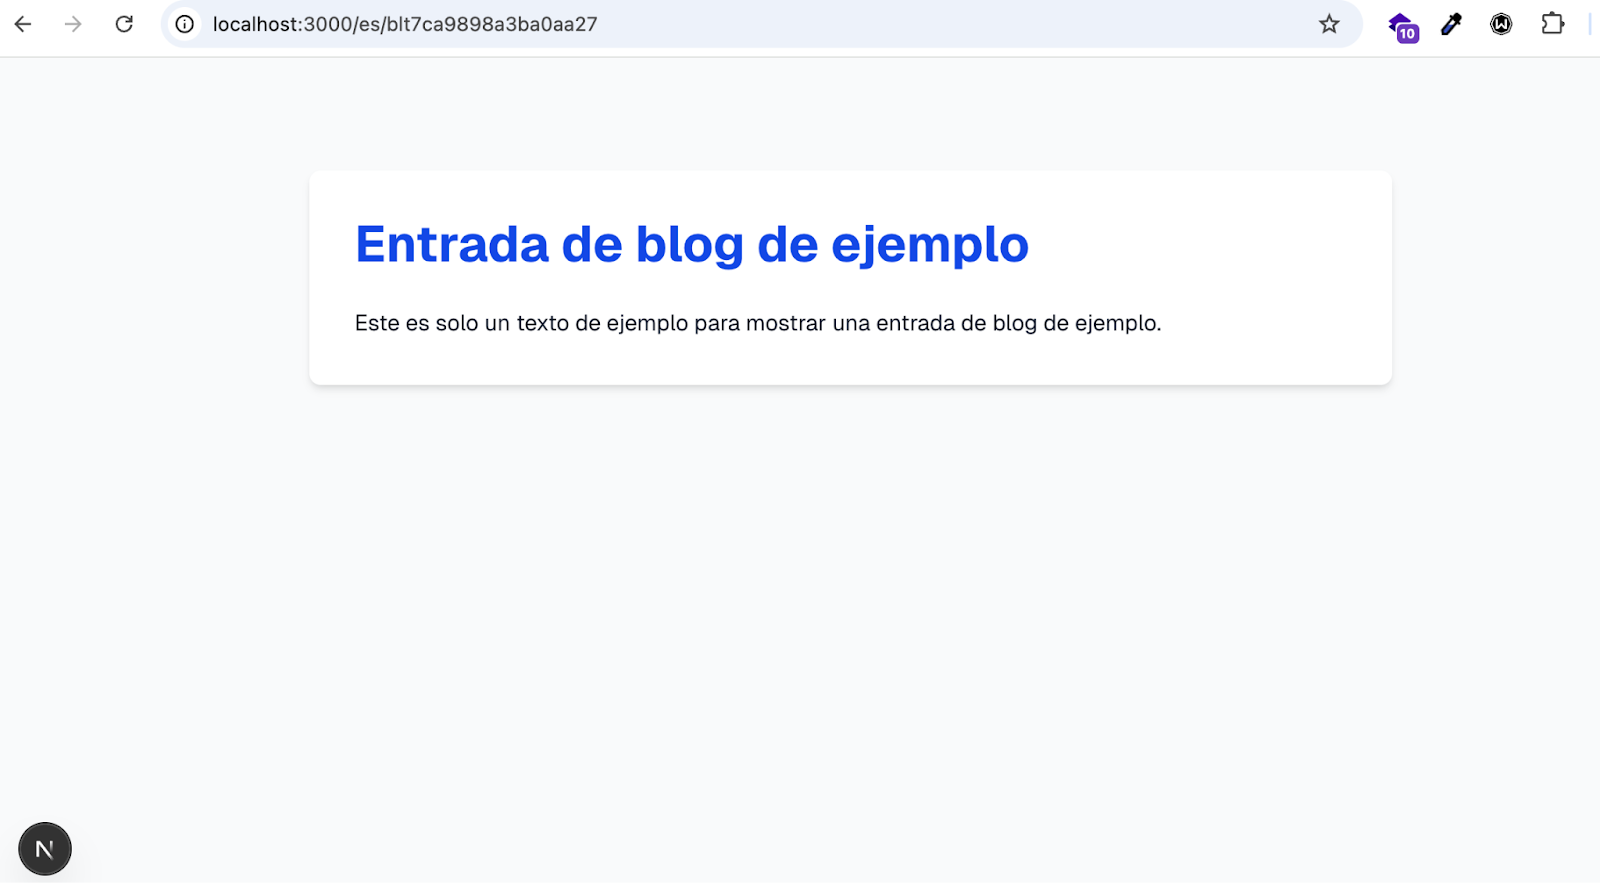
Now finally all of the pieces have been put together, you should be able to see that if you change the language code in the url that the correct content is fetched from Contentstack:
If you click to read an article it should fetch the one you clicked on with the correct locale:
To recap, you have built a stripped back example of a multilingual blog, you learned how to use Contentstack to create a stack with content types, and also how to localize the content you create. You set up internationalised routing with the App router, and you fetched localized content from Contentstack with the JavaScript SDK. This has set you up with a scalable foundation for building localized, content-driven websites.
Tips and best practices
The following are a few tips and tricks to help keep your multilingual website performing well and bug free:
Use fallback languages
If there isn't any content available in a user's preferred locale, use a fallback (e.g. English) that just prevents empty pages or errors for your users. Contentstack has you covered; as if you request a language you don't have content for, it will fallback to the default you set in the platform.
Handle untranslated content clearly
Consider flagging any untranslated content entries in the CMS so content editors know which locales are incomplete. In the frontend you could show a message like "This content is not yet available in your language"
Structure content types for reusability
Use modular fields (e.g. references, modular blocks) in Contentstack so you can avoid duplicating layout logic across locales, and only translate the actual content (not rebuild the structure).
SEO for localized routes
To improve SEO, make sure that your Next.js routes reflect the locale (/en/article1, /es/article1). It’s also important that you help search engines understand what language or regional version of a page it needs to serve to users. You can do this by including the hreflang HTML tag which tells search engines the language and optional geographical target of a page. This will ensure that users see the correct version of a page based on their language and location.
Contentstack + Next.js = powerful multi-lingual applications
As demonstrated, using Contentstack with Next.js gives you a powerful combination which remains flexible, for building dynamic, multi-language applications with Next.js i18n. With Contentstack you can easily structure and localize content, fetch it by locale over a high speed CDN, and render pages with high performance and SEO in mind using features like static site generation and internationalised routing.
This combination of technologies empowers global teams and content editors to manage content independently of the frontend, making it easier to scale and adapt to new markets, delivering consistent experiences across all languages.
About Contentstack
The Contentstack team comprises highly skilled professionals specializing in product marketing, customer acquisition and retention, and digital marketing strategy. With extensive experience holding senior positions at renowned technology companies across Fortune 500, mid-size, and start-up sectors, our team offers impactful solutions based on diverse backgrounds and extensive industry knowledge.
Contentstack is on a mission to deliver the world’s best digital experiences through a fusion of cutting-edge content management, customer data, personalization, and AI technology. Iconic brands, such as AirFrance KLM, ASICS, Burberry, Mattel, Mitsubishi, and Walmart, depend on the platform to rise above the noise in today's crowded digital markets and gain their competitive edge.
In January 2025, Contentstack proudly secured its first-ever position as a Visionary in the 2025 Gartner® Magic Quadrant™ for Digital Experience Platforms (DXP). Further solidifying its prominent standing, Contentstack was recognized as a Leader in the Forrester Research, Inc. March 2025 report, “The Forrester Wave™: Content Management Systems (CMS), Q1 2025.” Contentstack was the only pure headless provider named as a Leader in the report, which evaluated 13 top CMS providers on 19 criteria for current offering and strategy.
Follow Contentstack on LinkedIn.

Recommended posts


