

Setup Next.js Website with Personalize - Launch
This guide will help you set up your Next.js website with Personalize, hosted on Launch.
Prerequisites
- Next.js website on the latest version (14 and above) with app router
- Website content sourced from a Stack
- Website deployed on Launch
- Personalize project created and connected to the Stack
Steps for Execution
- Get Personalized project UID
- Proxy requests with Launch
- Fetch variant content from the origin
- Set up attributes and trigger events
Get Personalize Project UID
To retrieve the project UID, log in to your Contentstack account and perform the steps given below:
Navigate to Personalize and select your preferred project.
Click the Settings icon in the left navigation panel.
In the General tab, under Project Details, you will find the 24-character project UID.
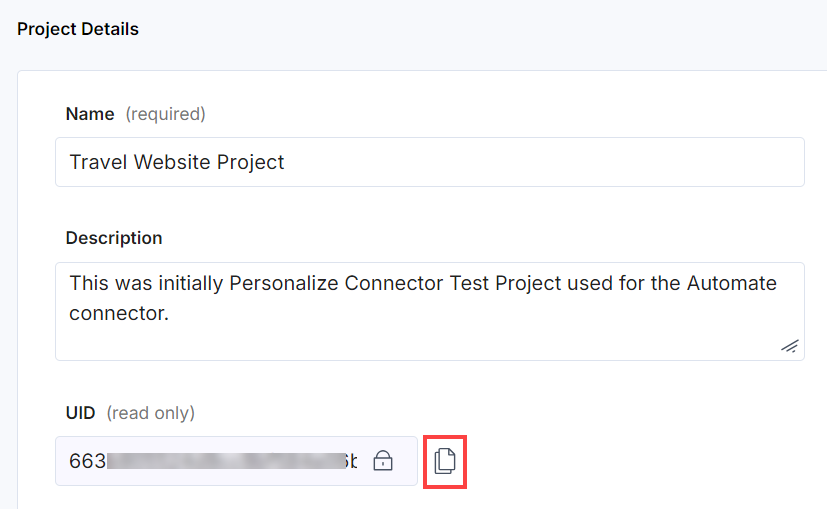
Click the Copy icon to copy the project UID to your clipboard. We will need this UID while setting up the Personalize Edge SDK in the next step.
Proxy Requests with Launch Edge Proxy
Launch Edge Proxy allows you to execute your code in proximity to your user’s location before a request is processed. Using this feature, we can make a call to the Personalize Edge API and fetch the User Manifest for each visitor. The User Manifest contains the selected Variant for each Experience. We can then pass these variants as the URL query parameters.
We would use the Launch Edge Proxy, since the Next.js Middleware executes on the server side and not in the Edge when hosted on Launch.
Install the Personalize SDK
To install the Personalize Edge SDK in your Next.js project:
$ npm install @contentstack/personalize-edge-sdk
Additional Resource: The API Reference for the SDK contains a lot of information on how to use the SDK.
Create the Edge Function Handler
The [proxy].edge.js is to be created in the /functions/ folder inside your website source code. To create the Edge Function Handler:
// [proxy].edge.js
export default async function handler(request, context) {
  return fetch(request);
}
The Edge Function Handler will now allow you to proxy all requests.
Initialize the SDK
Now modify the [proxy].edge.js file with the following code to initialize the Personalize Edge SDK:
import Personalize from '@contentstack/personalize-edge-sdk';

export default async function handler(request, context) {
  // set a custom edge API URL
  if (context.env.NEXT_PUBLIC_CONTENTSTACK_PERSONALIZE_EDGE_API_URL) {
    Personalize.setEdgeApiUrl(context.env.NEXT_PUBLIC_CONTENTSTACK_PERSONALIZE_EDGE_API_URL);
  }

  // Initialize the SDK and pass the request as well
  const personalizeSdk = await Personalize.init(context.env.NEXT_PUBLIC_CONTENTSTACK_PERSONALIZE_PROJECT_UID, {
    request,
  });
  return fetch(request);
}
Here, we initialize and get an instance of the Personalize Edge SDK. Notice how we are passing the request object along. As part of the initialization process, the user context is extracted from the request object and used to fetch the User Manifest from the Personalize Edge API. The Manifest provides a list of variants selected in each published experience.
Note: You can also provide a different Edge API URL in case you are on a different Contentstack region. Here are the Edge API URLs for each region:
- AWS NA: https://personalize-edge.contentstack.com
- AWS EU: https://eu-personalize-edge.contentstack.com
- Azure NA: https://azure-na-personalize-edge.contentstack.com
- Azure EU: https://azure-eu-personalize-edge.contentstack.com
- GCP NA: https://gcp-na-personalize-edge.contentstack.com
- AWS AU: https://au-personalize-edge.contentstack.com
Pass the variant parameter in the URL
Now add the following code to the [proxy].edge.js file to pass the variant parameter in the URL:
import Personalize from '@contentstack/personalize-edge-sdk';

export default async function handler(request, context) {
  const parsedUrl = new URL(request.url);
  if (context.env.NEXT_PUBLIC_CONTENTSTACK_PERSONALIZE_EDGE_API_URL) {
    Personalize.setEdgeApiUrl(context.env.NEXT_PUBLIC_CONTENTSTACK_PERSONALIZE_EDGE_API_URL);
  }

  const personalizeSdk = const Personalize.init(context.env.NEXT_PUBLIC_CONTENTSTACK_PERSONALIZE_PROJECT_UID, {
    request,
  });

  // get the variant parameter from the SDK
  const variantParam = personalizeSdk.getVariantParam();
  // set the variant parameter as a query param in the URL
  parsedUrl.searchParams.set(personalizeSdk.VARIANT_QUERY_PARAM, variantParam);

  // rewrite the request with the modified URL
  const modifiedRequest = new Request(parsedUrl.toString(), request);
  const response = await fetch(modifiedRequest);

  return response;
}
We are passing the variants we receive from the SDK into a query parameter personalize_variants as defined by personalizeSdk.VARIANT_QUERY_PARAM. We then make a request to the Next.js app with the modified URL. Essentially, we are rewriting the URL with the modified query parameter (here the website user does not know about the changed URL).
For e.g. if we have a URL as follows: /rewards, we’re rewriting it to /rewards?personalize_variants=0_0,1_0 here 0_0,1_0 is the variant parameter which is the combination of the Experience Short UID mapped to the selected Variant Short UID.
We use the short uids here to optimize the URL length which has a limit.
Add Response Context
Now add the following code to the [proxy].edge.js file to add the response context:
import Personalize from '@contentstack/personalize-edge-sdk';

export default async function handler(request, context) {
  const parsedUrl = new URL(request.url);

  if (context.env.NEXT_PUBLIC_CONTENTSTACK_PERSONALIZE_EDGE_API_URL) {
    Personalize.setEdgeApiUrl(context.env.NEXT_PUBLIC_CONTENTSTACK_PERSONALIZE_EDGE_API_URL);
  }

  const personalizeSdk = await Personalize.init(context.env.NEXT_PUBLIC_CONTENTSTACK_PERSONALIZE_PROJECT_UID, {
    request,
  });

  const variantParam = personalizeSdk.getVariantParam();
  parsedUrl.searchParams.set(Personalize.VARIANT_QUERY_PARAM, variantParam);

  const modifiedRequest = new Request(parsedUrl.toString(), request);
  const response = await fetch(modifiedRequest);

  const modifiedResponse = new Response(response.body, response);
  // add cookies to the response
  await personalizeSdk.addStateToResponse(modifiedResponse);
  // ensure that the response is not cached on the browser
  modifiedResponse.headers.set('cache-control', 'no-store');

  return modifiedResponse;
}
The Personalize Edge SDK needs to identify the visitor on the next request. To achieve this, the SDK sets two cookies on the response, with one for the user UID and another for the current state of the manifest. Here, we use addStateToResponse() method to modify the response object and add those cookies before returning it.
Exclude Asset Calls
We do not need to invoke the proxy logic for Next.js asset calls. By adding a quick check at the start of our edge function, we’re able to exclude them and only include page requests for processing in the edge function, achieving better performance.
import Personalize from '@contentstack/personalize-edge-sdk';

export default async function handler(request, context) {
  const parsedUrl = new URL(request.url);
  const pathname = parsedUrl.pathname;

  // exclude Next.js asset calls so that only page requests are processed
  if (['_next', 'favicon.ico'].some((path) => pathname.includes(path))) {
    return fetch(request);
  }

  // set a custom edge API URL
  if (context.env.NEXT_PUBLIC_CONTENTSTACK_PERSONALIZE_EDGE_API_URL) {
    Personalize.setEdgeApiUrl(context.env.NEXT_PUBLIC_CONTENTSTACK_PERSONALIZE_EDGE_API_URL);
  }

  // Initialize the SDK and pass the request as well
  const personalizeSdk =  await Personalize.init(context.env.NEXT_PUBLIC_CONTENTSTACK_PERSONALIZE_PROJECT_UID, {
    request,
  });

   // get the variant parameter from the SDK
  const variantParam = personalizeSdk.getVariantParam();
  // set the variant parameter as a query param in the URL
  parsedUrl.searchParams.set(personalizeSdk.VARIANT_QUERY_PARAM, variantParam);

  // rewrite the request with the modified URL
  const modifiedRequest = new Request(parsedUrl.toString(), request);
  const response = await fetch(modifiedRequest);

  const modifiedResponse = new Response(response.body, response);
  // add cookies to the response
  await personalizeSdk.addStateToResponse(modifiedResponse);
  // ensure that the response is not cached on the browser
  modifiedResponse.headers.set('cache-control', 'no-store');

  return modifiedResponse;
}
We now have the Launch Edge Function ready to go. Next, we’ll look at leveraging the variant parameter passed in the URL.
Reference Project
You can refer to the following project for a reference implementation: Next.js example GitHub repository and find it hosted here: https://personalize-demo.contentstackapps.com
Fetch Variant Content from the Origin
The final step is to fetch the variant content using the variant parameter passed in the URL. This step needs to be performed for all the pages that need Personalize enabled.
Move to Server Side Rendering (SSR) + Cache Headers
Launch uses cache headers to cache content with SSR, hence we need to change our Next.js rendering mode to SSR. This is because we want to execute backend logic to render uncached requests, so that the right variants can be rendered for each unique request.
Please follow the Launch documentation steps to move to SSR and cache headers here. Essentially, this step involves force rendering the page on the server side and setting the appropriate cache headers.
The cache headers recommended in the above documentation can be tweaked for our personalized setup. We need to replace stale-while-revalidate with must-revalidate in the example code, to ensure that the personalized page is available immediately as the user navigates the website.
Fetch Personalized Variants from the CMS
Here, we modify the Homepage (/app/page.ts) to fetch Personalized variants from the CMS. Similarly, add the code to the other pages of your website source code.
import Personalize from '@contentstack/personalize-edge-sdk';
import contentstack from '@contentstack/delivery-sdk';

const Page = async ({
  searchParams,
}: {
  searchParams: Record<string, string>;
}) => {
  // extract the variant parameter from the URL
  let variantParam = decodeURIComponent(
    searchParams[Personalize.VARIANT_QUERY_PARAM]
  );
  // initialize the CMS Delivery SDK
  const stack = contentstack.stack({
    apiKey: process.env.NEXT_PUBLIC_CONTENTSTACK_API_KEY,
    deliveryToken: process.env.NEXT_PUBLIC_CONTENTSTACK_DELIVERY_TOKEN,
    environment: process.env.NEXT_PUBLIC_CONTENTSTACK_ENVIRONMENT,
    host: process.env.CONTENTSTACK_DELIVERY_API_HOST,
  });
  // the call to fetch a specific entry
  const entryCall = stack
    .contentType(process.env.NEXT_PUBLIC_CONTENTSTACK_HOMEPAGE_CONTENTTYPE_UID)
    .entry(process.env.NEXT_PUBLIC_CONTENTSTACK_HOMEPAGE_ENTRY_UID);
  let entry;
  if (variantParam) {
    // convert the variant parameter to variant aliases
    const variantAlias = Personalize.variantParamToVariantAliases(variantParam).join(',');
    // pass the variant aliases when fetching the entry
    entry = await entryCall.variants(variantAlias).fetch();
  } else {
    // fetch the entry without the variant aliases
    entry = await entryCall.fetch();
  }
  // render the page with the entry
};
The above example shows how to fetch an entry variant instead of the base entry when variants are passed in the URL. We are converting the variant parameter passed in the URL to variant aliases used in the SDK.
Note: Optionally, if you want to enable Live Preview for your Personalize project, follow the steps in the Get Started with TypeScript Delivery SDK and Live Preview guide.
Set Up Attributes and Trigger Events
Setting attributes and triggering events can be done in the following ways:
Integrating with a CDP
Using Google Tag Manager
Using the SDK in the code (JavaScript Personalize Edge SDK)
Below we have elaborated on the third approach.
Initialize the SDK
You can create a personalized React Context to initialize the SDK as follows:
Note: For this step, we have placed the file in /components/context/ but you can choose to place this wherever appropriate.
//components/context/PersonalizeContext.ts

'use client';
import Personalize from '@contentstack/personalize-edge-sdk';
import { Sdk } from '@contentstack/personalize-edge-sdk/dist/sdk';

const PersonalizeContext = createContext<Sdk | null>(null);

let sdkInstance: Sdk | null = null;
export function PersonalizeProvider({ children }: { children: React.ReactNode }) {
 const [sdk, setSdk] = useState<Sdk | null>(null);
 useEffect(() => {
   getPersonalizeInstance().then(setSdk);
 }, []);
 return (
   <PersonalizeContext.Provider value={sdk}>
     {children}
   </PersonalizeContext.Provider>
 );
}

export function usePersonalize() {
 return useContext(PersonalizeContext);
}

async function getPersonalizeInstance() {
 if (!Personalize.getInitializationStatus()) {
   sdkInstance = await Personalize.init(process.env.NEXT_PUBLIC_CONTENTSTACK_PERSONALIZE_PROJECT_UID as string);
 }
 return sdkInstance;
}
And you can wrap the app with PersonalizeProvider as follows:
 // app/layout.tsx
import
{PersonalizeProvider} from '@/app/components/context/PersonalizeContext'
export default function RootLayout({
  children,
}: Readonly<{
  children: React.ReactNode;
}>) {
  return (
    <html lang="en">
      <body>
          <PersonalizeProvider>{children}</PersonalizeProvider>
      </body>
    </html>
  );
}
Here, we initialize the Personalize SDK as part of the React Context. We then use the SDK object to create the context.
The SDK needs to be initialized before setting attributes or triggering events.
We use React Context here so the SDK is initialized once and then available as Context for any Client Component in Next.js. Setting attributes and triggering impressions and events should be done on the client side since we set data and trigger the events when the page renders on the browser.
Set Attributes
The following snippet shows how to set an attribute submitted via a form for a user’s age:
'use client';
import { useContext } from 'react';
import { PersonalizeContext } from '../context/PersonalizeContext';
const Page = () => {
  const personalizeSdk = useContext(PersonalizeContext);
  const onFormSubmit = async (form: MyForm) => {
    await personalizeSdk.set({ age: form.age });
  }
  // render the component
}
Here, the attributes are a key-value object passed to the set method. You can pass multiple key-values here. If the same key is passed, the existing attribute is overwritten.
Trigger Events
Impressions
To let Personalize know that a particular experience is being shown to the user, you can trigger an impression event. The following snippet shows how to trigger impressions:
'use client';
import { useContext, useEffect } from 'react';
import { PersonalizeContext } from '../context/PersonalizeContext';
const Page = () => {
  const Personalize = useContext(PersonalizeContext);
  useEffect(async () => {
    await Personalize.triggerImpression(MY_EXPERIENCE_SHORT_UID);
  }, []);
  // render the component
}
We are using useEffect in this example so that the impression is triggered only on the first render of the component, that is, when the page loads for the first time in the browser.
Here the triggerImpression method takes an Experience Short UID, which you can find in the Personalize UI on the Experiences List page. The SDK will also automatically pass the selected variant of the experience as part of the impression.
Conversions
Any action performed by the user can be a conversion event if it leads to a positive outcome. To let Personalize know that an action has been performed, trigger the event as follows:
'use client';
import { useContext } from 'react';
import { PersonalizeContext } from '../context/PersonalizeContext';
const Page = () => {
  const personalizeSdk = useContext(PersonalizeContext);
  const onClickLearnMore = async (e: any) => {
    e.preventDefault();
    await personalizeSdk.triggerEvent('learnMoreClicked'); // here 'learnMoreClicked' is the eventKey
  }
  // render the component
}
Here, we are triggering an event on the click of the Learn More button. The triggerEvent method takes an eventKey. The eventKey is configured when you create an event.
Your Personalize Edge SDK is now set up and ready to interact with your Contentstack Personalize project and proceed with personalization for your website.
