

XTM App Installation Guide
XTM is a powerful cloud-based translation management platform designed to streamline language localization and content distribution across multiple systems. With its robust, user-friendly, and cost-effective features, XTM enables businesses to efficiently manage translations, ensuring consistent multilingual experiences at scale.
Through the Contentstack Marketplace, you can seamlessly integrate the XTM app into your stack to create and manage localized versions of your content with ease.
Prerequisites
- XTM Cloud account
- Contentstack account
- Access to the Contentstack Organization/Stack as the Owner/Admin
Follow this step-by-step guide to install and configure the XTM app within your stack.
Steps for Execution
- Retrieve your Credentials from XTM
- Create Workflow in Contentstack
- Install and Configure the XTM app in Marketplace
- Use the XTM App for Machine Translation
- Use the XTM app for Human Translation
Retrieve your Credentials from XTM
To configure and connect the XTM app within Contentstack, you need to fetch the credentials from your XTM account by following the given steps:
- Log in to your XTM Cloud account and copy the Base URL, Company name, and Password. During the app configuration in step 3, paste these values into the corresponding fields: XTM Base URL, User Company Name, and XTM Password.
- To get the User ID, navigate to Users > User list, select the relevant user, and click the “Info” icon. Copy the ID and paste it into the XTM User Identifier field in step 3.

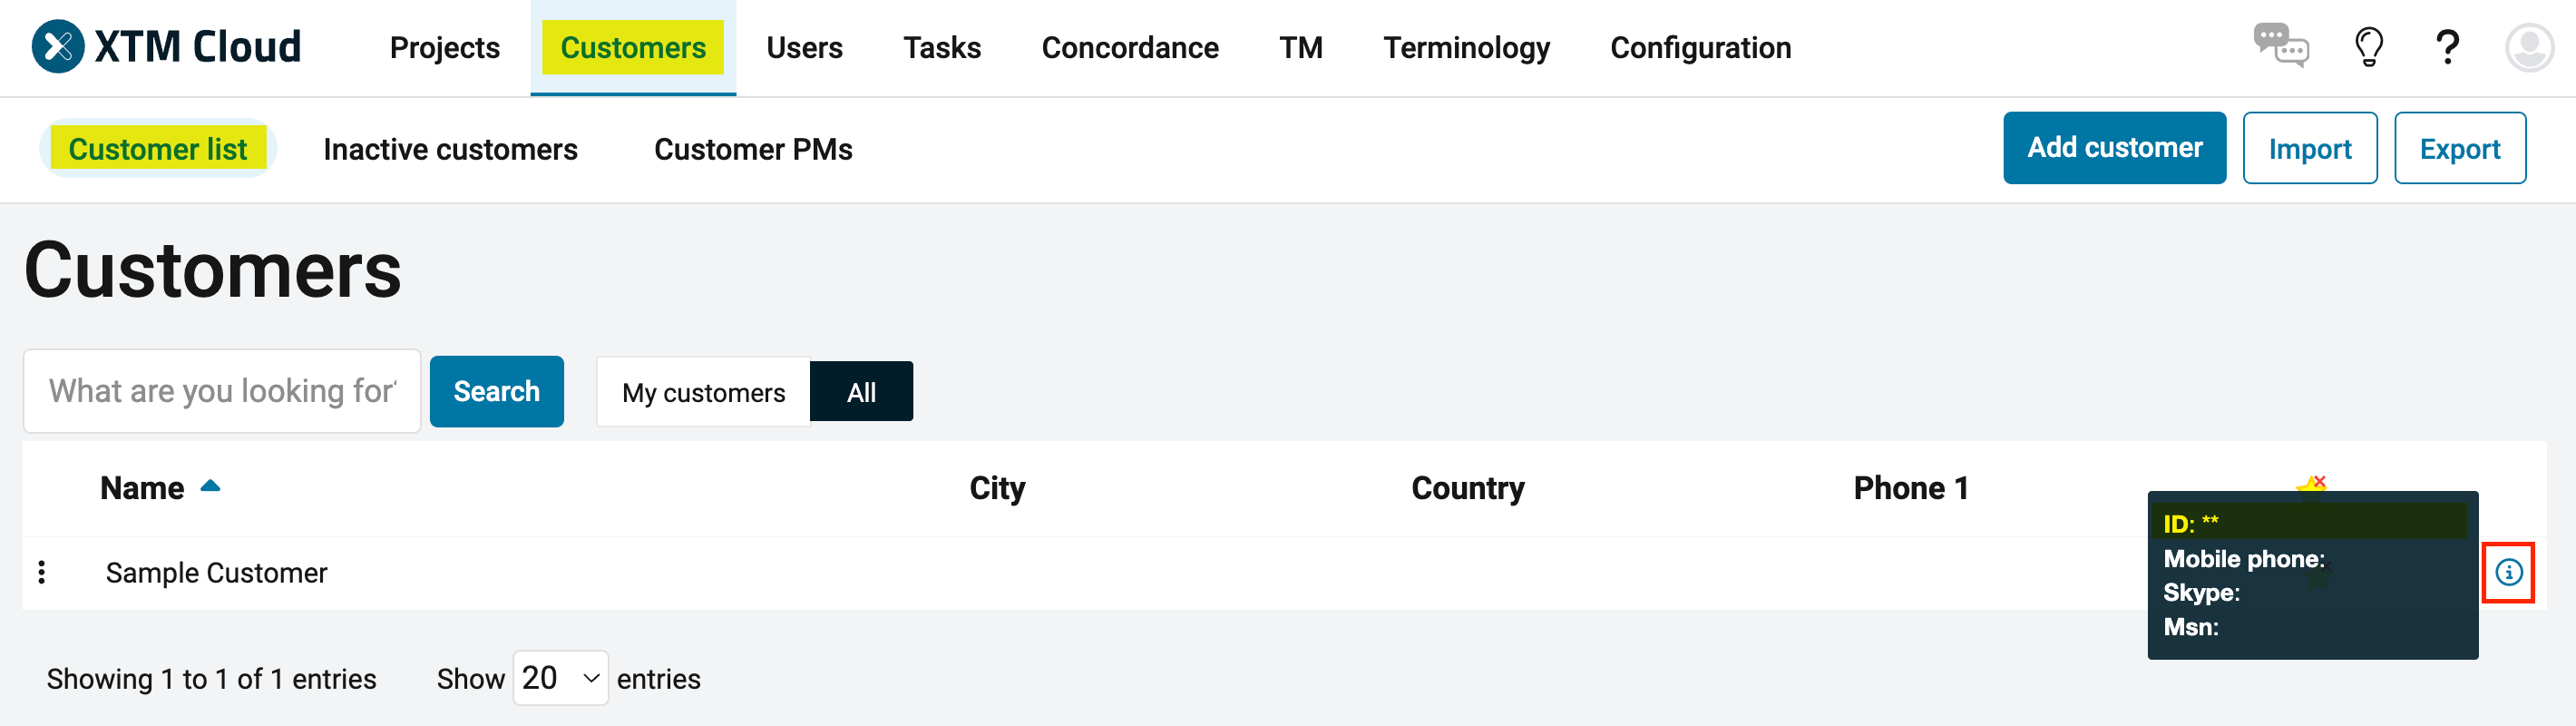
- To get the Customer ID, navigate to Customers > Customer list, select the relevant customer and click the “Info” icon. Copy the ID and paste it into the XTM Customer ID field in step 3.
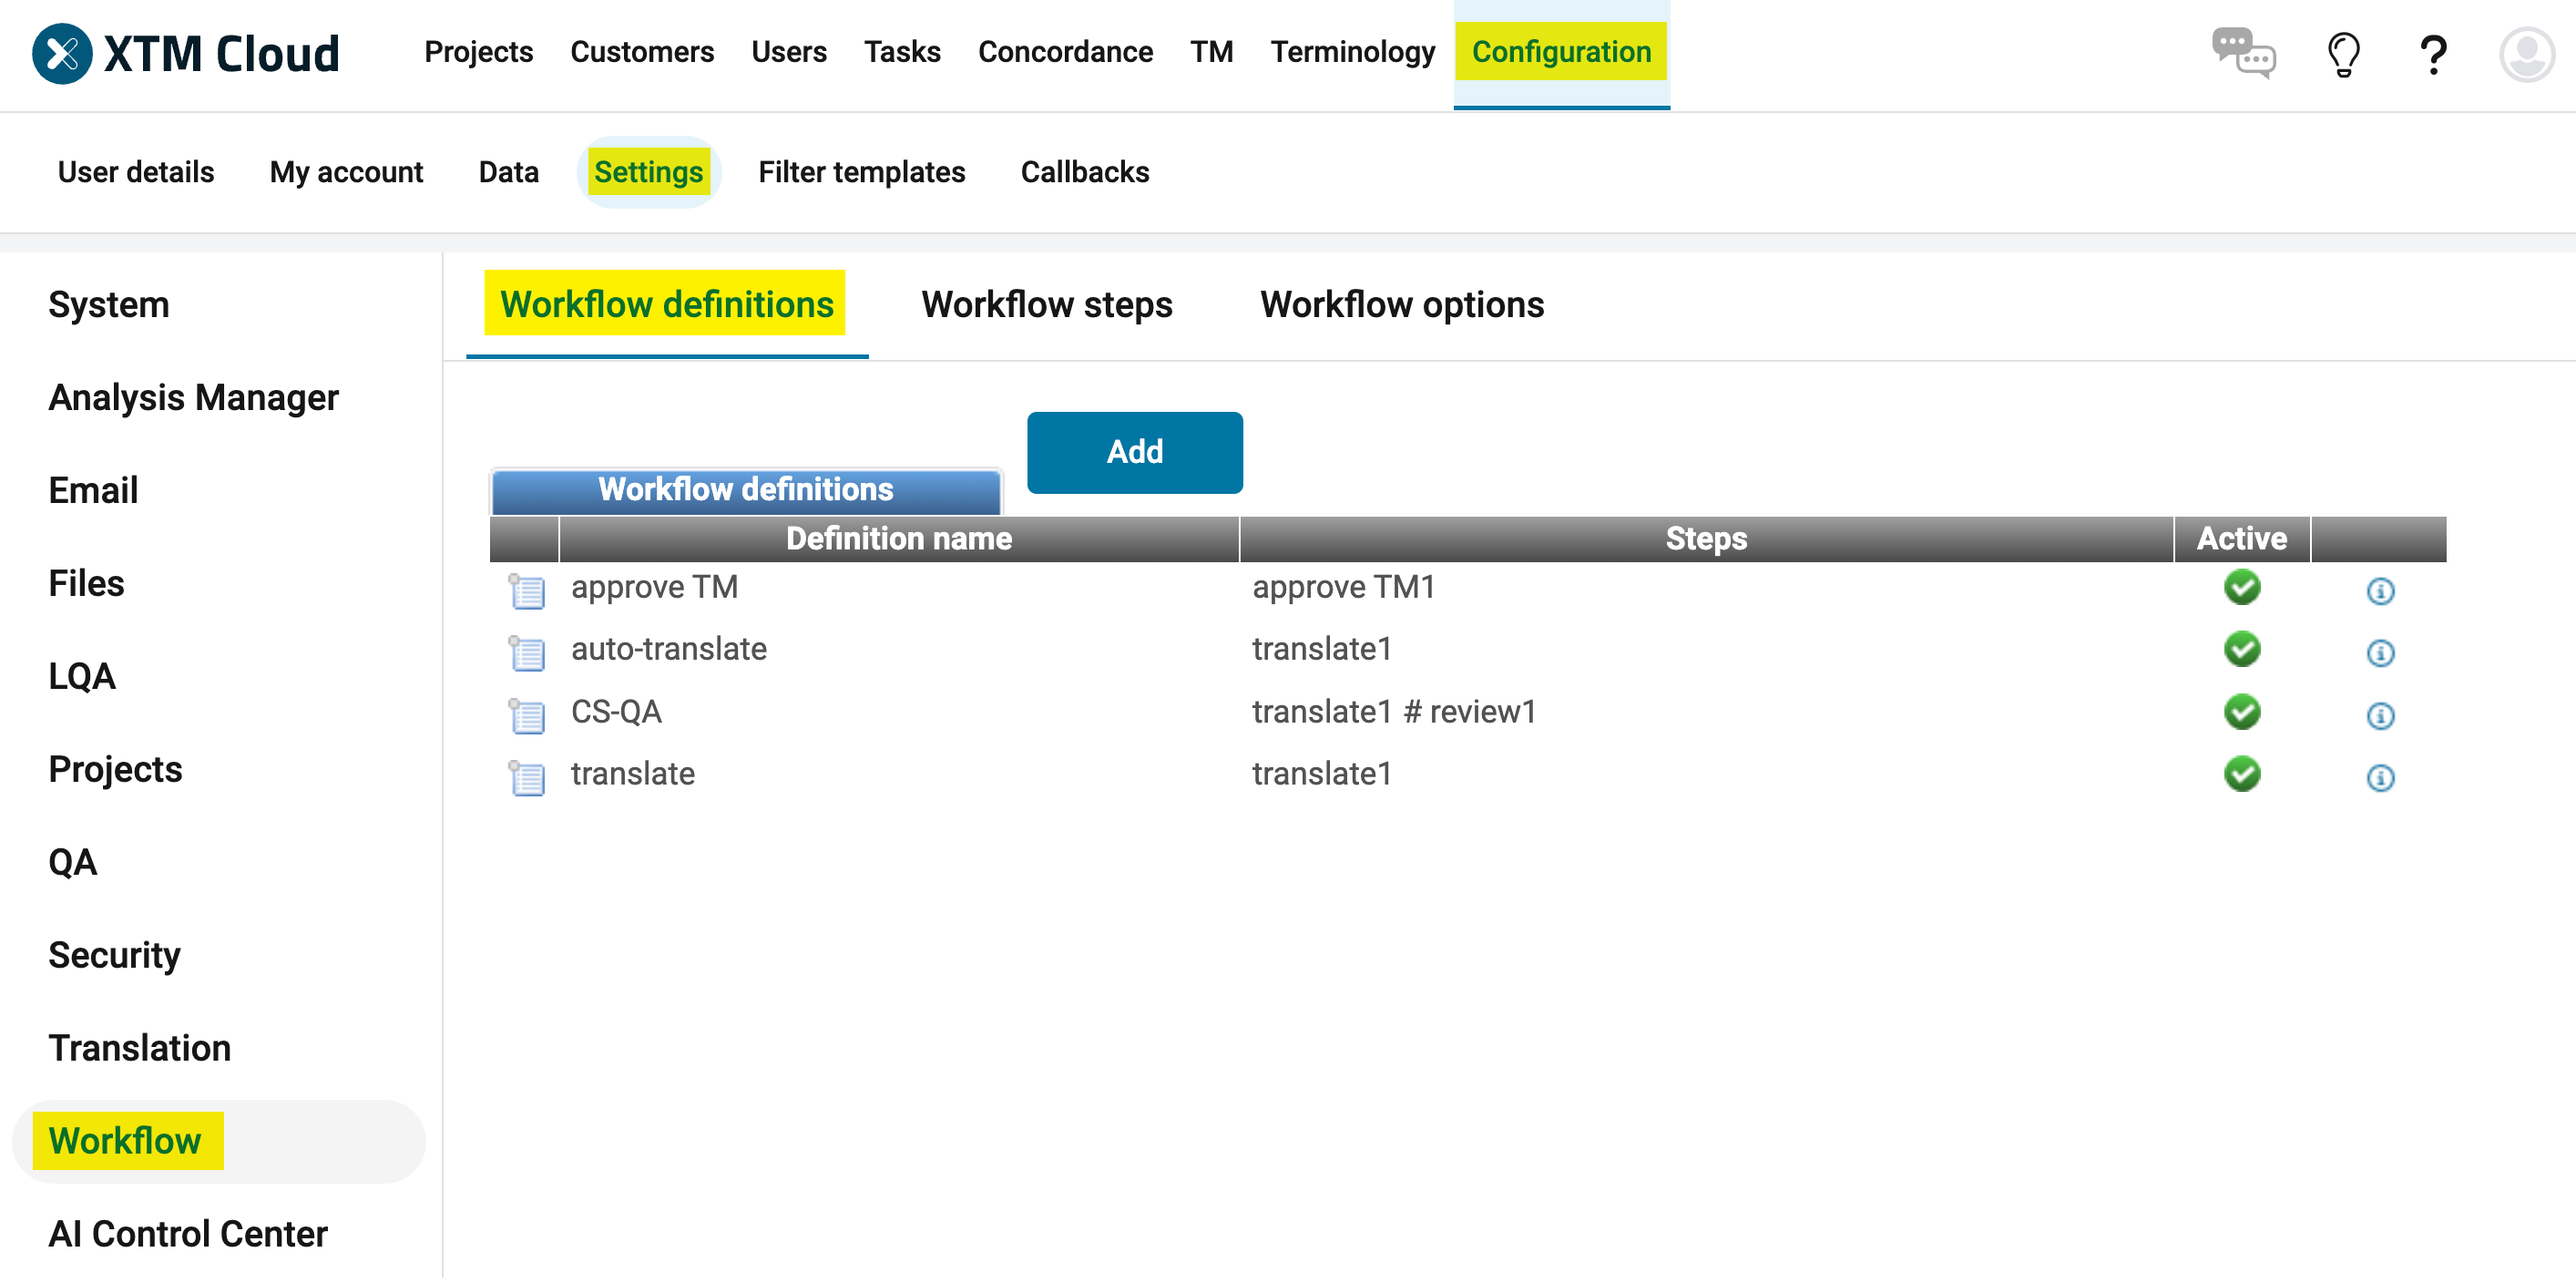
- If you want to create projects in Contentstack using the Entry Sidebar or Full Page app, you must create a workflow in XTM.
To do this, navigate to Configuration > Settings > Workflow. Under Workflow definitions, create a new workflow by clicking the Add button or select an existing one. Copy the Workflow definition name and paste it into the XTM Workflow field in step 3.
Note: In XTM, you must define the languages and create a translation template to enable the translation process. Ensure that the languages configured in XTM also exist in your Contentstack to maintain seamless integration.
Add Custom Fields in XTM
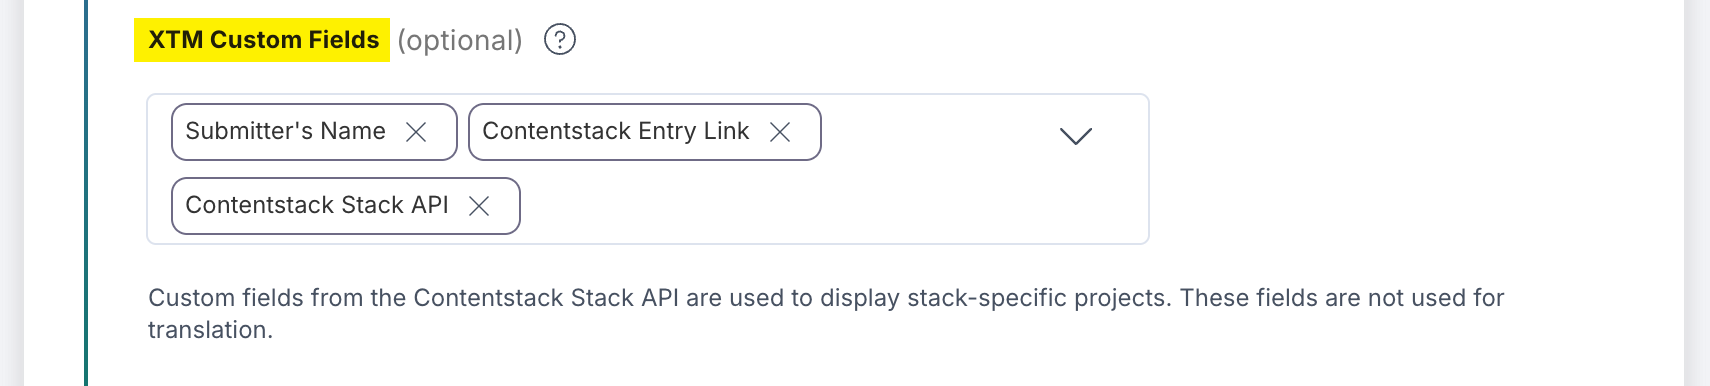
Mapping custom fields from Contentstack into XTM adds valuable context and traceability to your localization process. For instance, adding Submitter’s Name, Contentstack Entry Link, Contentstack Stack API custom fields during app configuration in step 3.
To add custom fields in XTM, follow the given steps:
- Navigate to Configuration > Data > Custom fields. Under Project custom fields, click the Add button.

- In the Add custom field modal, enter the Field name, select Field type as Text field from the dropdown, and click Save.
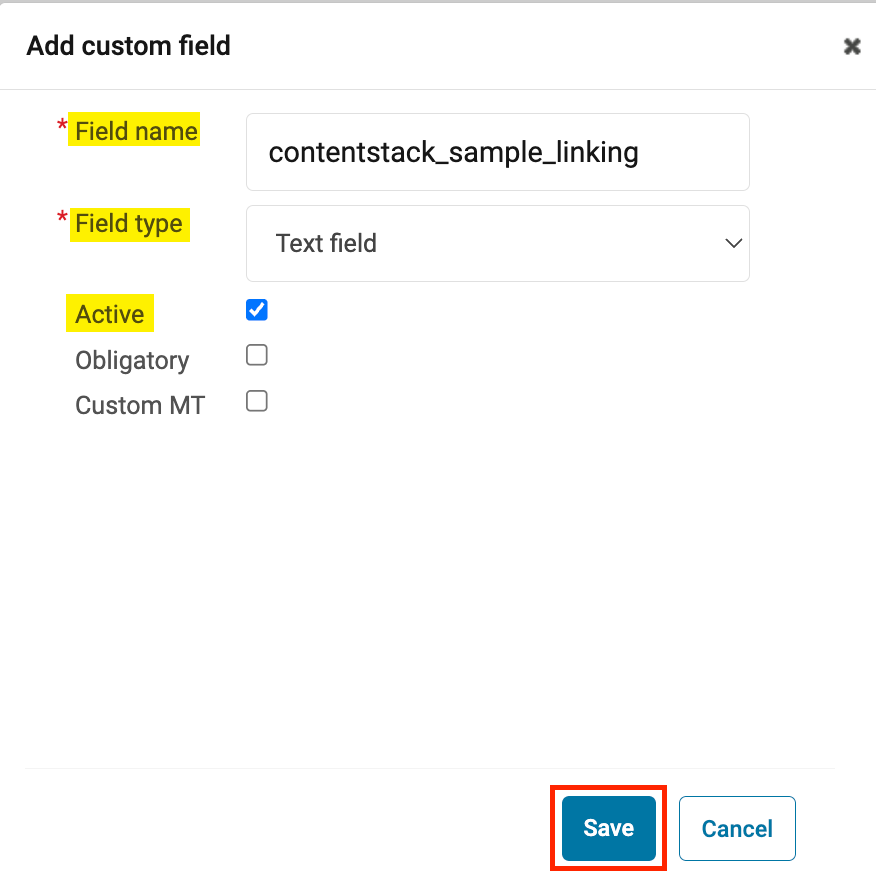
Note: Ensure that the checkbox for the Active field is selected.
Create Workflow in Contentstack
Before using the XTM app for translations, you must define a Workflow to create a project and initiate the translation process.
To create a workflow, log in to your Contentstack account, and follow the steps:
- Navigate to your stack, click Settings in the top navigation panel, and then click Workflows. Click the + New Workflow button to add a new workflow.

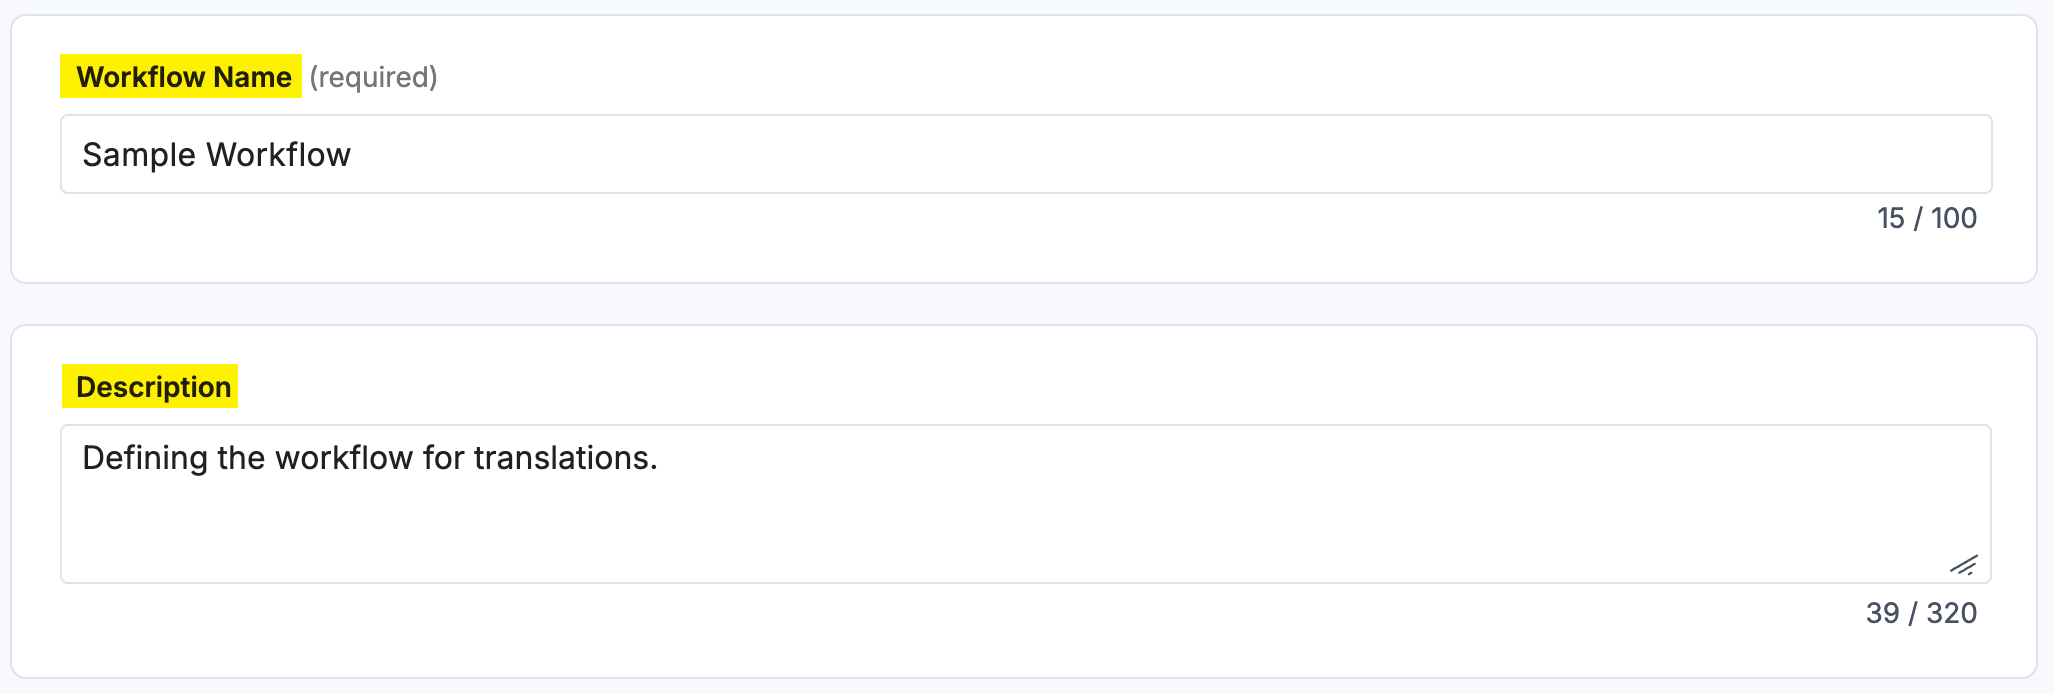
- On the workflow creation page, enter the following details:
- Provide the Workflow Name and Description.
- Set the Scope of the workflow that includes setting up the branches and content types.

- Define the Workflow Stages.

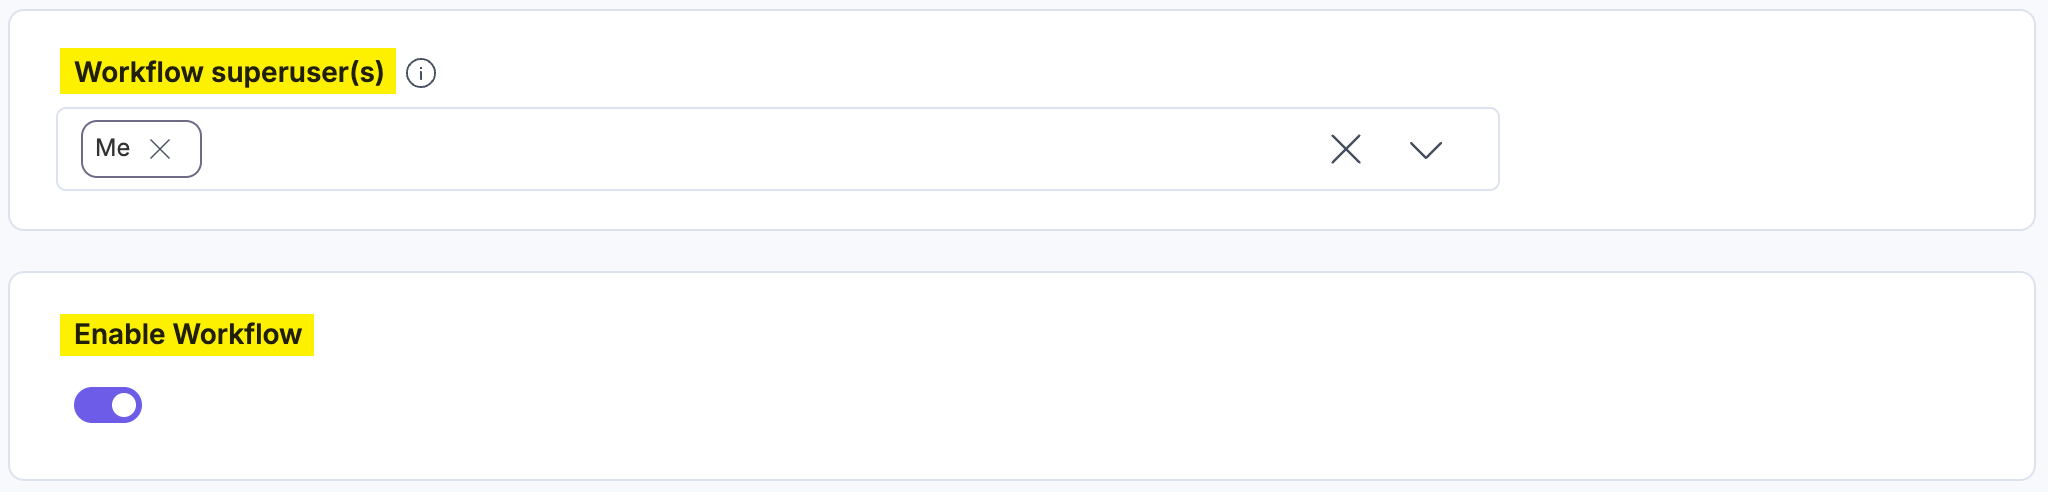
- Select the Workflow superuser(s) from the provided dropdown. To activate the workflow, click the Enable Workflow toggle button.
- Provide the Workflow Name and Description.
- After filling up the details, click Save. A workflow is created to configure in the XTM app in step 3.
Additional Resource: To learn more, refer to the Workflows documentation.
- Navigate to your stack, click Settings in the top navigation panel, and then click Workflows. Click the + New Workflow button to add a new workflow.
Install and Configure the XTM app in Marketplace
To install the app in Contentstack, log in to your Contentstack account and follow the steps below:
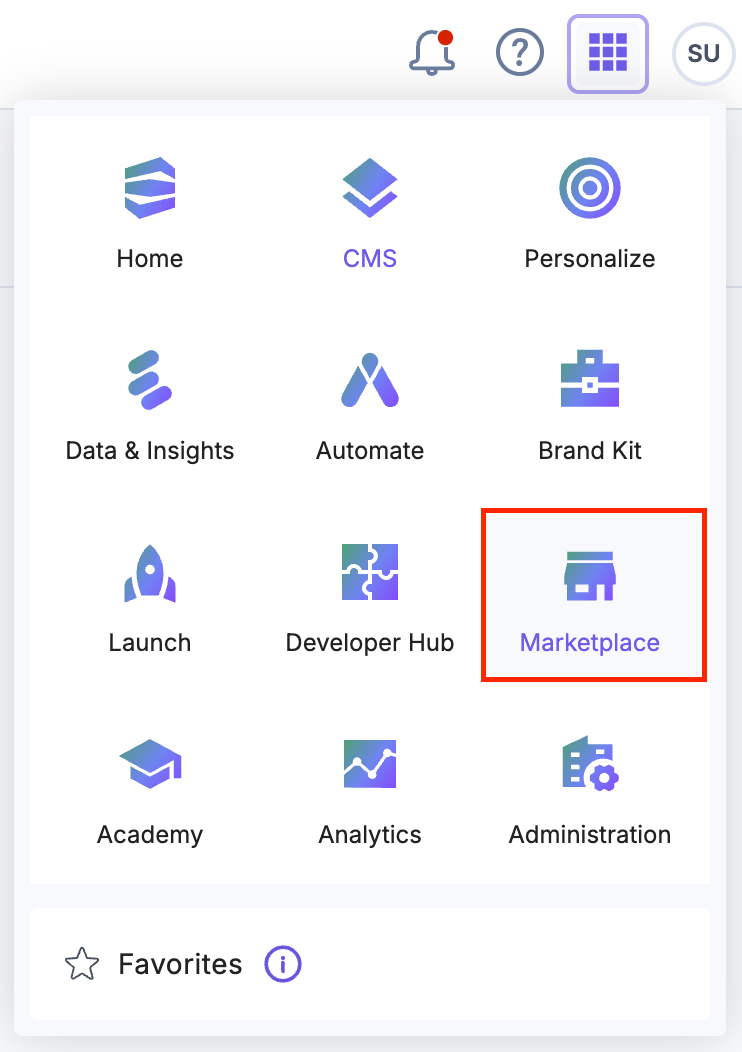
- Navigate to the “App Switcher” icon in the top-right corner and click Marketplace.
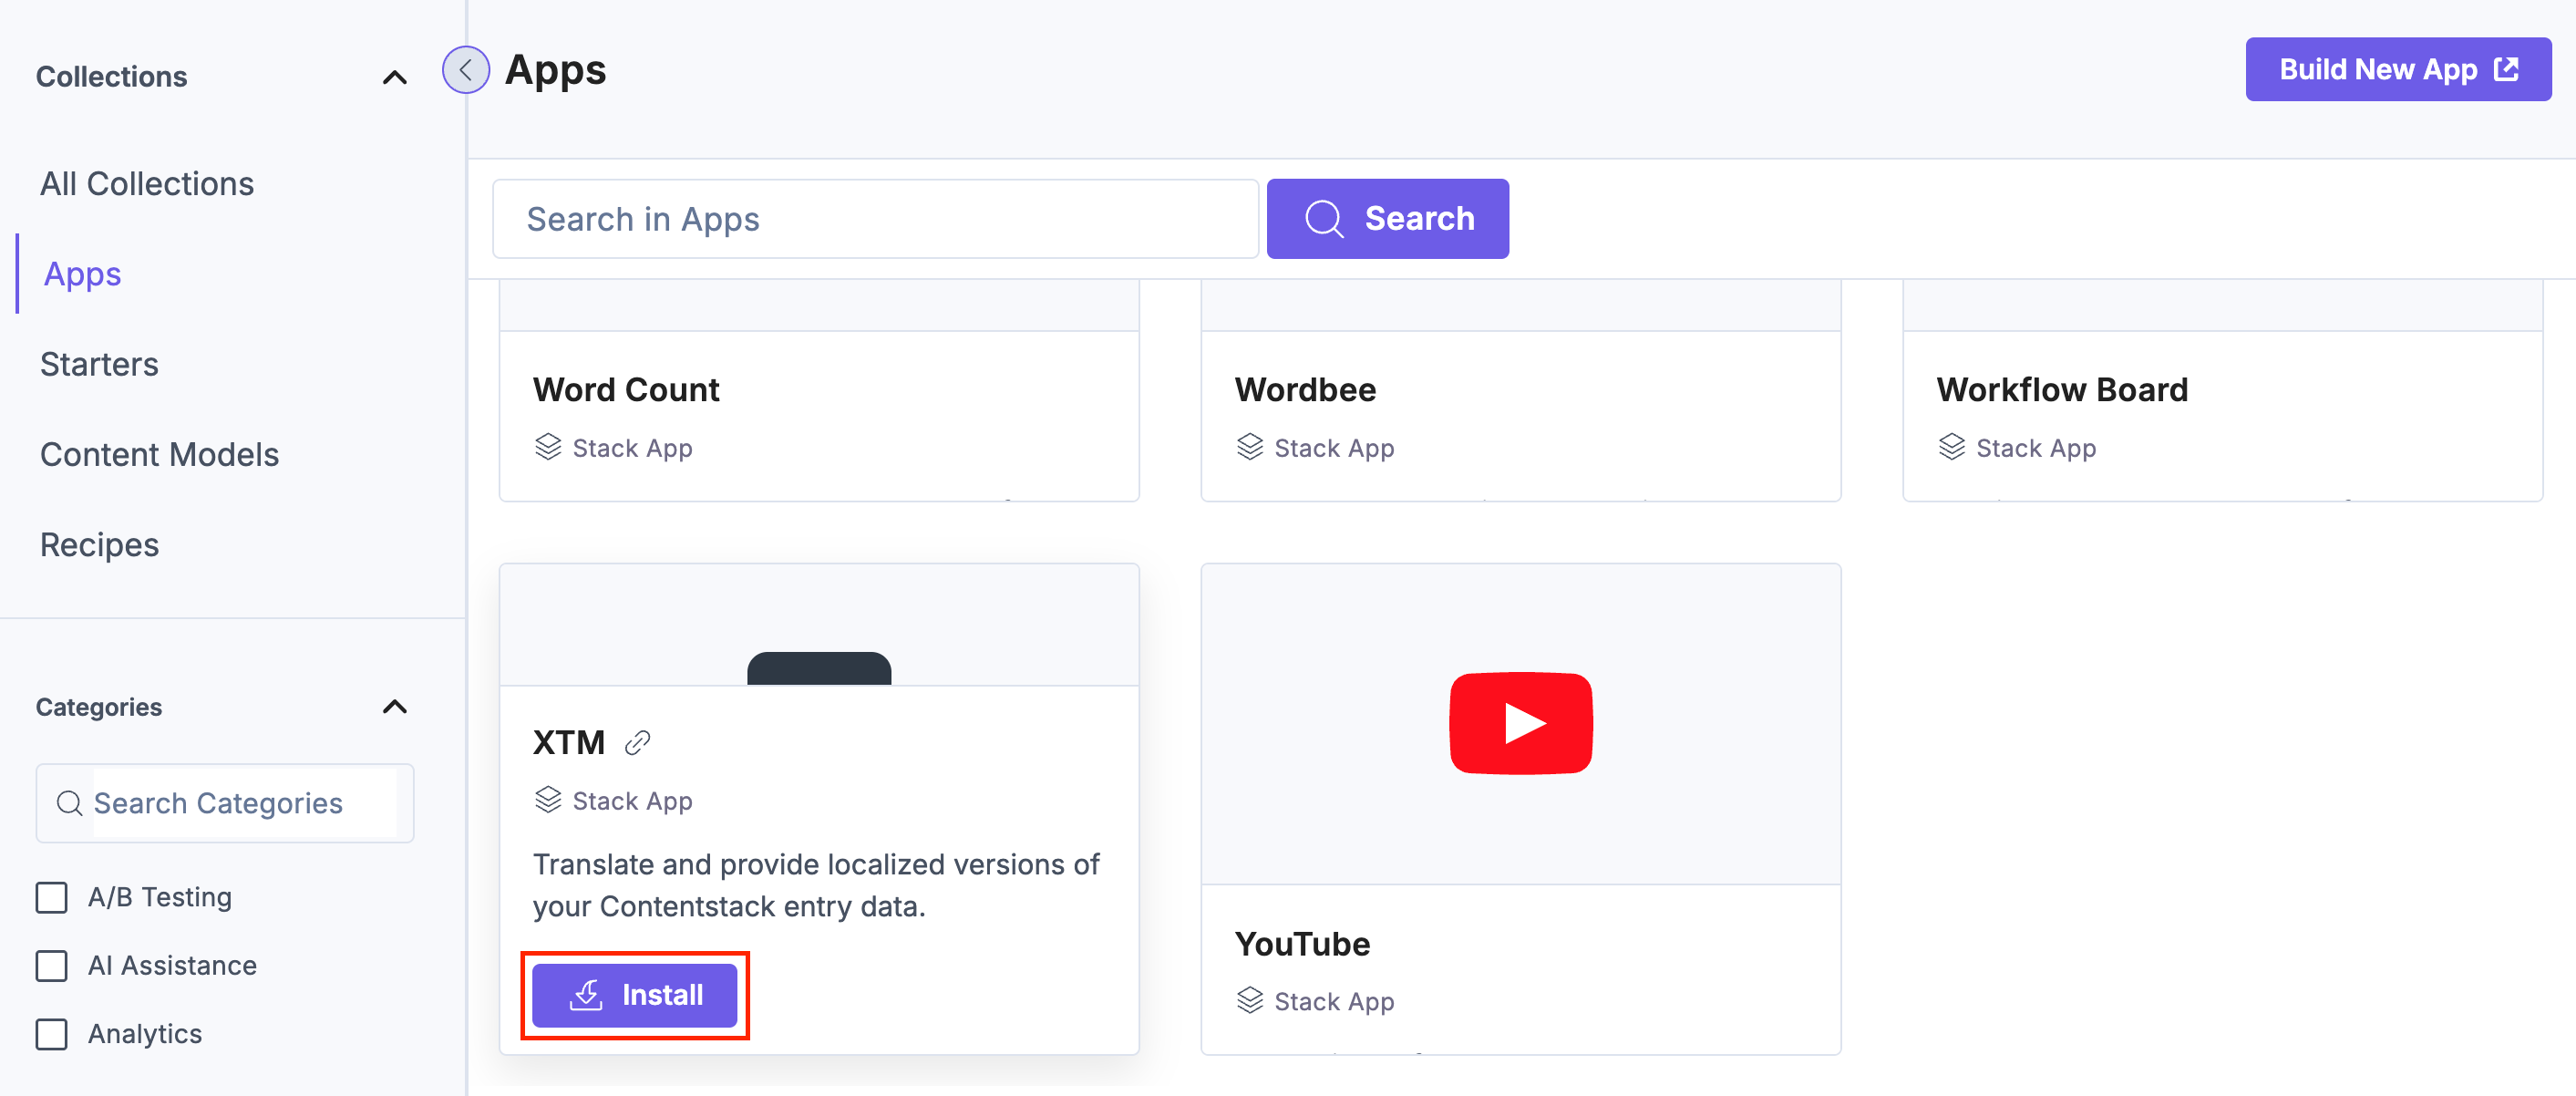
- Click Apps from the left panel.
- Within the Marketplace, locate the XTM app and click Install.
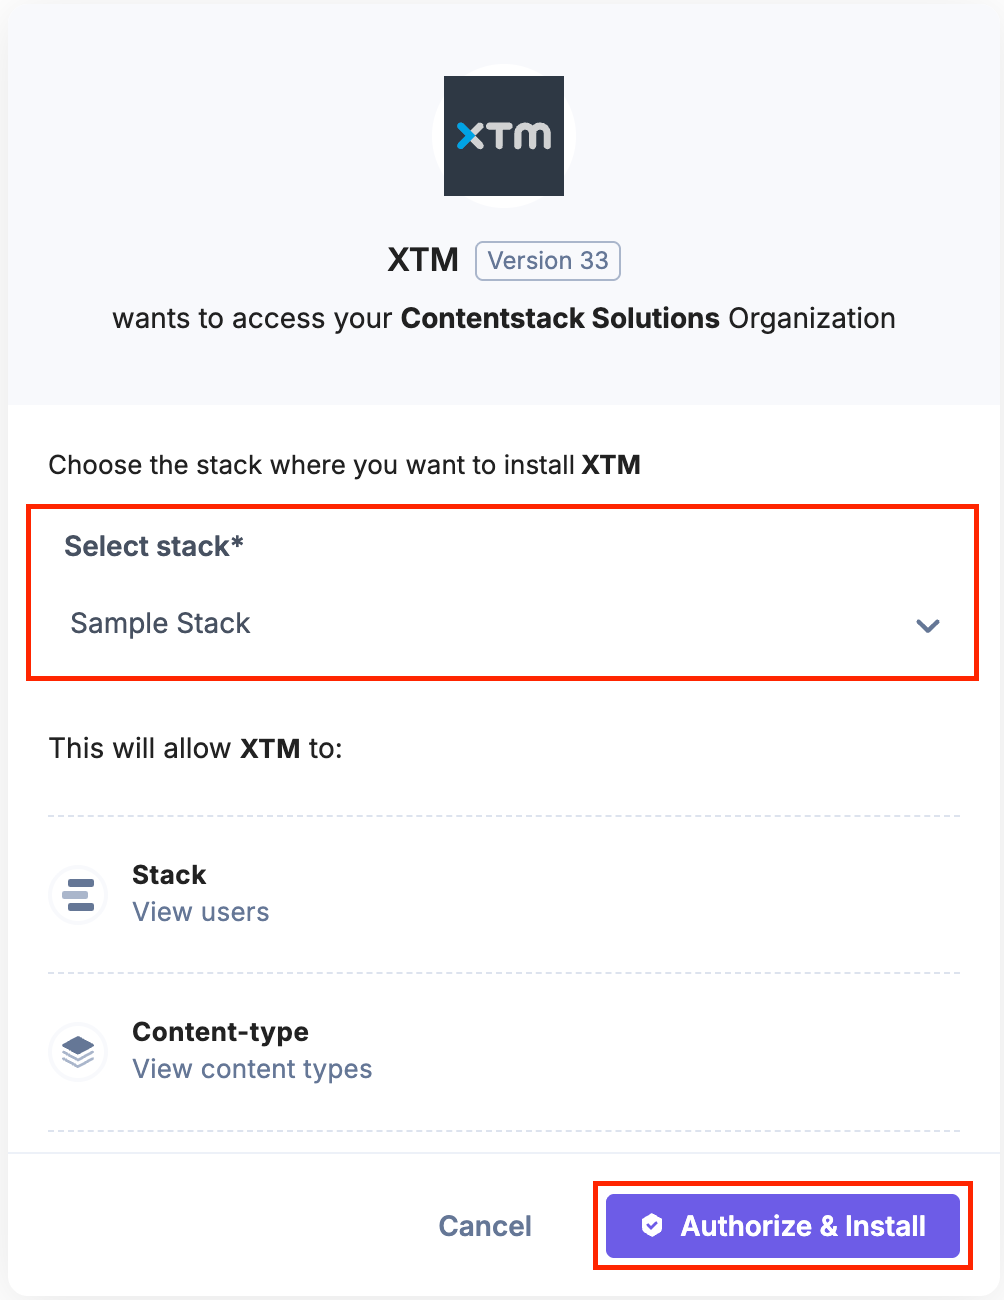
- In the pop-up window, select the stack where you want to install the XTM app, accept the Terms of Service, and click the Authorize & Install button.
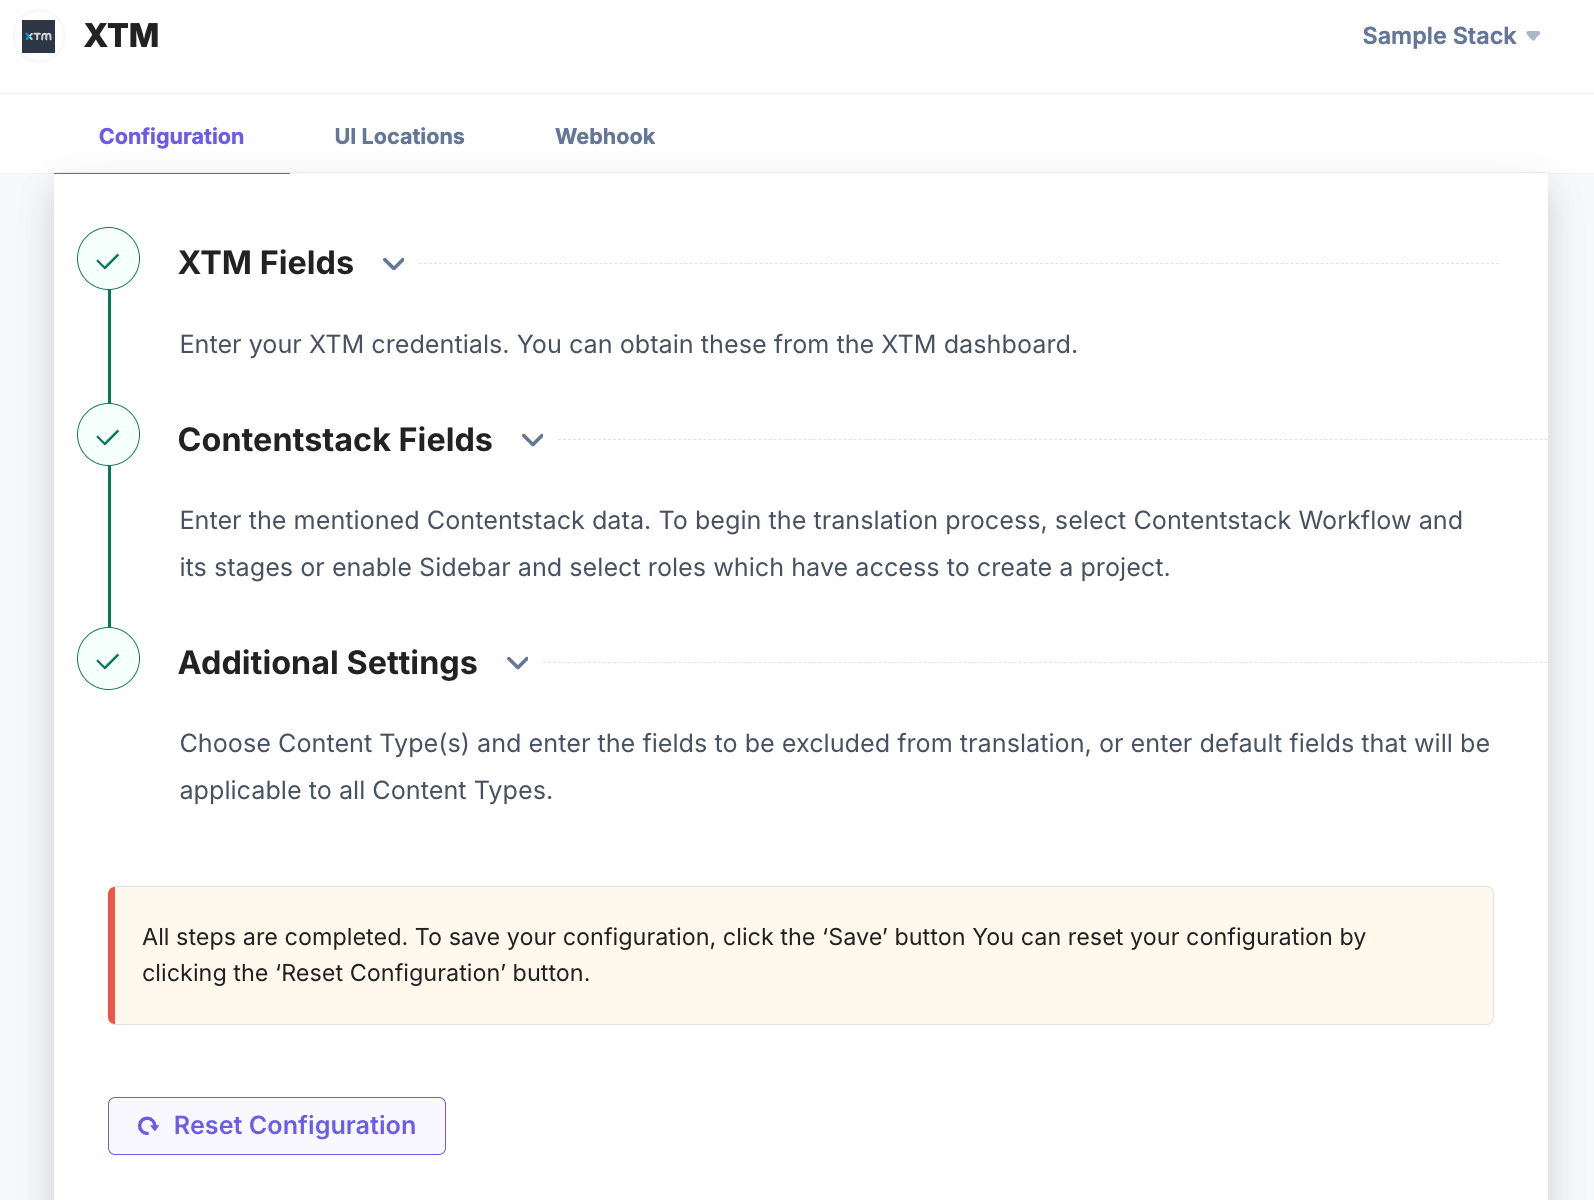
- On the Configuration screen, enter the following details:
- XTM Fields: Enter your XTM credentials to connect Contentstack with your XTM account.
- Provide the XTM Base URL, XTM User Identifier, User Company Name, XTM Customer ID, XTM Password, and XTM Workflow retrieved in step 1.
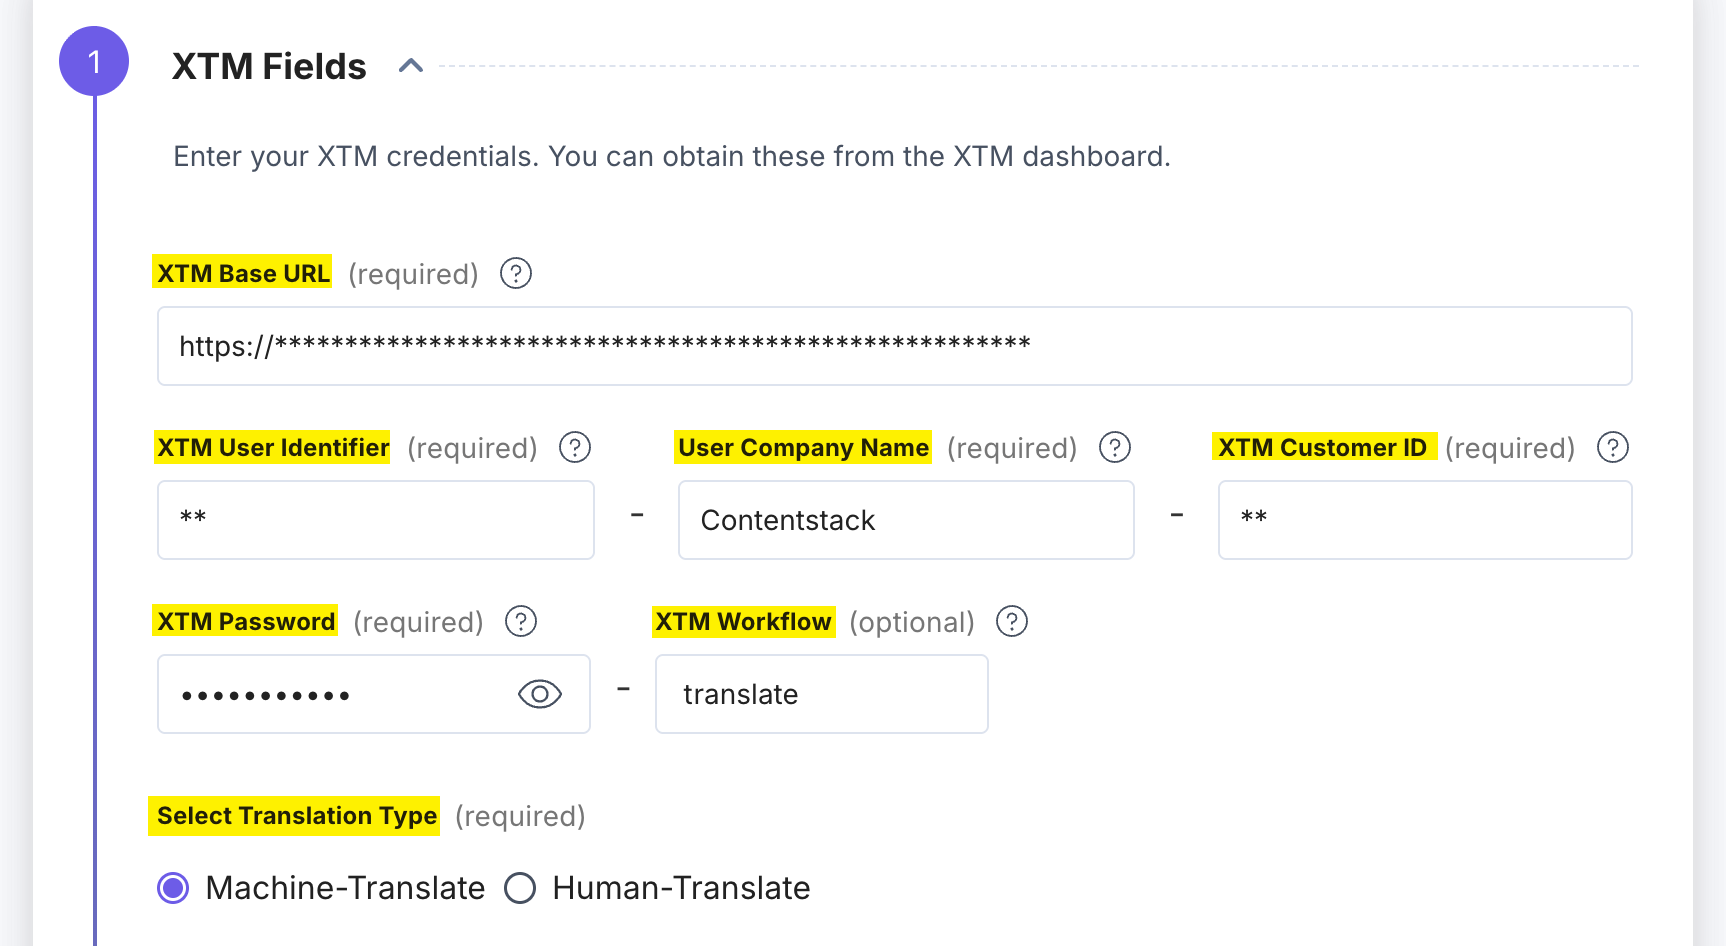
- XTM offers two types of translation methods. Under Select Translation Type, choose one:
- Machine Translate: Machine Translation automatically translates your entry content as soon as you update the workflow, enabling faster processing and translation of data. This option is ideal for quick turnarounds or when human review is not required.
Machine Translate is, by default, selected.
Additional Resource: Refer to the Use the XTM App for Machine Translation section for further steps.
- Human Translate: Human Translation allows translators on the XTM side to manually translate the content. While this method takes longer than machine translation, it provides greater accuracy and quality control.
Additional Resource: Refer to the Use the XTM App for Human Translation section for further steps.
- Machine Translate: Machine Translation automatically translates your entry content as soon as you update the workflow, enabling faster processing and translation of data. This option is ideal for quick turnarounds or when human review is not required.
- XTM Templates help you define the languages into which you want to translate your content. Click the Get XTM Template button; a dropdown menu appears with a list of available templates from XTM. Select the appropriate template that matches your localization needs.

- By selecting the XTM Custom Fields (Submitter’s Name, Contentstack Entry Link, or Contentstack Stack API), you can map additional metadata from Contentstack to XTM. These fields are sent to XTM when creating a translation project.
Note:
- The fields contentstack_initiator_name, contentstack_entry_link, and contentstack_stack_api must exist in the Custom fields section of the XTM app. For more details, refer to the Add Custom Fields in XTM section.
- If you select Submitter’s Name, it will appear in the Status section of the Contentstack Entry Sidebar.
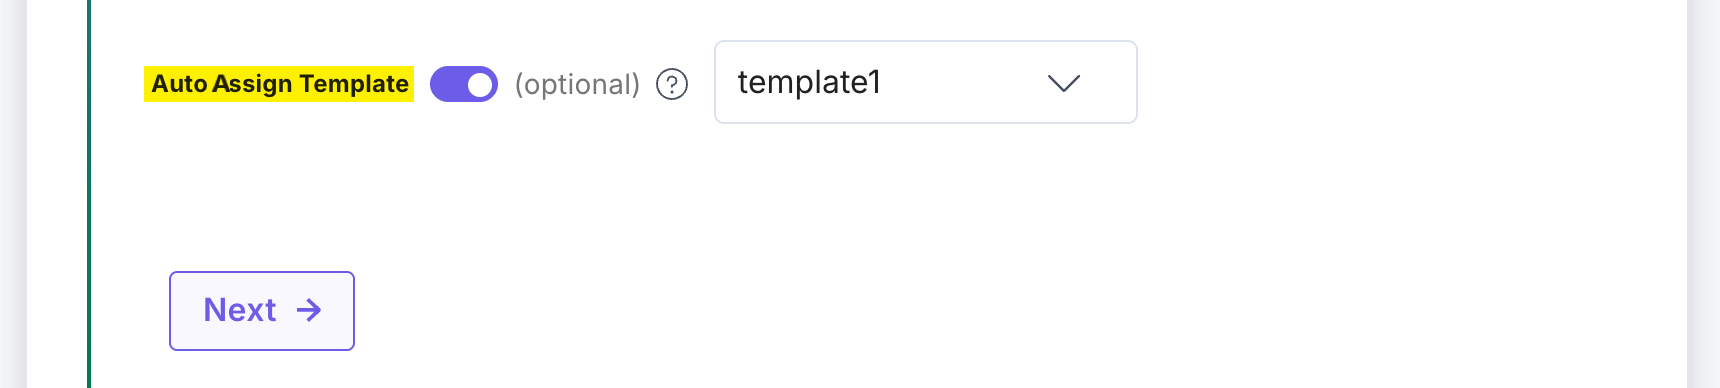
- Enable the Auto Assign Template toggle button to select a translation template when initiating translations from the Entry Sidebar.
- Provide the XTM Base URL, XTM User Identifier, User Company Name, XTM Customer ID, XTM Password, and XTM Workflow retrieved in step 1.
- Click the Next button.
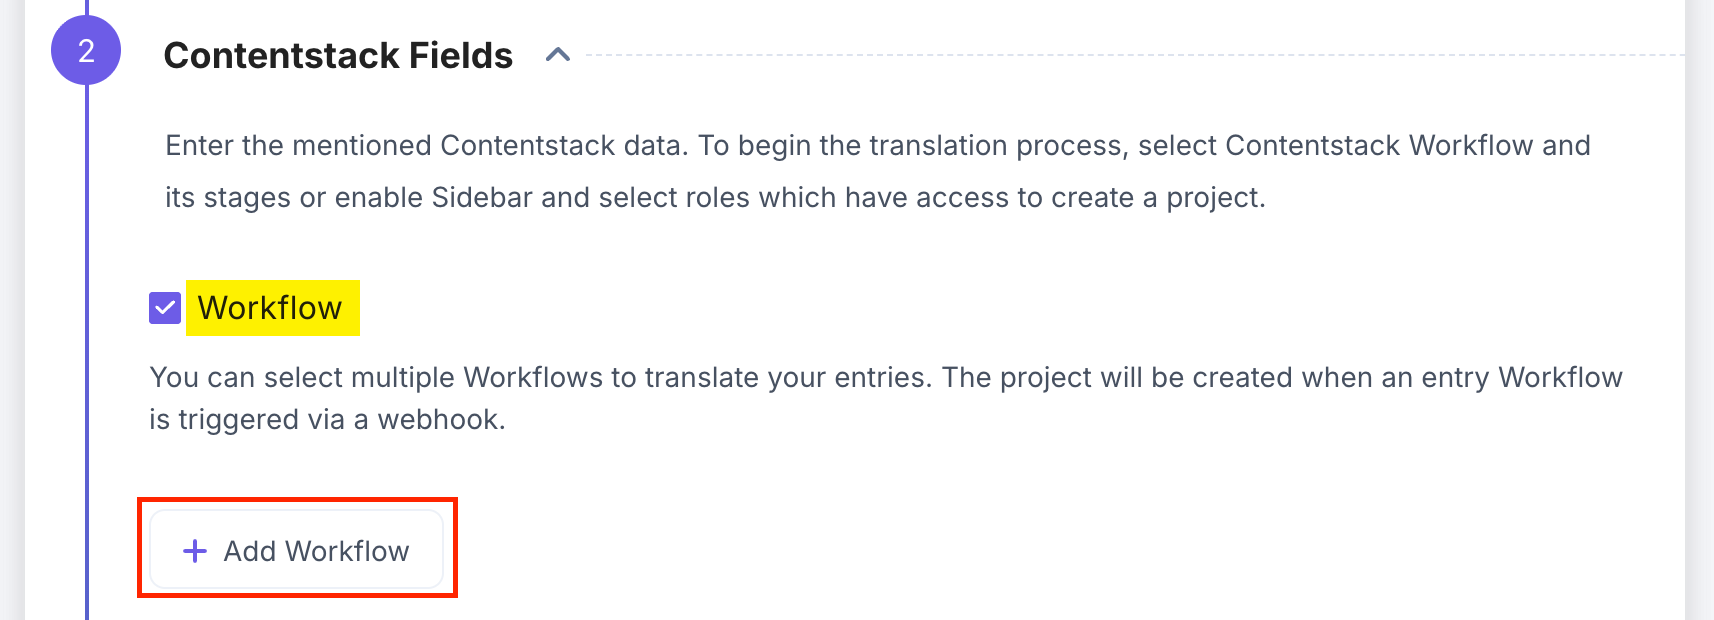
- Contentstack Fields: Configure workflows, stages, and roles for project creation and translation within Contentstack.
- You can create a project using multiple workflows within Contentstack to define how content moves through the translation process. Mark the Workflow checkbox and then click the Add Workflow button.
- Select the Workflow from the dropdown and then fill up the four workflow stages: Request Stage, Completed Stage, In Progress Stage (optional), and Error Stage (optional) from the respective dropdowns.
- Select an XTM Templates to create projects associated with the chosen workflow.
- Enable the Enable Workflow for Sidebar or Bulk Translate toggle button to apply your workflow configurations when sending entries for translation via the Sidebar or Bulk Translate.
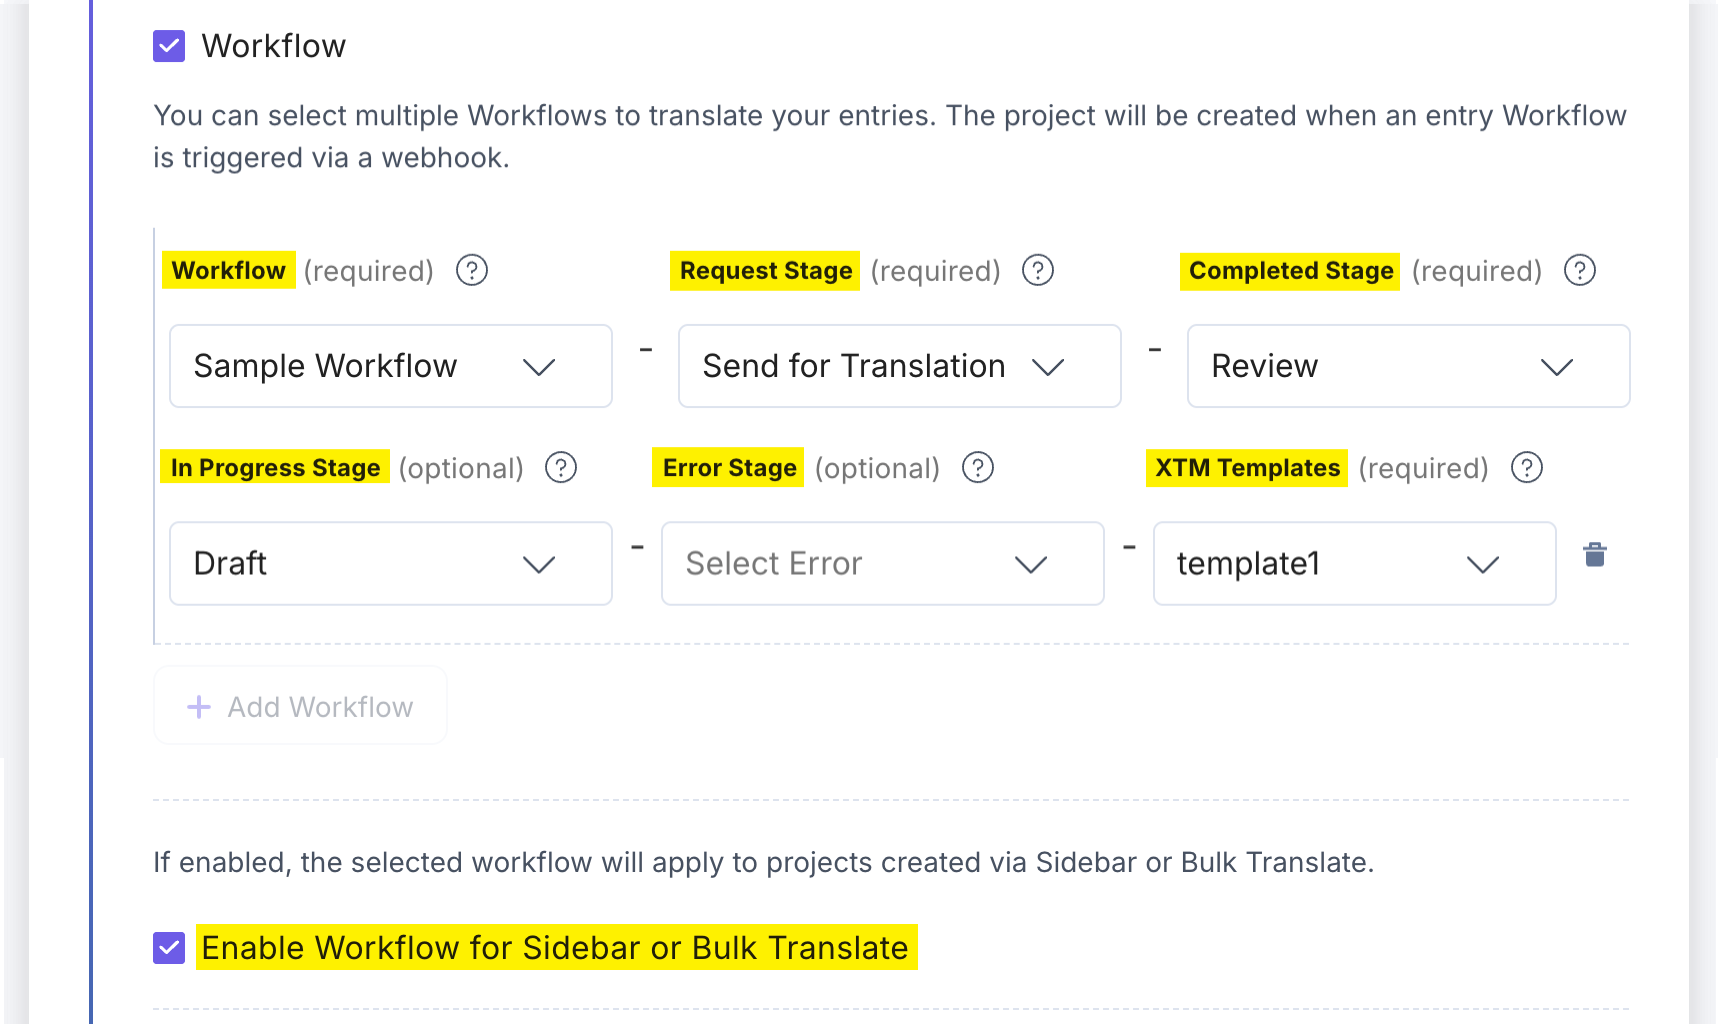
Note: To use the Enable Workflow for Sidebar or Bulk Translate setting, make sure your XTM app is updated to the latest version.
- To create a project using the Entry Sidebar or Bulk Translate in the Full Page app, check the From Sidebar or Bulk Translate in the Full Page UI checkbox, and select a role from the Select Roles dropdown.
- To create a project using the Content Types Bulk Translate in the Full Page app, check the Content Types Bulk Translate in the Full Page UI checkbox, and select a role from the Select Roles dropdown.
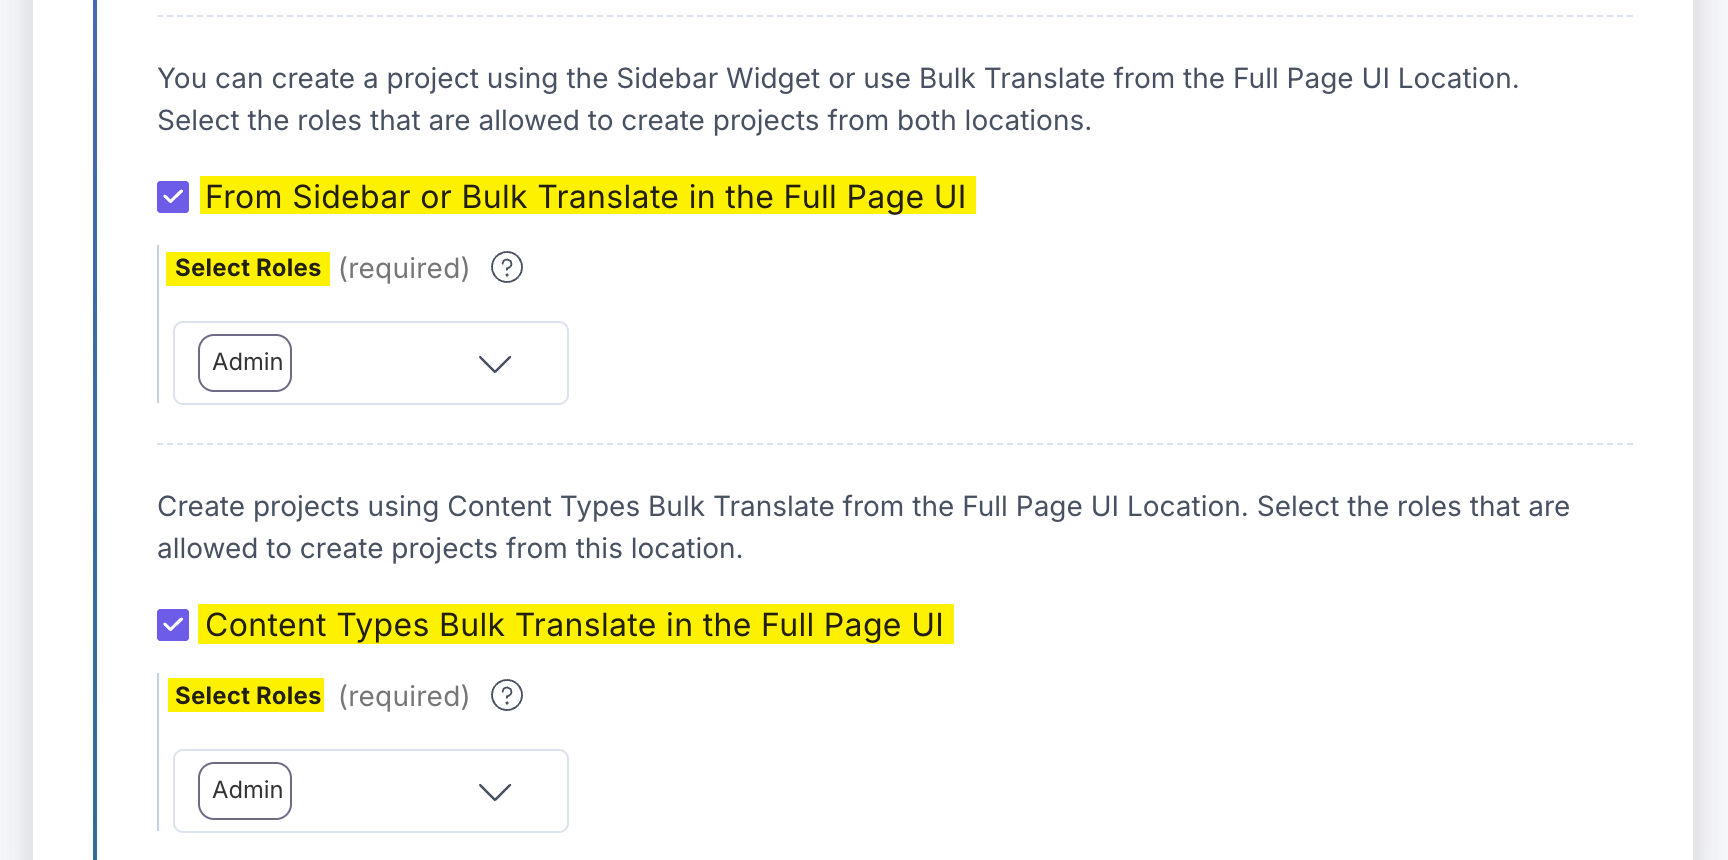
Note: Only users with the selected roles will have access to Create Project from the Full Page Location and Entry Sidebar. By default, only the Stack Owner and Admin have this permission.
- Version Naming: You can append the master locale to the version name, making it easier to identify and track different versions across locales.
Syntax: sourceEntrylocale_sourceEntryversion_targetEntryVersion
For example: en-us_1_3
- Character Limit Validation: Translators can now view both maximum and minimum character limits directly within the XTM dashboard.

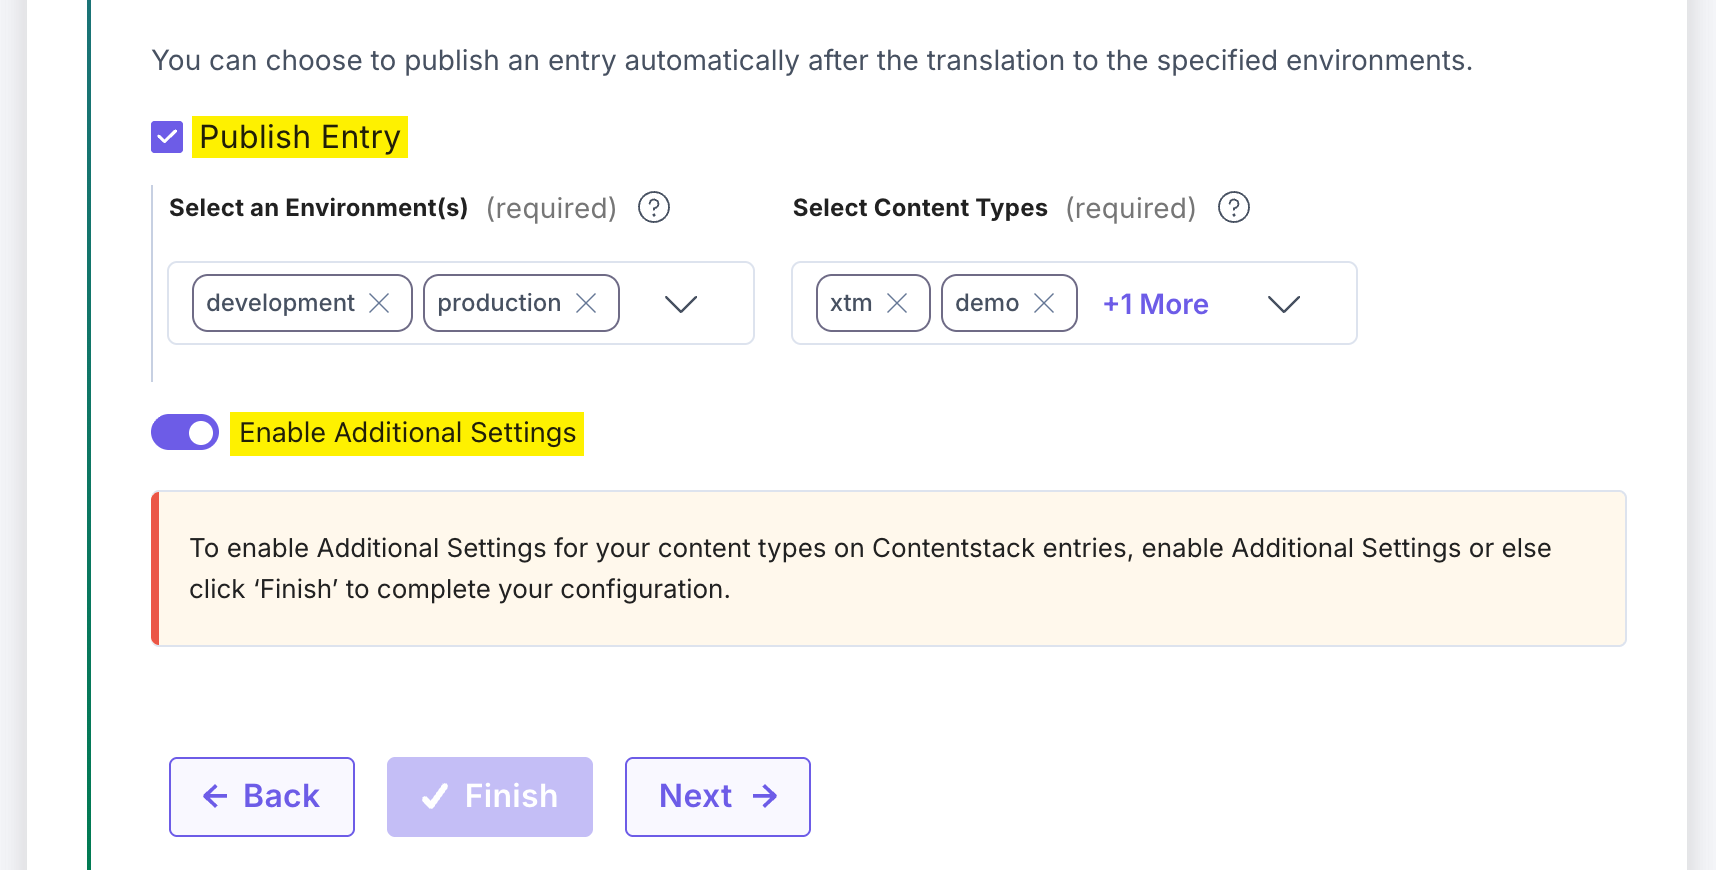
- To publish an entry automatically to the specified environments after the translation, mark the Publish Entry checkbox and select the required environment(s) and the content type(s) to which you want to publish.
- If you select the Enable Additional Settings option, you can define the scope of your fields for translation.
- You can create a project using multiple workflows within Contentstack to define how content moves through the translation process. Mark the Workflow checkbox and then click the Add Workflow button.
- Click the Next button.
- Additional Settings: Define field exclusions or inclusions, language mappings, and trigger URLs to fine-tune translation behavior.
- Exclusions: You can specify which fields or languages should be excluded from the translation process:
- Content Type Field Mapper: Define specific fields within a particular content type that you want to exclude from translation. For example, you can select specific fields (e.g., multi_line, date) within a content type to prevent them from being sent to XTM.
- Field(s) to Exclude from All Content Types: Define fields that should be excluded from translation across all content types. For example, excluding title and url ensures these fields are never translated in any content type.
- Select Field Types to Exclude: Automatically exclude fields based on their field type. For example, selecting Number will filter out and exclude all number-type fields across content types from translation.
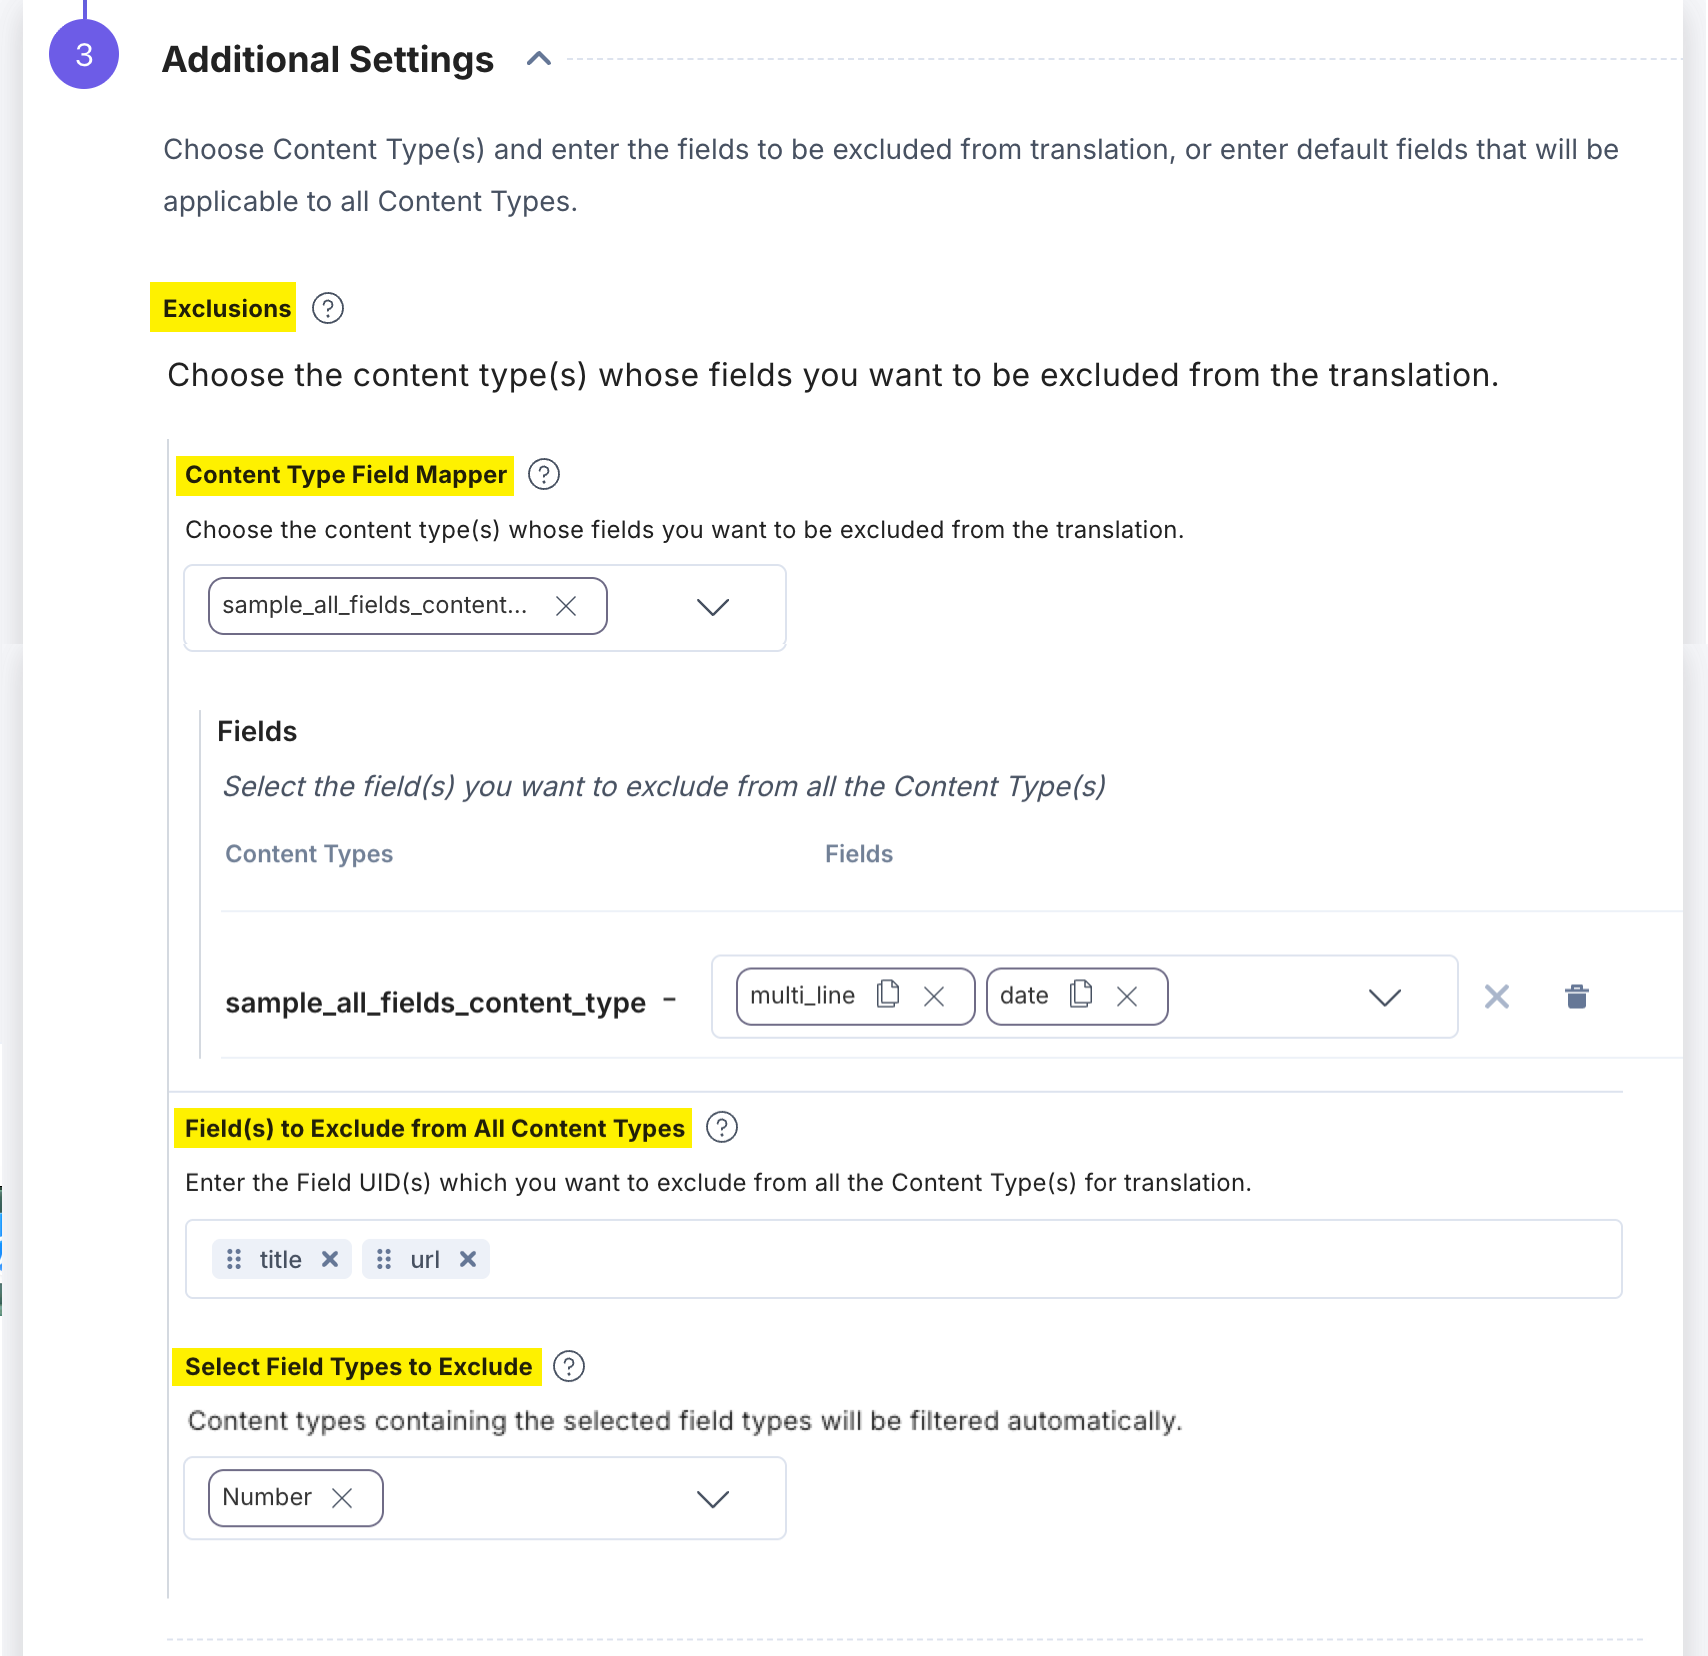
Note:
- When the target language is not localized, the XTM app uses the source language code for exclusions.
- When the target language is localized, it uses the target language code for exclusions.
- Inclusions: Specify the fields that should be included for translation within a content type.
Content Type Field Mapper: Define fields of a particular content type that you want to explicitly include in translation. For example, you can select specific fields such as name or item_description within a content type to ensure only those fields are translated.

Note:
- While mapping Modular Blocks, use syntax such as:
- modular_blocks[].block_a.heading: Sends all instances of block_a.heading inside modular_blocks to XTM.
- modular_blocks[0].block_a.heading: Targets only the first instance.
- Do not use an index and empty brackets together. For example: modular_blocks[0].block_a.group[].title is invalid.
- While mapping Modular Blocks, use syntax such as:
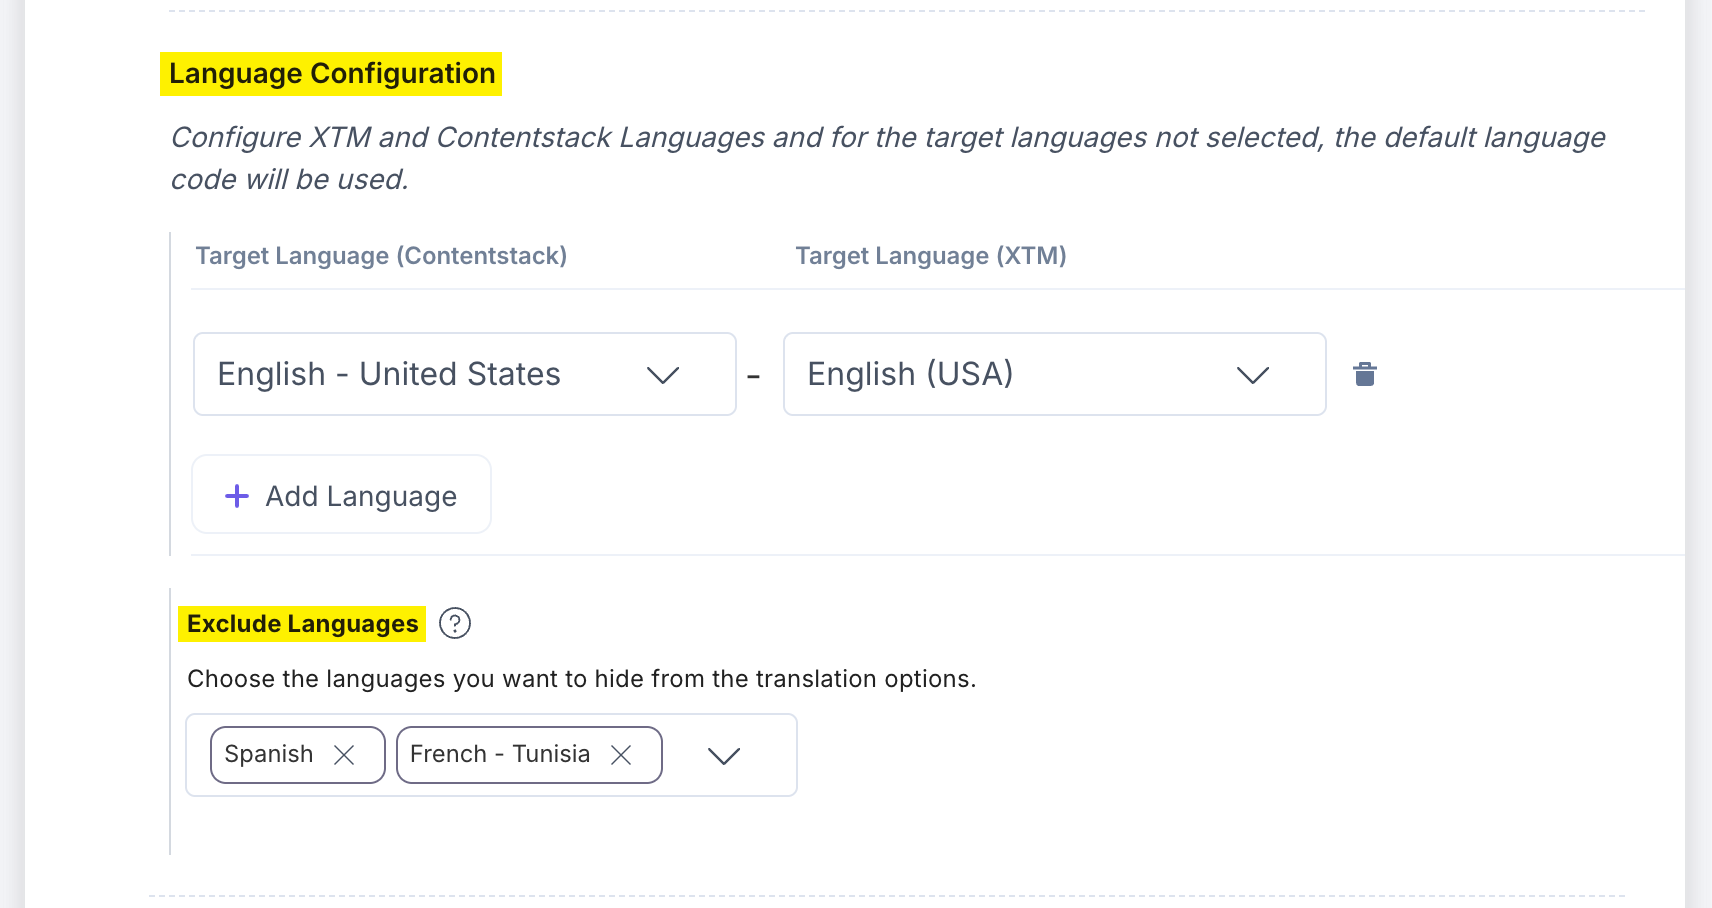
- Language Configuration: Define the content translation languages for XTM and Contentstack to avoid any mismatch between the language codes.
Click the Add Language button to add a language. All entries from XTM languages will be localized into the corresponding Contentstack languages.
For any target languages not selected, the app uses the default language code of the stack.
Exclude Languages: Select the language(s) from the dropdown that you want to remove from the Language dropdown in the sidebar.
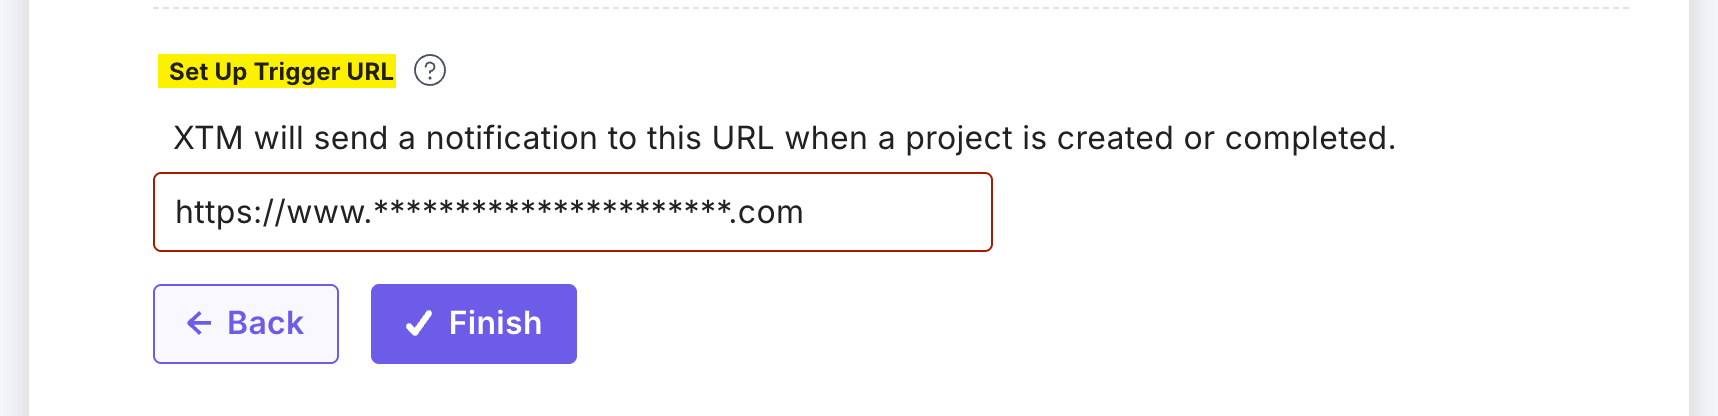
- Set Up Trigger URL: Configure your endpoint to receive automatic triggers from XTM. A POST request is sent when a project is created, and a GET request is made when the project is completed.
- Exclusions: You can specify which fields or languages should be excluded from the translation process:
- Once done, click Finish.
- If you want to reset the configuration settings, click the Reset Configuration button. A popup will appear. Click the Reset Config button to reset the entire configuration.
- XTM Fields: Enter your XTM credentials to connect Contentstack with your XTM account.
- After adding the configuration details, click the Save button.
- On the UI Locations tab, you can see the predefined app locations. You can use the toggle button corresponding to each UI location to enable or disable it based on your requirements.
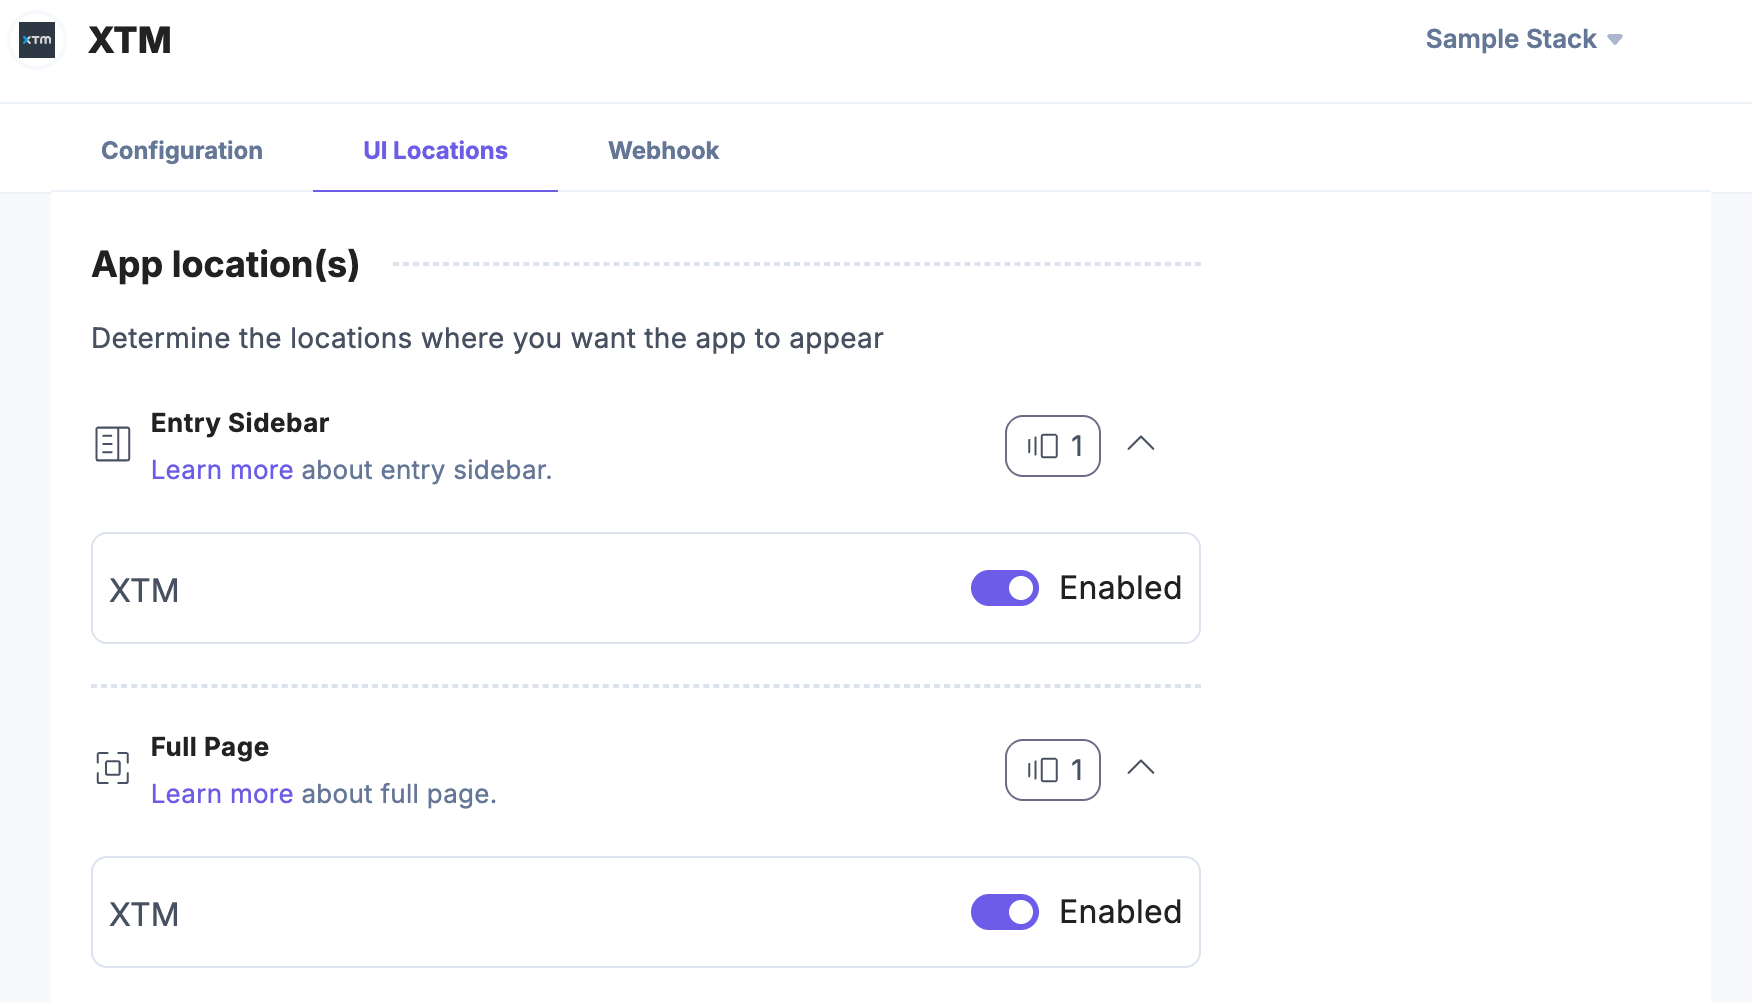
- If the webhook is enabled for your app, you can view the webhook logs under the Webhook tab.
Additional Resource: For more information on UI locations and webhooks, refer to the Installed Apps guide.
- Navigate to the “App Switcher” icon in the top-right corner and click Marketplace.
Use the XTM App for Machine Translation
To create projects for translation using the XTM app, you can use Workflow, Entry Sidebar, and Full Page Location.
Using XTM in a Workflow
To use XTM in a workflow, log in to your Contentstack account and follow the steps given below:
Note: We assume that you have created a workflow in step 2 and then configured the workflow and workflow stages under Contentstack Fields in the XTM app configuration in step 3.
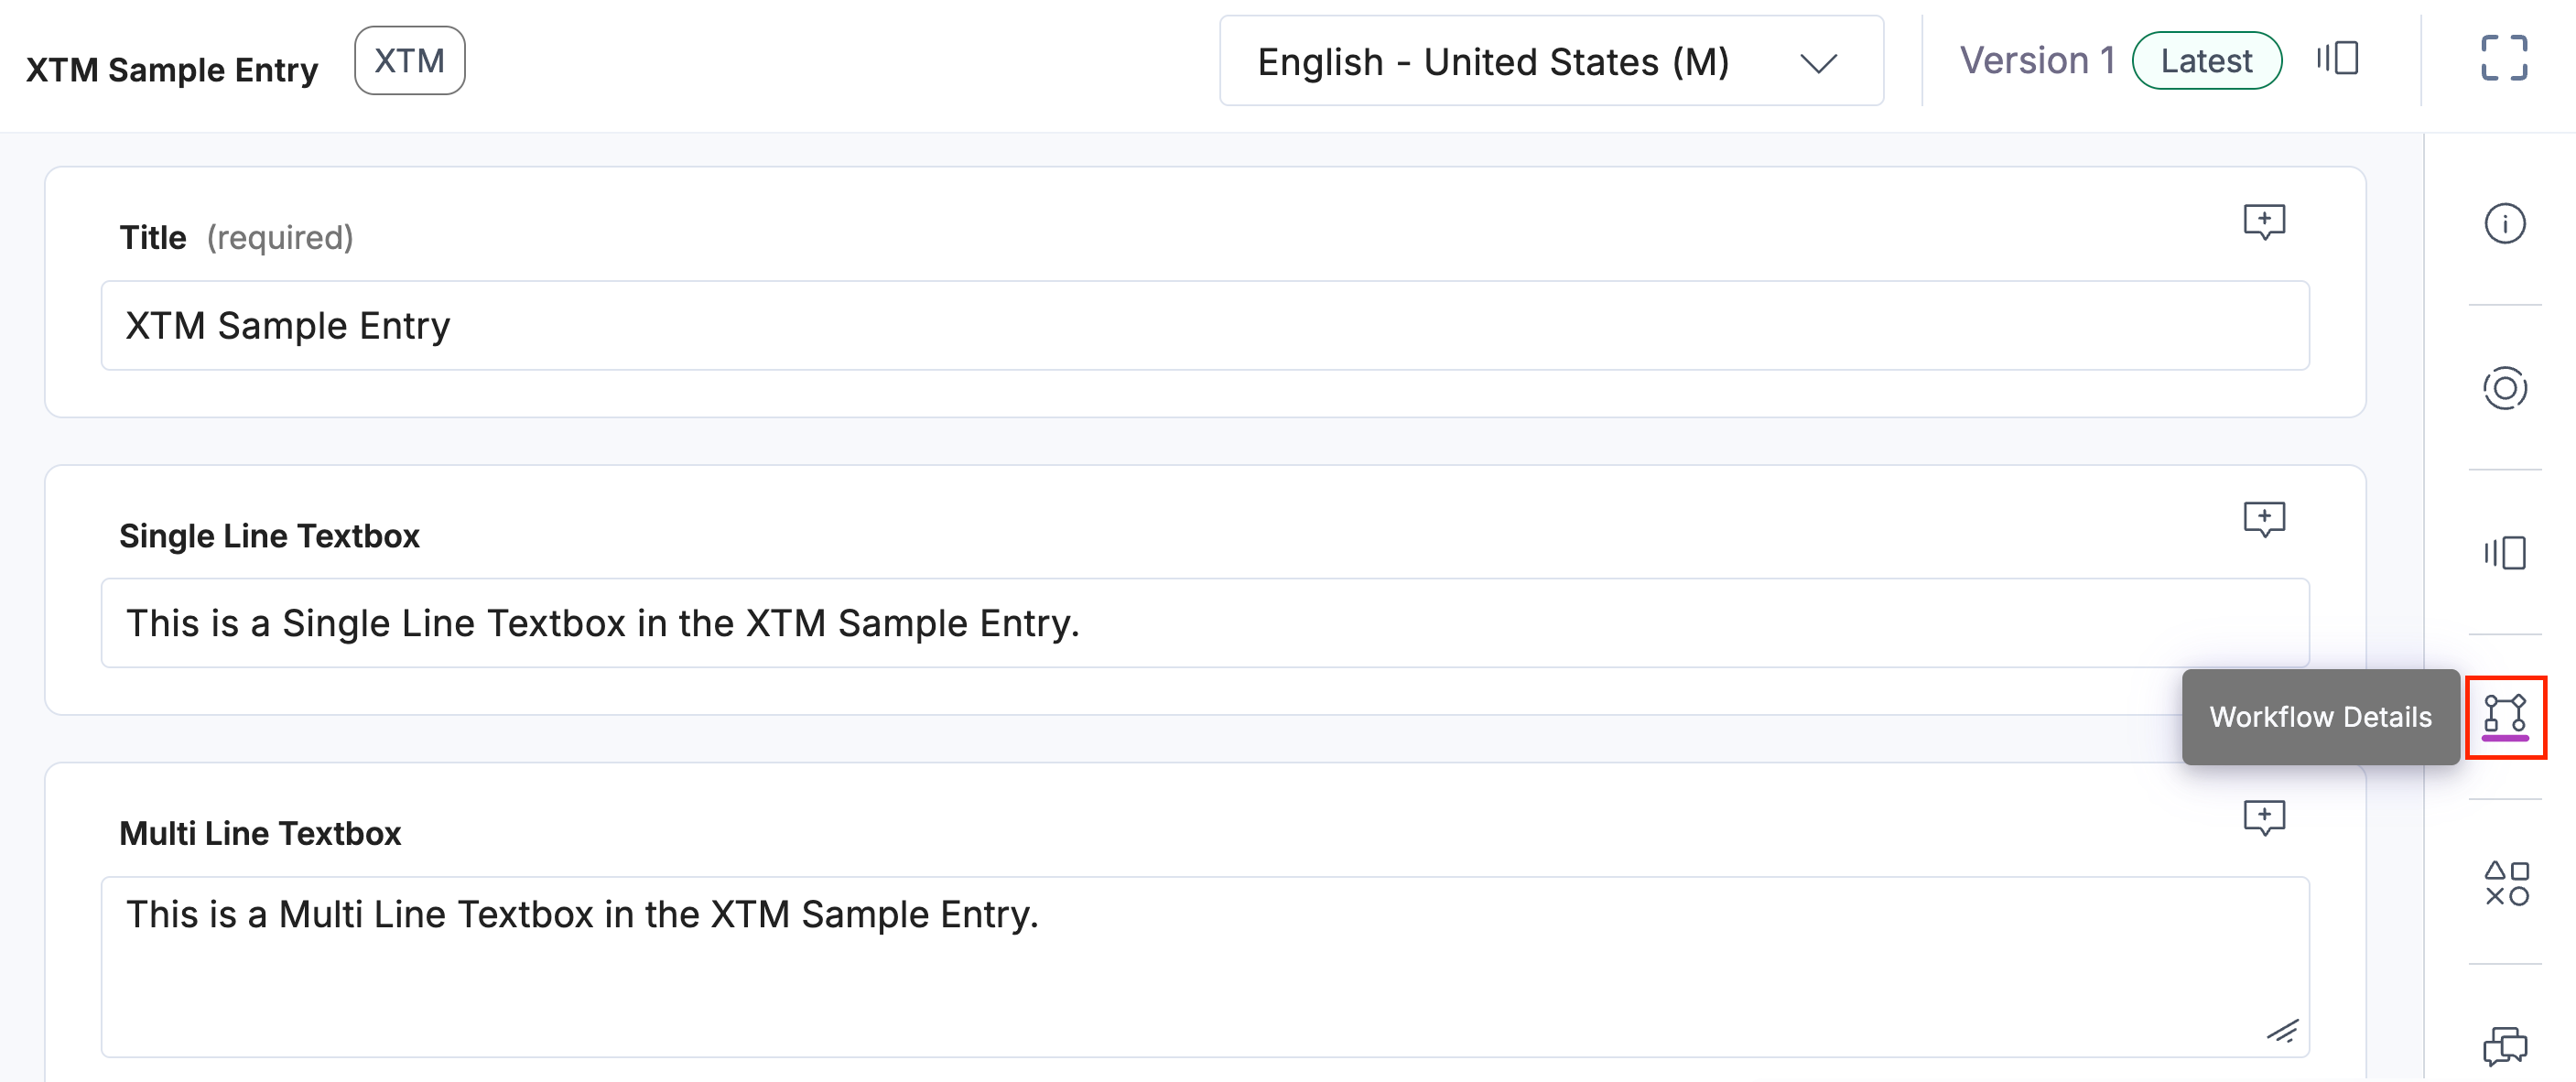
- Navigate to Entries from the header and open the entry you want to translate. Then click the “Workflow Details” icon from the right navigation panel.
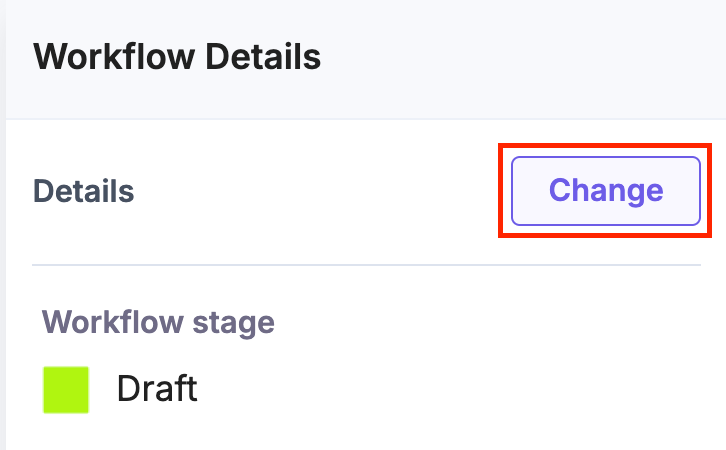
- To initiate the translation process, change the workflow stage as defined in the app configuration in step 3 by clicking the Change button.
- Select the next workflow stage from the Set Workflow Stage dropdown. For instance, after Draft, select the Send for Translation stage to create a project and initiate the translation.
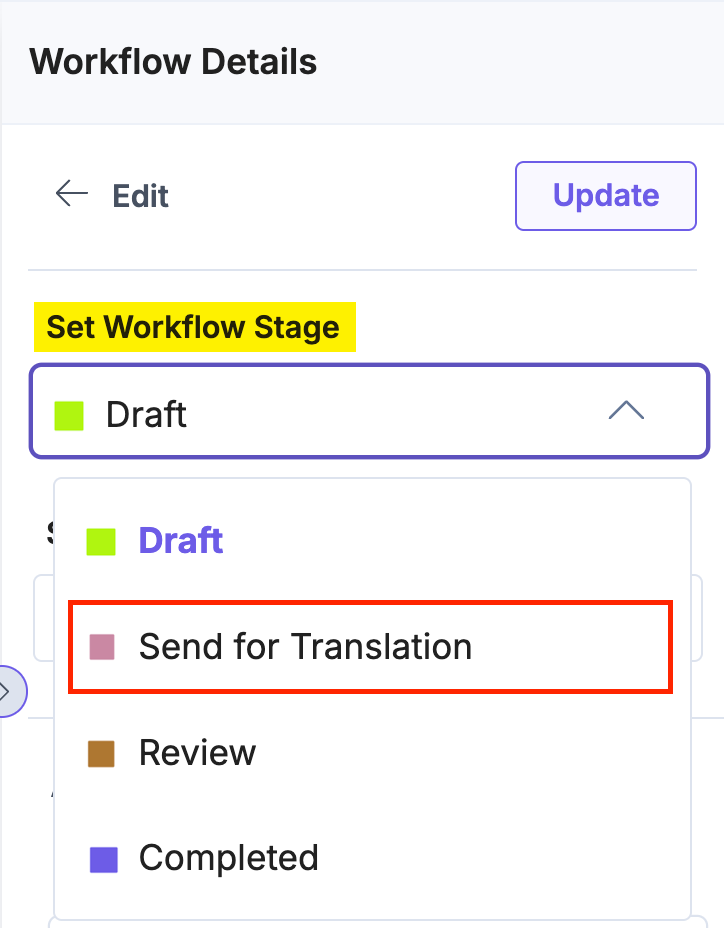
- You can also set a due date, assign to users or roles, add comments, and then click the Update button.

Note: If you want to use the JSON Rich Text Editor field, you can select the XTM pre-configured JSON RTE template option from the Filter Template drop-down. To configure the Filter Templates in your XTM account, please contact XTM support.
Using the XTM App as an Entry Sidebar
To use the XTM app as an Entry Sidebar, log in to your Contentstack account and follow the steps given below:
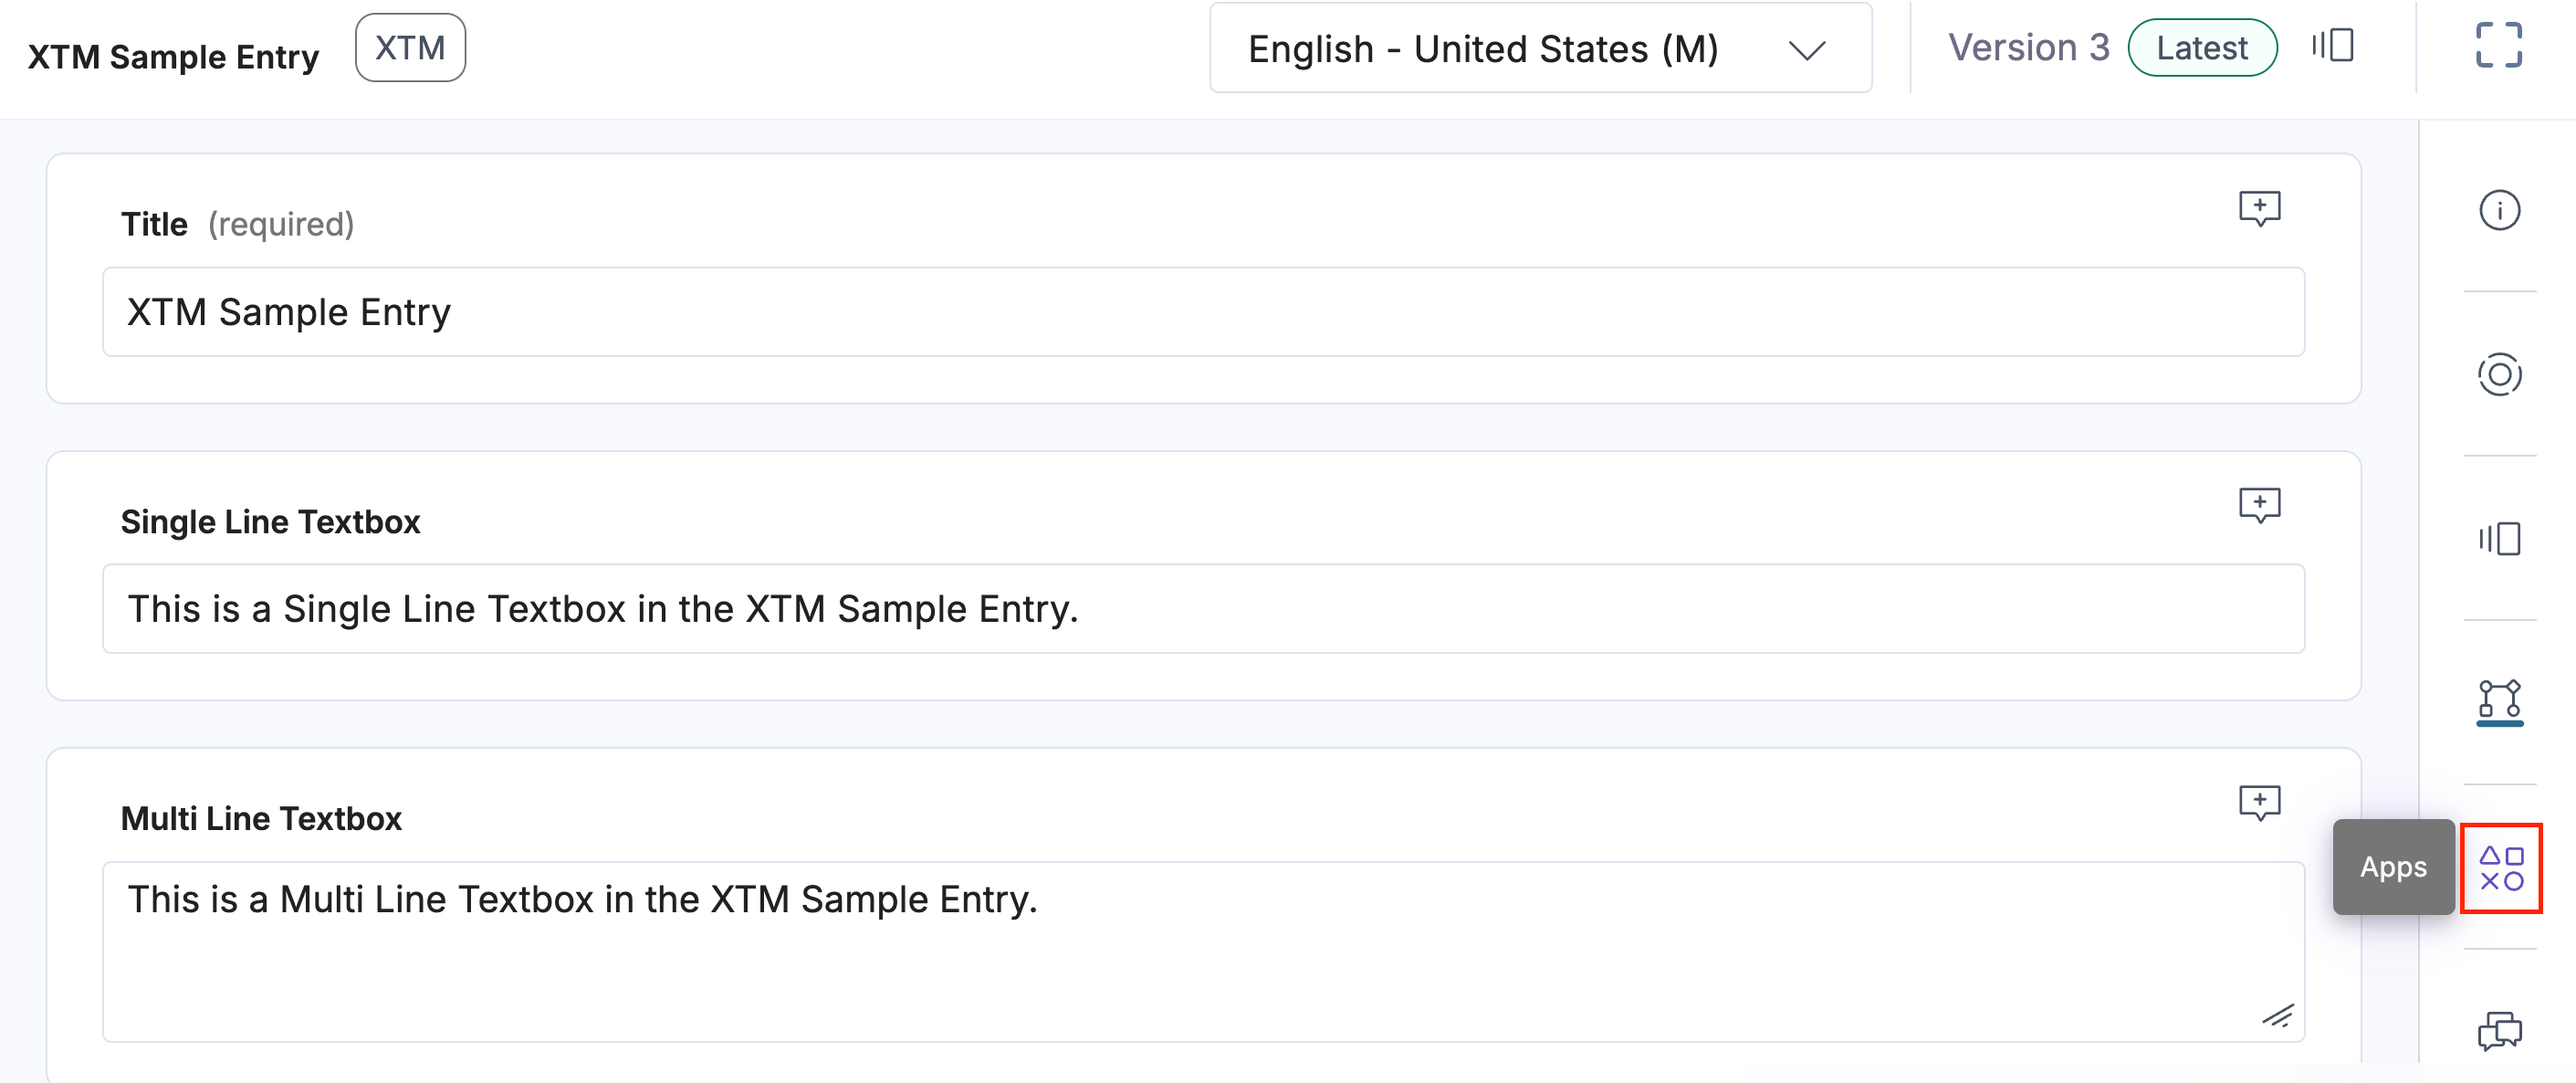
- Navigate to Entries from the header and open the entry you want to translate. Then click the “Apps” icon from the right navigation panel.
- Select XTM from the dropdown and fill in all the fields under the Translate tab.
- Project Name: Enter the project name to create a project for translation.
- Select the Language or Template option:
- Language: If you want to use Language, choose the respective radio button. Then select the locales from the Language dropdown, and choose the Filter Template.
If Auto Assign Template is configured under XTM Fields during app configuration in step 3, it will be selected by default in the dropdown. You can also select any template from the dropdown.
Enable the Exclude XTM Workflow toggle button if you want to exclude the XTM Workflow configured under XTM Fields during app configuration in step 3.
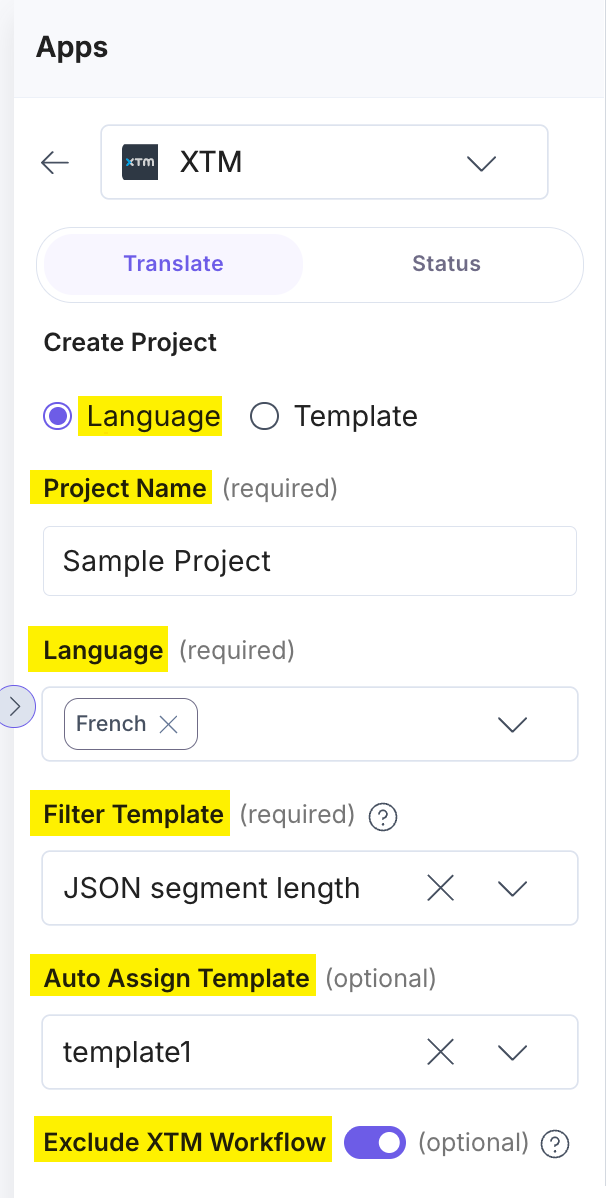
Note: If you are using the JSON Rich Text Editor field, select the JSON RTE Filter template option in your XTM account.
- Template: Click the Template option and select a template from the dropdown.
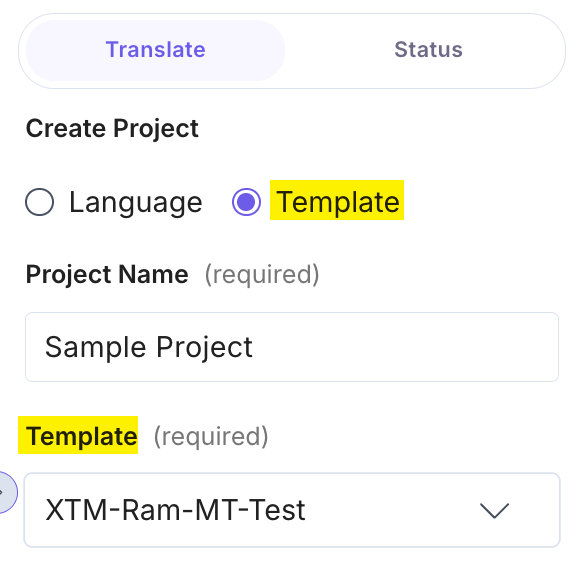
- Language: If you want to use Language, choose the respective radio button. Then select the locales from the Language dropdown, and choose the Filter Template.
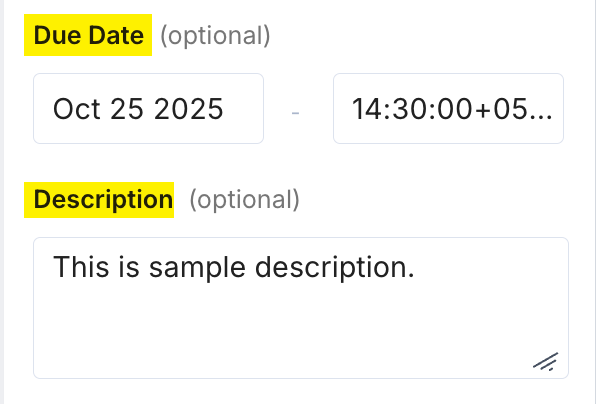
- Due Date (optional): The due date selected in the Sidebar app will be displayed in the Delivery due date field of the General info section for the specified project in XTM.
- Description (optional): The description provided for the project in the Sidebar app will be displayed in the Description field of the General info section for the specified project in XTM.
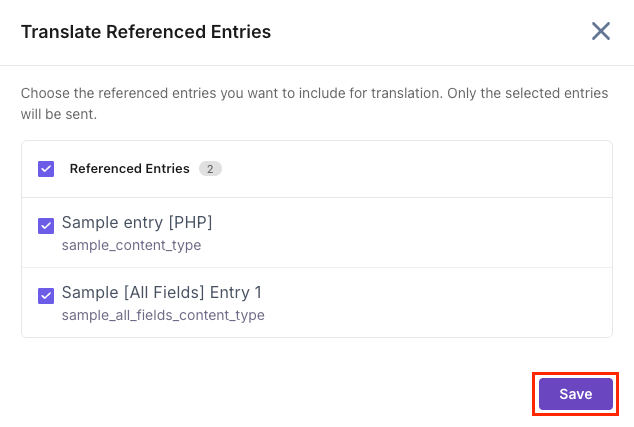
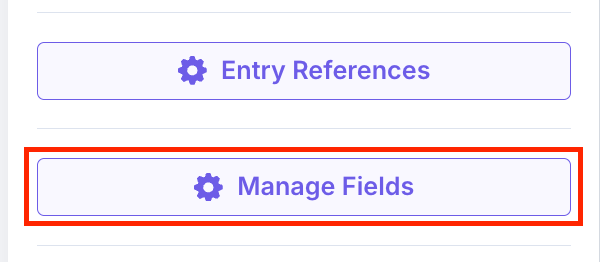
- Entry References: You can add referenced entries for translation directly from the sidebar by clicking the Entry References button.

In the Translate Referenced Entries modal, select the referenced entries and click Save.
- Manage Fields: Click the Manage Fields button. In the Manage Fields modal, all fields are selected by default. If fields are specified in the Exclusion or Inclusion settings in the configuration, the fields displayed in the Manage Fields modal will reflect those settings.
Deselect the fields you want to exclude from the translation and click Save.
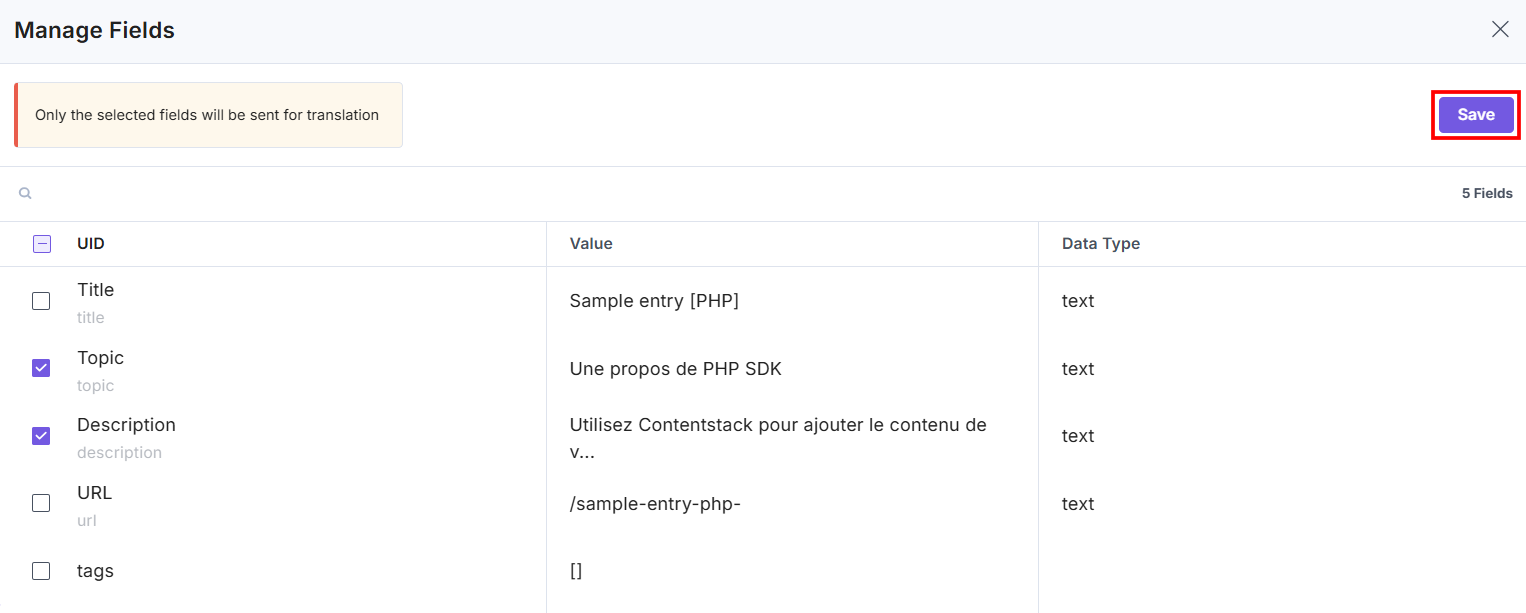
Note: Manage Fields settings will be saved for only one instance.
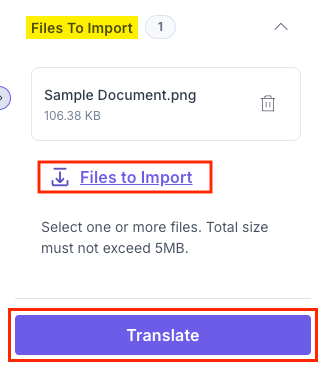
- Files to Import: You can import multiple reference files for translation by clicking the Files to Import button.
Note: Total size must not exceed 5 MB.
- Translate: Click the Translate button to complete the project creation and start the translation process.
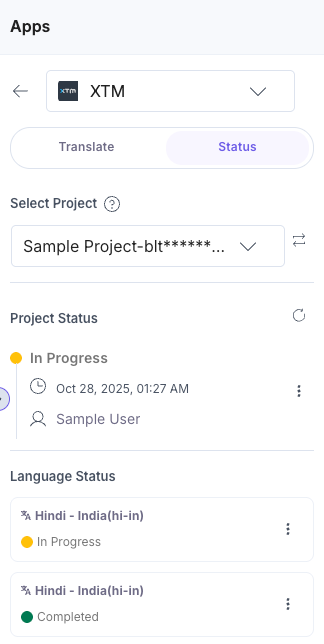
- You can view the translation status under the Status tab by selecting a project using the Select Project dropdown. This dropdown holds the Project Name of the translation projects.
You can view the status of your project, and the date and time of update under the Project Status section. Click the vertical ellipses to Cancel or Reanalyze your project.
Note: When you click Cancel, the project deactivates only in the XTM portal. The localized language remains as it is.
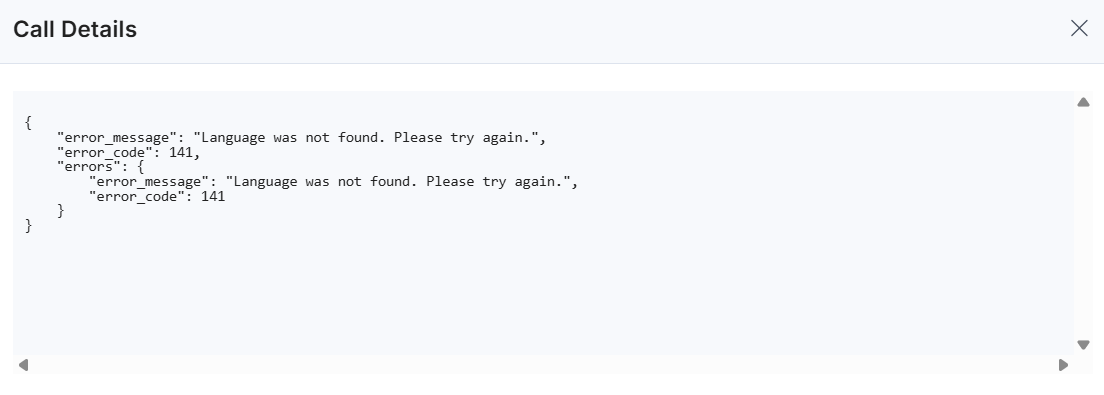
In the Language Status section, you can view the status of the individual language you selected. Click the vertical ellipses to use the View Error (in case of errors), Open Entry, or Cancel options.
Note: You can view the translation status of up to 10 recent projects in the XTM dashboard.
- After successful translation, you can view the translated content in the entries.
Using XTM as a Full Page Location App
To use the XTM app in Contentstack, log in to your Contentstack account and follow the steps below:
- Navigate to the stack dashboard, click Apps from the header, and select the XTM app.

- You can view the XTM app within your CMS.
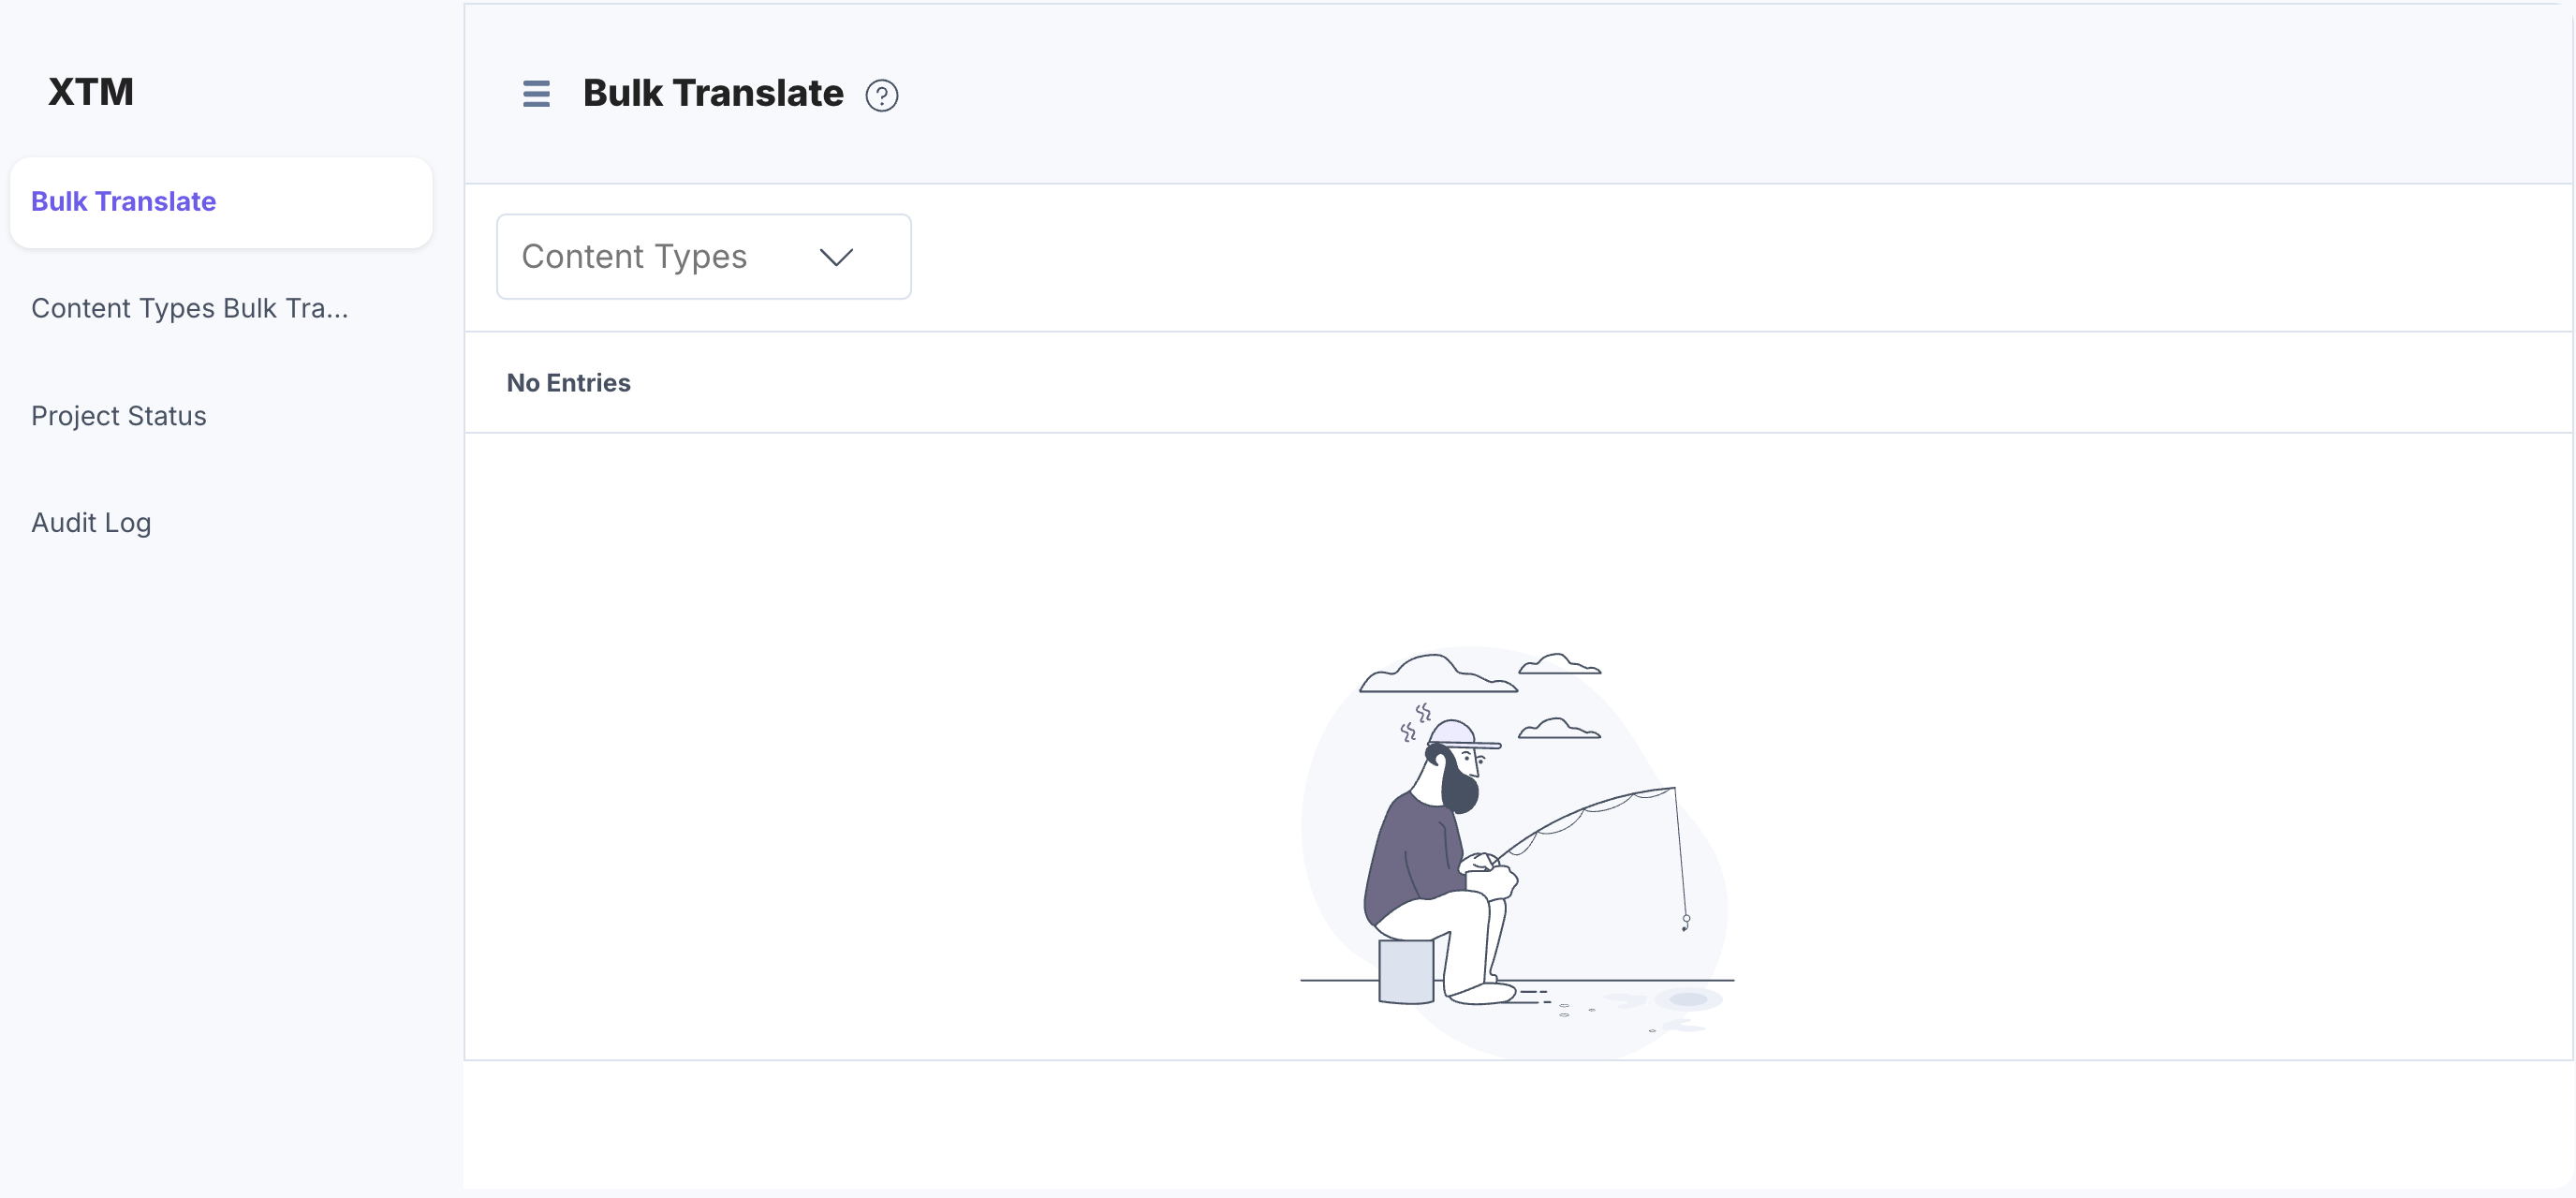
Note: Bulk Translate lets you choose specific entries from a content type to send for translation, while Content Types Bulk Translate sends all entries of selected content types for translation at once.
- The Bulk Translate feature sends selected entries for translation and tracks them in one place. To translate content using this option, follow the given steps:
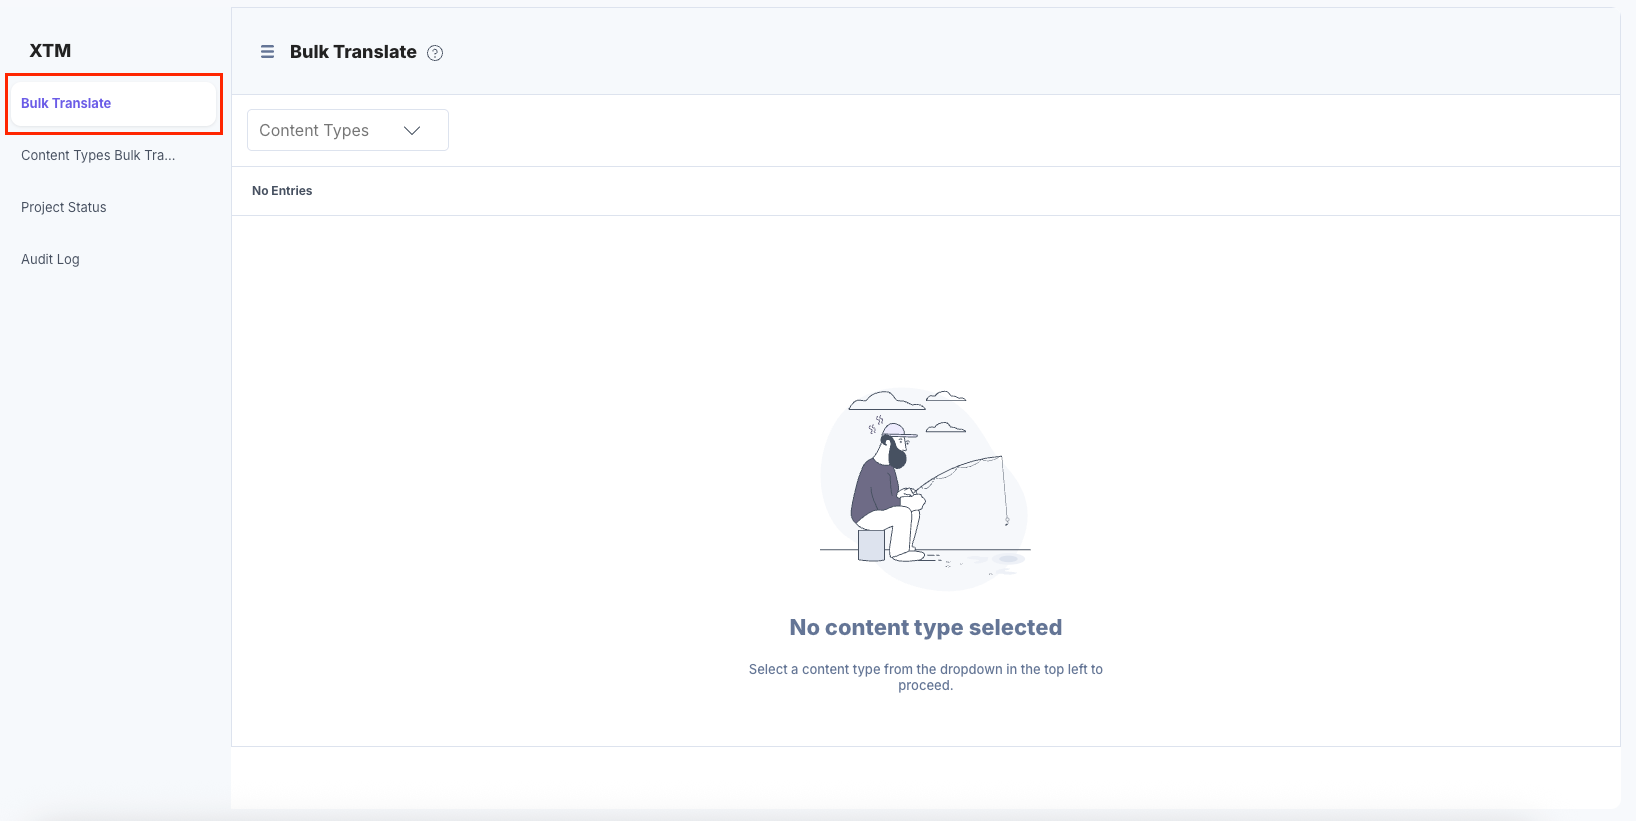
- Select the Content Type for translation.
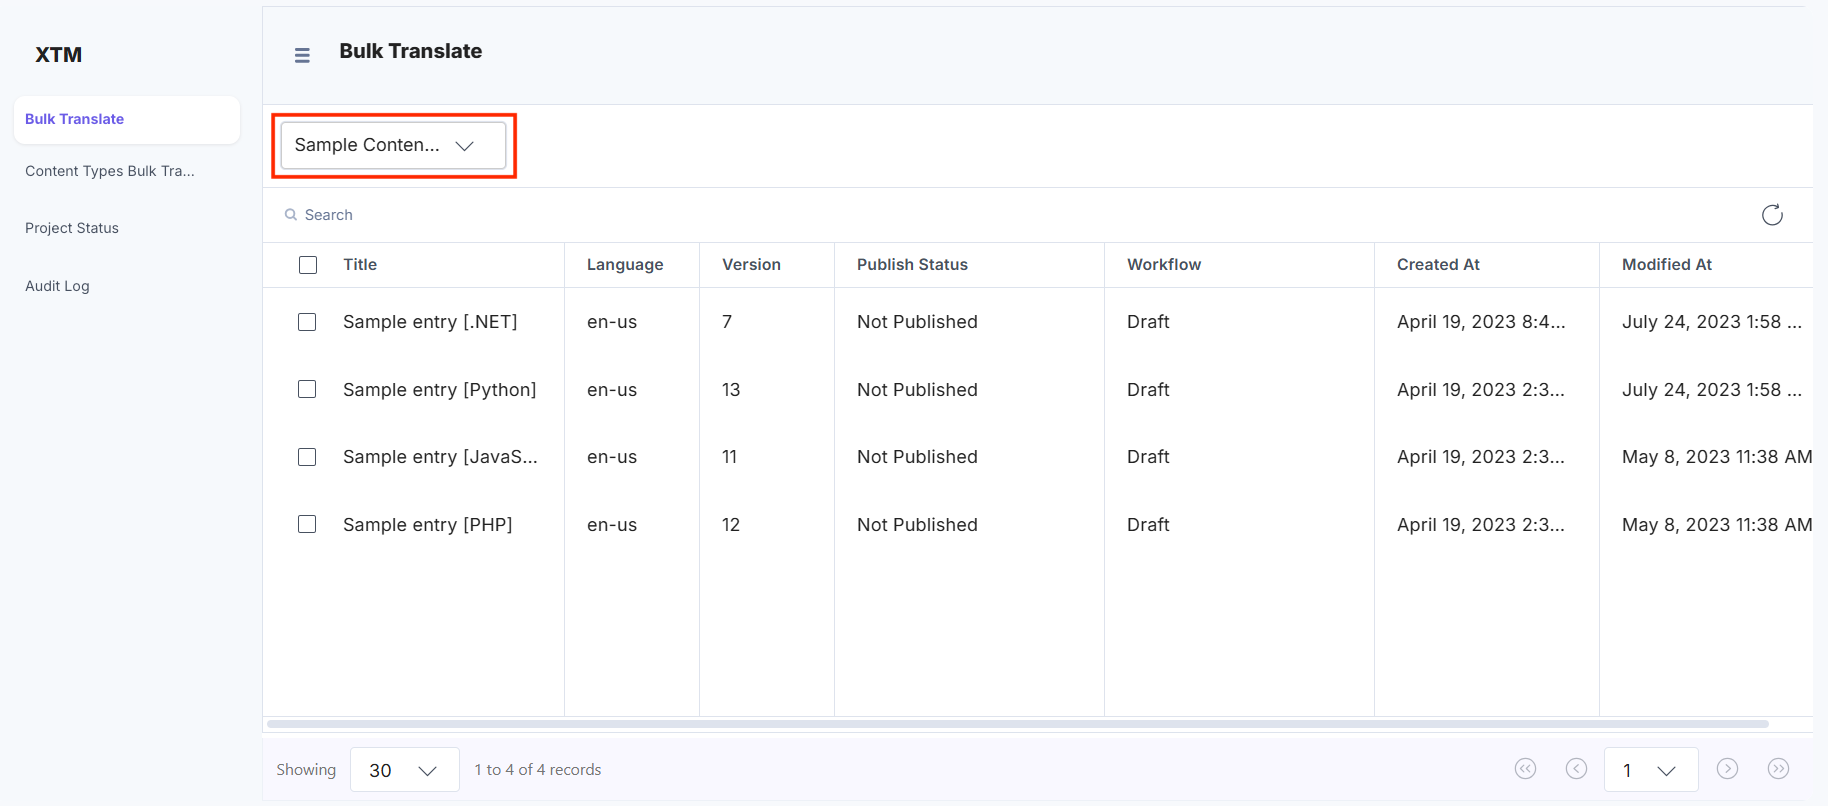
- Select entries for translation.
Note: You can translate up to 500 entries (including locale versions) at once.
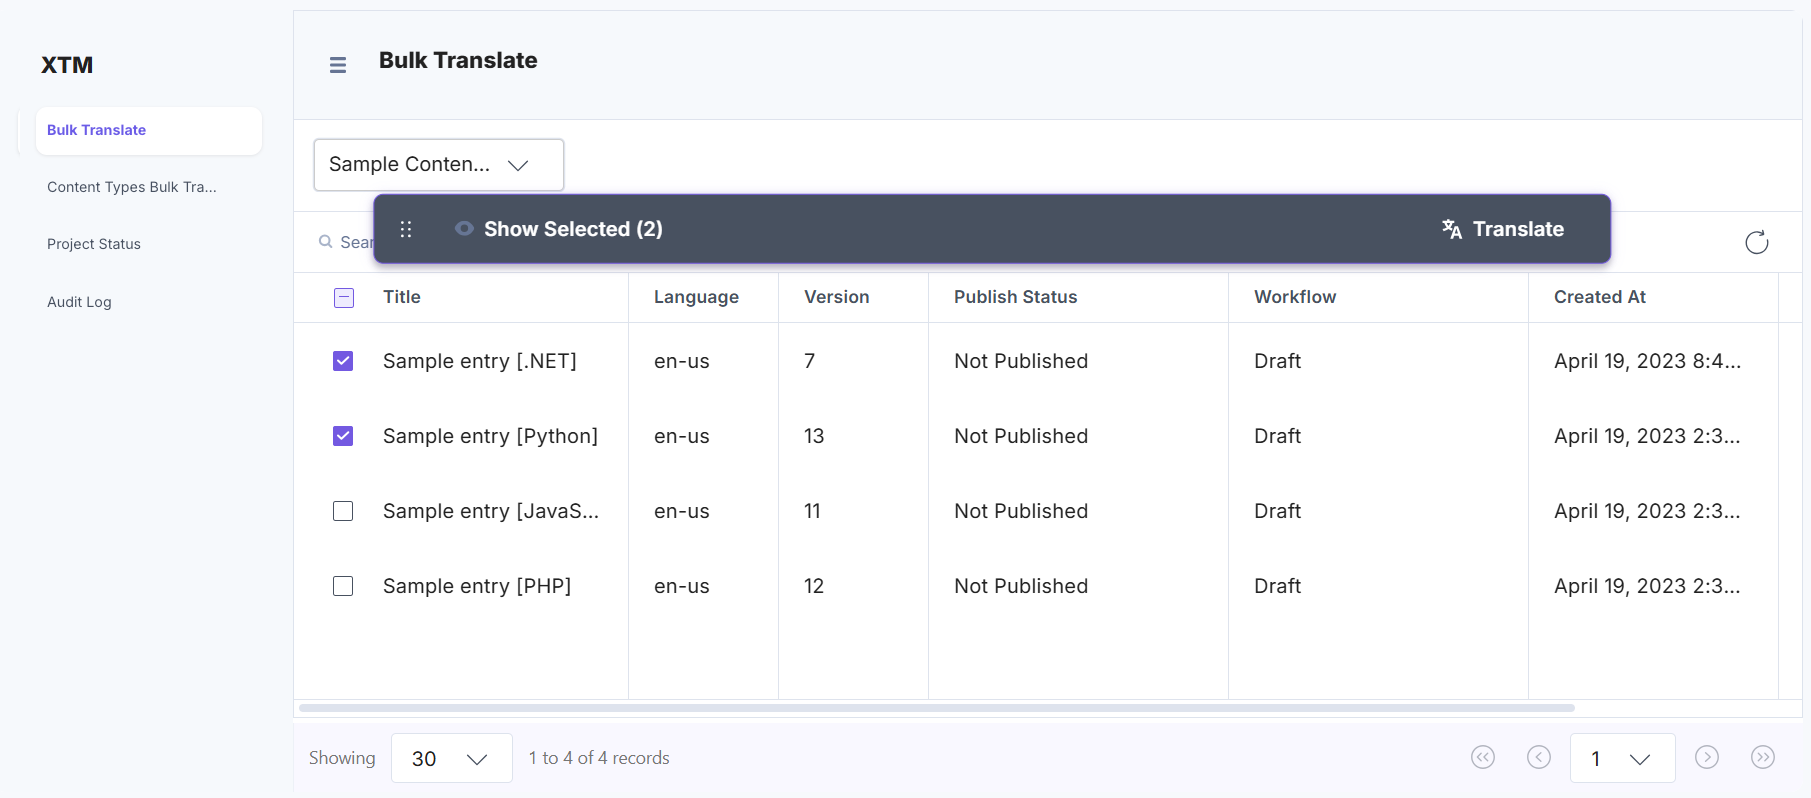
- After adding the entries, click Show Selected to view all the entries added for translation.
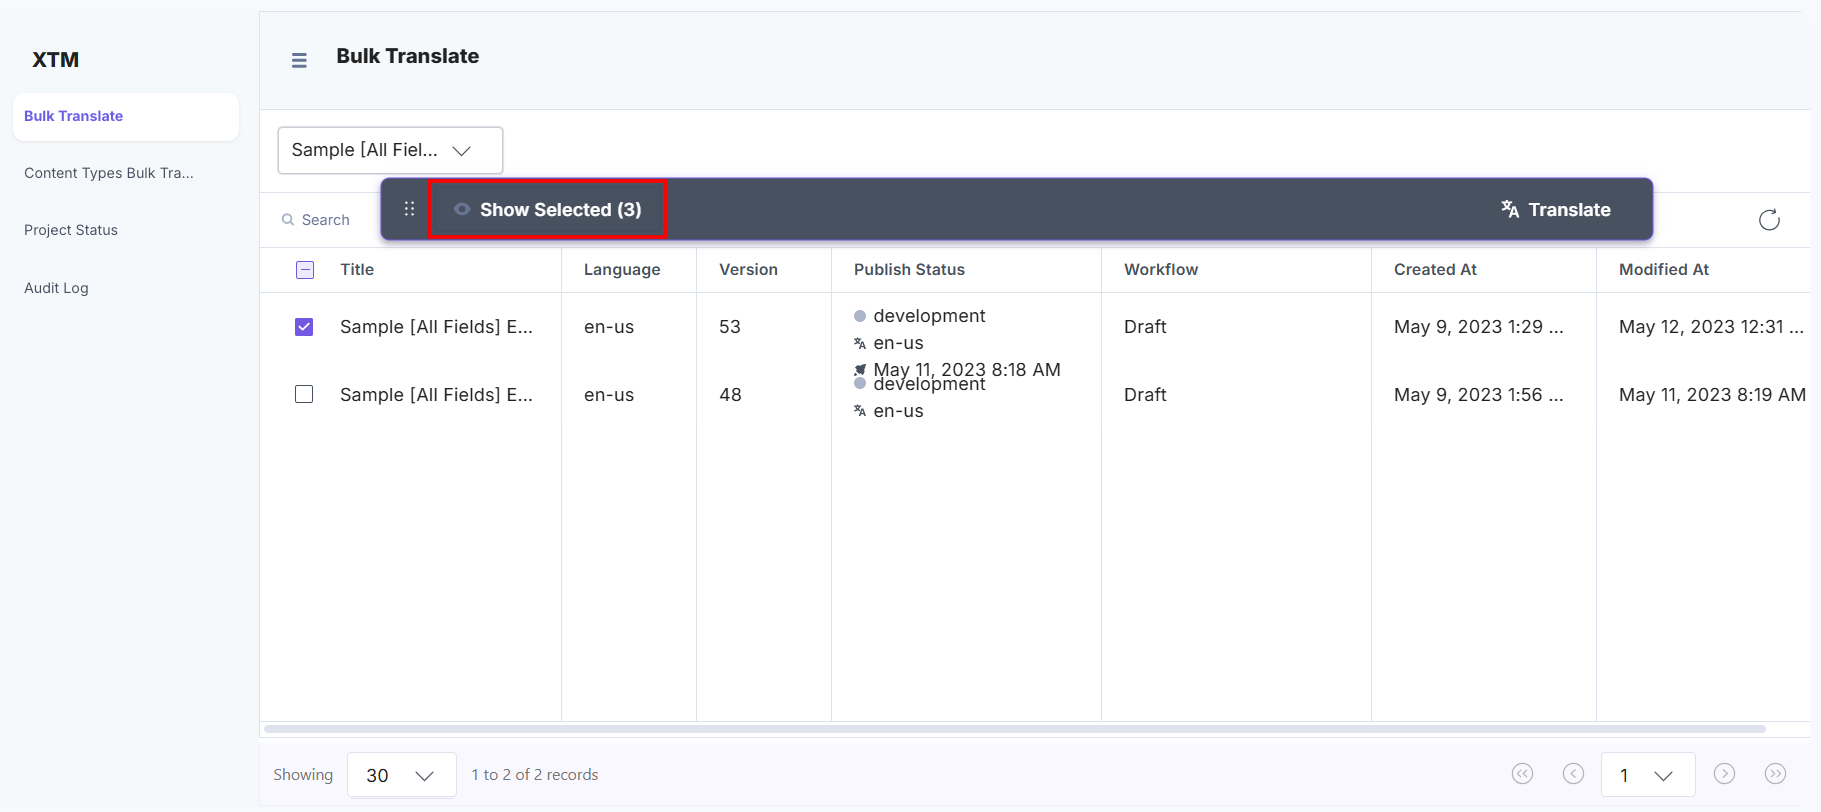
- To initiate the translation process, click Translate.

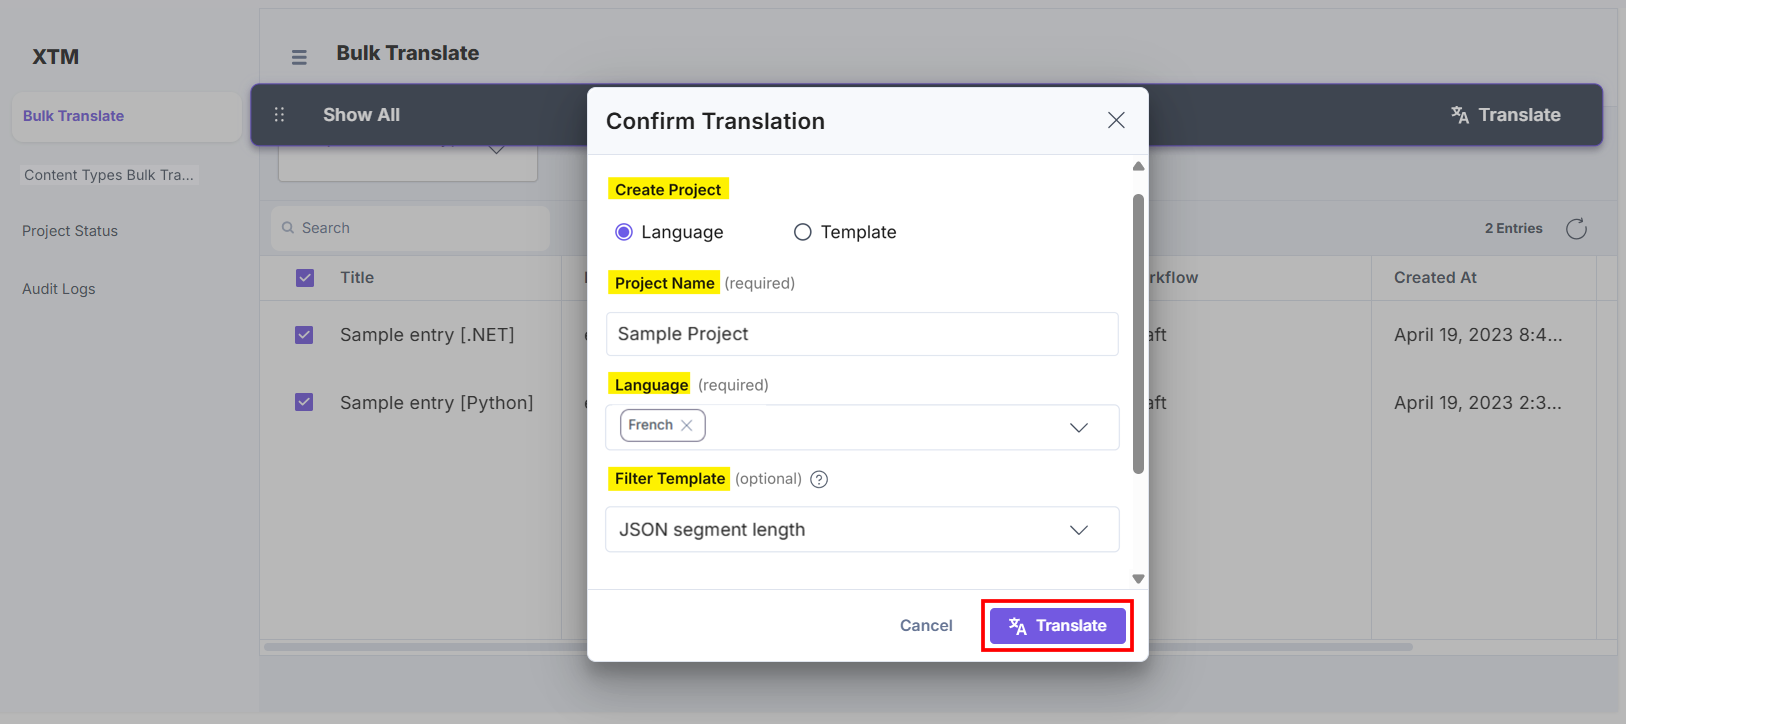
- In the Confirm Translation modal, fill in the details as follows:
- Provide the Project Name for the translation.
- Select the Language or Template option:
- Language: Click the Language option, then select a Language and a Filter Template from the respective dropdowns.
If Auto Assign Template is configured under XTM Fields during app configuration in step 3, it will be selected by default in the dropdown. You can also select any template from the dropdown.
Note: If you are using the JSON Rich Text Editor field, select the JSON RTE Filter template option in your XTM account.
- Template: Click the Template option and select a template from the dropdown.
- Language: Click the Language option, then select a Language and a Filter Template from the respective dropdowns.
- Set the date and time in the Due Date (optional) field for the translation process.
Note: The Deadline Date format is mm:dd:yyyy, and the time format is hh:mm:ssZZ, where ZZ refers to the time zone.
- Enter the Description (optional) for the XTM translation project.
- Under the Files to Import section, you can import reference files for translation.
Note: Total size must not exceed 5 MB.
- Once these details are added, click the Translate button.
- Select the Content Type for translation.
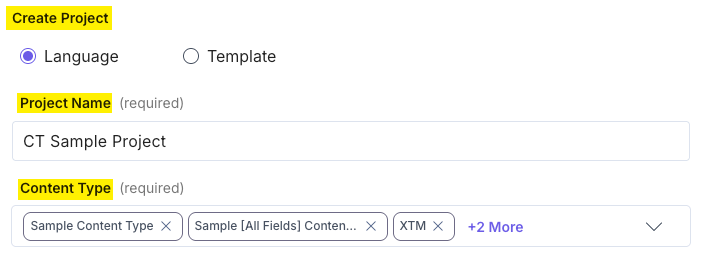
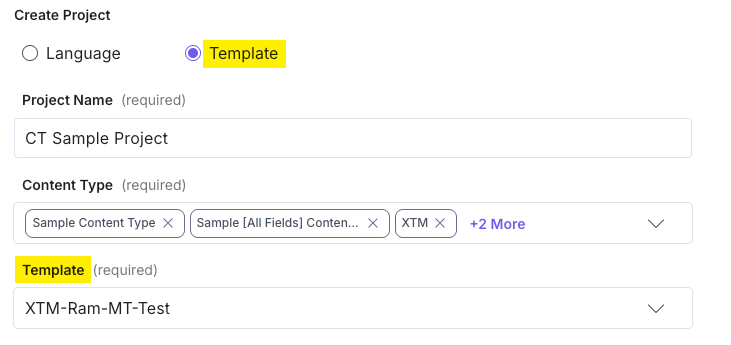
- The Content Types Bulk Translate option translates all entries across selected content types at once. To translate content using this feature, follow the given steps:
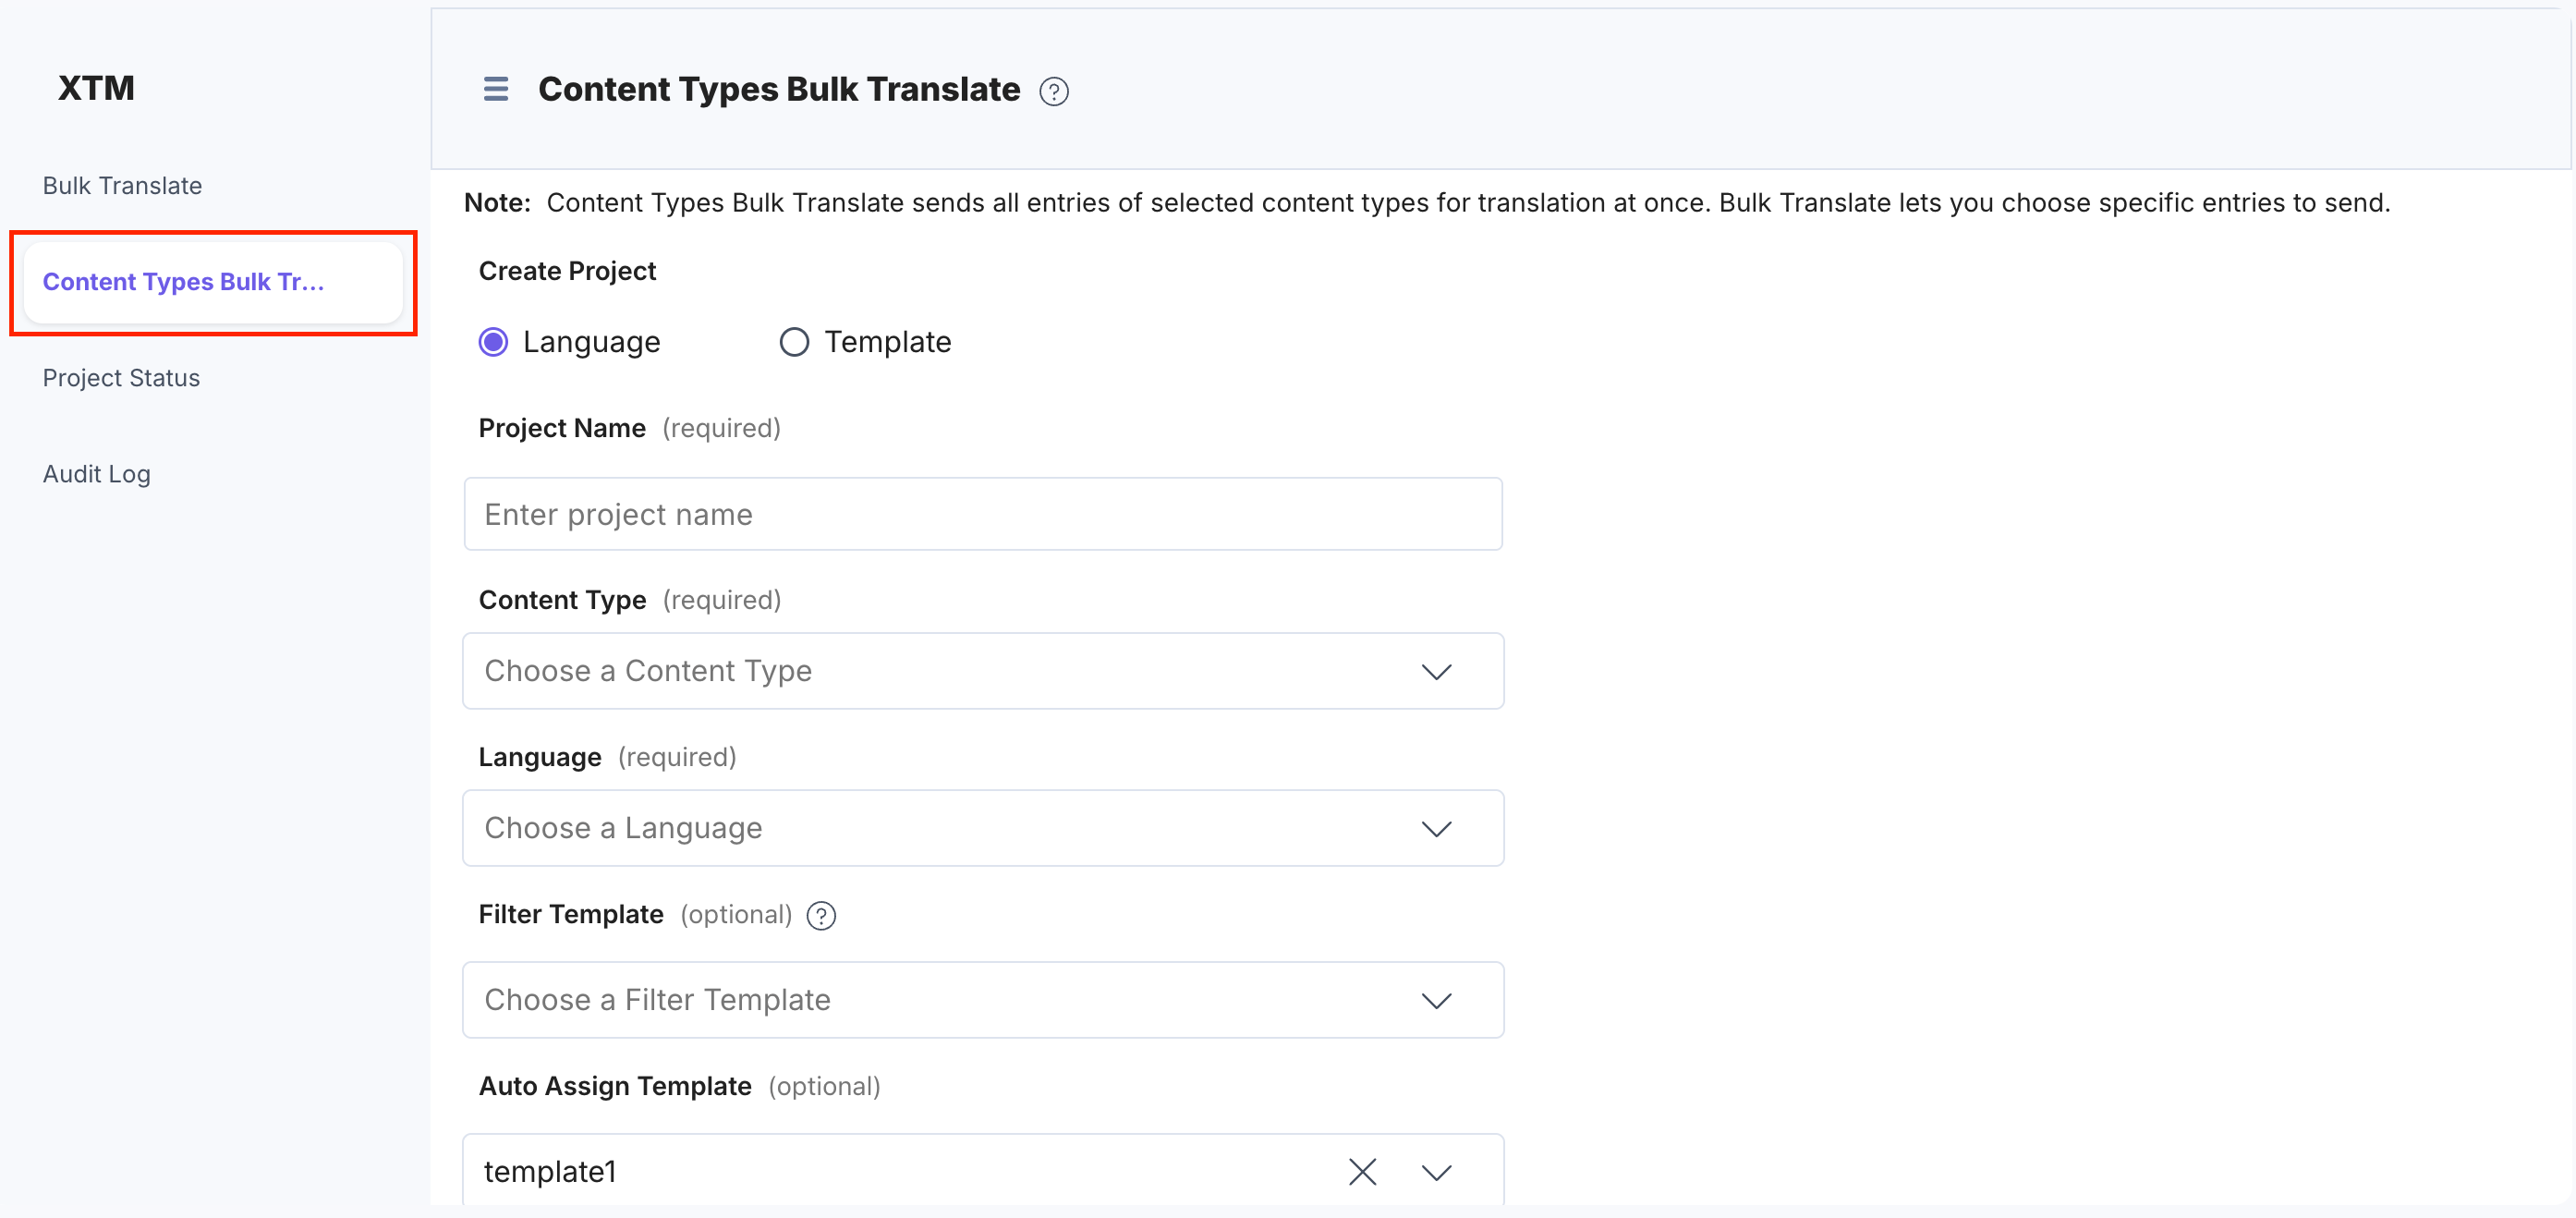
- You can Create a Project by providing the Project Name for the translation.
- Select Content Types from the dropdown. You can add multiple content types for translation at one go.
- Select the Languages or Templates option:
- Language: Choose the respective radio button. Then select the locales from the Language dropdown, and choose the Filter Template.
Note: You can add multiple locales for translation at once.
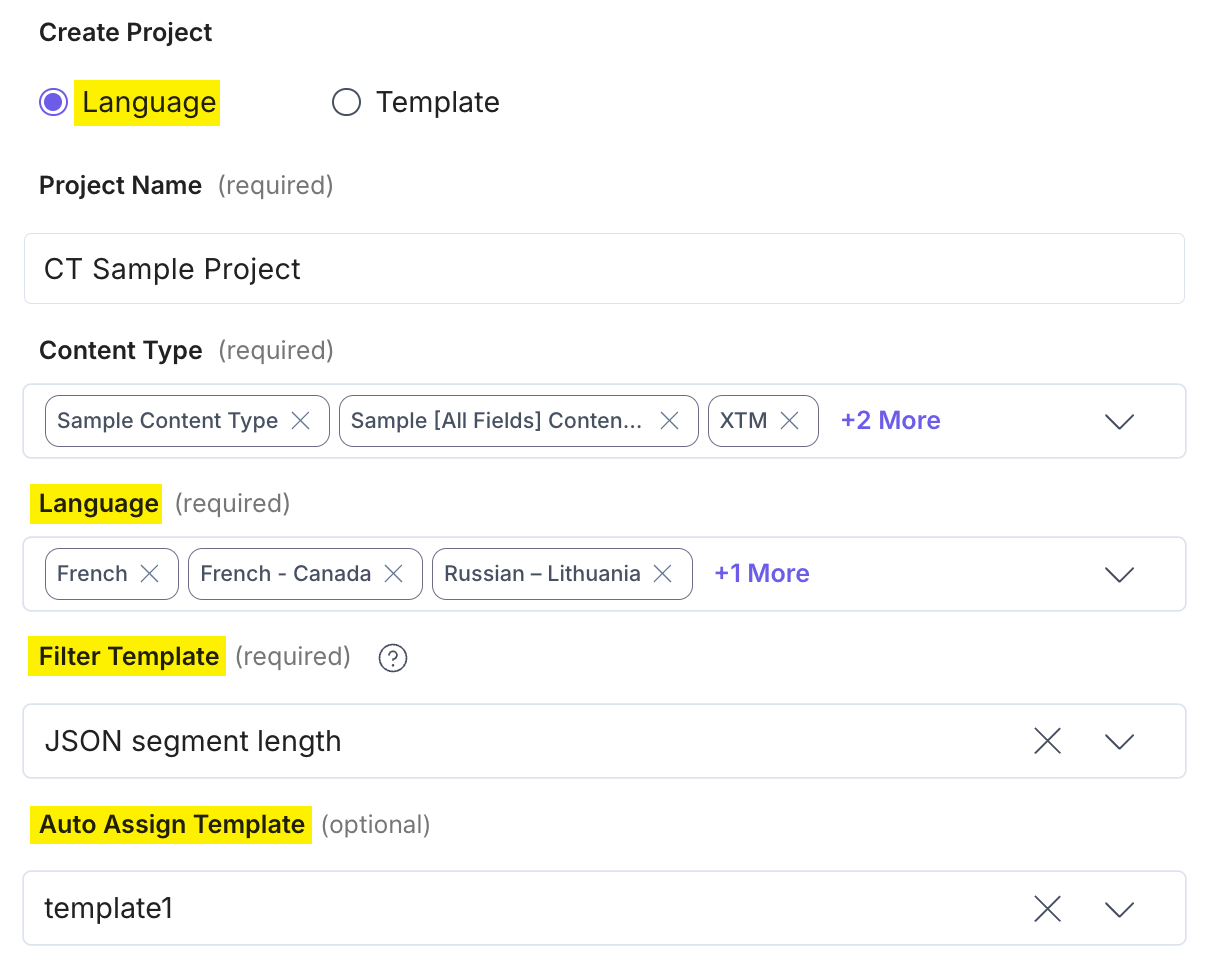
- Template: Choose the respective radio button and select the template provided in the dropdown.
- Language: Choose the respective radio button. Then select the locales from the Language dropdown, and choose the Filter Template.
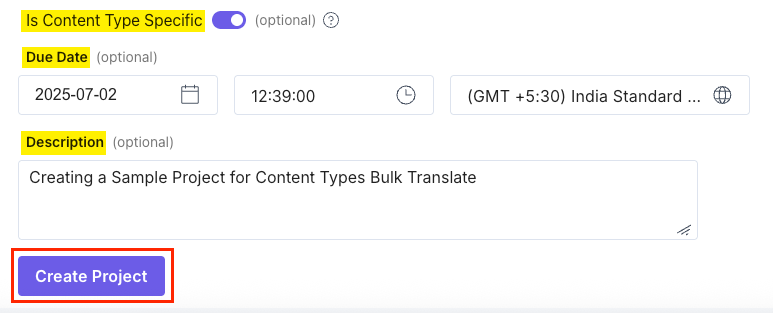
- Enable the Is Content Type Specific toggle to create a separate project for each content type in the XTM dashboard. Each project will be named using the format <Project_Name Content_Type_UID>. When disabled (default), all content types are grouped under a single Project Name as specified.
- Set the date and time in the Due Date (optional) field for the translation process.
Note: The Deadline Date format is mm:dd:yyyy, and the time format is hh:mm:ssZZ, where ZZ refers to the time zone.
- Enter the Description (optional) for the XTM translation project.
- Once these details are added, click the Create Project button to initiate the translation.
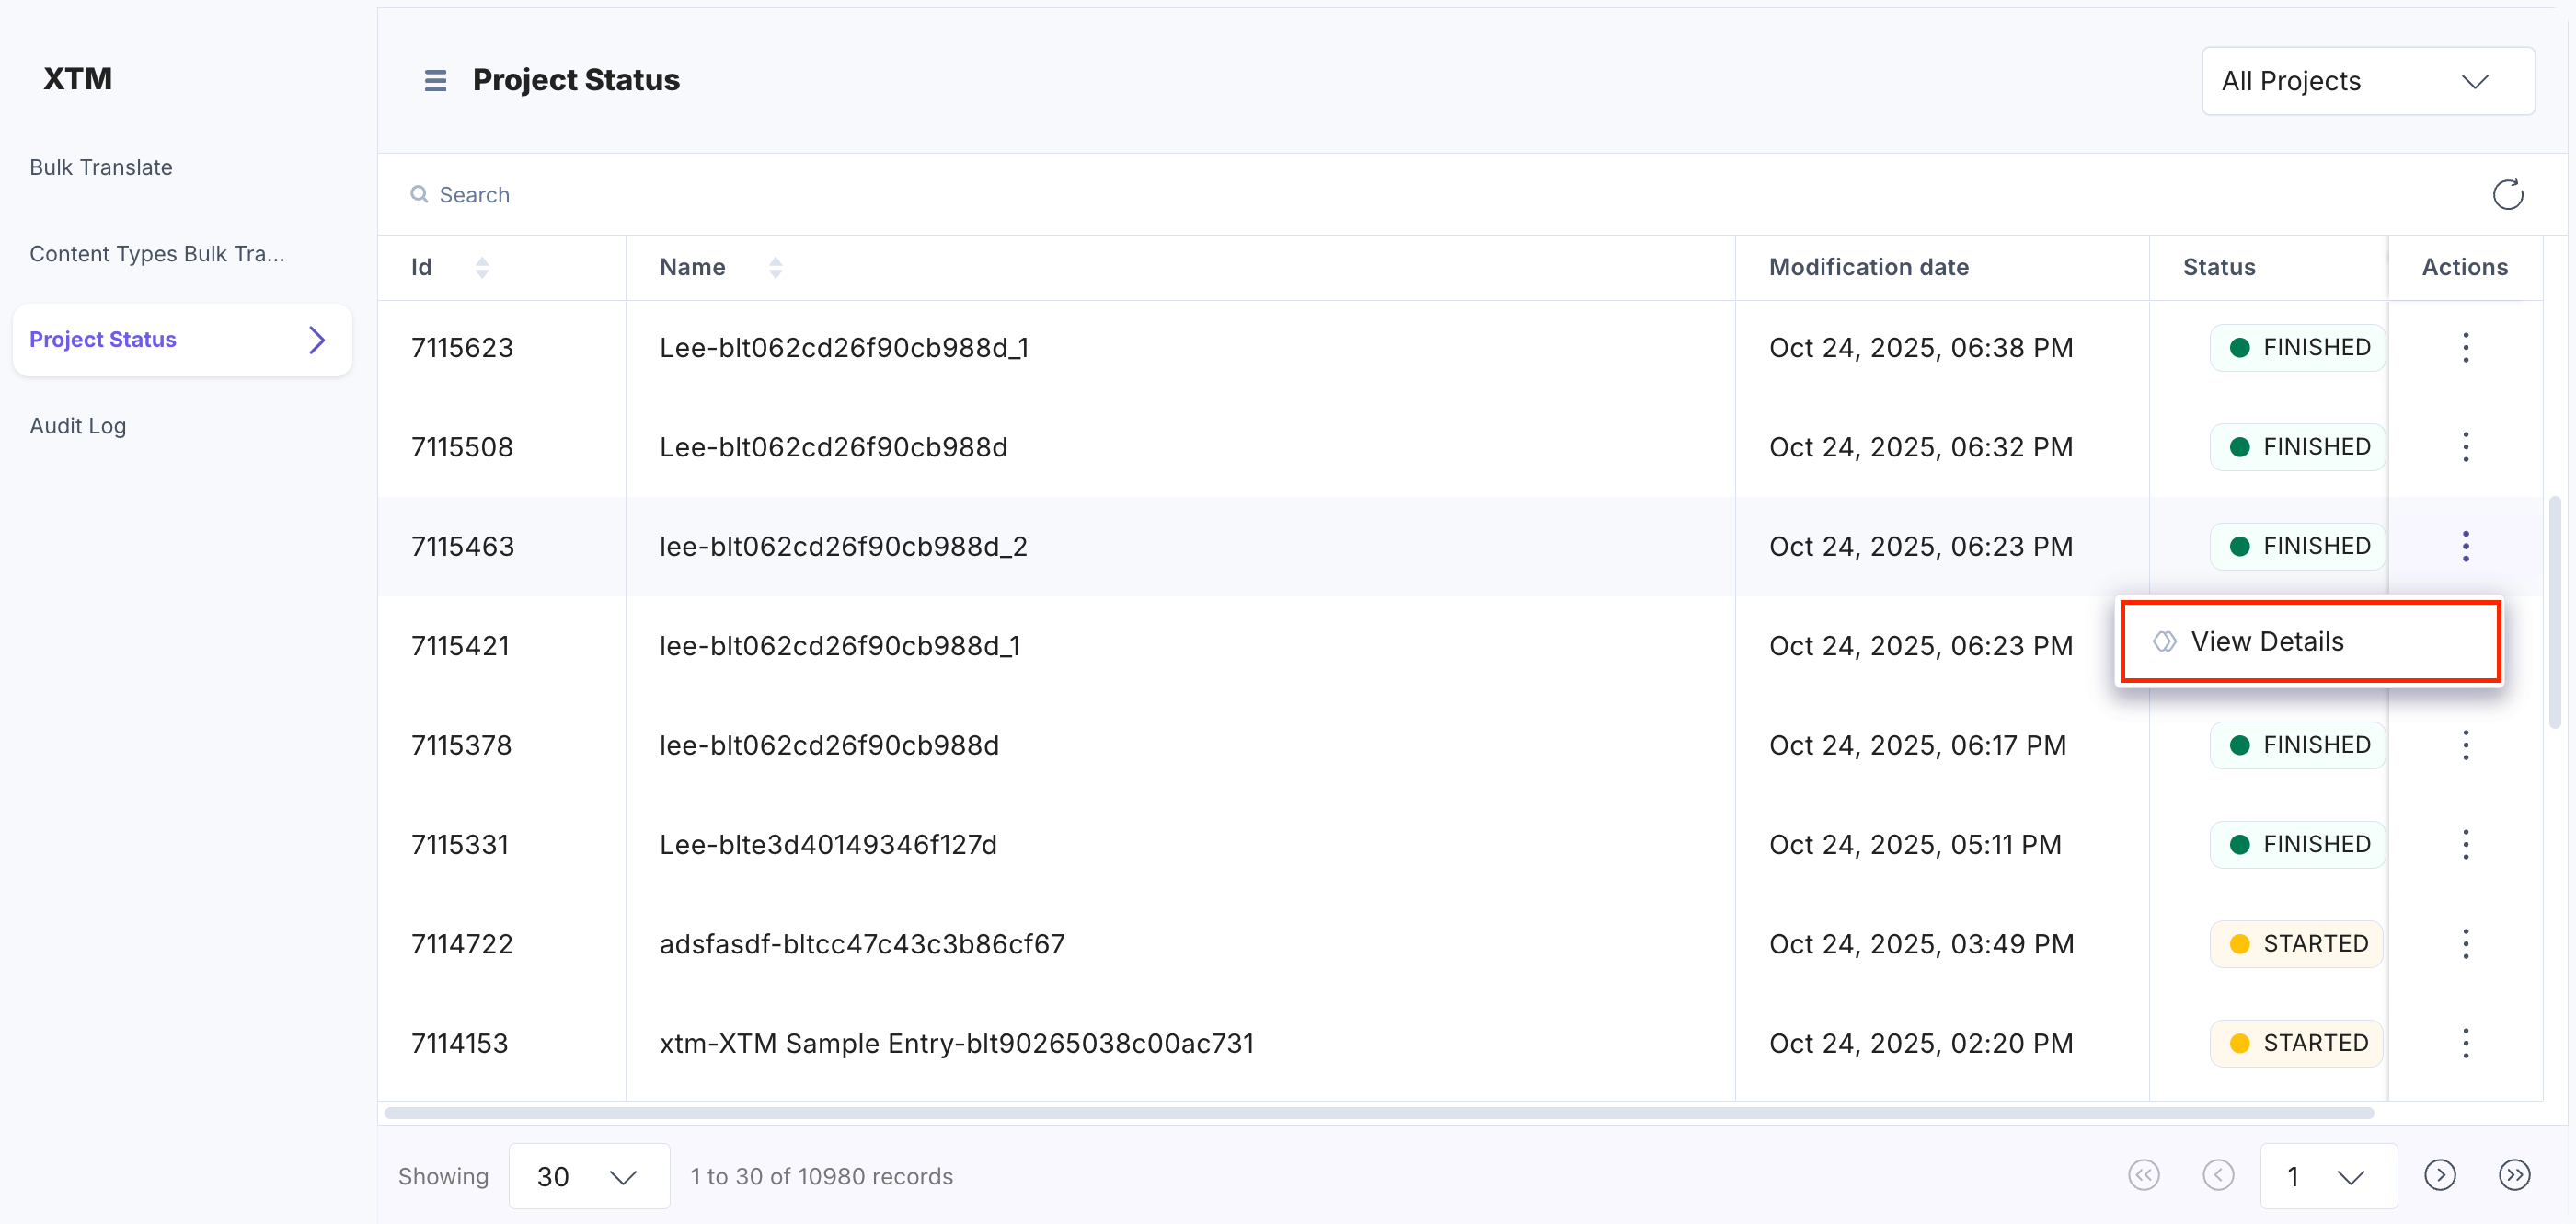
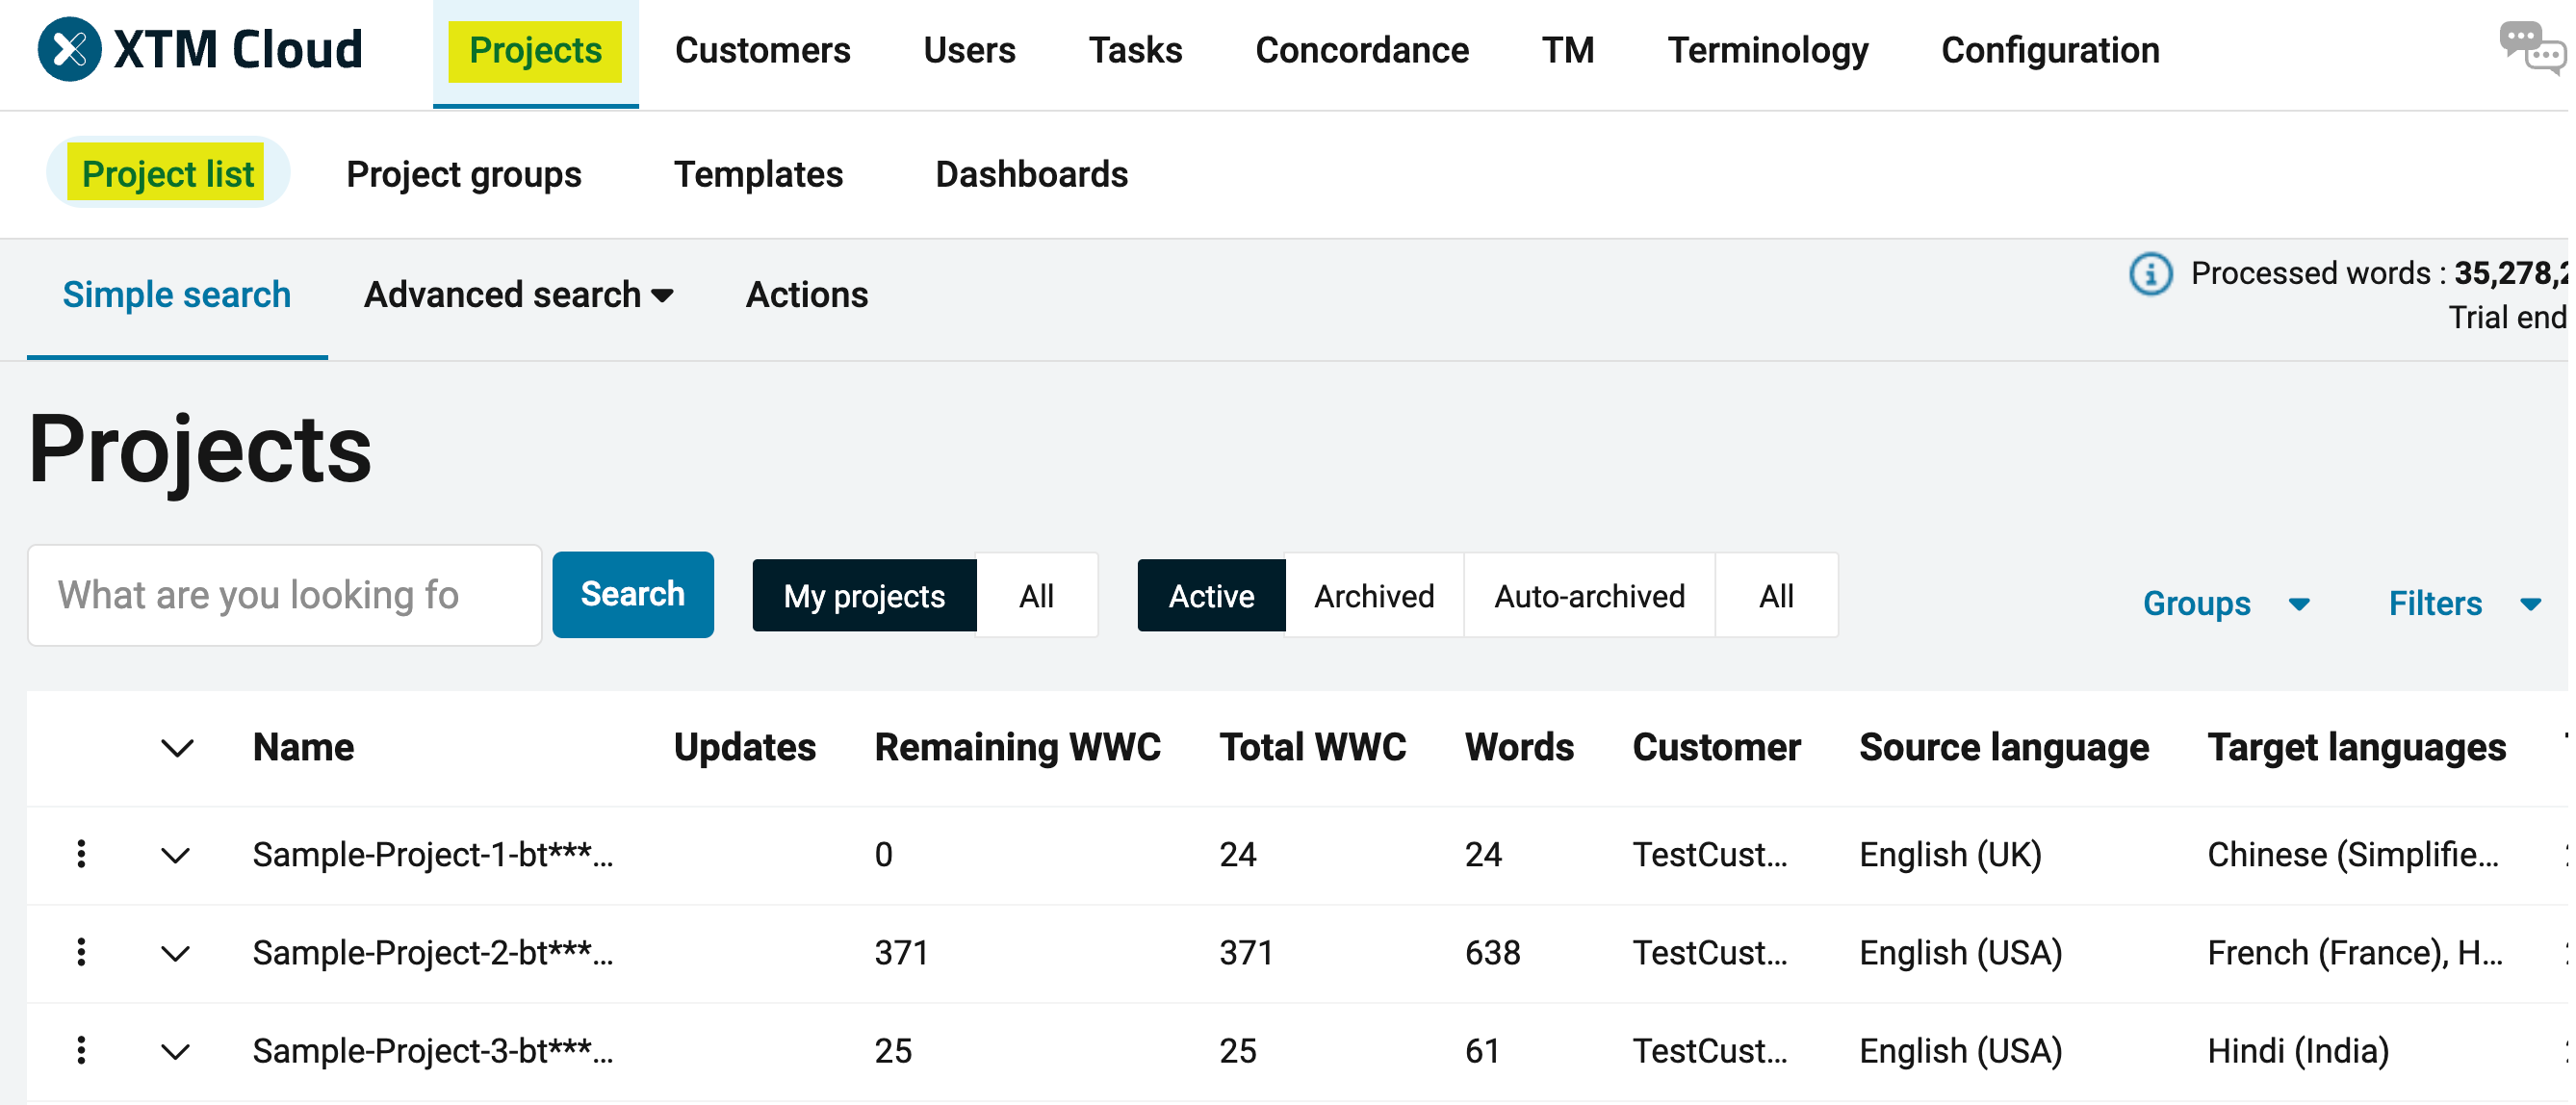
- To view the translation status of the entries, click Project Status from the left panel.
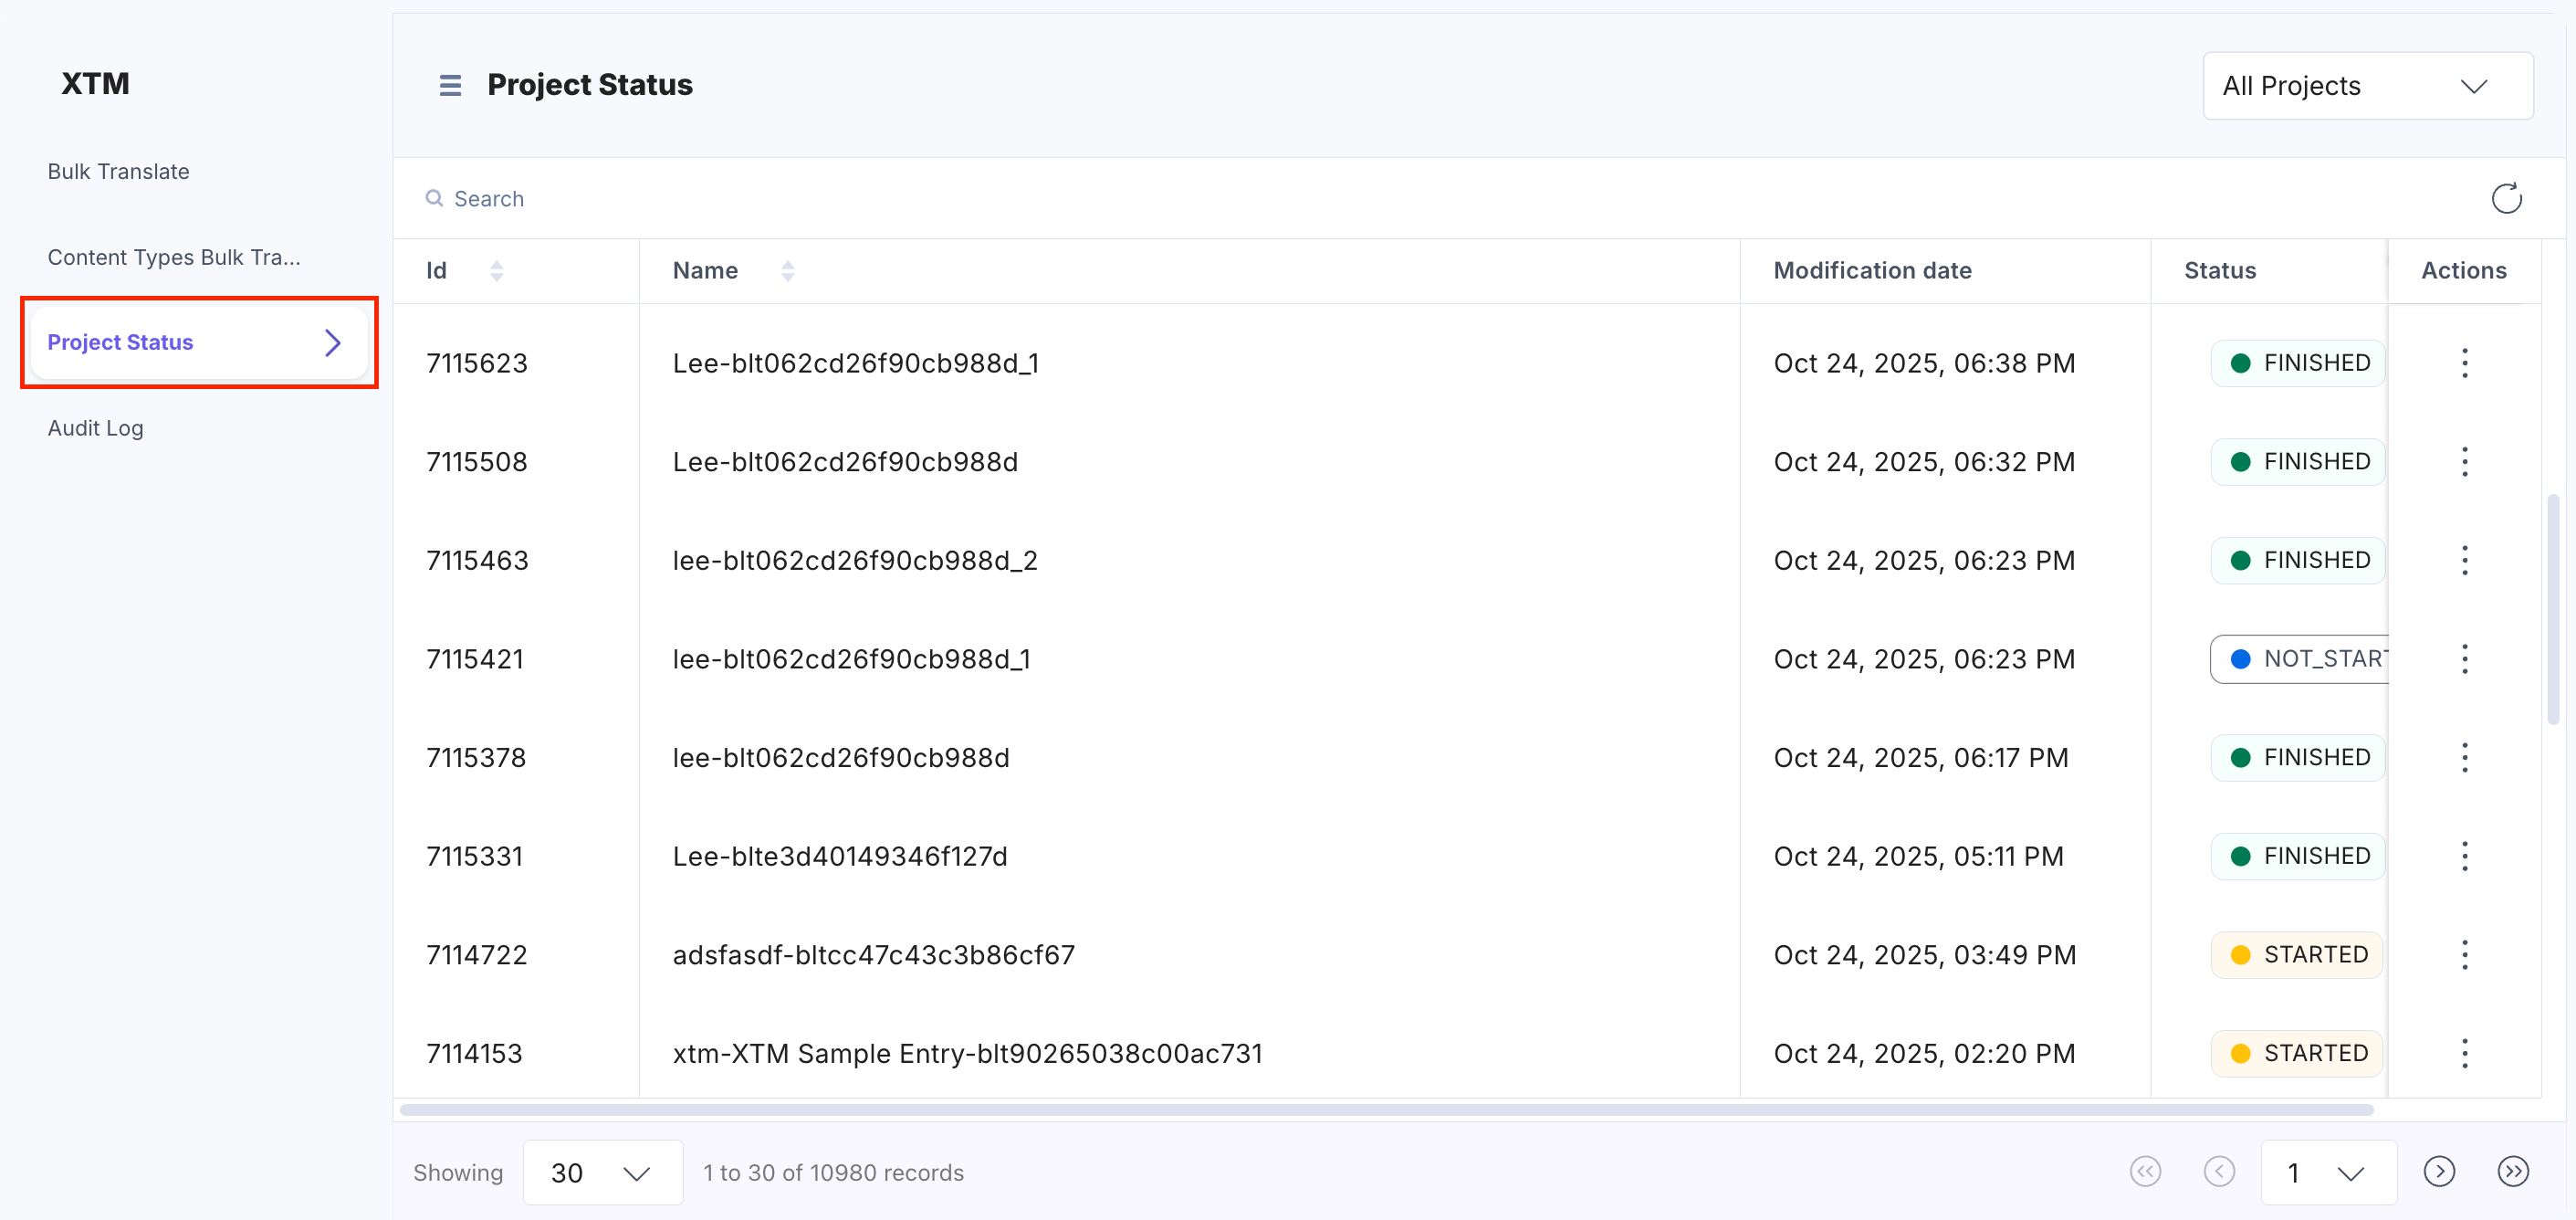
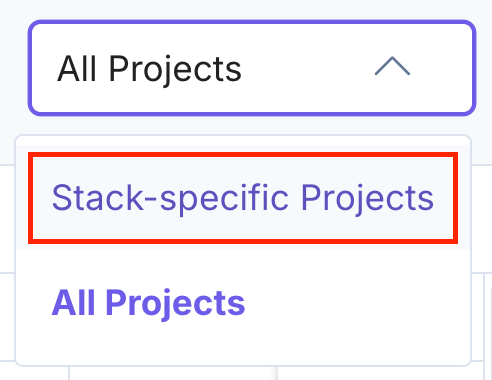
To view the stack-specific project statuses, select the Stack-specific Projects dropdown option.
Note: You can also view the translation status in the XTM project dashboard.
- To view the detailed status, click the vertical ellipses under the corresponding Actions section and click View Details.
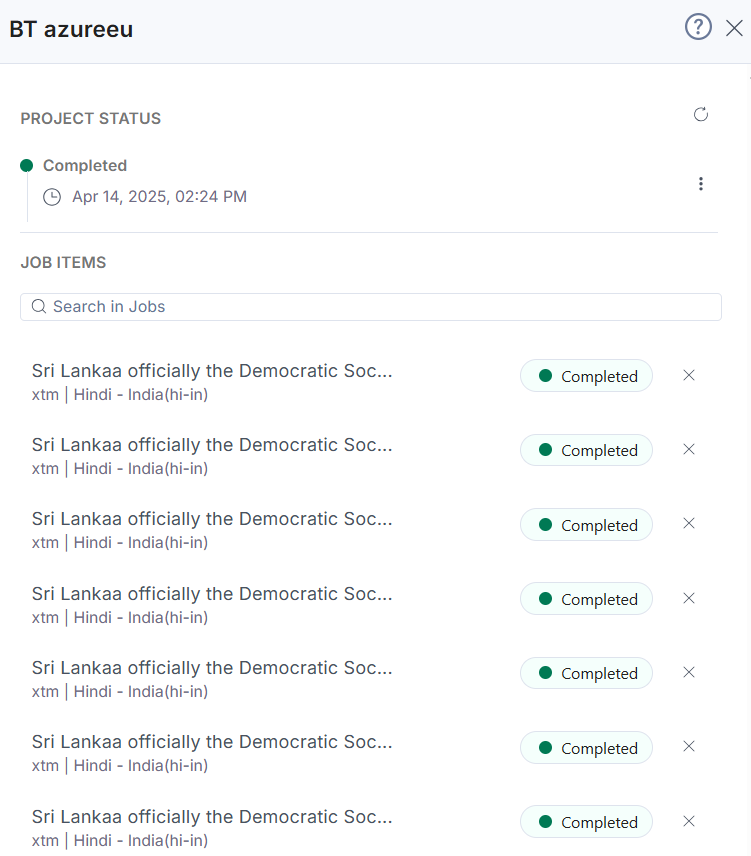
- You can check the elaborated translation status of the entry.
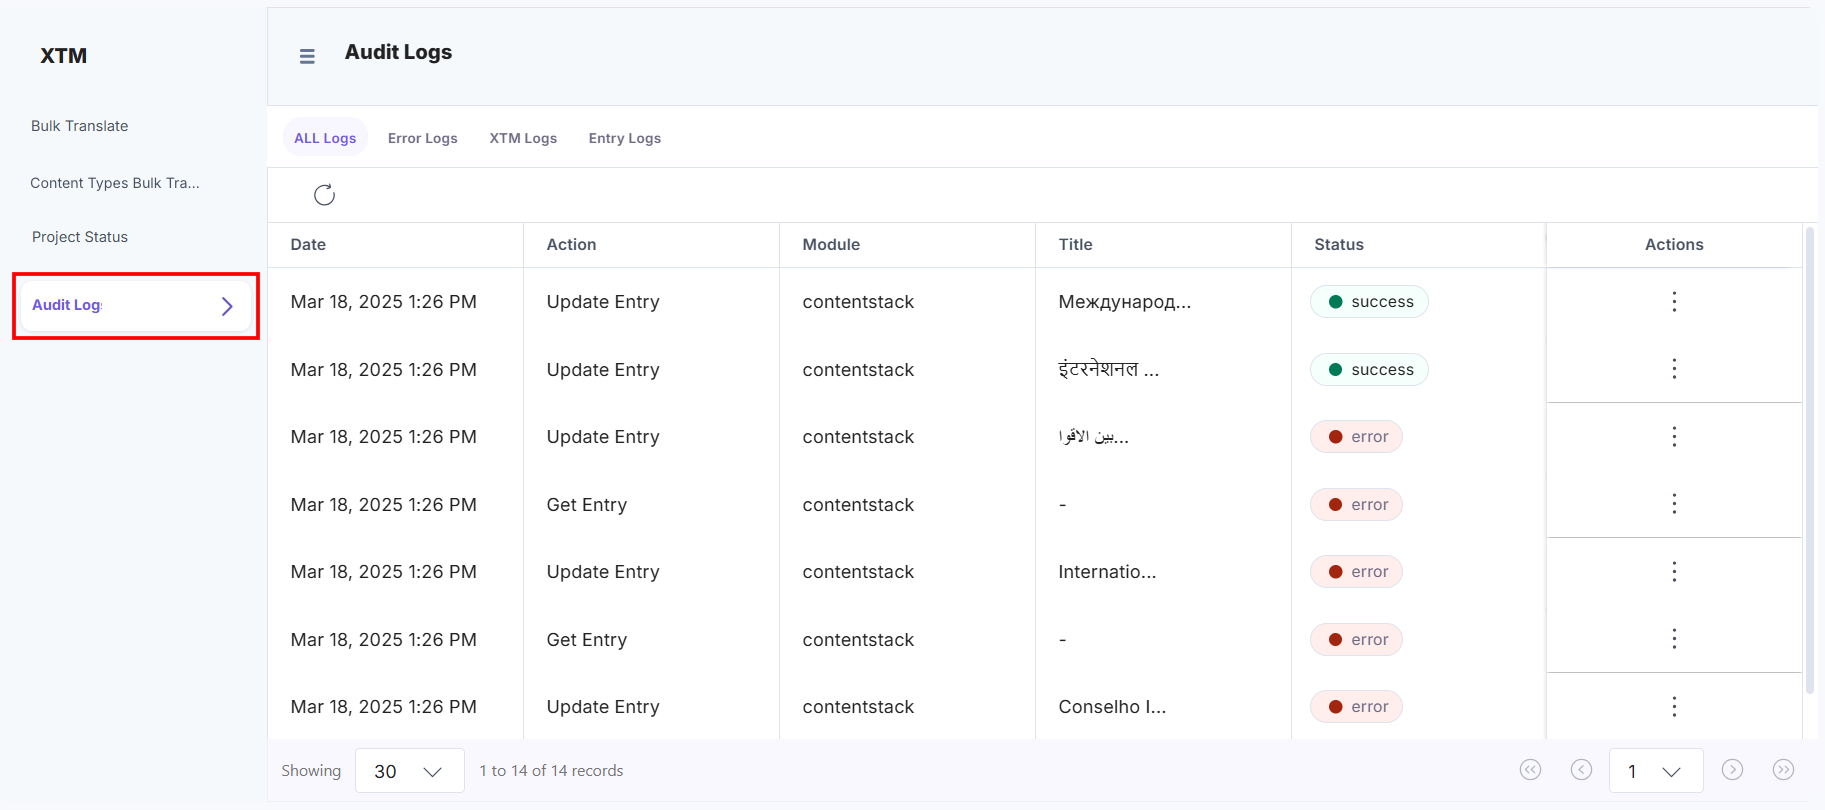
- Click Audit Log to view all types of logs: Error Logs, XTM Logs, and Contentstack Entry Logs.
- To edit, click the vertical ellipses under the corresponding Actions section to edit the entry or view its details.
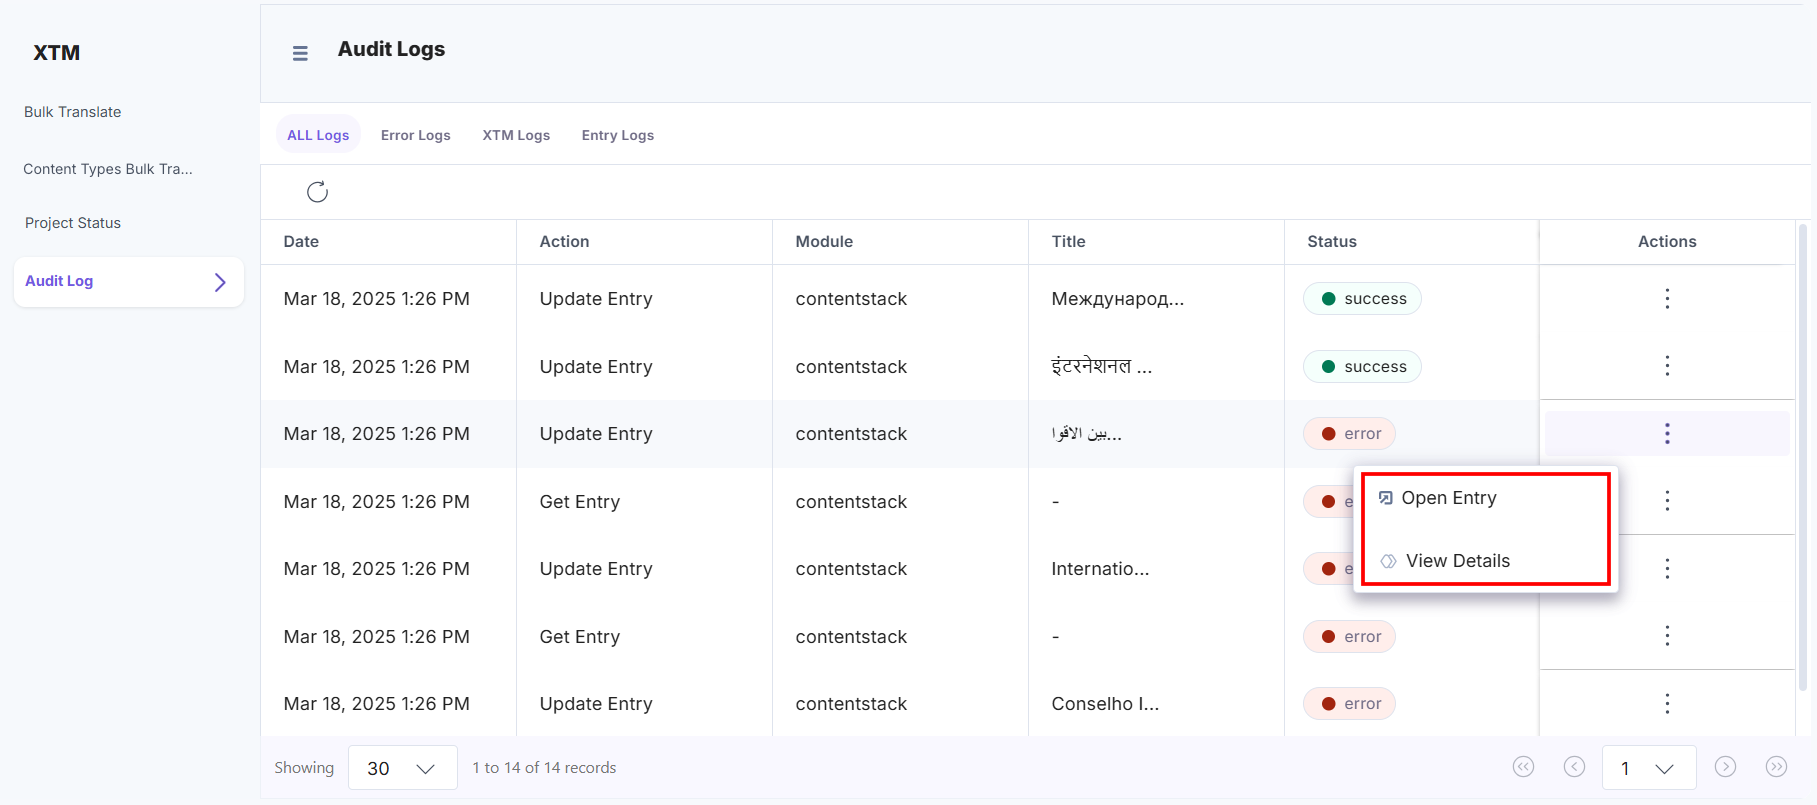
- Select Open Entry to go to the entry page.
- Select View Details to get the detailed error.
After successful translation, you can view the translated content in the entries.
- Navigate to Entries from the header and open the entry you want to translate. Then click the “Workflow Details” icon from the right navigation panel.
Use the XTM app for Human Translation
Human translation in XTM allows an individual user to manually translate content. This process is slower than machine translation.
To translate the content manually using the XTM app in Contentstack, log in to your Contentstack account and follow the steps below:
- Navigate to Entries from the header and open the entry you want to translate. Then click the “Apps” icon from the right navigation panel.
- Select XTM from the dropdown and create a project. Under the Translate tab, select the Language option, provide Project Name, choose Languages from the dropdown, select the Filter Template, and then click Translate.
- In the entry sidebar, go to the Status tab. You can view your Project Name in the Select Project dropdown. Copy it to the clipboard to use in XTM.
Note: The Project Name is a unique identifier for the entry. It allows users to easily locate the entry in the XTM dashboard for manual translation.
- Navigate to the XTM dashboard to view all projects. Select the project corresponding to your Project Name.
- In the left navigation panel, click Workflow. Assign different languages to different users to translate the content manually and then click the Start button.
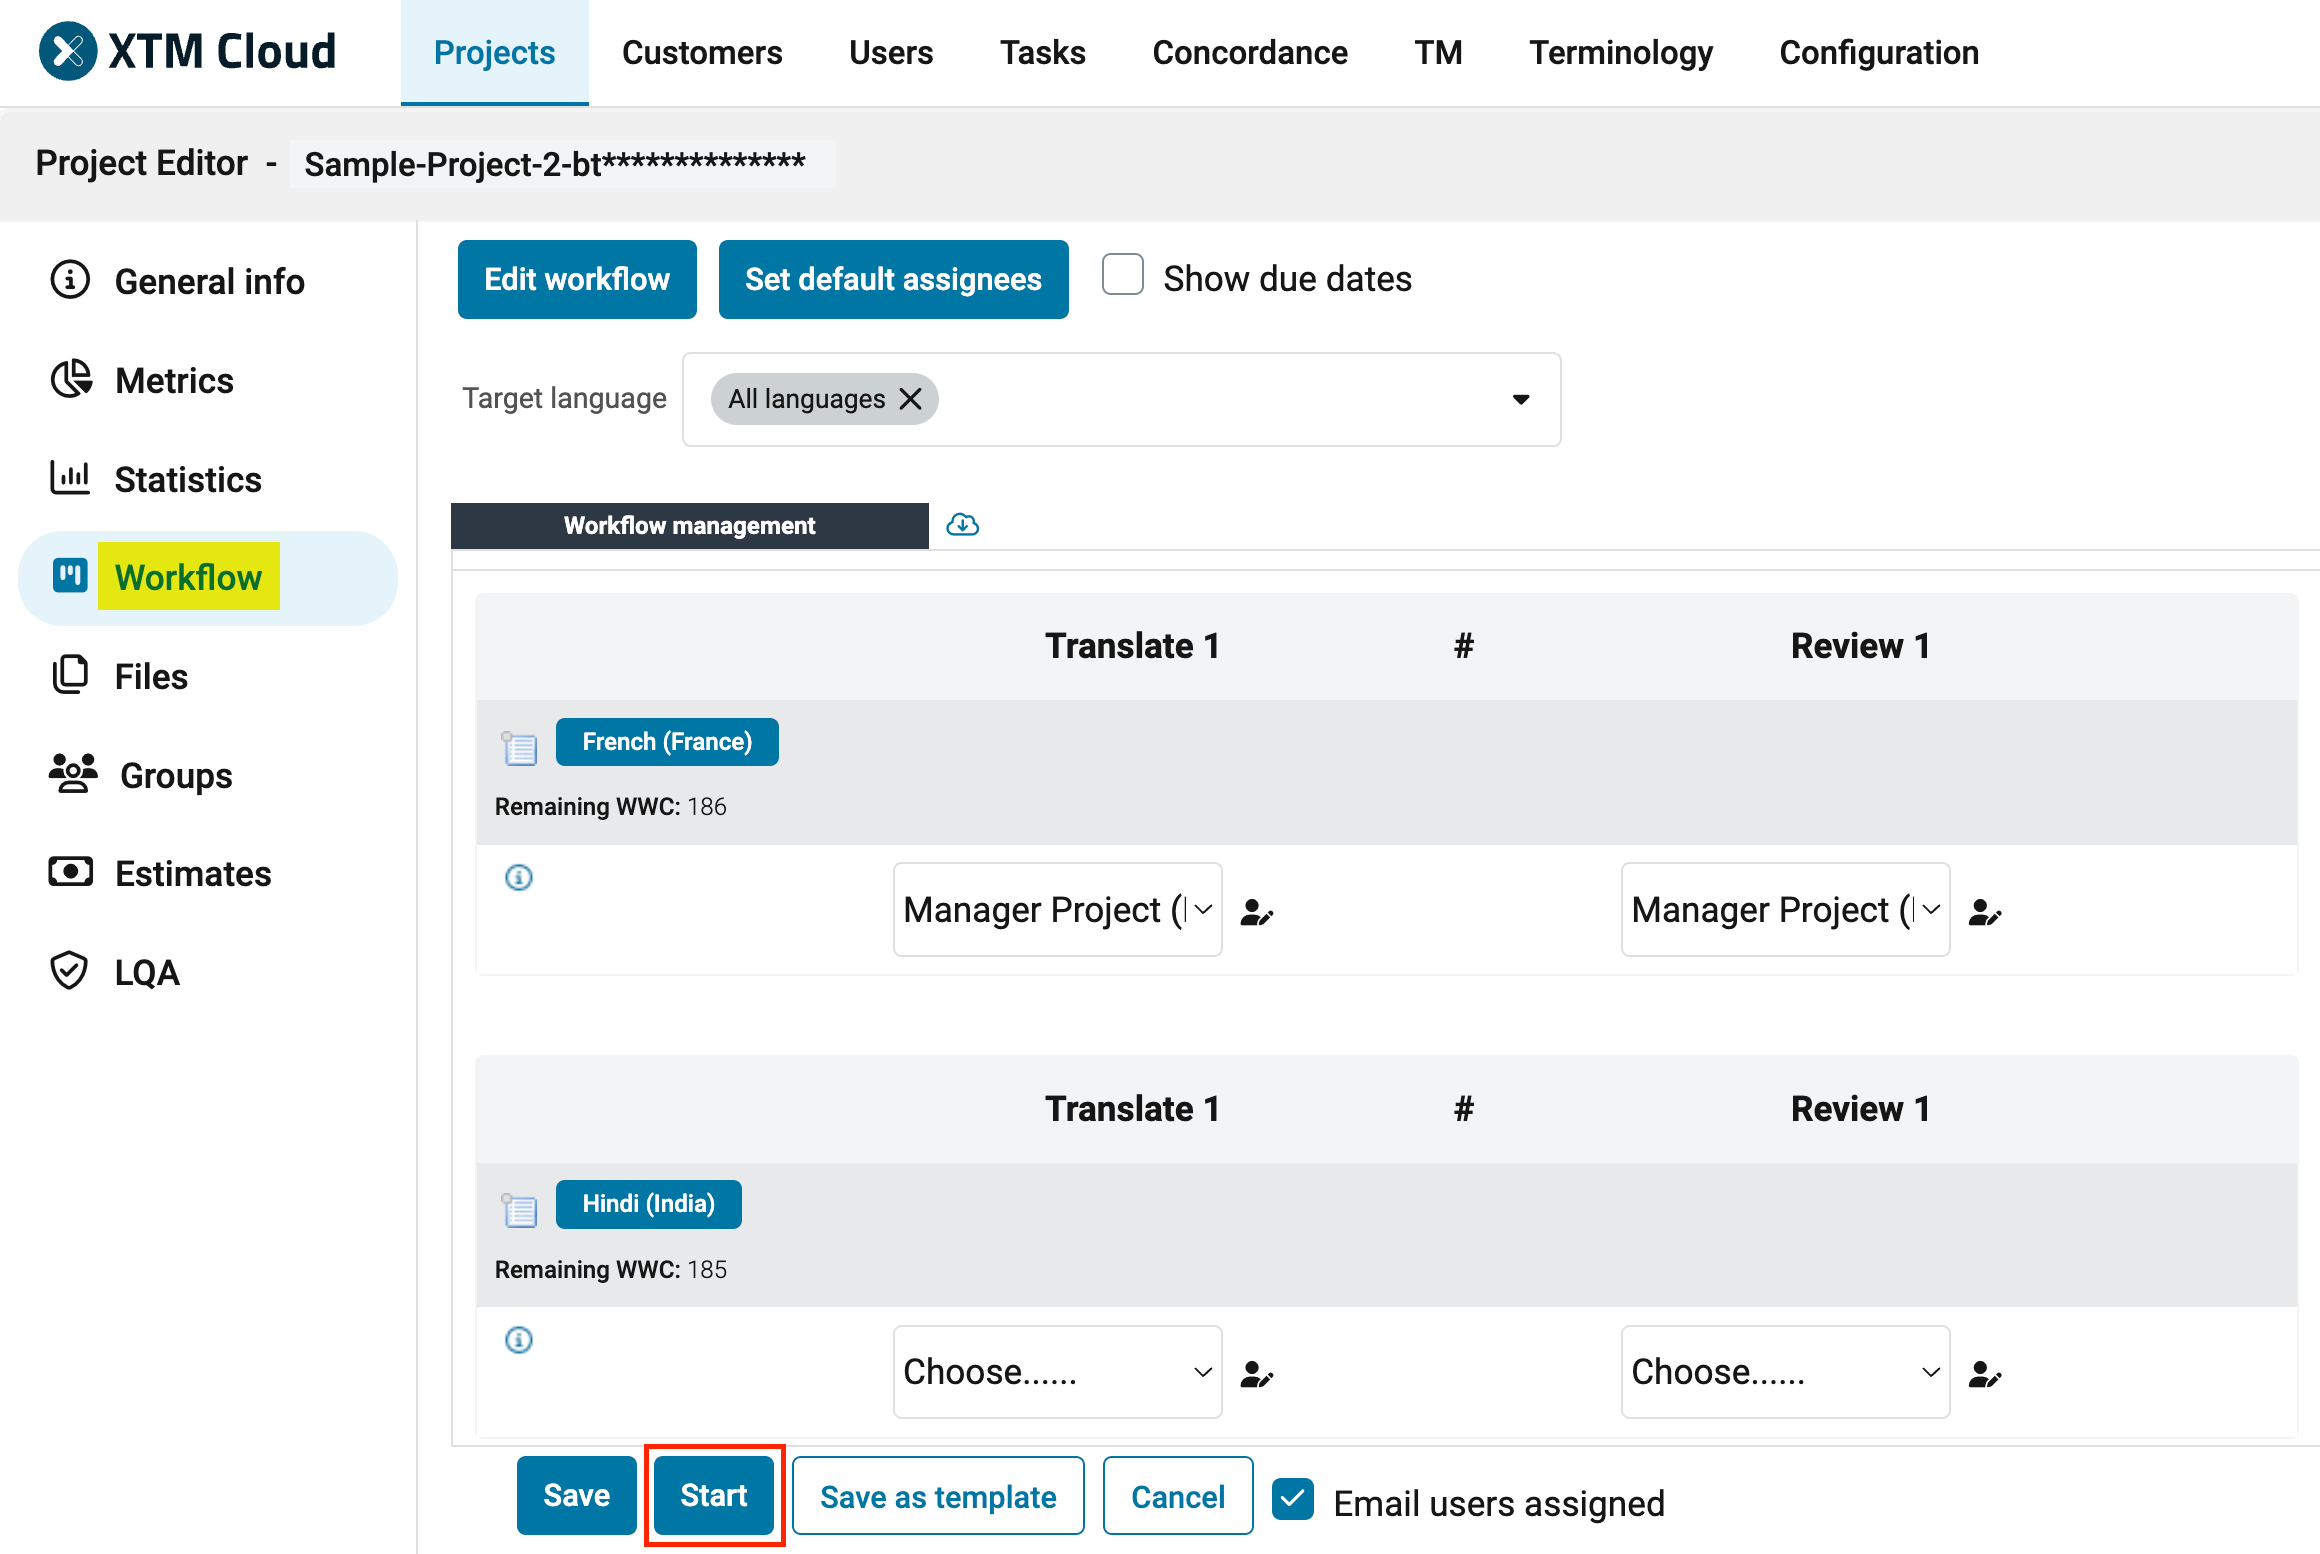
Note: Users must log in with individual credentials. Human and machine translation use separate credentials in XTM.
- Select the project based on the Project Name and manually translate the content. Once completed, the translated content will be saved automatically and appear in Contentstack.
- Navigate to Entries from the header and open the entry you want to translate. Then click the “Apps” icon from the right navigation panel.
More articles in "Translation"
