Transform
The Transform action connector helps in manipulating texts and numbers as required. It helps you to manipulate and structure data according to our needs.
For example, suppose in the previous trigger specific data is selected to be displayed. In that case, the action defined by the Transform connector can manipulate or change it to meet your display requirements.
Set up the Transform modifiers
Perform the following steps to set up the Transform action connector:
- Click Configure Action Step from the left navigation panel.
-
Click Action Step to configure third-party services.
- Within the Configure Action Step, click the Transform connector.
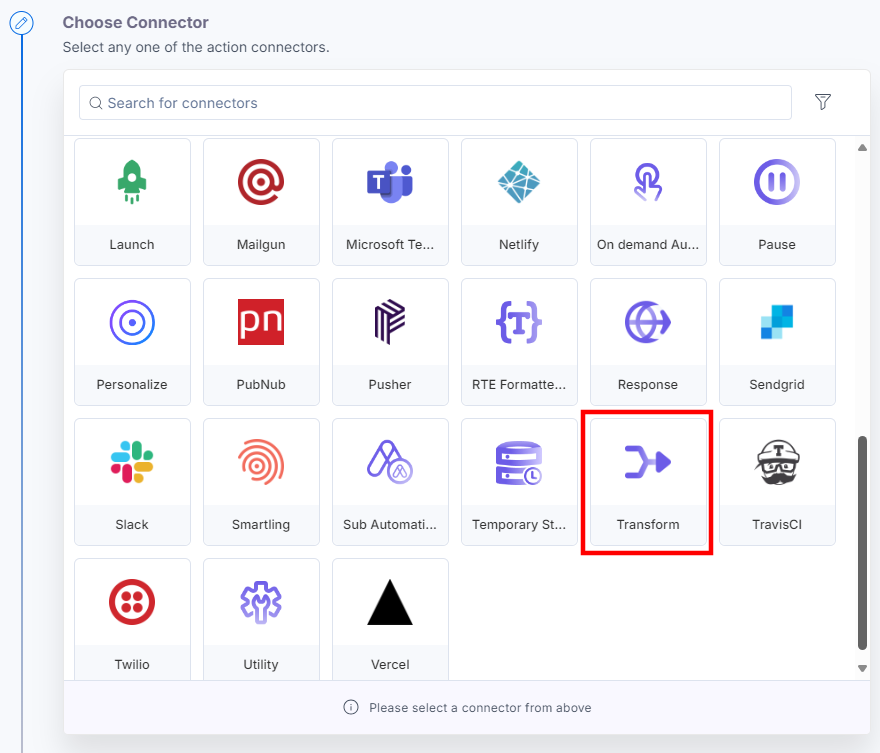
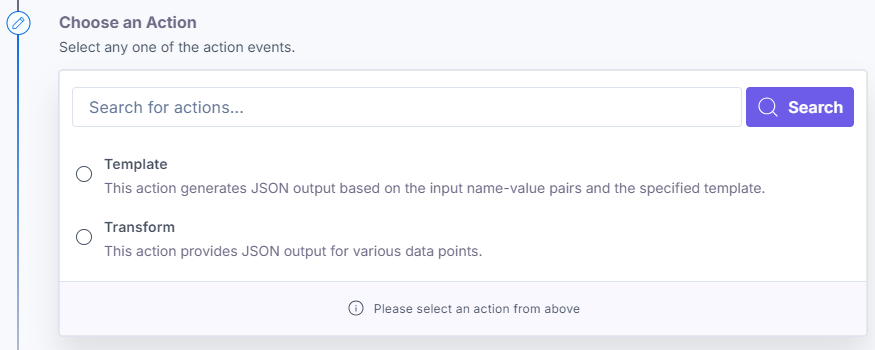
- You will see these actions under the Choose an Action tab: Template and Transform.
- On the Transform Configure Action page, enter the following details:
- Click the Add Input button, and enter a variable name for the Input Name (say, “name”) and an Input Value for the variable (say, “john” in lowercase letters).
Note: You can even pass the value directly into the Transformation box.
- Let’s enter the JSON code that uses the “capitalize()” modifier in the Transformation box. Use the following code: {“result” : “{capitalize(name)}” }
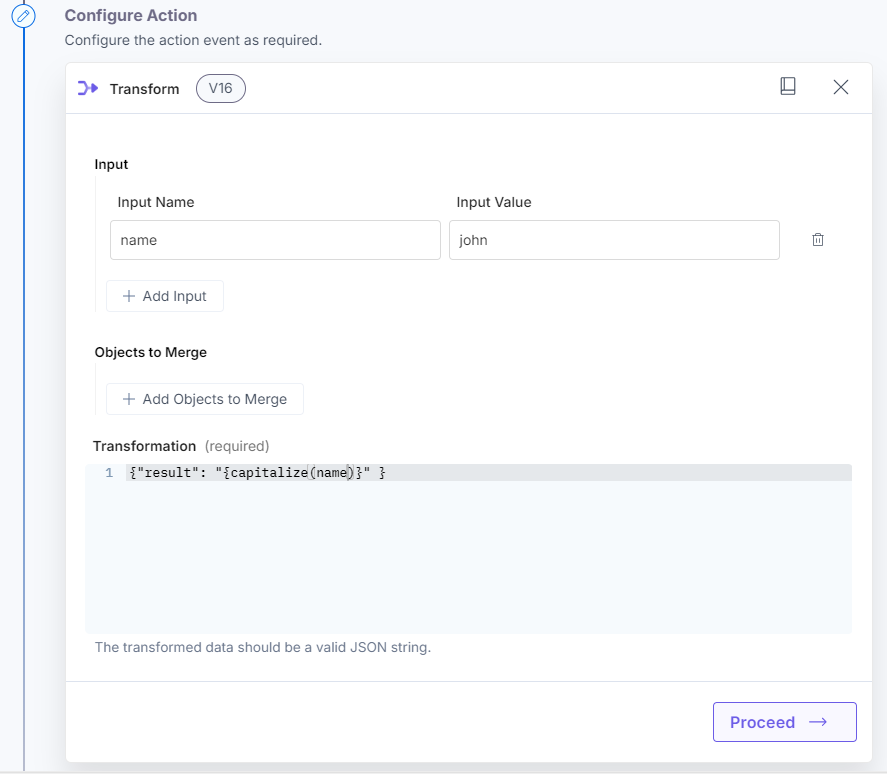
- Click the Add Input button, and enter a variable name for the Input Name (say, “name”) and an Input Value for the variable (say, “john” in lowercase letters).
- Click Proceed.
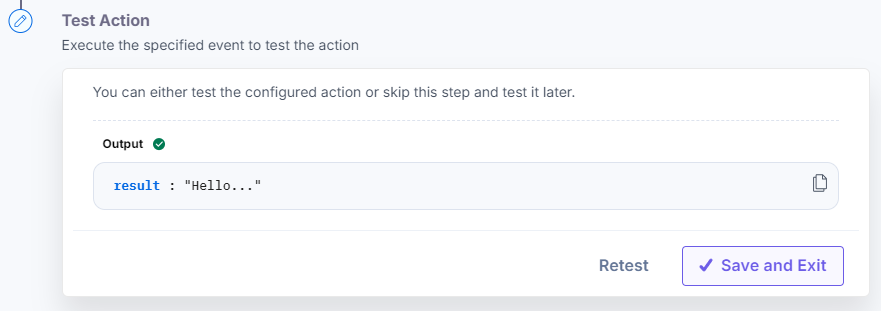
- Check if the details are correct. If yes, click Test Action.

- Once set, click Save and Exit.
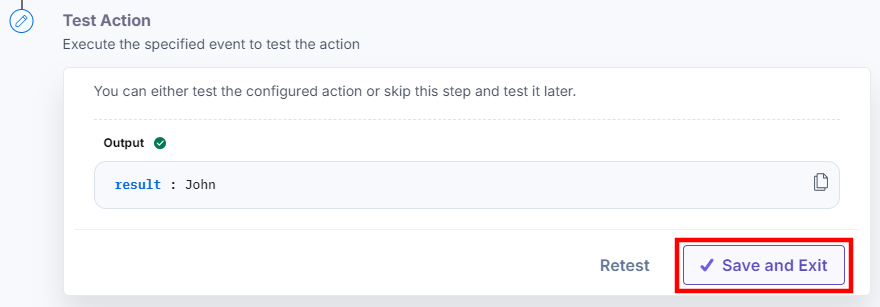
This sets up the Transform action connector.
Transform Modifiers
Transform modifiers help in manipulating texts and numbers as per our needs. This function utilizes JSON code and modifiers to transform data.
The Transform connector also helps in mapping different JSON objects into one object, as seen in the sample transform input data:
{
  "first_name" : "{user_first}",
  "last_name" : "{user_last}",
  "full_name" : "{join(user_first,user_last,' ')}",
  "country" : "india",
  "time" : "{now('toISO')}"
}
The Transform function has specific modifiers that can manipulate the data. Let’s look at the applicable transform modifiers in detail.
truncate
Use this modifier to reduce the length of a string to a specific number of characters or words using ellipses or word-break options.
Note: The boolean value (true, false) implies whether you want to break the word or not. True means you want to break the word, and false means not. The space after the word is considered a break.
Example: truncate (string,number of characters,'ending string', ‘word break’)
Note: If the limit for the number of characters is more than that of the string, the output will contain the complete string without ellipses.
Here’s a screenshot that shows the input:
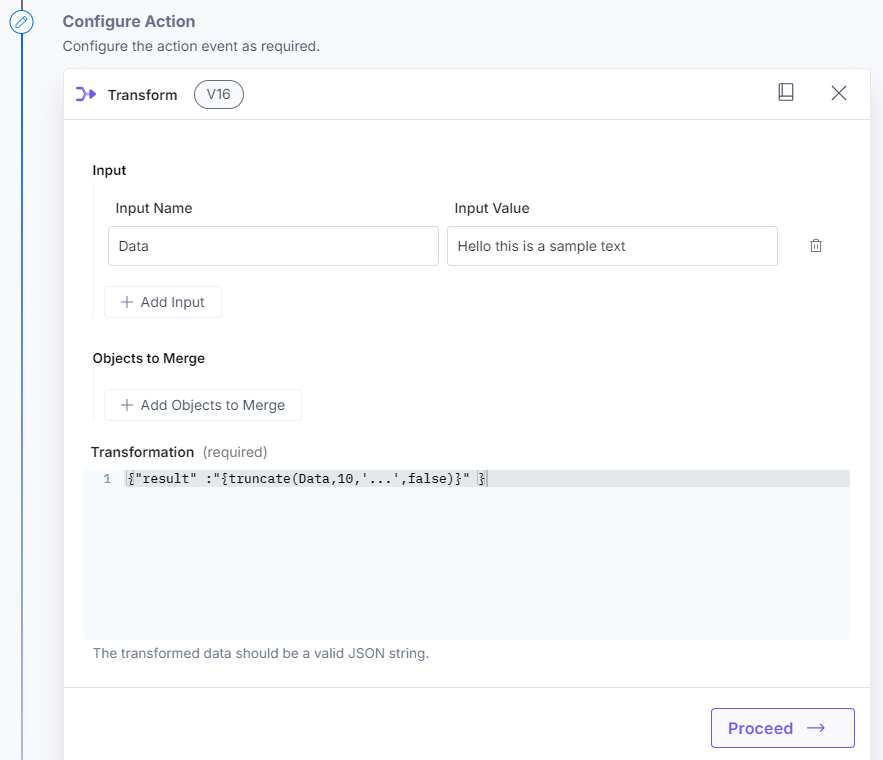
Here’s a screenshot that shows the output: 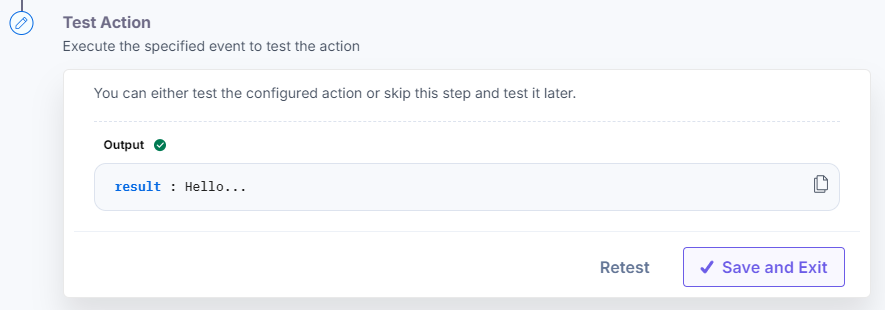
Here’s a screenshot that shows the input when the word break is set to true by default.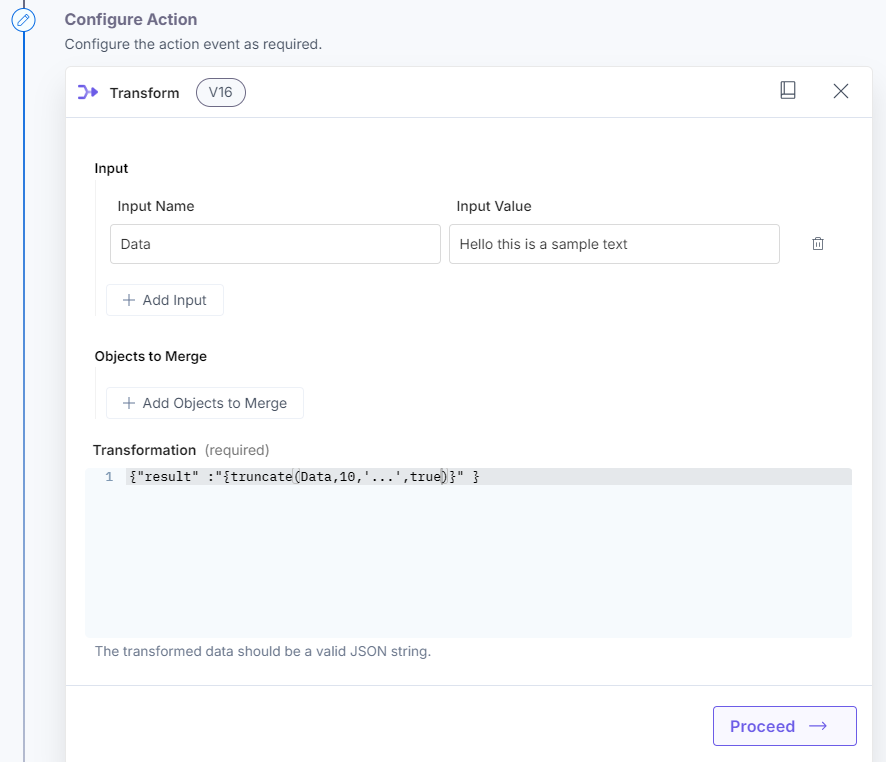
Here’s a screenshot that shows the output:
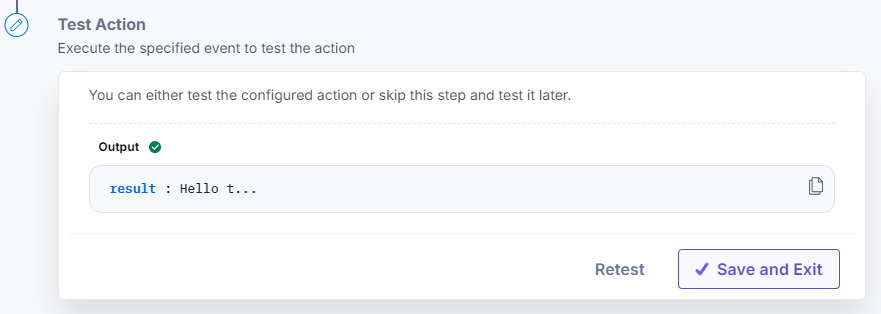
Note: In the truncate modifier, string and the number of characters are the two mandatory fields. If we do not specify the ending string, it would take the ellipses (...) or any other characters the user enters such as (***).
replace
Use this modifier to replace any character, word, or string given in the 2nd argument with the 3rd argument.
Example: replace(Data, 'one char, one word or string', 'with this string')
Note: The replace modifier can only replace the first occurrence of a character/word/string.
Here’s a screenshot that shows the input: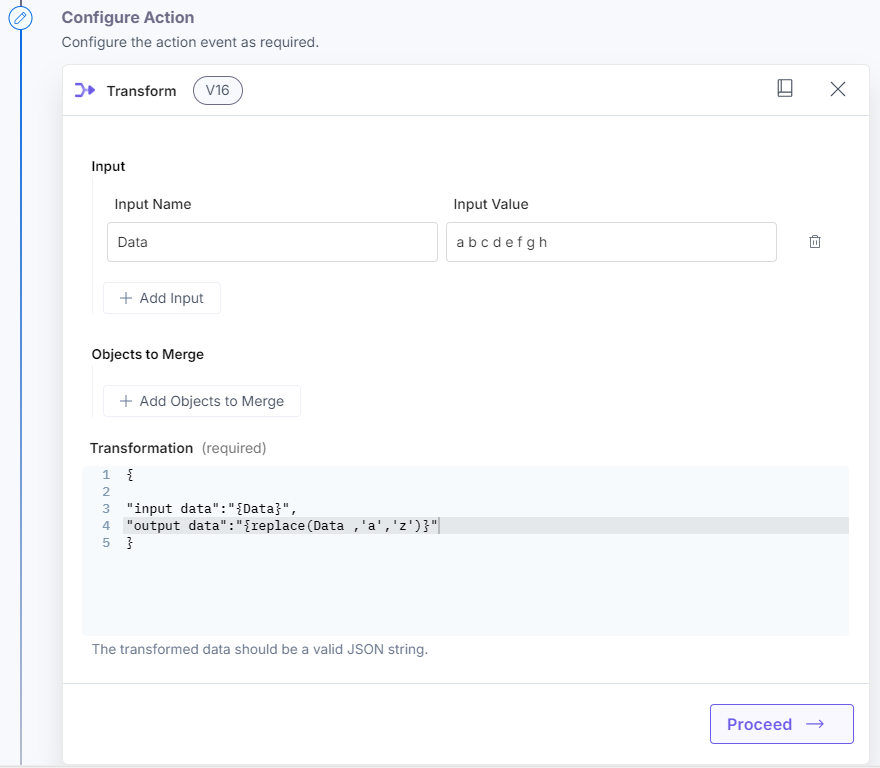
Here’s a screenshot that shows the output: 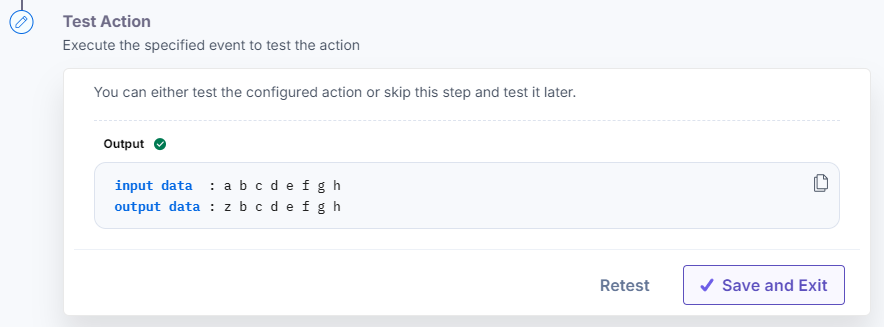
replaceAll
Use this modifier to replace all the characters, words, or strings given in the 2nd argument with the 3rd argument.
Example: replaceAll(Data, 'one char, one word or string', 'with this string')
Note: The replaceAll modifier will replace multiple occurrences of a character/word/string with the same pattern.
Here’s a screenshot that shows the input: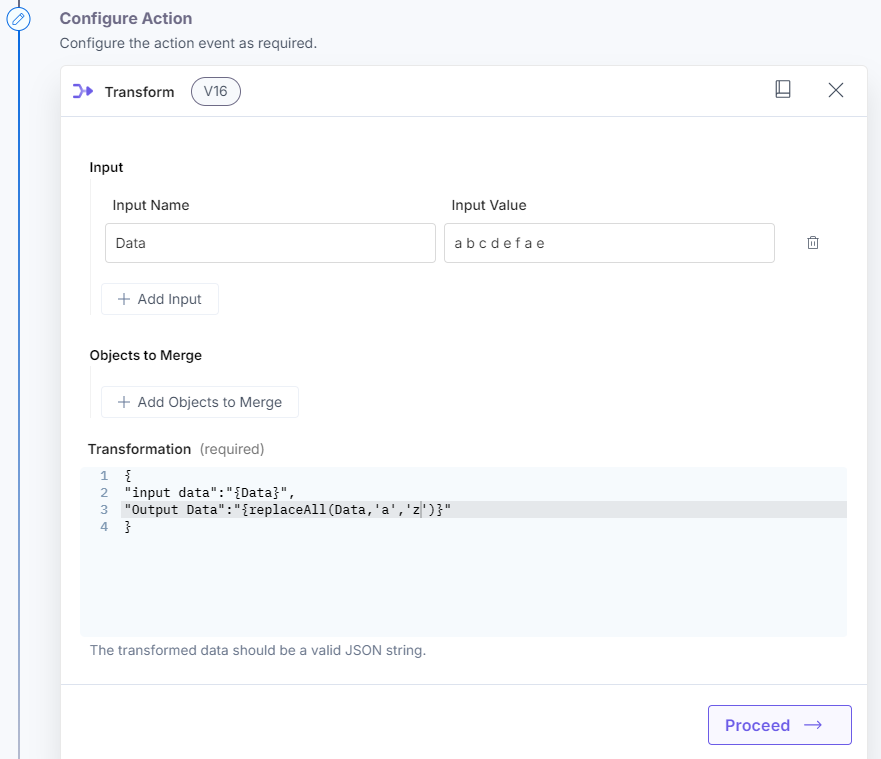
Here’s a screenshot that shows the output: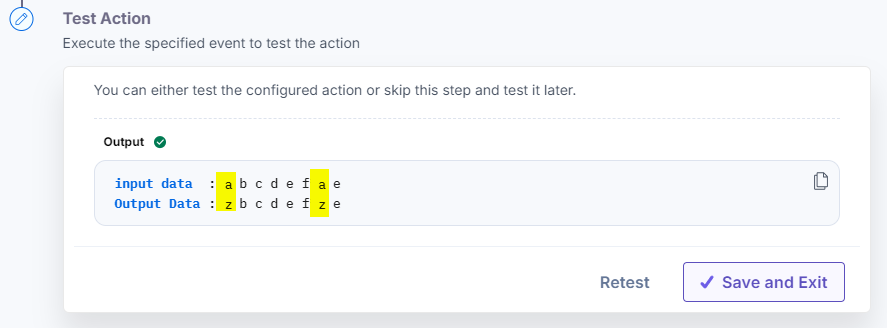
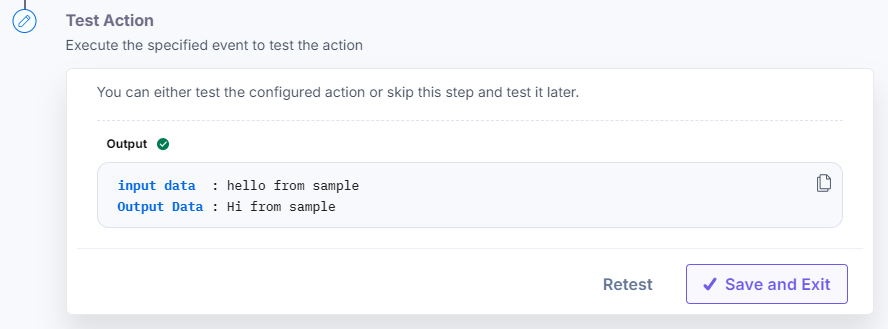
You can also pass the data configured from the previous step and replace the content. Here is an example:
- Configure your HTTP Trigger and use the trigger data in the input value field.
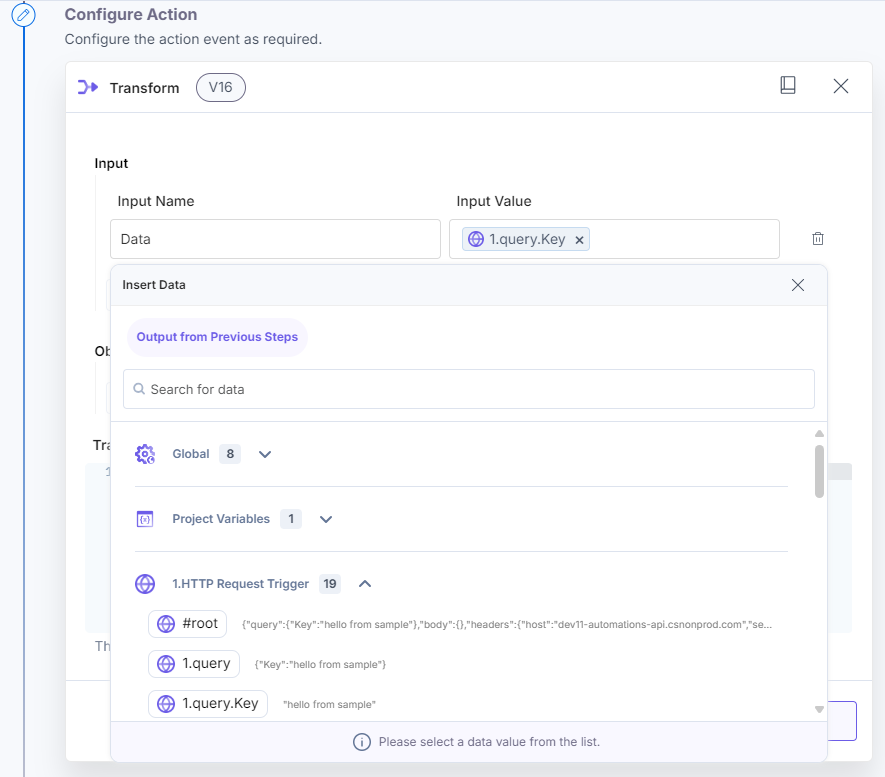
- To replace all the occurrences of the word hello with hi.
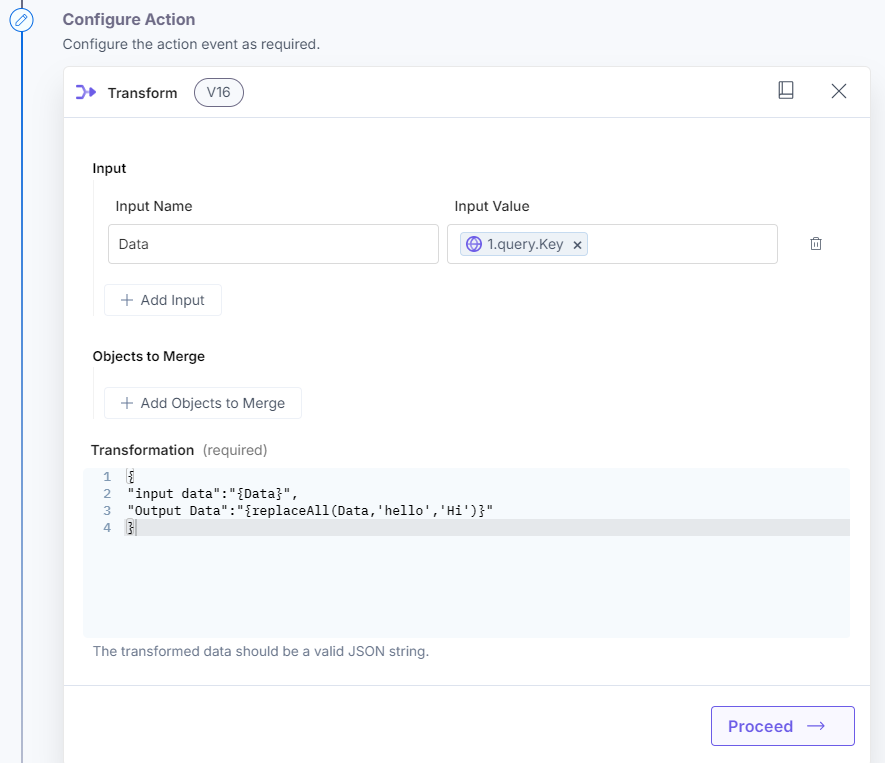
Here’s a screenshot that shows the output:
trim
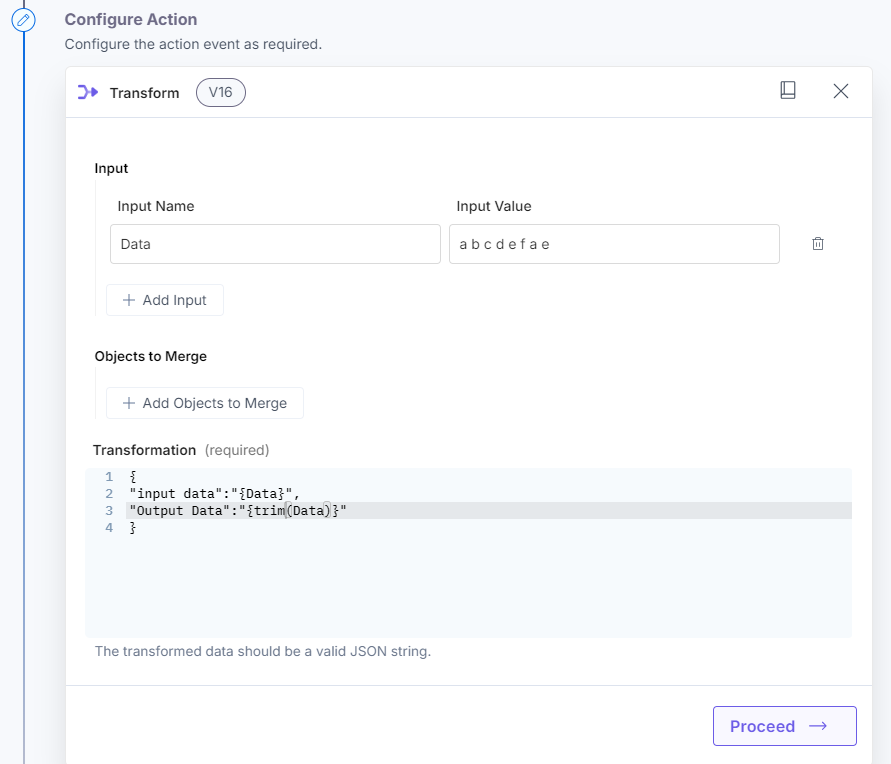
Use this modifier to remove white spaces at the beginning and end of the string, including tab, space, null byte, new line, and carriage return.
Example: trim(Data)Here’s a screenshot that shows the input:
Here’s a screenshot that shows the output:
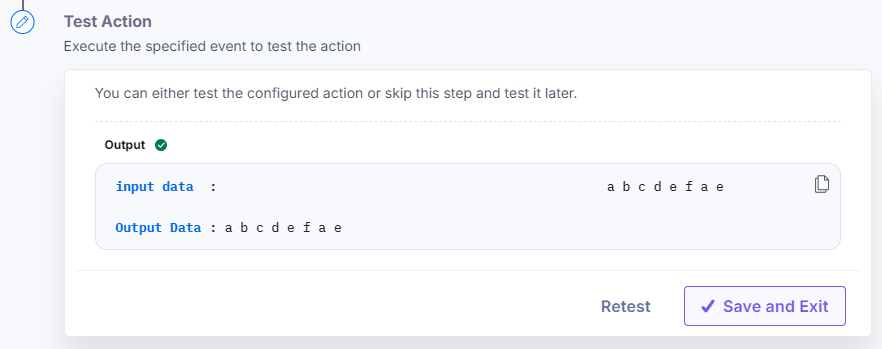
capitalize
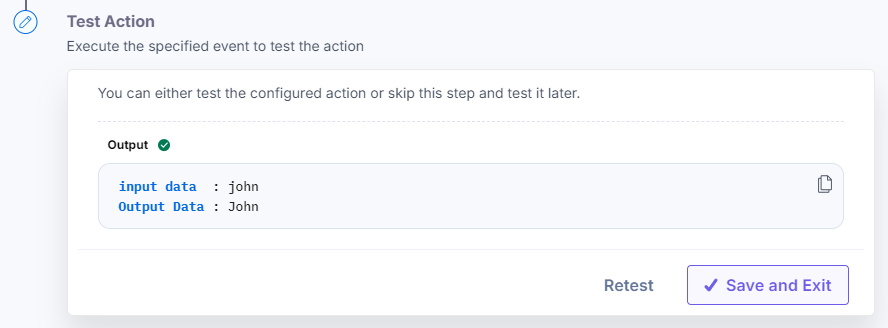
Use this modifier to convert the input data into the capital (upper) case.
Example: capitalize('input data') or capitalize(variable)Here’s a screenshot that shows the input:
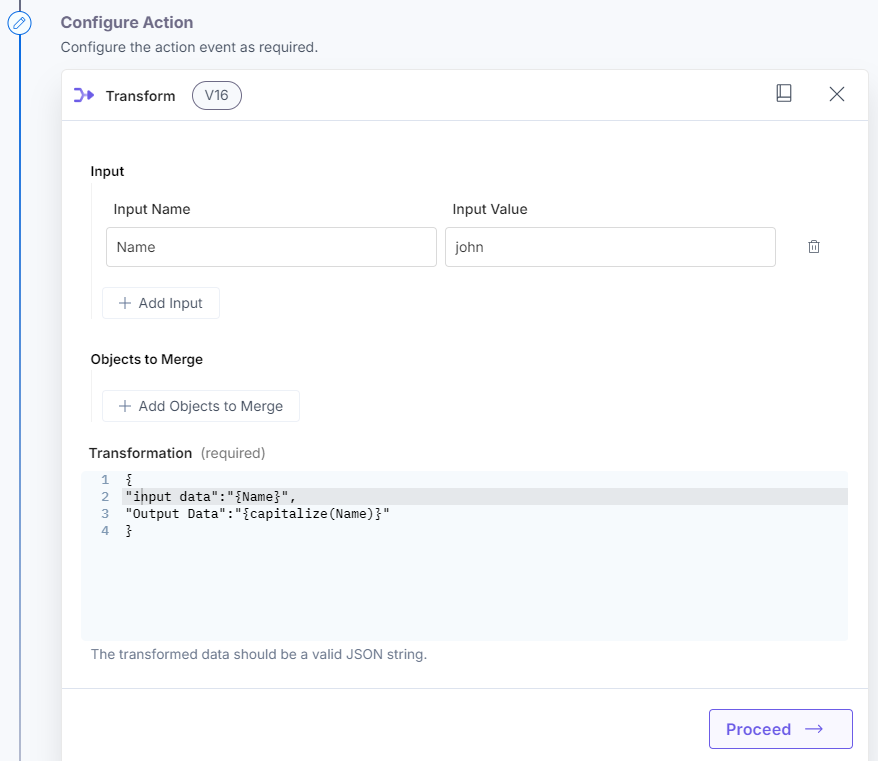
Here’s a screenshot that shows the output:
camelCase
Use this modifier to convert the input text into the camel case.
Example: camelCase('input data')Here’s a screenshot that shows the input:
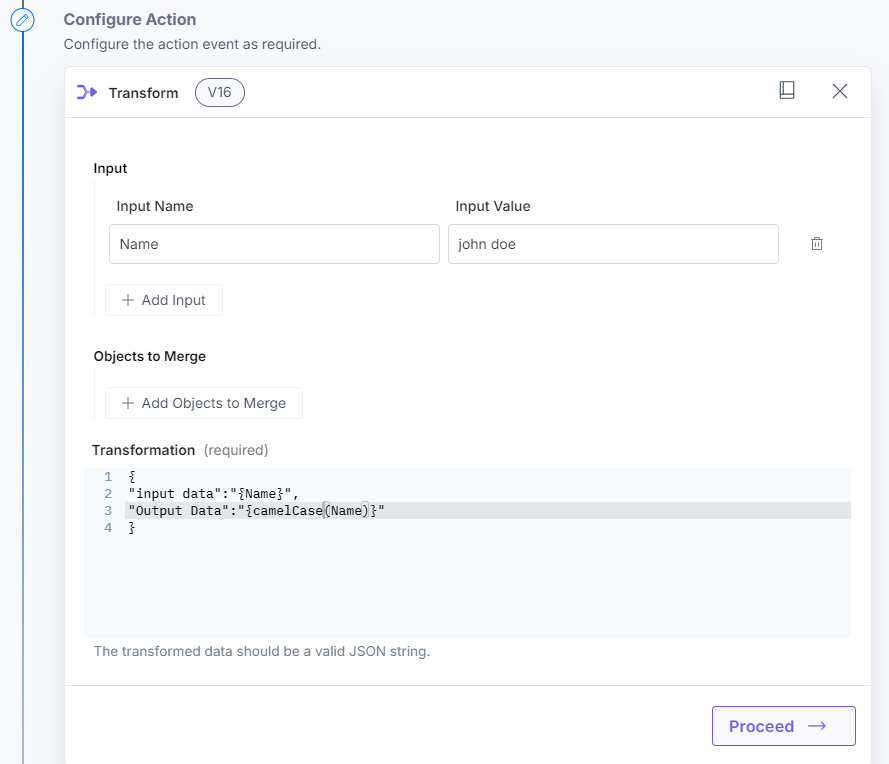
Here’s a screenshot that shows the output:
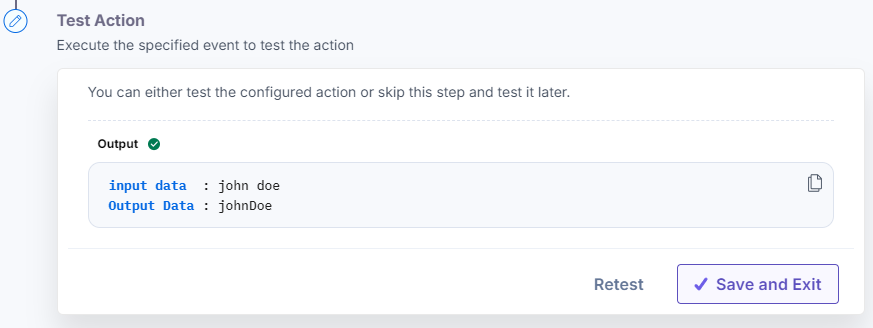
kebabCase
Use this modifier to convert the input text into the kebab case.
Example: kebabCase('input data')Here’s a screenshot that shows the input:
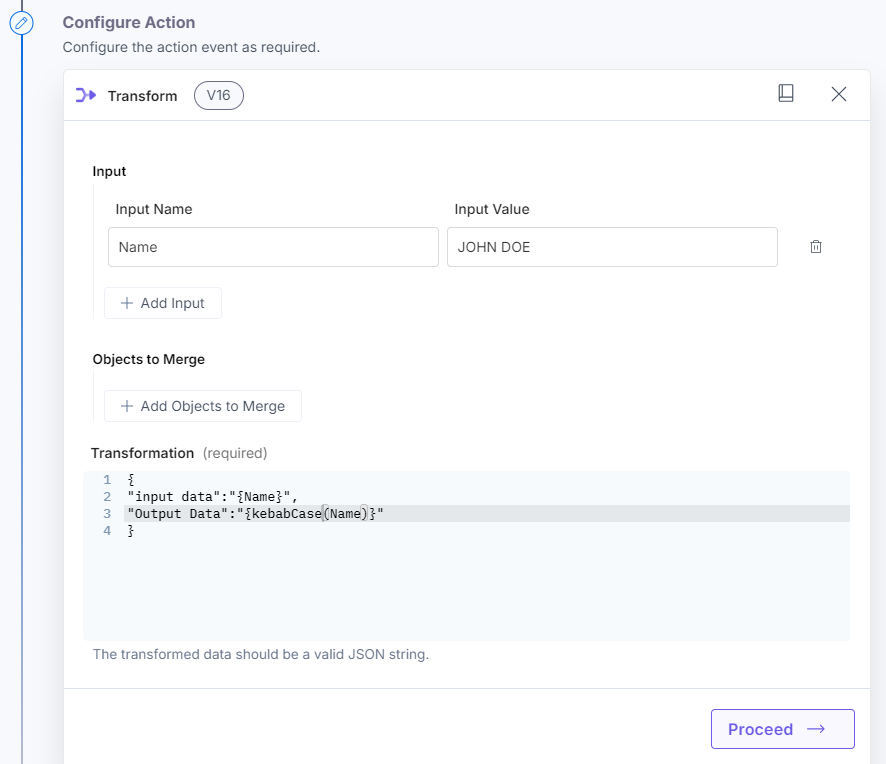
Here’s a screenshot that shows the output:
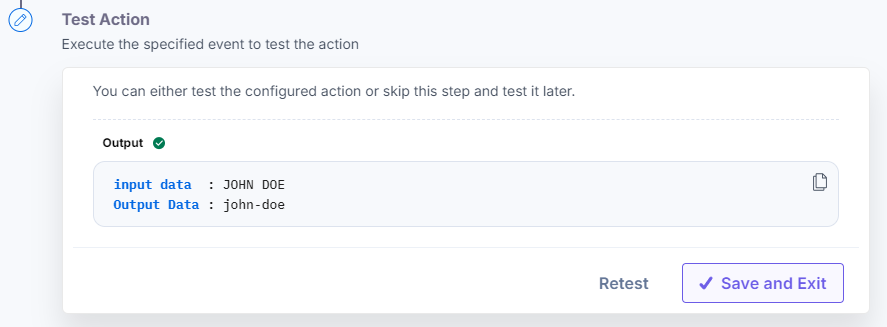
snakeCase
Use this modifier to convert the input text into the snake case.
Example: snakeCase('input data')Here’s a screenshot that shows the input:
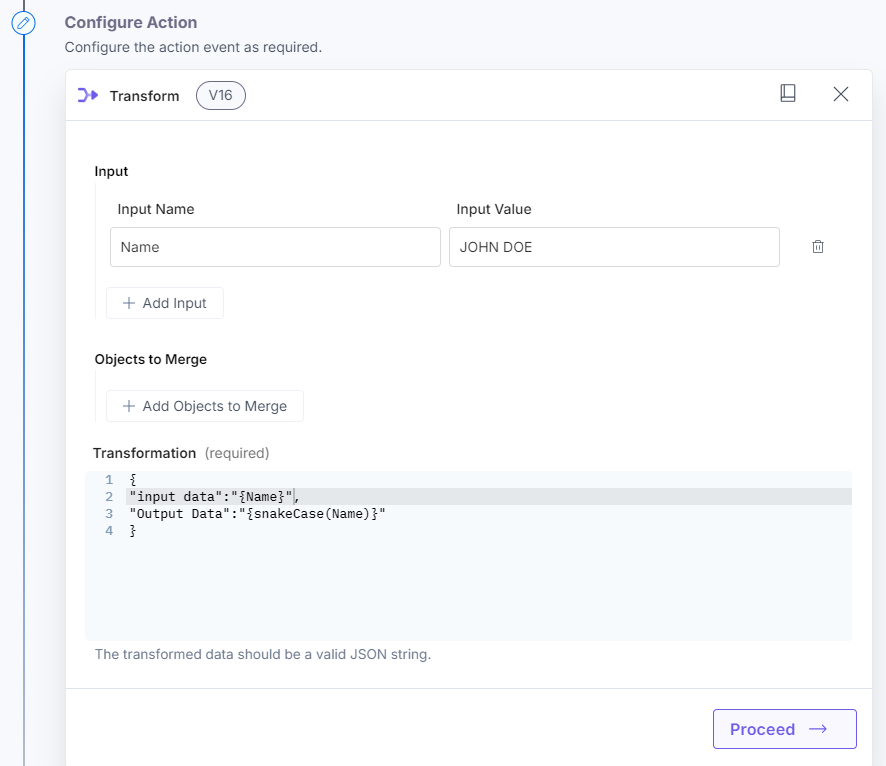
Here’s a screenshot that shows the output: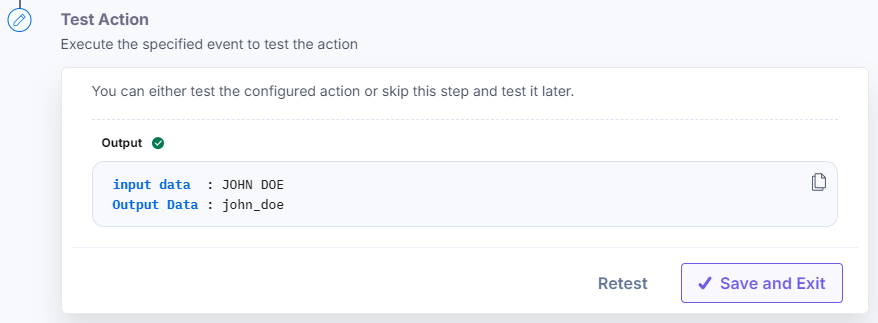
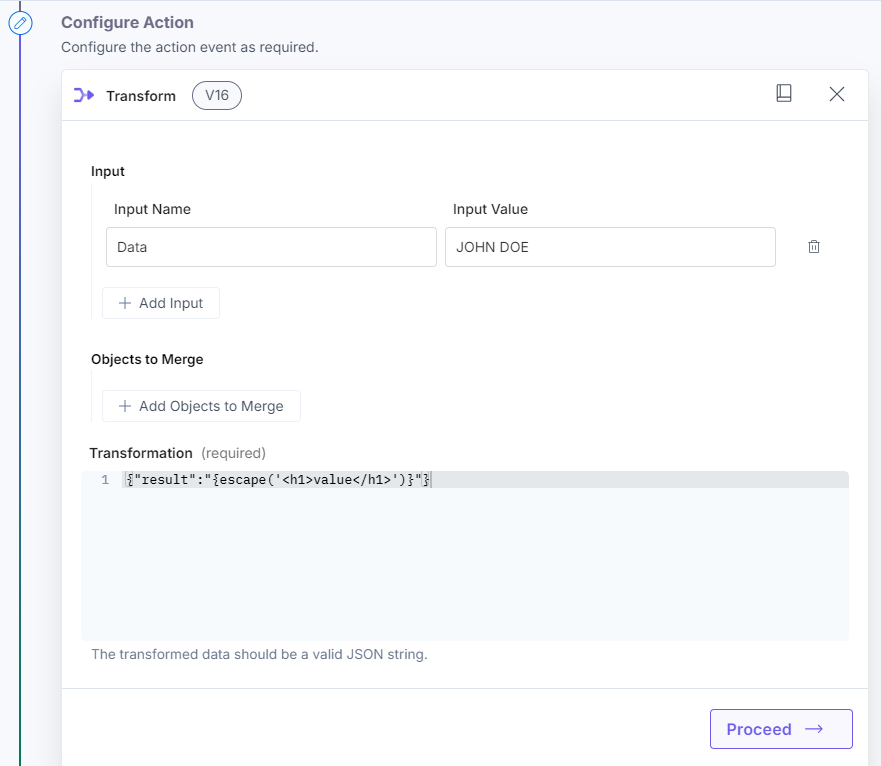
escape
Use this modifier to escape HTML characters.
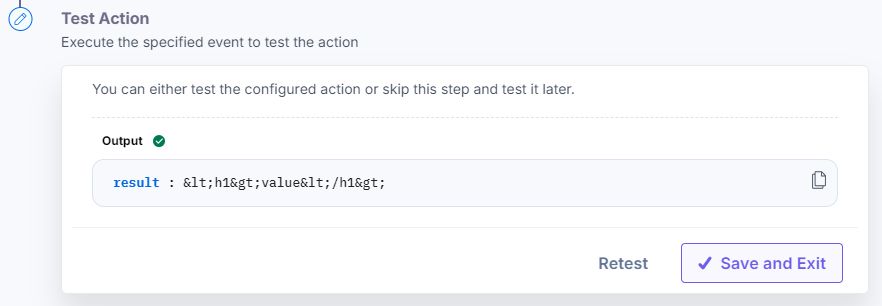
Example: escape('<data input>')Here’s a screenshot that shows the input:
Here’s a screenshot that shows the output:
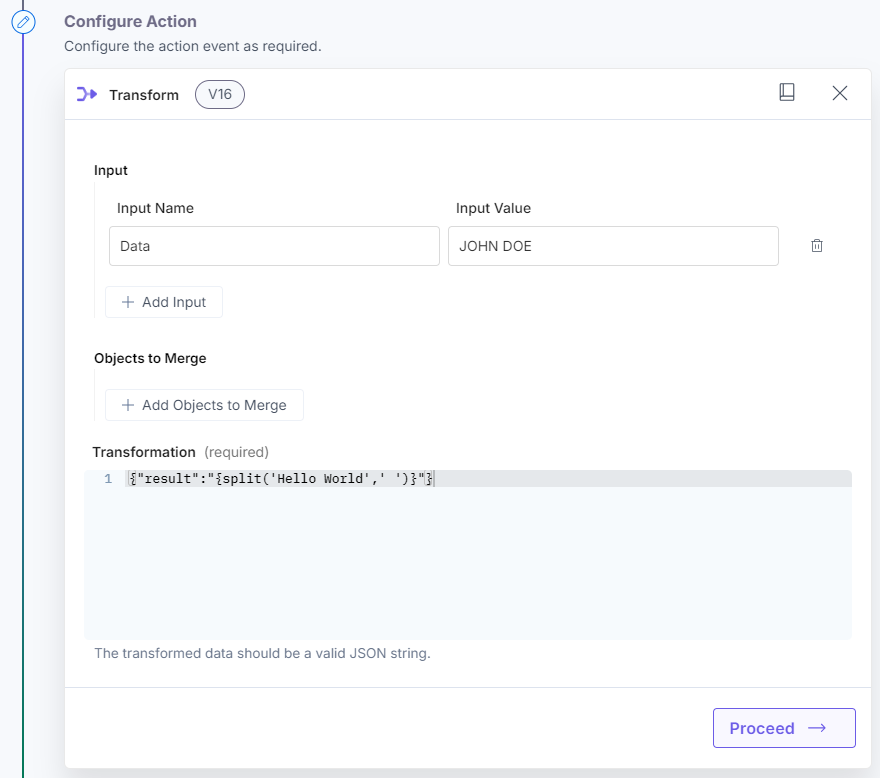
split
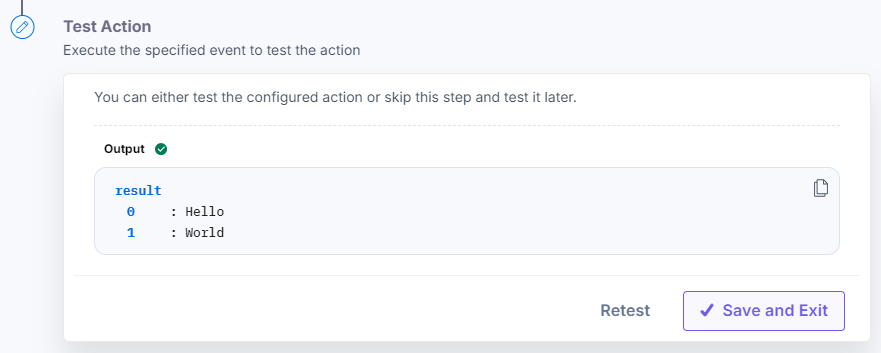
Use this modifier to split the text into an array.
Example: split('data-input' , '-')Here’s a screenshot that shows the input:
Here’s a screenshot that shows the output:
join
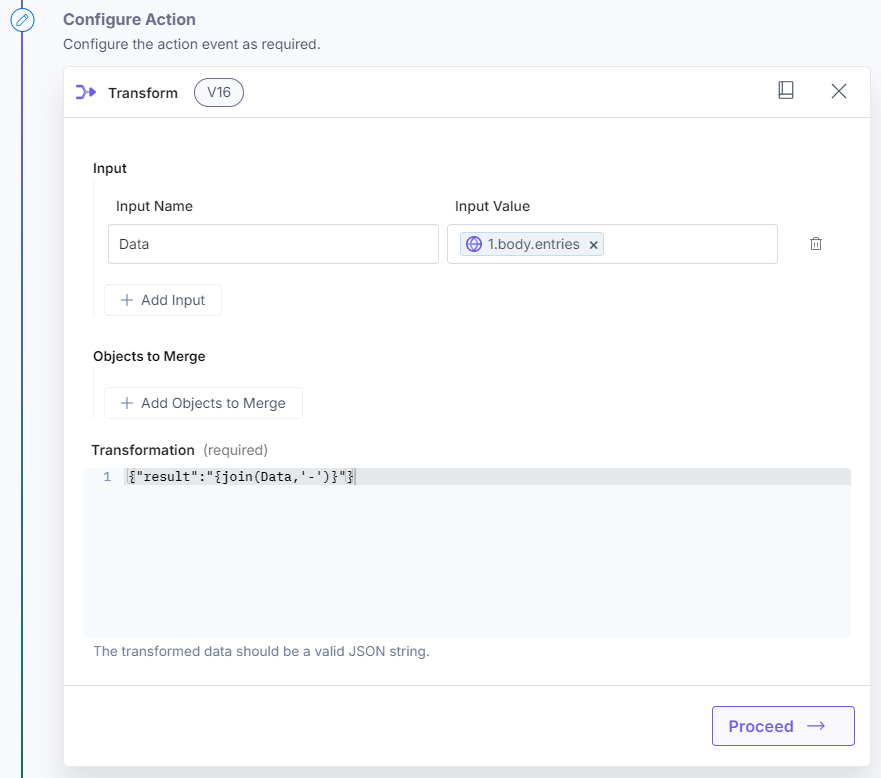
Use this modifier to join all items of an array to make a single string.
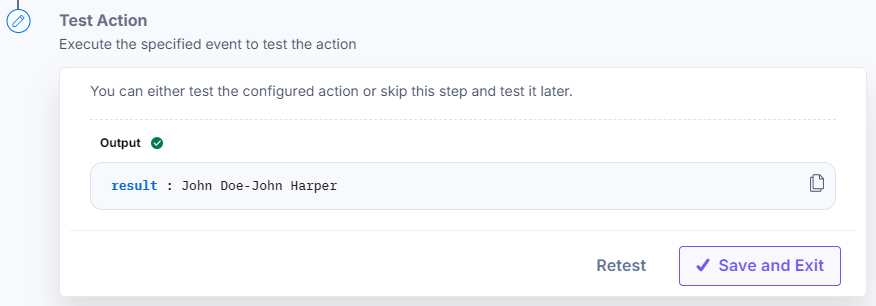
Example: join(…arrayRef|string , '-')Here’s a screenshot that shows the input:
Here’s a screenshot that shows the output:
number
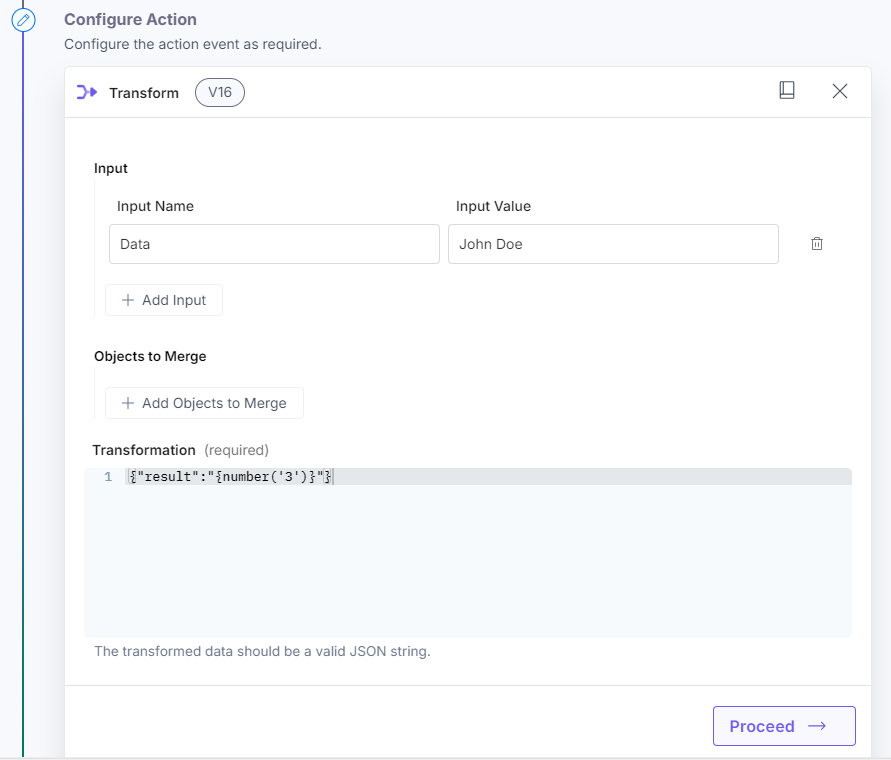
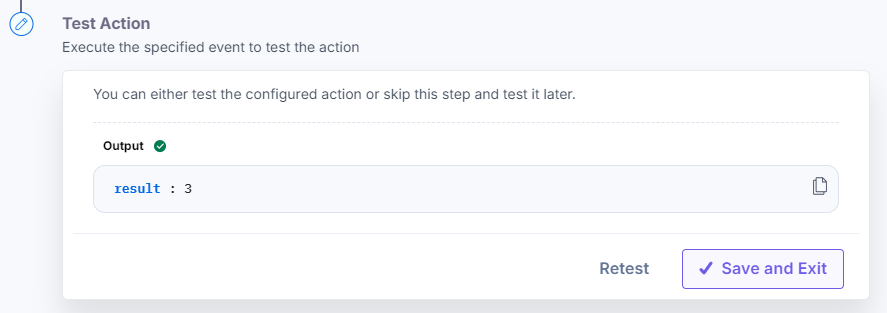
Use this modifier to convert text into numbers.
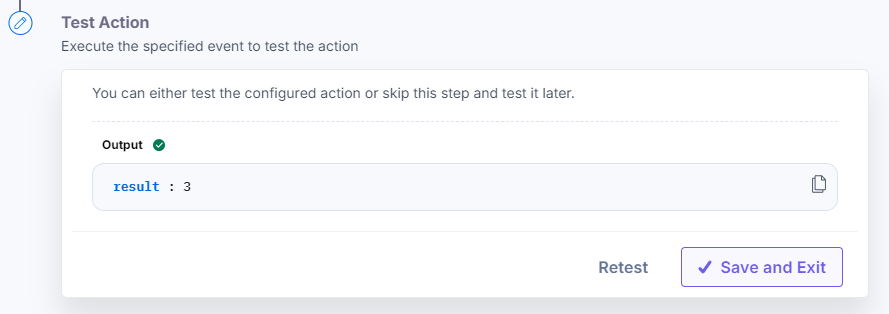
Example: number('3')Here’s a screenshot that shows the input:
Here’s a screenshot that shows the output:
sum
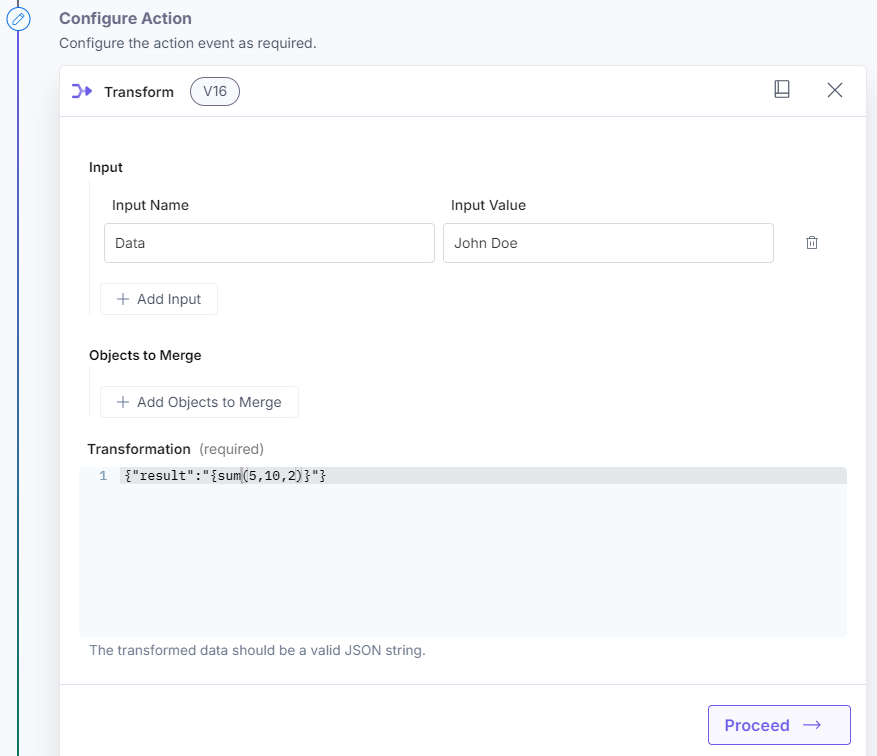
Use this modifier to perform the addition of all numbers.
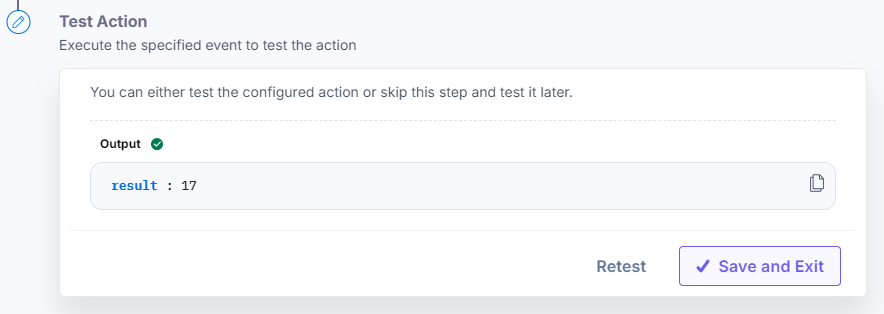
Example: sum(5,10,2)Here’s a screenshot that shows the input:
Here’s a screenshot that shows the output:
random
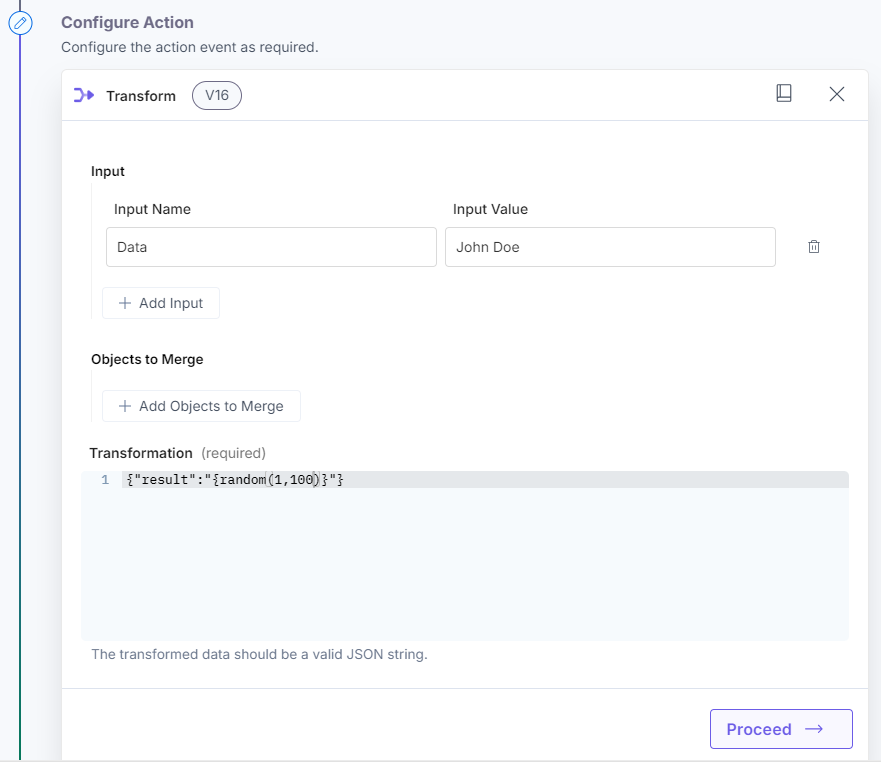
Use this modifier to generate random numbers from a specified range.
Example: random(1, 100)Here’s a screenshot that shows the input:
Here’s a screenshot that shows the output:
max
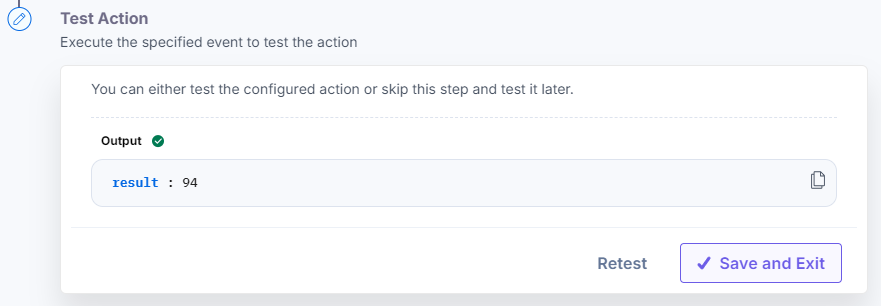
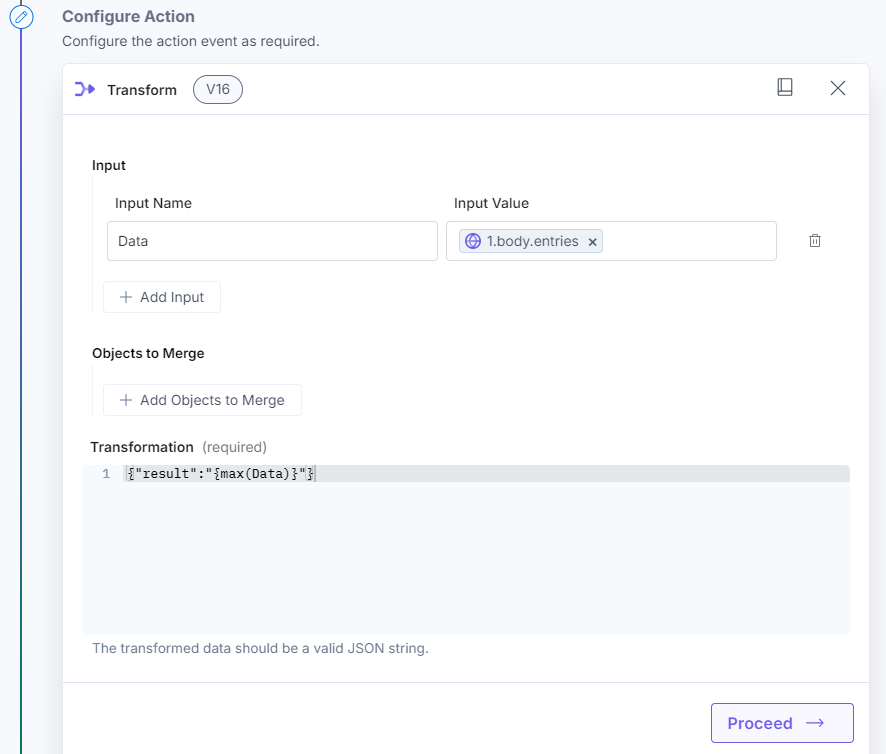
Use this modifier to retrieve the largest number from an array.
Example:max(arrayRef)Here’s a screenshot that shows the input:
Here’s a screenshot that shows the output:
min
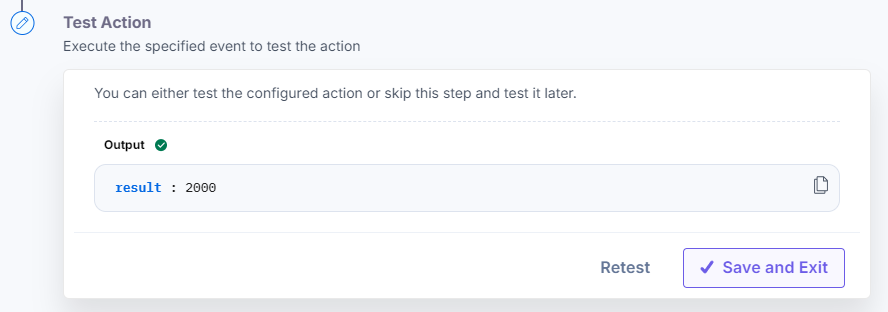
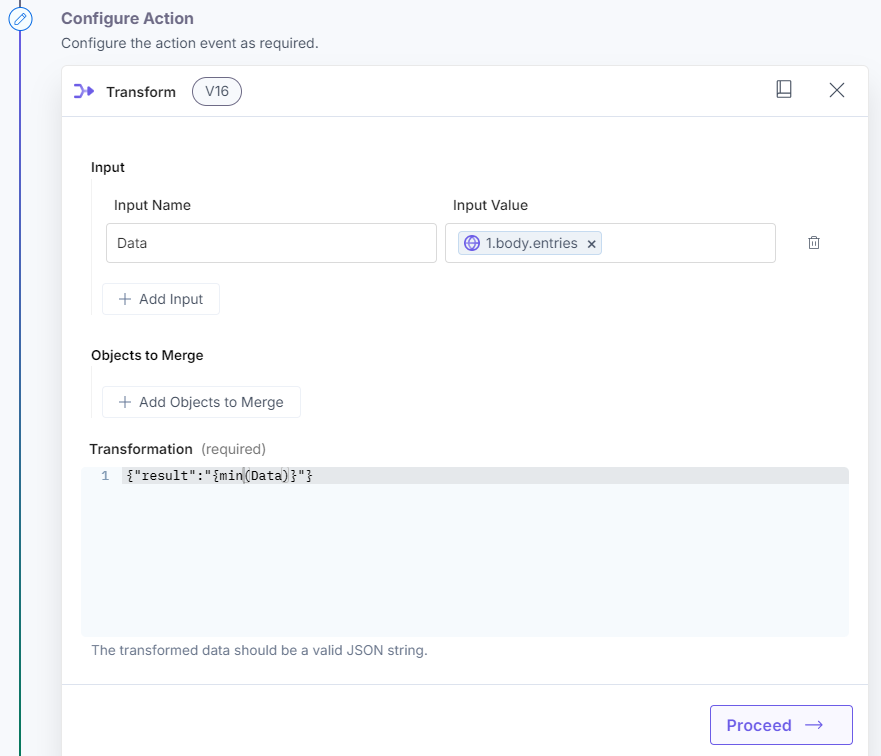
Use this modifier to retrieve the smallest number from an array.
Example: min(arrayRef)Here’s a screenshot that shows the input:
Here’s a screenshot that shows the output:
upperCase
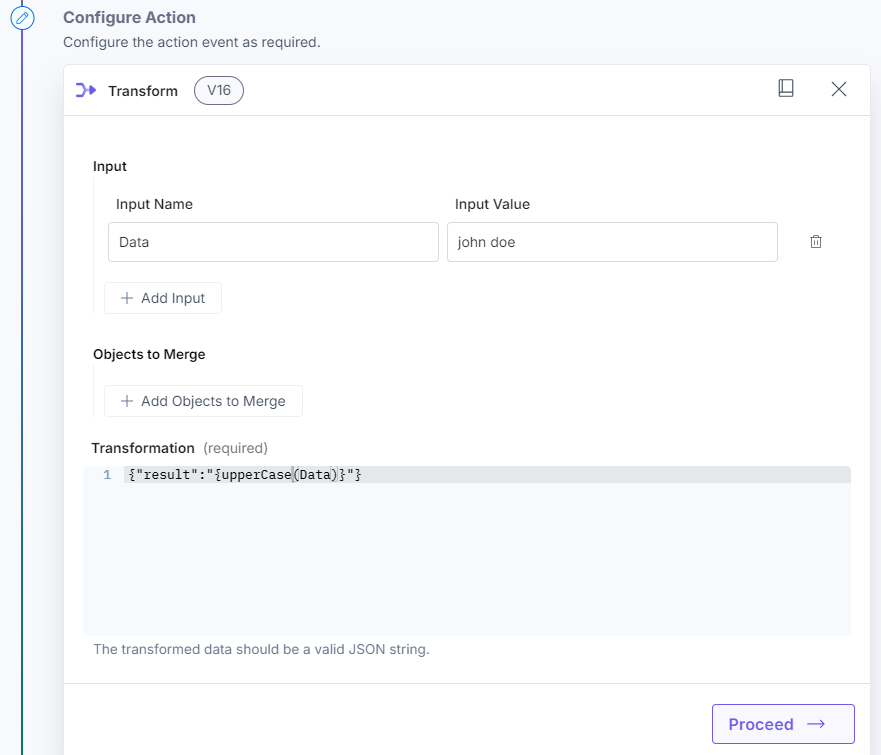
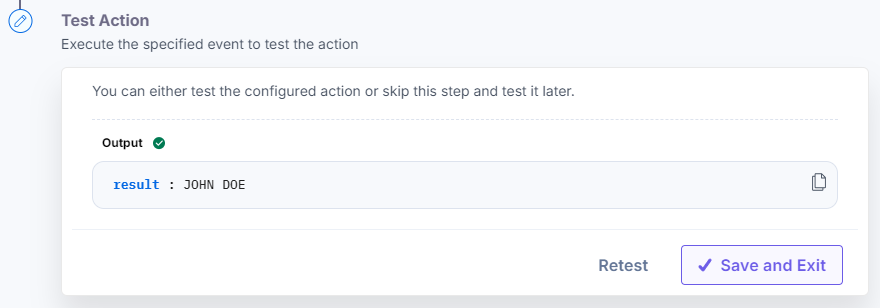
Use this modifier to convert the input text into upper case.
Example: upperCase(Data)Here’s a screenshot that shows the input:
Here’s a screenshot that shows the output:
lowerCase
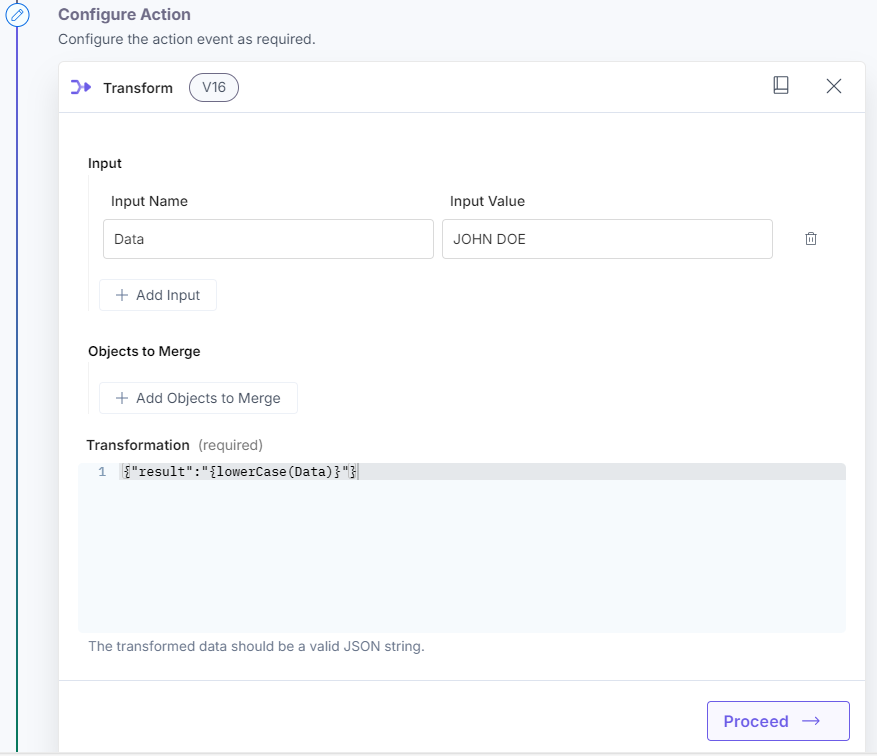
Use this modifier to convert the input text into lower case.
Example: lowerCase(Data)Here’s a screenshot that shows the input:
Here’s a screenshot that shows the output:
text
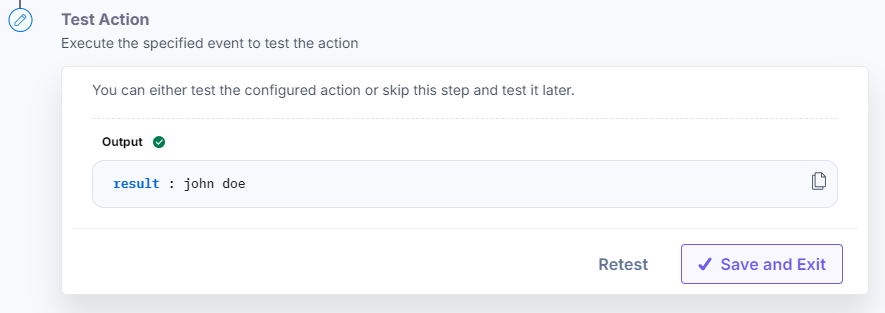
Use this modifier to convert numbers to the text type, i.e., this modifier typecasts data which means that the data type gets changed to string.
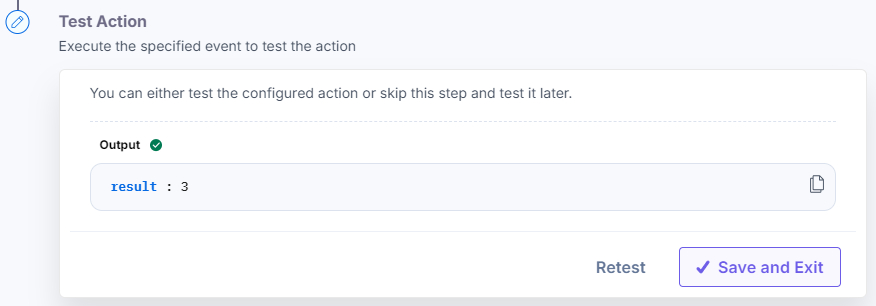
Example: text(3)Here’s a screenshot that shows the input:
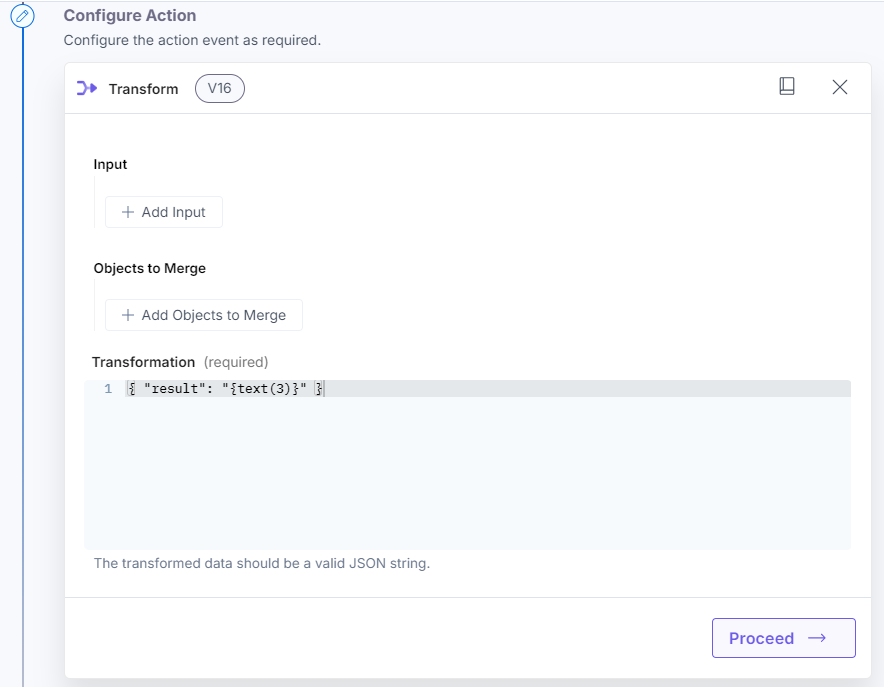
Here’s a screenshot that shows the output:
uniqueItems
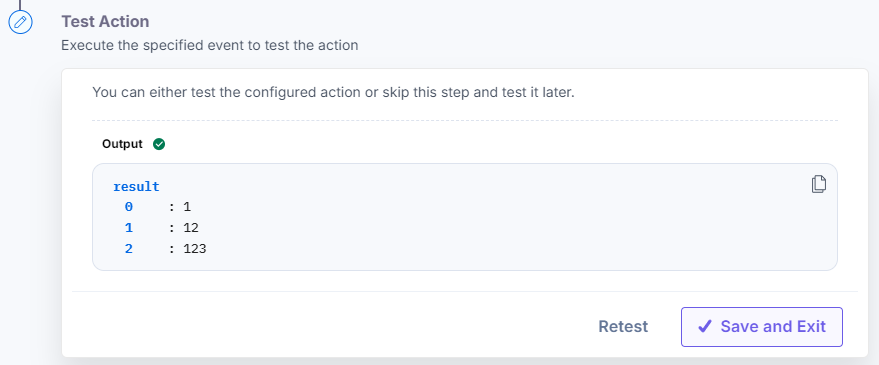
Use this modifier to remove duplicate items and return unique values from an array.
Here’s a screenshot that shows the input:
Example: uniqueItems(Data)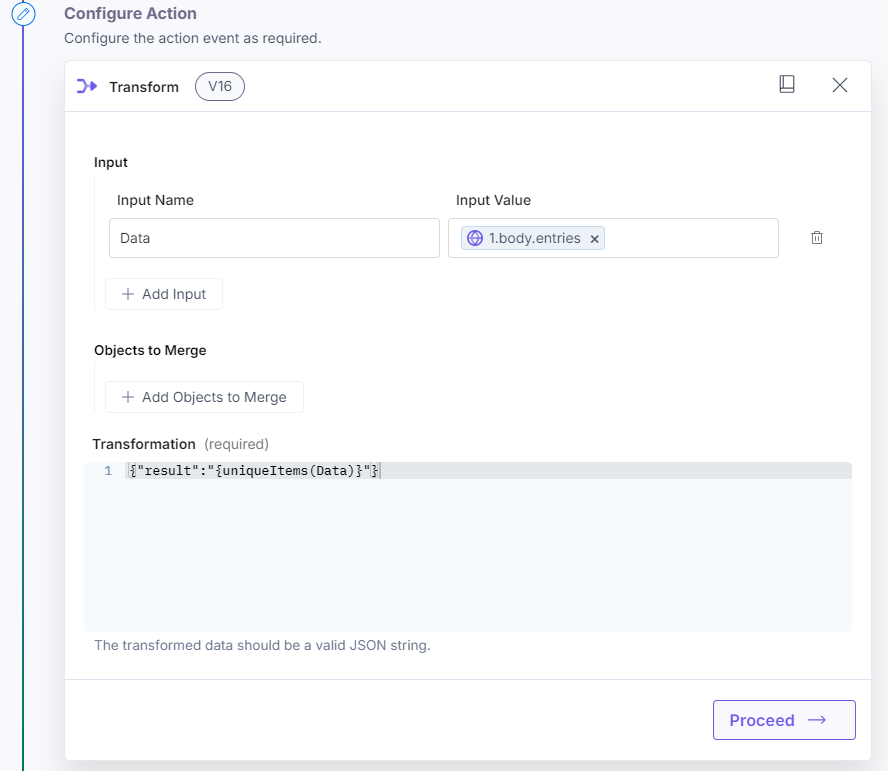
Here’s a screenshot that shows the output:
findInCollection
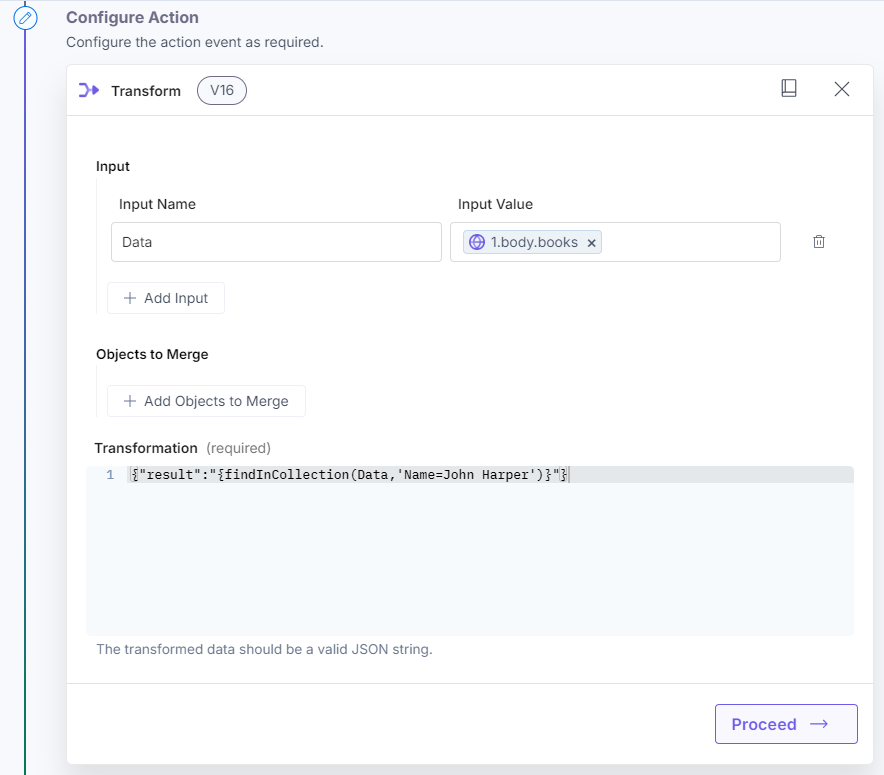
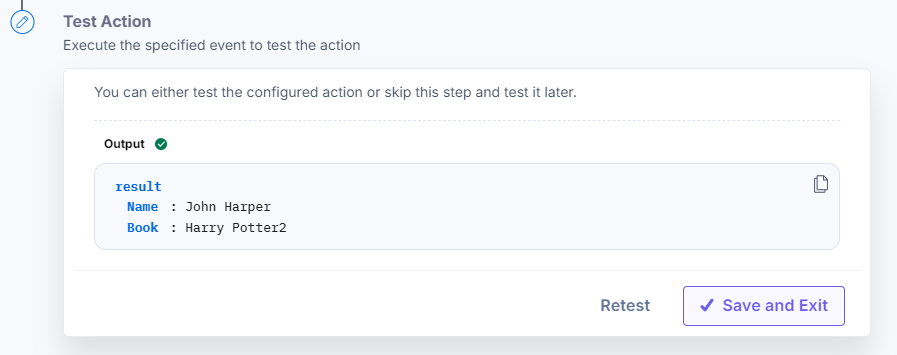
Use this modifier to return objects from an array specified in the conditions.
Example: findInCollection(Data, 'Name= John Harper')Here’s a screenshot that shows the input:
Here’s a screenshot that shows the output:
filterCollection
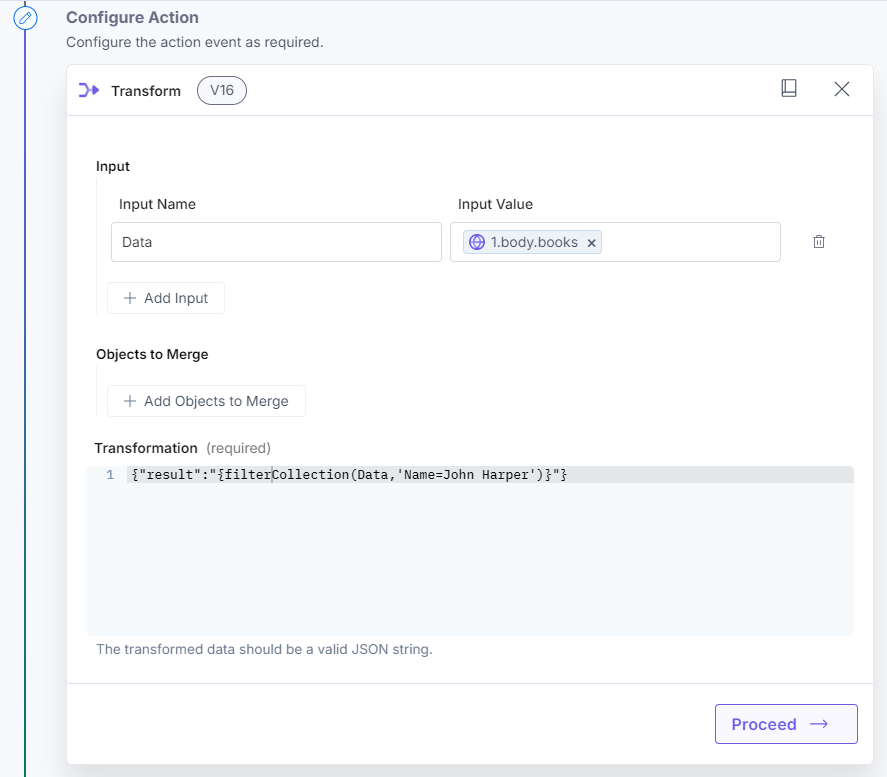
Use this modifier to filter an array and remove all objects which do not match the condition.
Example: filterCollection(Data, 'Name=John Harper')Here’s a screenshot that shows the input:
Here’s a screenshot that shows the output:
mapCollection
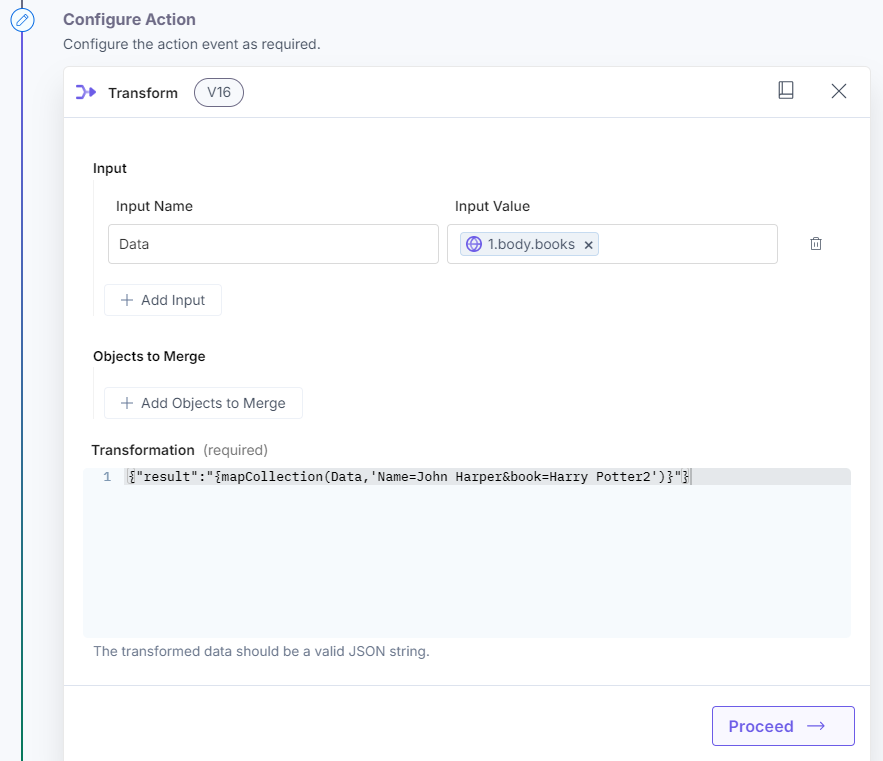
Use this modifier to map the collection data. This function will help users create a new collection by mapping data to different keys.
Example: { "userslist": "{mapCollection(users,'Name=John Harper&book =Harry Potter')}" }Here’s a screenshot that shows the input:
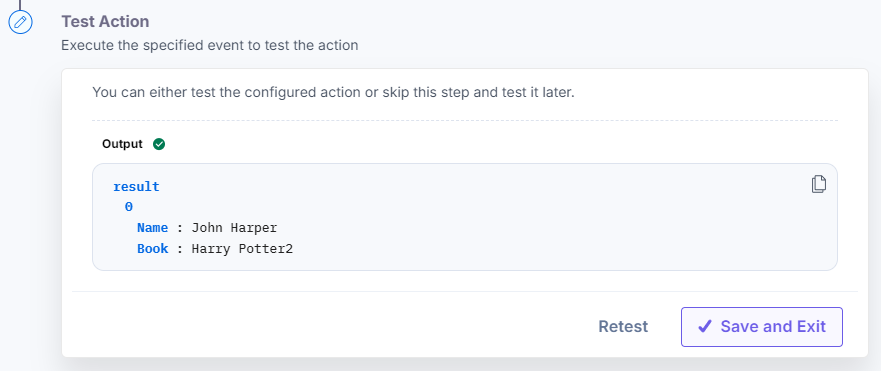
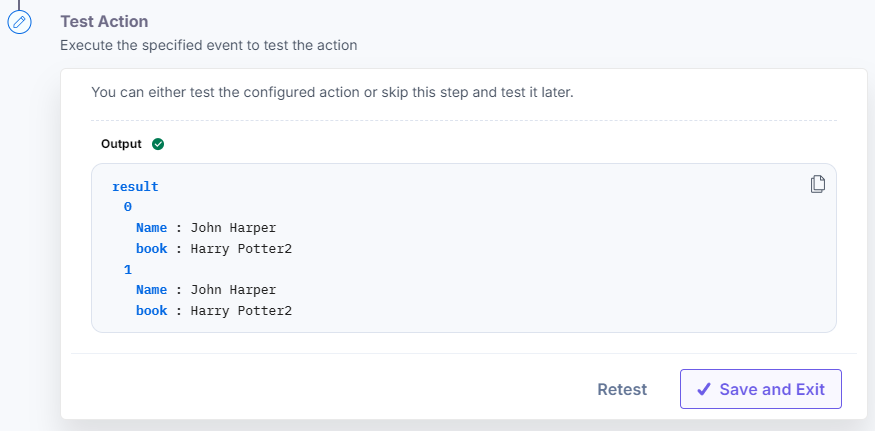
Here’s a screenshot that shows the output:
size
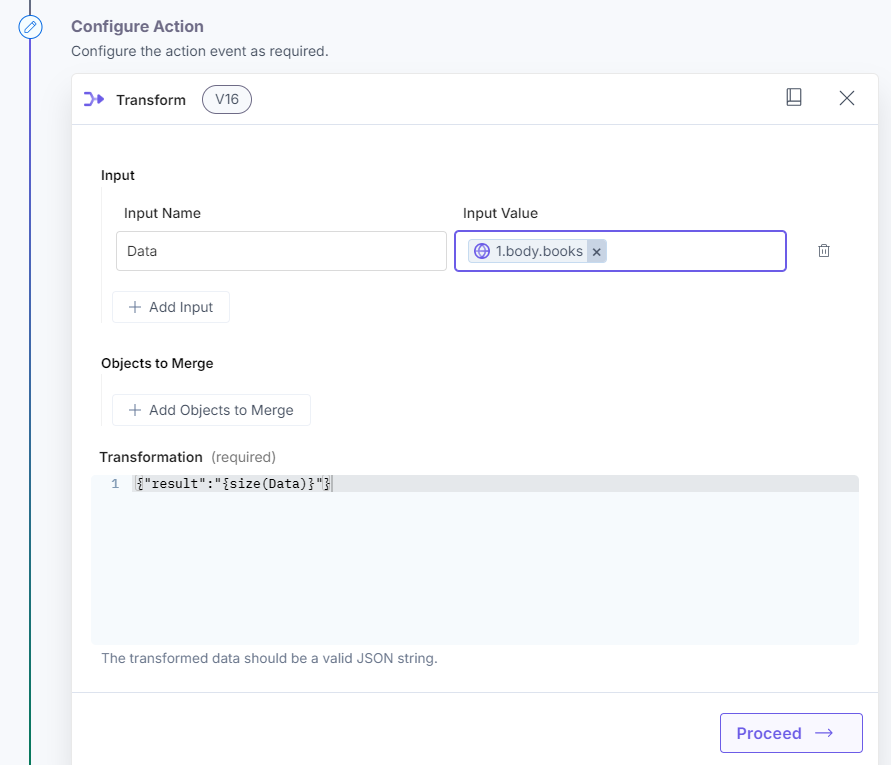
Use this modifier to retrieve the size of an array.
Example: size(Data)Here’s a screenshot that shows the input:
Here’s a screenshot that shows the output:
now
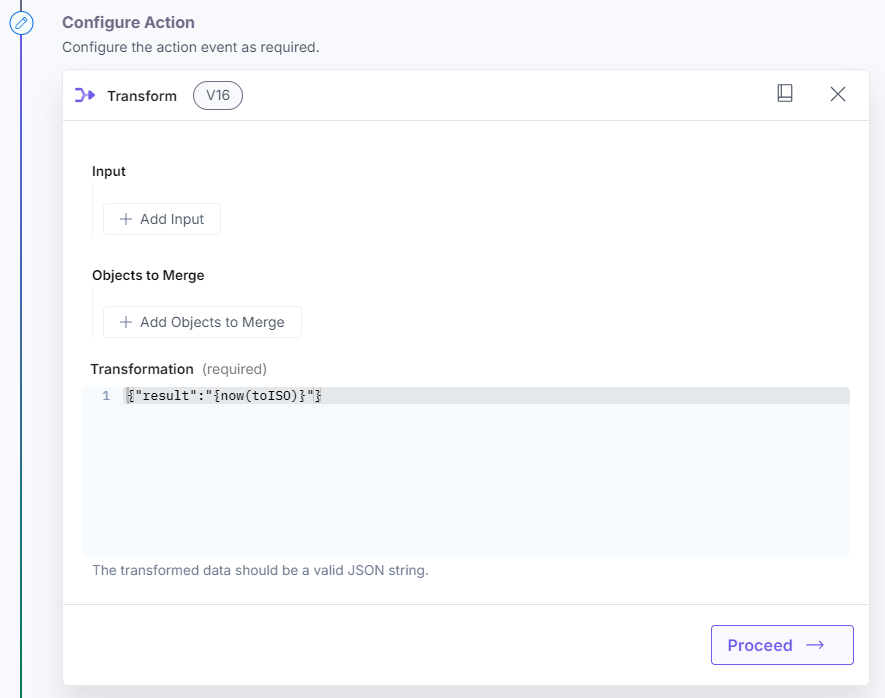
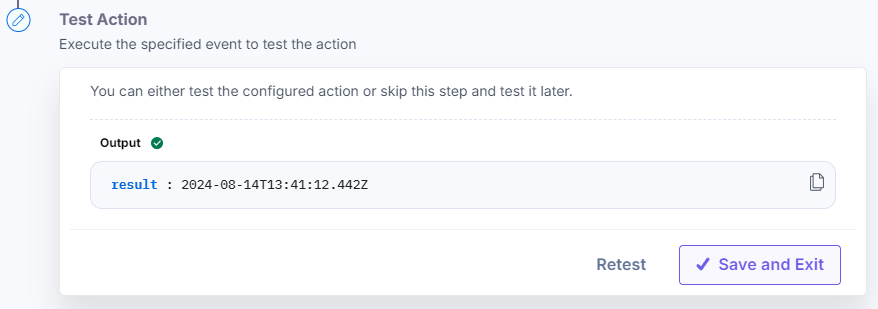
Use this modifier to retrieve the current timestamp.
Example: now(toISO)
Options: toISO | toDate | toGMT | toUTC | toTimeHere’s a screenshot that shows the input:
Here’s a screenshot that shows the output:
uuid
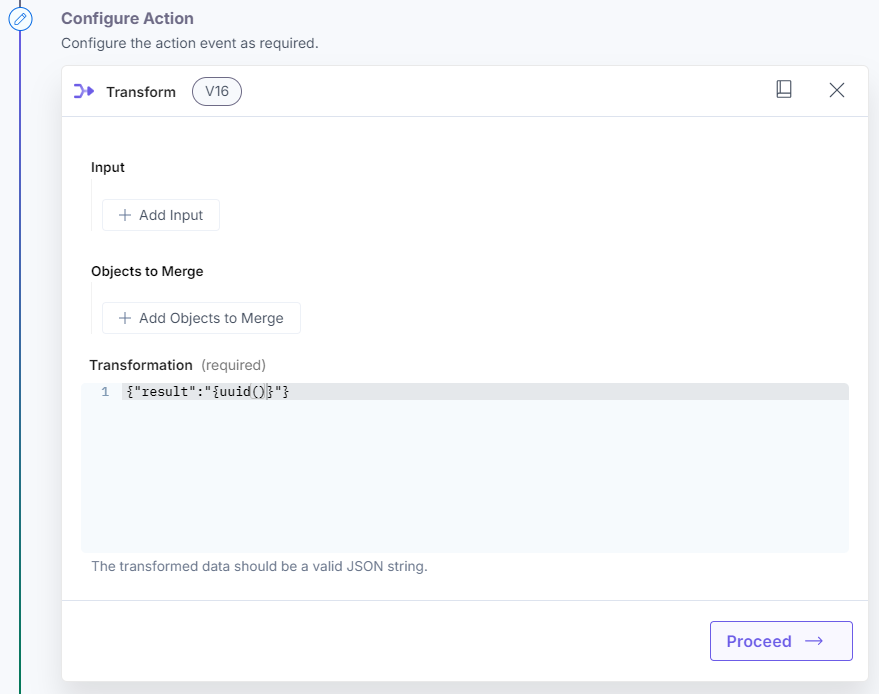
Use this modifier to retrieve the unique ID based on UUID v4.
Example:
uuid()
{ "uuid" : "{uuid()}"}Here’s a screenshot that shows the input:
Here’s a screenshot that shows the output:
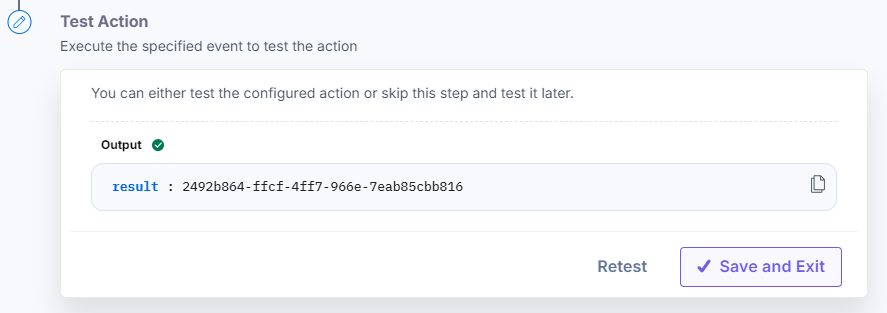
Using Multiple Filters
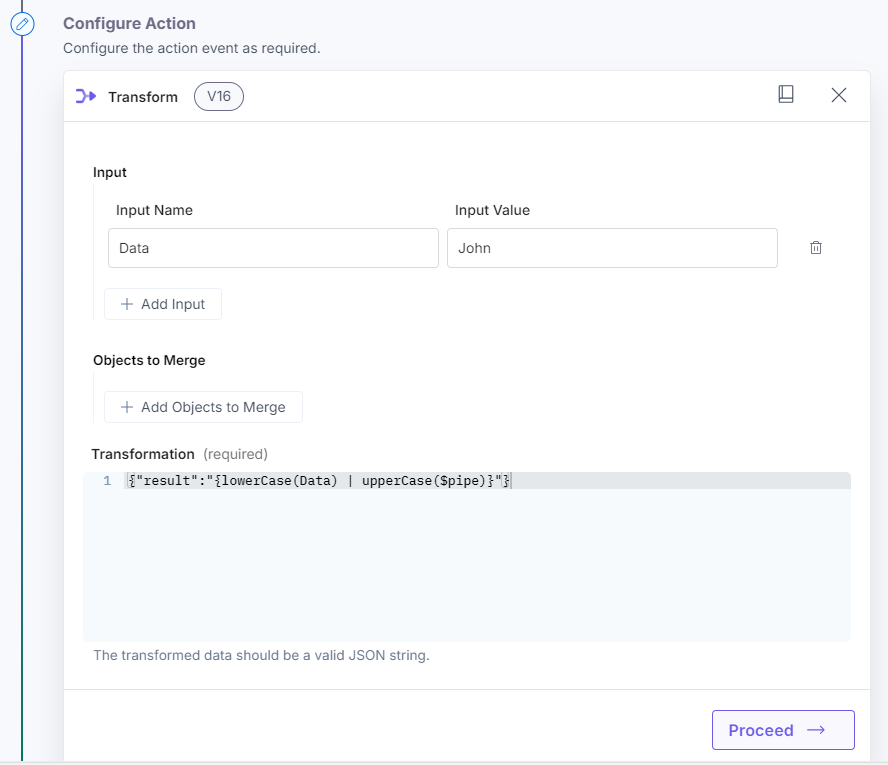
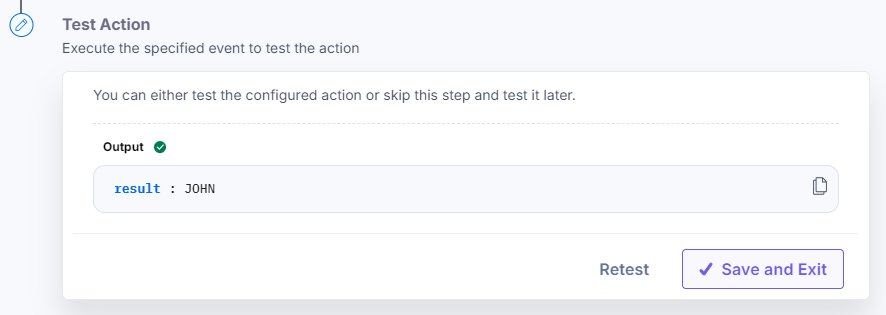
You can also pass data in for more than one filter, as shown below:
{
“name”: “{lowerCase(firstname)|upperCase($pipe)}”
}Here’s a screenshot that shows the input:
Here’s a screenshot that shows the output:
Template
This action enables you to format your data using HTML, incorporate inline CSS, and apply custom helper functions for data formatting. It includes many predefined functions, making it easier to transform inputs into your desired formats.
Additional Resource: Refer to the Handlebars document for details on custom functions that can be used within the Template.
- Under Choose an Action tab, select the Template action.
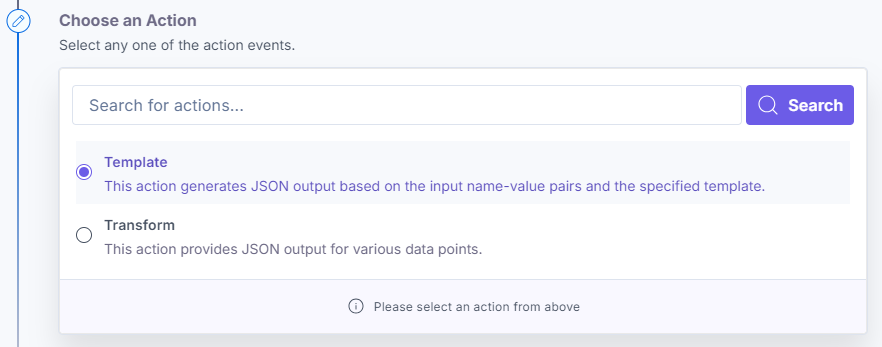
- On the Template Configure Action page, enter the details given below:
- Click the Add Input button, and enter a variable name and value in the Input Name and Input Value fields respectively. For example, enter Entry Title in the Input Name field and in the Input Value field, fetch the entry title configured in the previous step as shown in the screenshot below:
Note: You can also pass the value directly into the Template box.
- In the Template field, provide a template and fetch the values from the previous step as shown below:
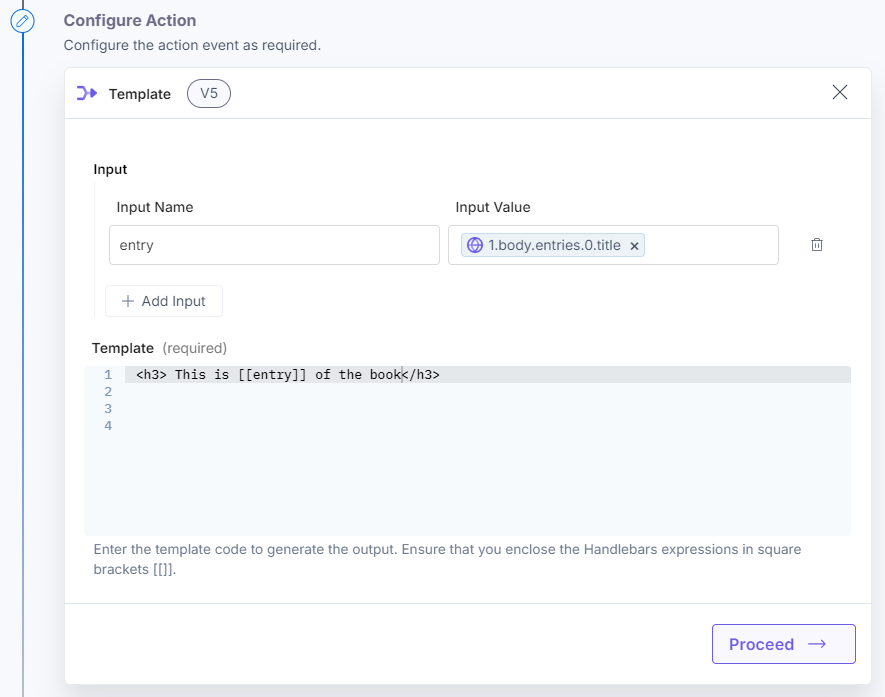
- Click the Add Input button, and enter a variable name and value in the Input Name and Input Value fields respectively. For example, enter Entry Title in the Input Name field and in the Input Value field, fetch the entry title configured in the previous step as shown in the screenshot below:
- Click Proceed.
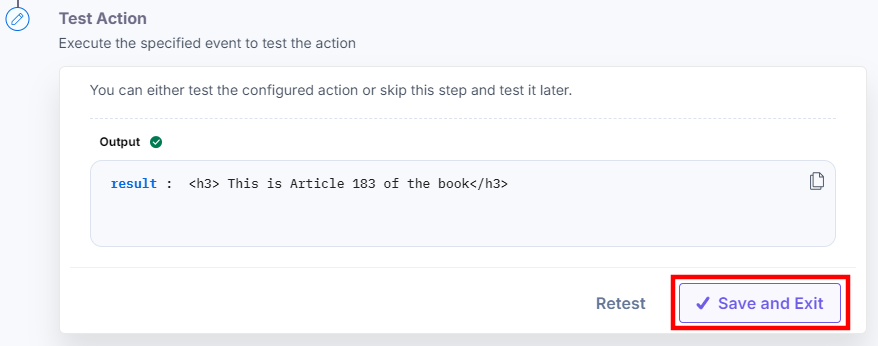
- Check if the details are correct. If yes, click Test Action.

- Once set, click Save and Exit.
Examples
Let’s look at some of the basic examples of the Template action.
Example 1:
Data Array:
data = [{name: "Alice", age: 25}, {name: "Bob", age: 30}]
Explanation:
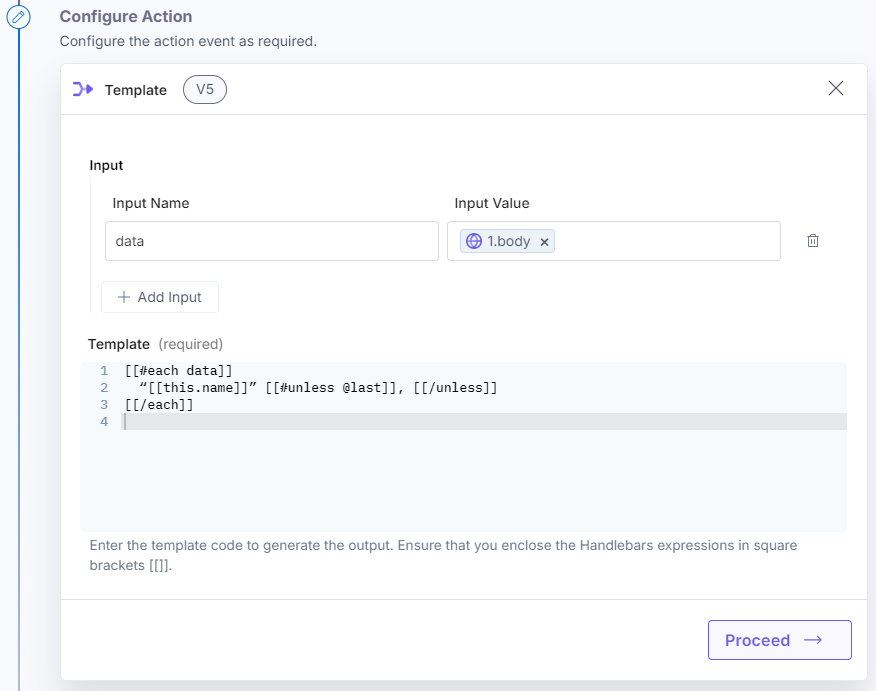
- [[#each data]] loops through the data array.
- [[this.name]] accesses the name property of each object in the array.
- [[#unless @last]] checks if the current item is not the last one in the array; if it is not, a comma is added.
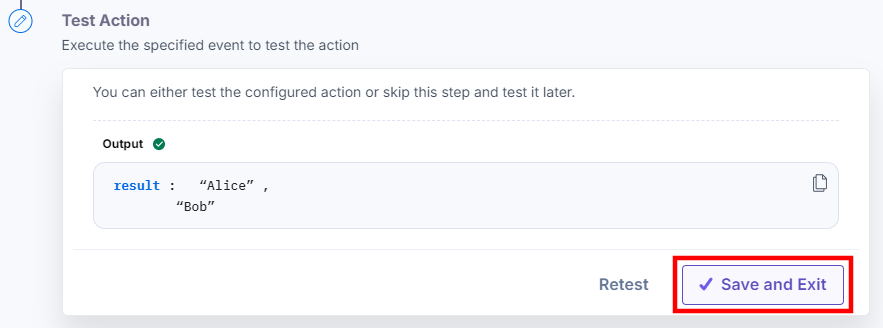
This results in the names being joined with commas, except after the last name.
Here’s a screenshot that shows the input:
Here’s a screenshot that shows the output:
Example 2:
Data Array:
data = [{name: "Alice", age: 25}, {name: "Bob", age: 30}]
Explanation:
- [[#each data]] loops through the data array, creating a list item (<li> </li>) for each iteration that displays the name value. The result is an HTML list where each name appears as a list item.
This results in an unordered list.
Here’s a screenshot that shows the input:
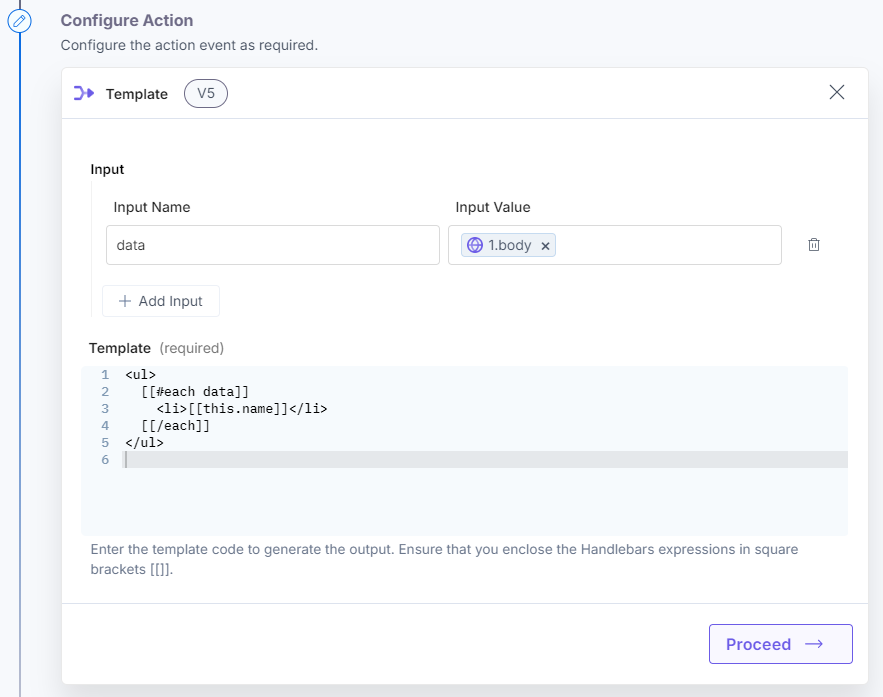
Here’s a screenshot that shows the output:
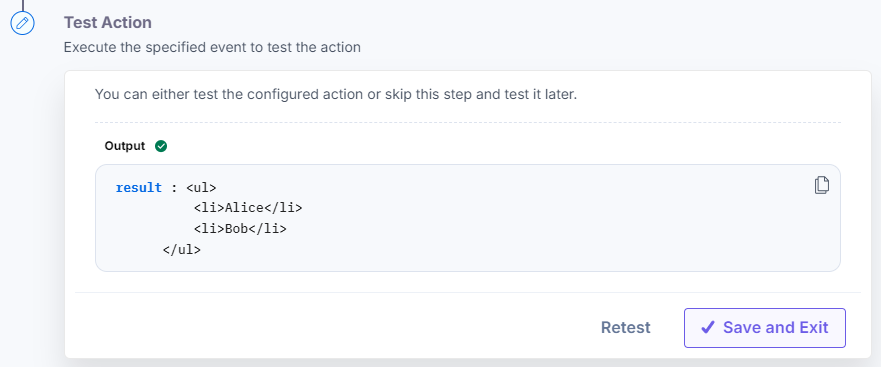
Example 3:
Data Array:
Data = { author: true, firstName: "Yehuda", lastName: "Katz"}
Explanation:
- [[#if Data.author]] checks whether the author exists.
- If the author is present, the full name is displayed within an <h1> tag.
- If the author is not present, the message "He is not an author" is displayed.
- In this scenario, since the author exists, the name is shown.
Here’s a screenshot that shows the input
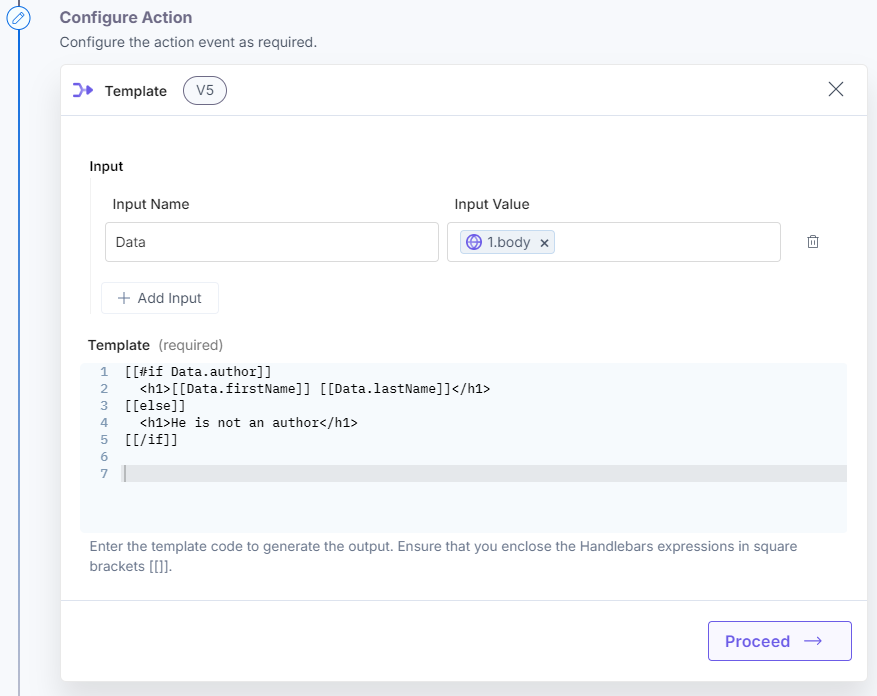
Here’s a screenshot that shows the output:
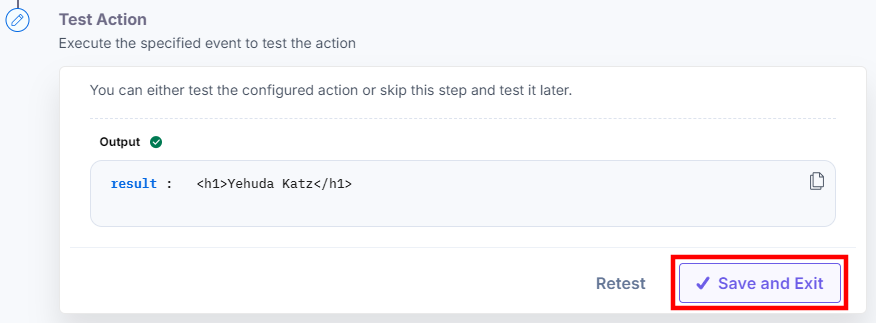
Example 4:
Data Array:
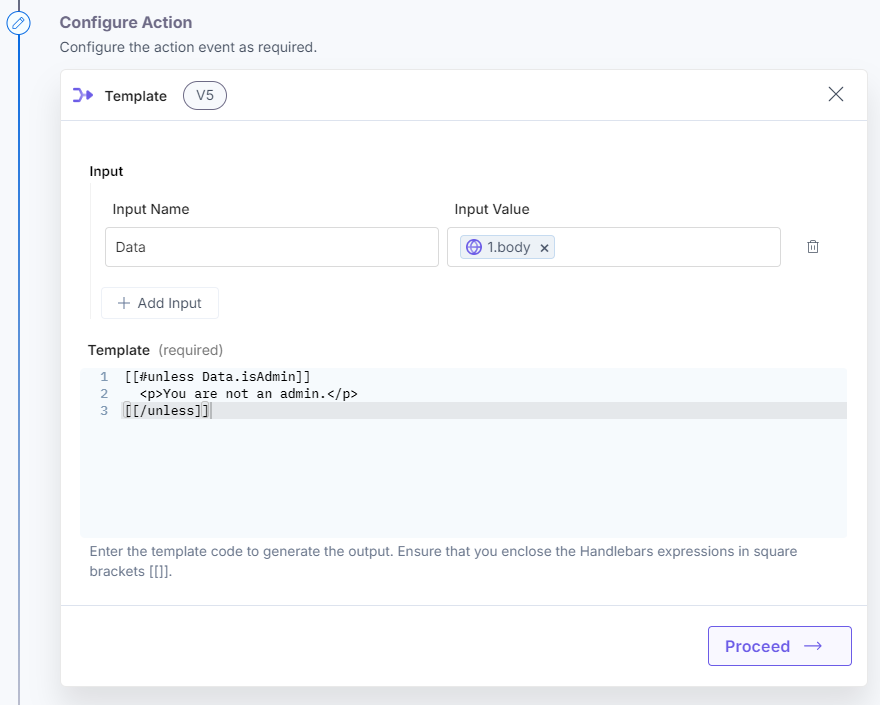
Data= { isAdmin: false}
Explanation:
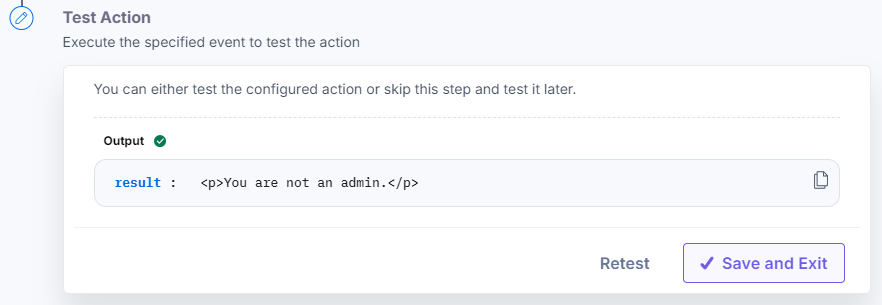
- [[#unless Data.isAdmin]] checks if isAdmin is false.
- If it is, the message "You are not an admin" is displayed.
- In this case, since isAdmin is false, the message is shown.
Here’s a screenshot that shows the input:
Here’s a screenshot that shows the output:
Example 5:
Data Array:
data =
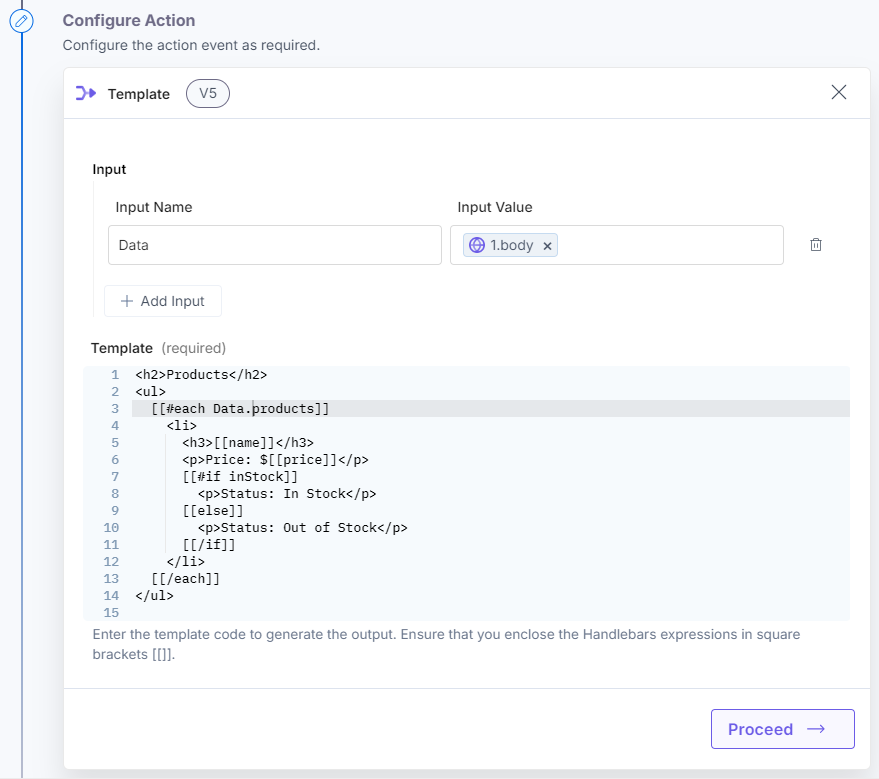
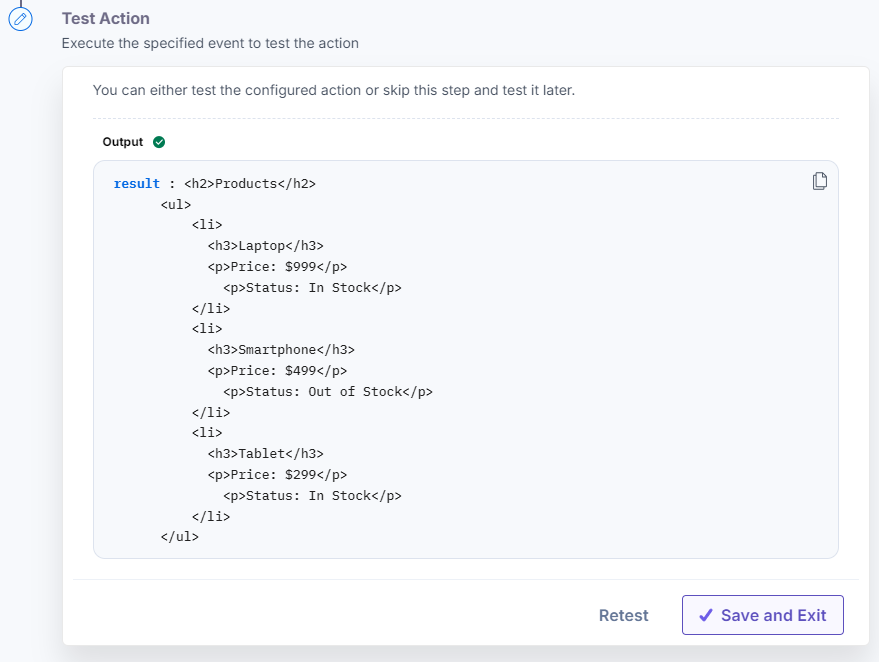
{ products = [ { "name": "Laptop", "price": 999, "inStock": true }, { "name": "Smartphone", "price": 499, "inStock": false }, { "name": "Tablet", "price": 299, "inStock": true } ] }
Explanation:
- The template uses [[#each products]] to loop through the products array.
- For each product, it displays the name, price, and stock status within a list item (<li>).
- The [[#if inStock]] helper checks if the product is in stock and conditionally shows the correct status.
- The result is an HTML list of products, showing their names, prices, and stock availability.
Here’s a screenshot that shows the input:
Here’s a screenshot that shows the output:
Example 6:
Data Array:
Data = { "data": ["a", "b", "c", "d", "e"] }
Explanation:
- The [[size Data]] helper counts the elements in the Data array.
- The output is the total number of items, which, in this case, is 5.
Here’s a screenshot that shows the input:

Here’s a screenshot that shows the output:

Template Helper Functions
The Transform action connector is a robust tool for manipulating text and numerical data according to user specifications. To offer users even greater flexibility in data transformation and manipulation, Automate offers templating.
This enhancement significantly expands the capabilities of the Transform action connector, making it even more powerful and user-friendly.
Let’s look at the applicable template helper functions in detail.
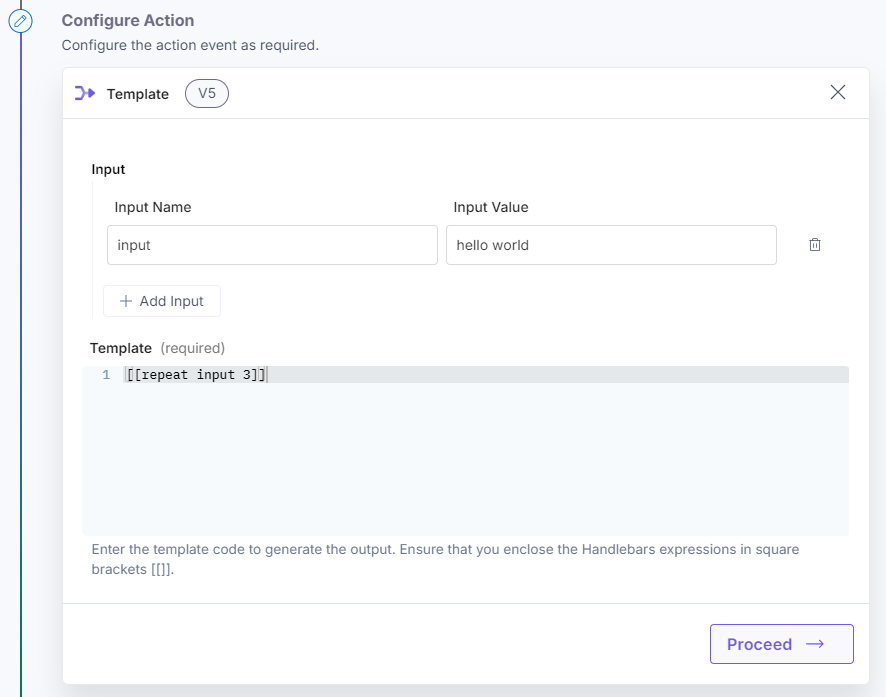
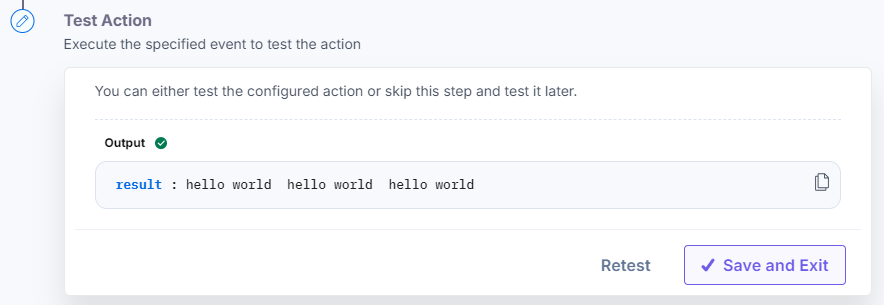
repeat
Use this function to repeat the input string a specified number of times.
Example: [[repeat string_name number]].
In the above example:
- repeat is the helper function
- string_name is the input string which you want to repeat
- number specifies the count of repetition for the string
Note: The input value must be a string, and the number should be an integer value.
Here’s a screenshot that shows the input:
Here’s a screenshot that shows the output:
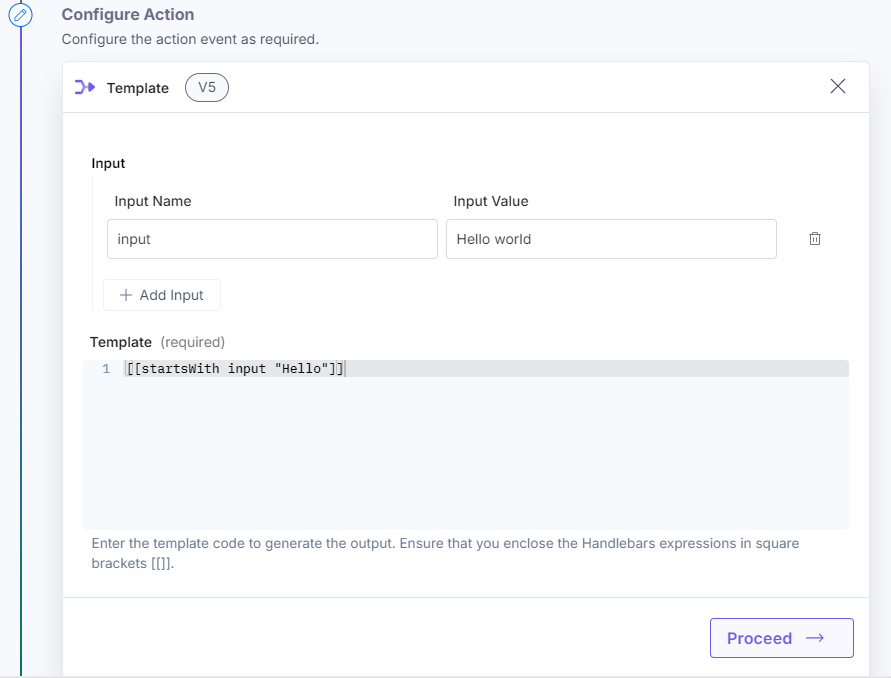
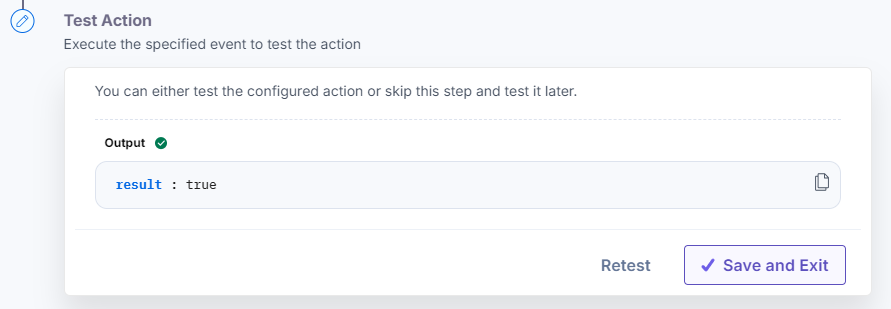
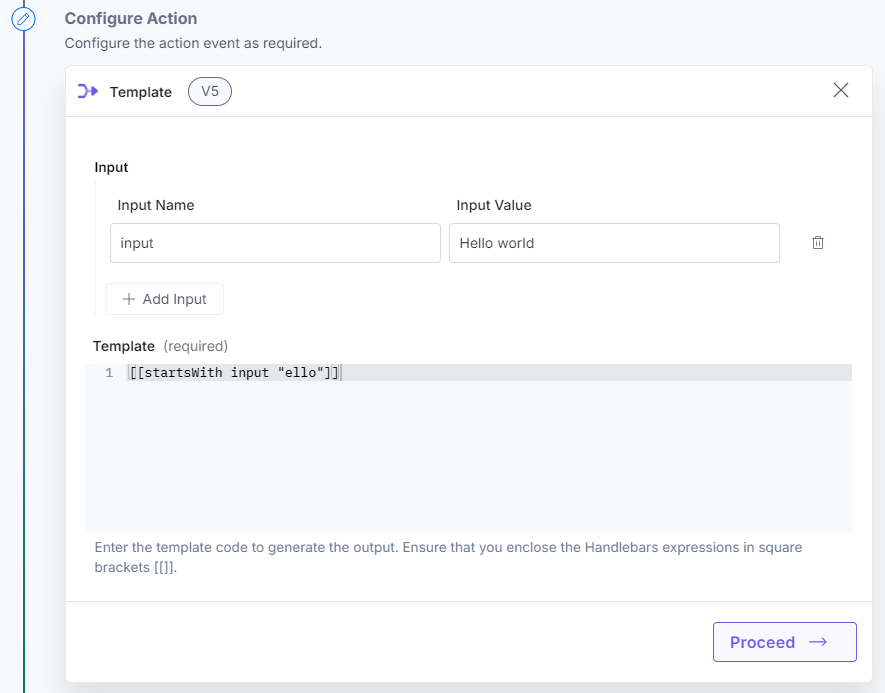
startsWith
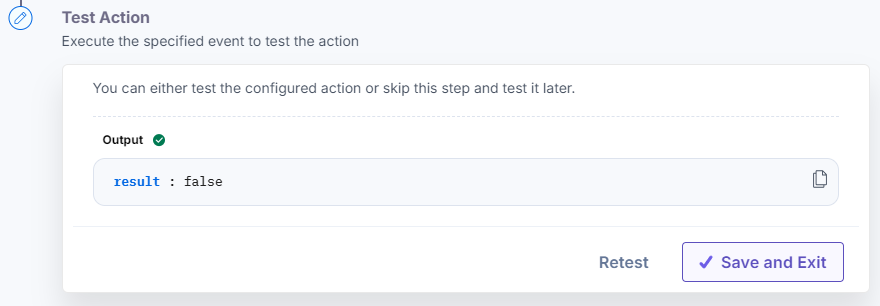
Use this function to check whether the input string starts with the specified letter or string. This returns a boolean value, i.e., true or false.
Example: [[startsWith string_name “letter/string”]].
In the above example:
- startsWith is the helper function
- string_name is the input string which you want to verify
- letter/string is the string that you want to check against the beginning of the input string.
Here’s a screenshot that shows the input:
Here’s a screenshot that shows the output:
In case of incorrect input:
Output:
endsWith
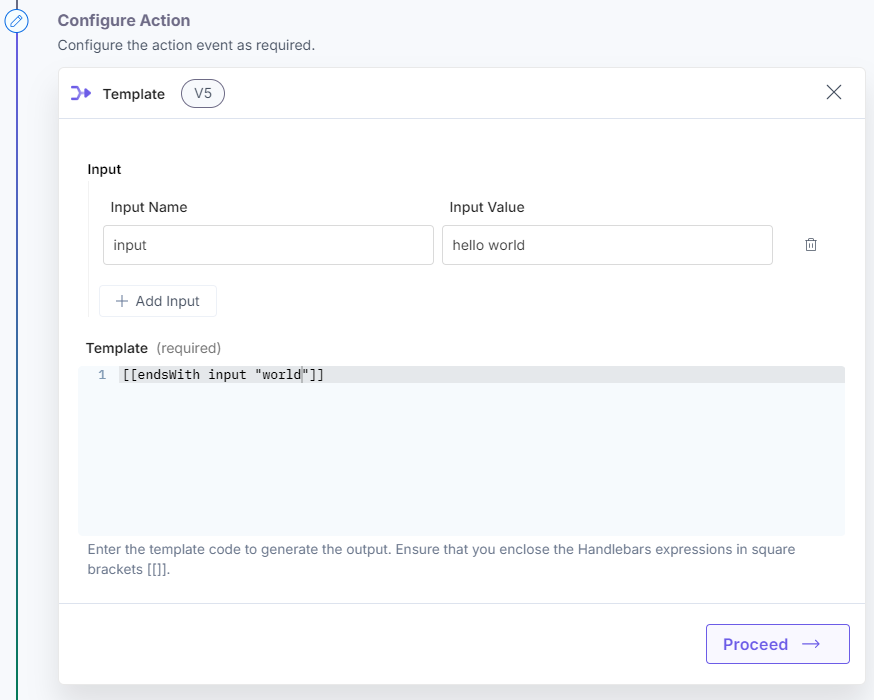
Use this function to check whether the input string starts with the specified letter or string. This returns a boolean value, i.e., true or false.
Example: [[endsWith string_name “letter/string”]].
In the above example:
- endsWith is the helper function
- string_name is the input string which you want to verify
- letter/string is the string that you want to check against the end of the input string.
Here’s a screenshot that shows the input:
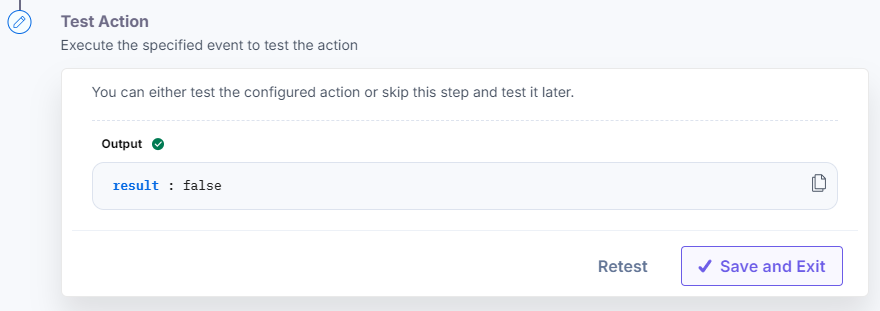
Here’s a screenshot that shows the output:
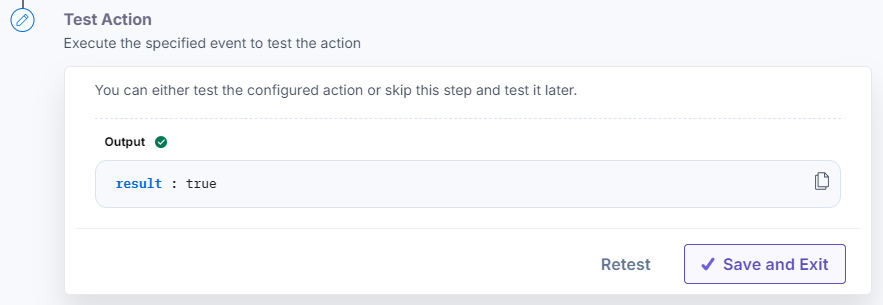
In case of incorrect input:
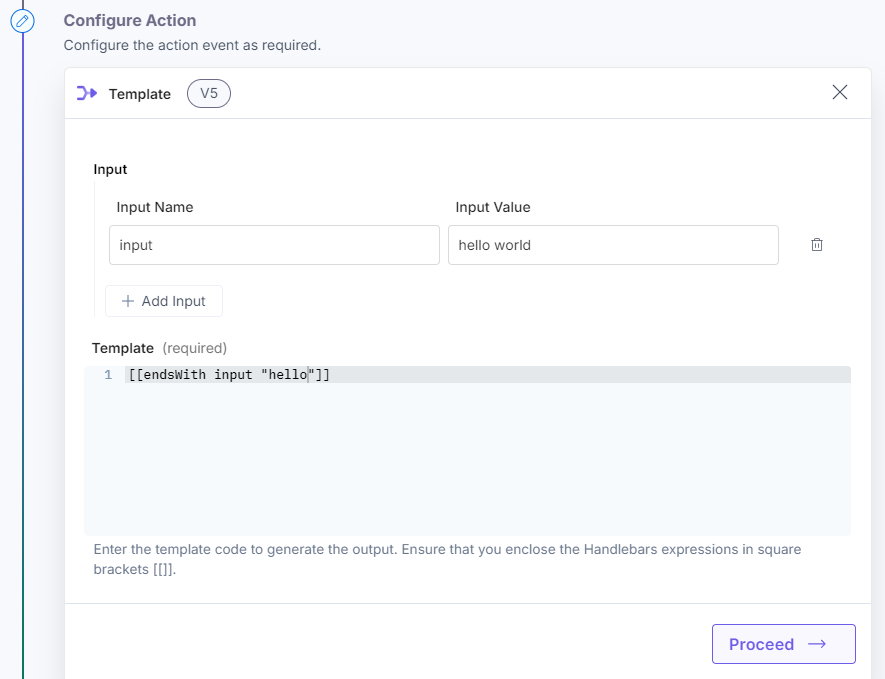
Output:
and
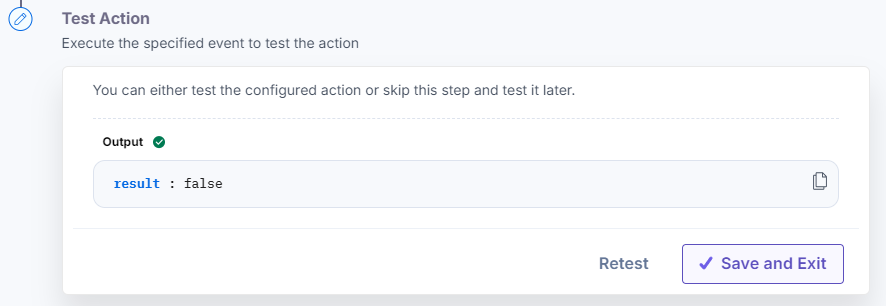
Use this function to perform a logical AND operation between two boolean values. You will get true if both boolean inputs are true, and false if either of the boolean values is false.
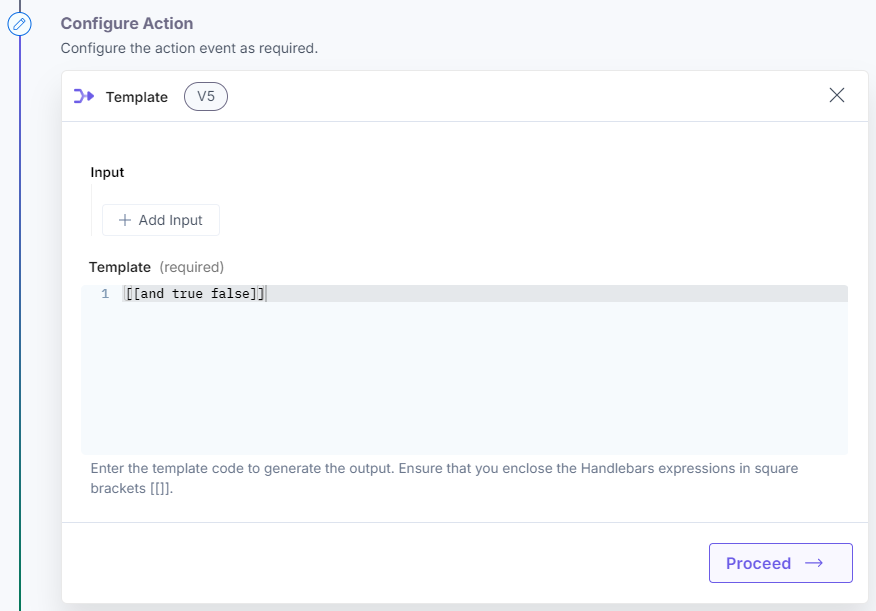
Example: [[and true false]].
In the above example:
- and is the helper function
- true is the first boolean value
- false is the second boolean value
Here’s a screenshot that shows the input:
Here’s a screenshot that shows the output:
or
Use this function to perform a logical OR operation between two boolean values. You will get true if either of the boolean values is true, and false if both the boolean inputs are false.
Example: [[or true false]].
In the above example:
- or is the helper function
- true is the first boolean value
- false is the second boolean value
Here’s a screenshot that shows the input:
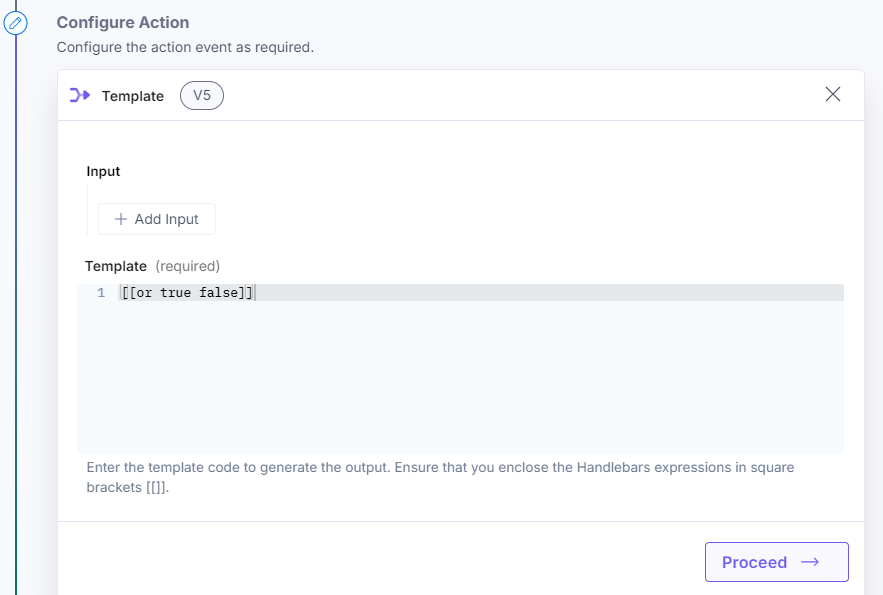
Here’s a screenshot that shows the output:
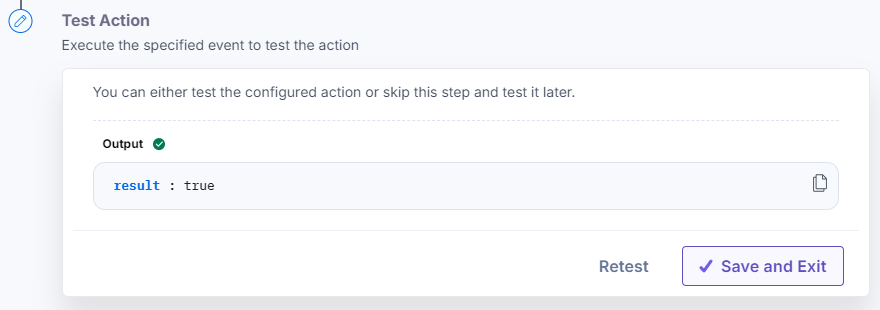
contains
Use this function to check whether the input string contains the specified letter or substring. This function returns a boolean value: true if the specified text is found, and false otherwise.
Example: [[contains “string_name” “letter/substring”]].
In the above example:
- contains is the helper function
- string_name is the input string
- letter/string is the substring that you want to search in the input string.
Here’s a screenshot that shows the input:
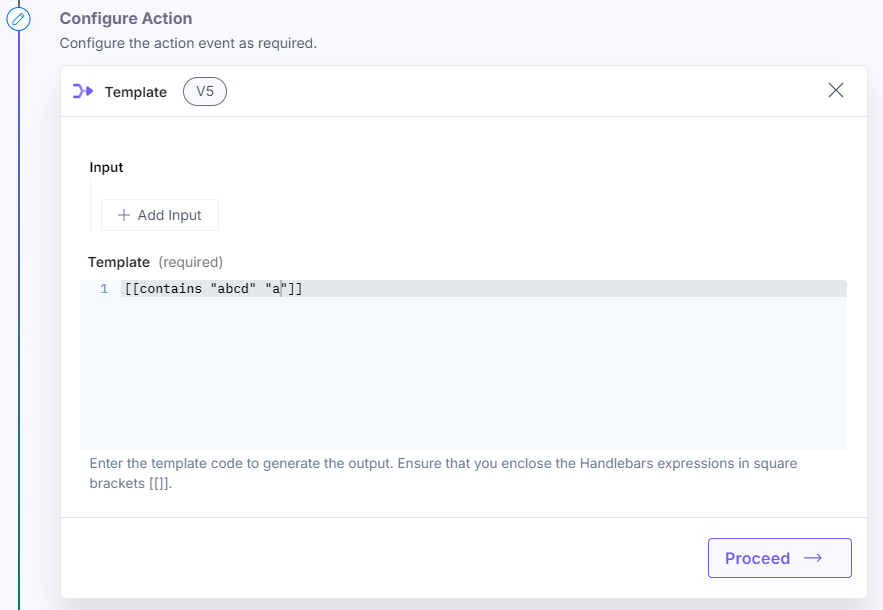
Here’s a screenshot that shows the output:
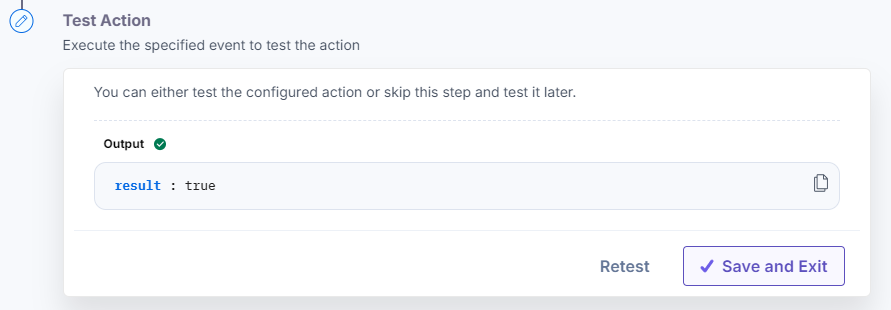
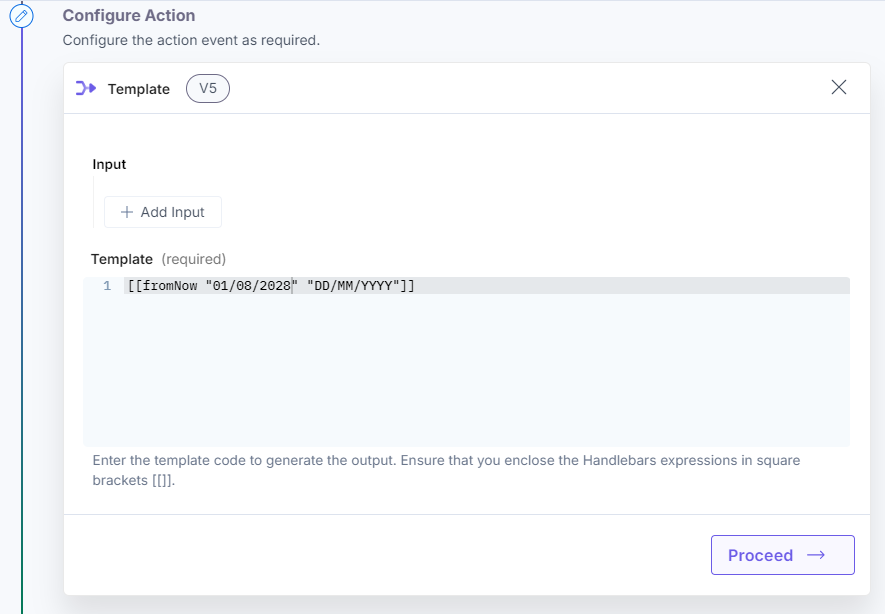
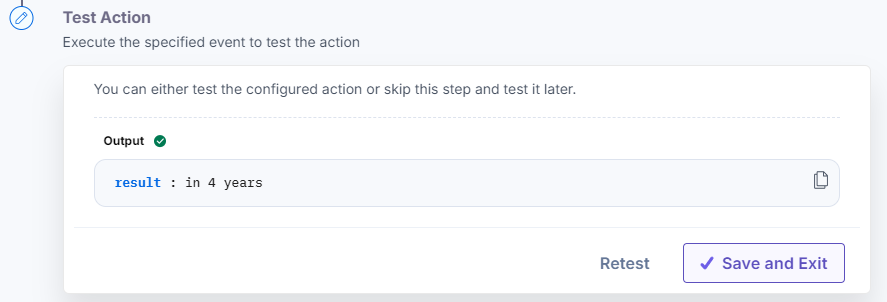
fromNow
Use this function to check the time from an existing date with the specific date.
Example: [[fromNow “01/08/2028” “MM/DD/YYYY”]].
In the above example:
- fromNow is the helper function
- 01/08/2028 is the date from which you want to check the time
- MM/DD/YYYY is the date format of the specified date
Here’s a screenshot that shows the input:
Here’s a screenshot that shows the output:
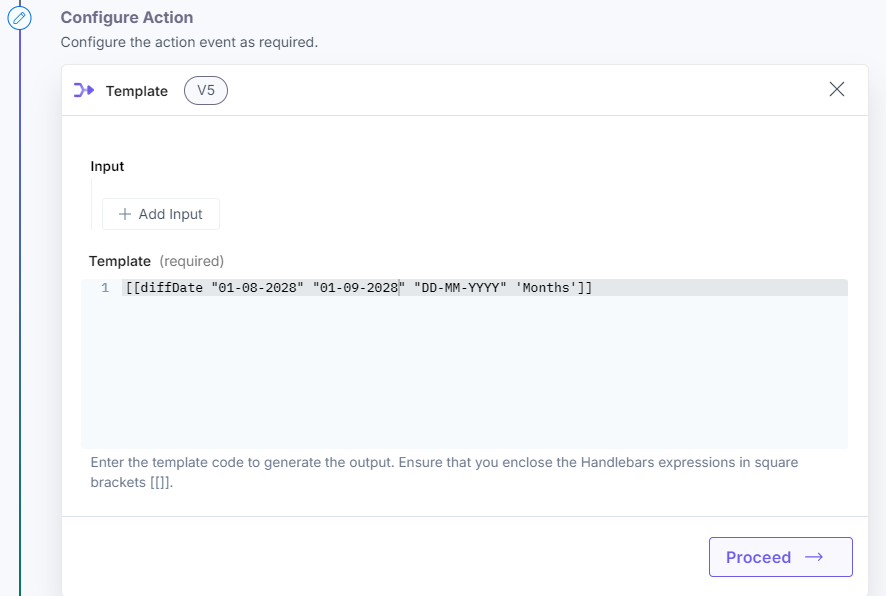
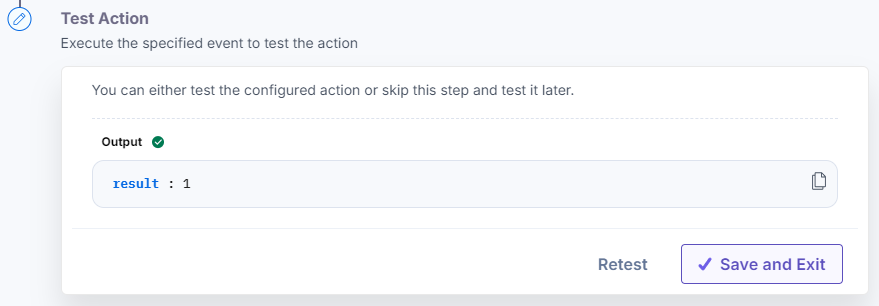
diffDate
Use this function to calculate the difference between two dates.
Example: [[diffDate “01/08/2028” “01/09/2028” “MM/DD/YYYY” “Months”]].
In the above example:
- diffDate is the helper function
- 01/08/2028 and 01/09/2028 are the dates to find the difference between
- MM/DD/YYYY is the format of the specified dates
- Months represent the desired output of the difference that you want i.e., months will fetch the difference between the two dates in months.
Here’s a screenshot that shows the input:
Here’s a screenshot that shows the output:
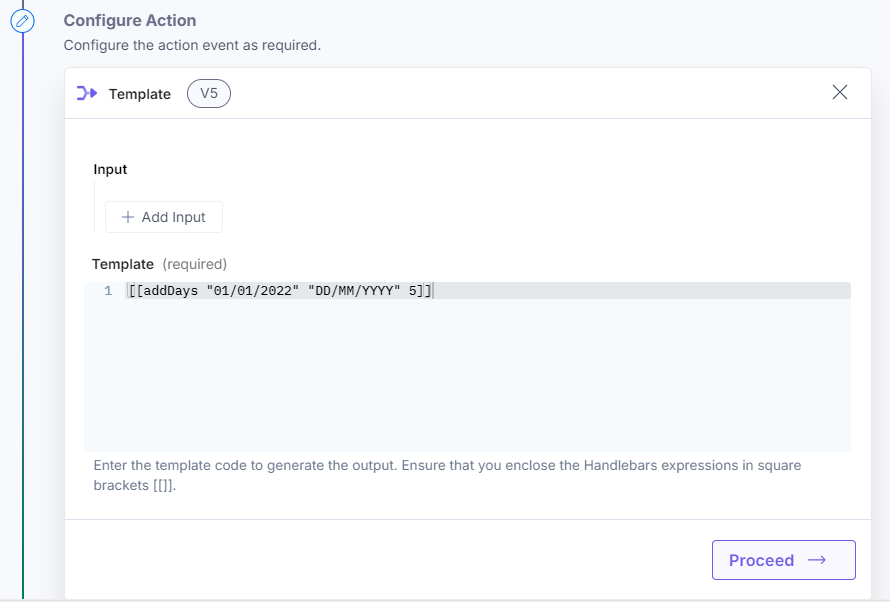
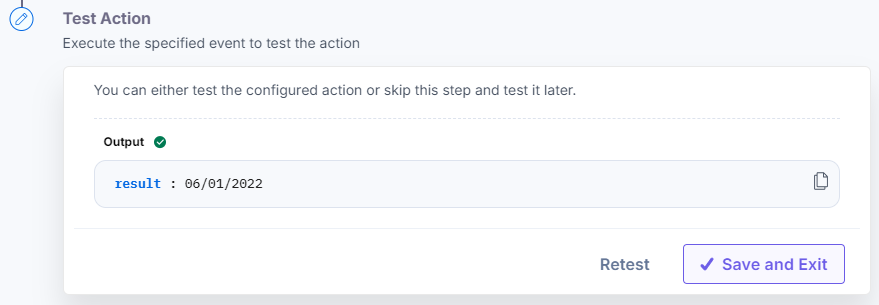
addDays
Use this function to add days in the specified date.
Example: [[addDays “01/08/2028” “MM/DD/YYYY” 5]].
In the above example:
- addDays is the helper function
- 01/08/2028 is the date in which you want to add the days
- MM/DD/YYYY is the format of the specified date
- 5 represents the total number of days you want to add in the specified date.
Here’s a screenshot that shows the input:
Here’s a screenshot that shows the output:
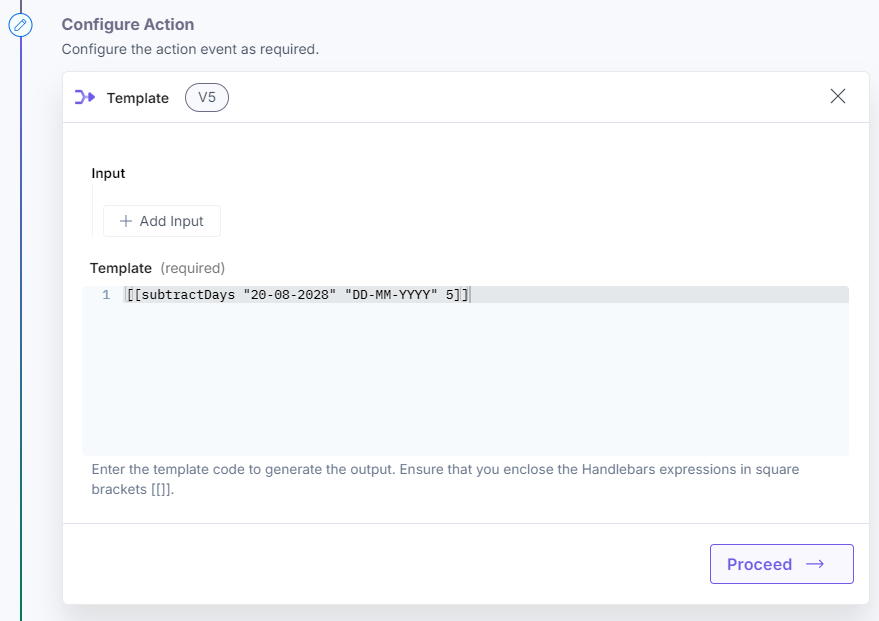
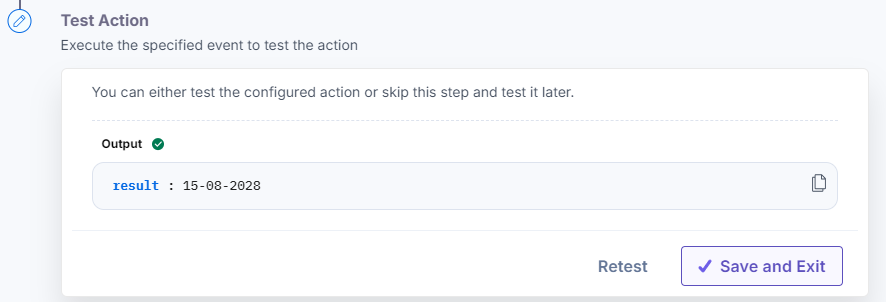
subtractDays
Use this function to subtract days from the specified date.
Example: [[subtractDays “20/08/2028” “MM/DD/YYYY” 5]].
In the above example:
- subtractDays is the helper function
- 20/08/2028 is the date from which you want to subtract the days
- MM/DD/YYYY is the format of the specified date
- 5 represents the total number of days you want to subtract from the specified date
Here’s a screenshot that shows the input:
Here’s a screenshot that shows the output:
formatDate (Scenario 1)
Use this function to parse the date string according to the second argument, and then generate the output as per the third argument.
Example: [[formatDate “16/08/2024” “DD/MM/YYYY” “YYYY/MM/DD”]].
In the above example:
- formatDate is the helper function
- 16/08/2024 is the date string
- DD/MM/YYYY is the format of the specified date string
- YYYY/MM/DD represents a new format in which you want to transform the date string
Here’s a screenshot that shows the input:
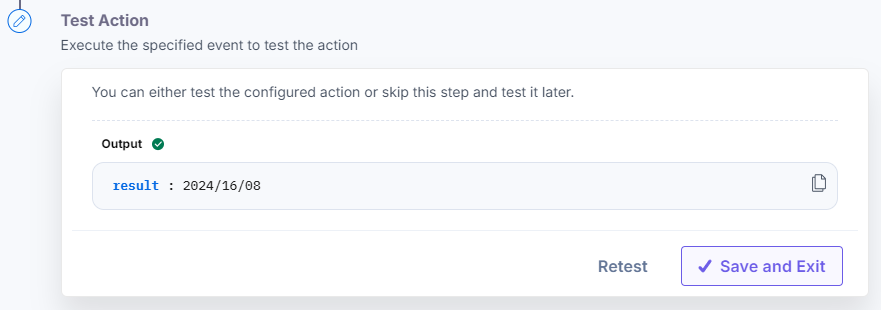
Here’s a screenshot that shows the output:

formatDate (Scenario 2)
Use this function to format the current date and time in ISO 8601 format.
Example: [[formatDate]].
In the above example:
- formatDate is the helper function
Here’s a screenshot that shows the input:
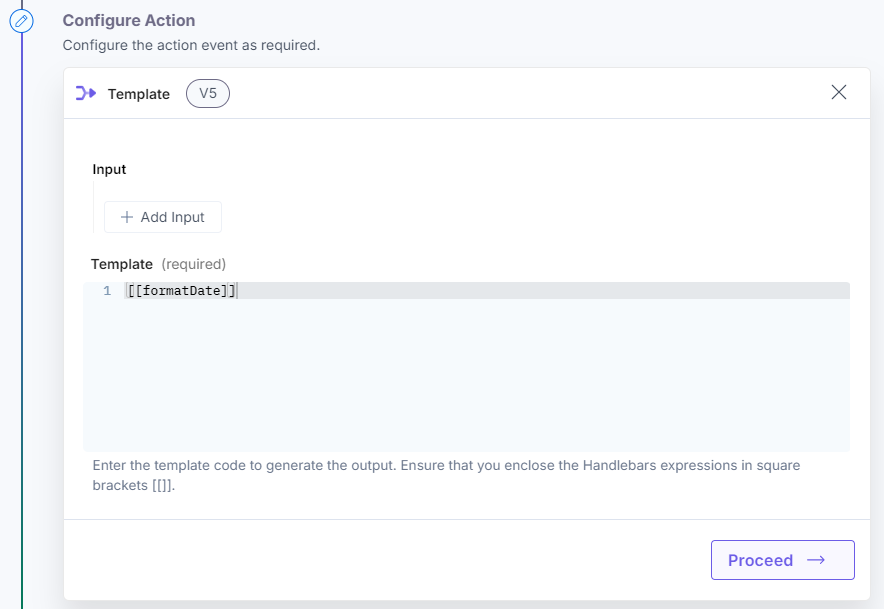
Here’s a screenshot that shows the output:
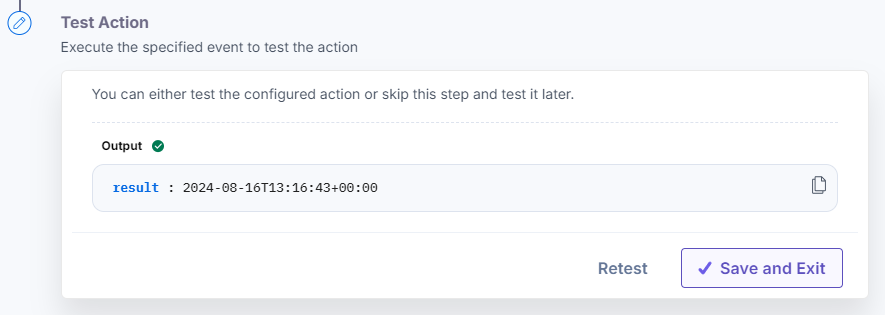
Refer to the below table to understand more about the formatDate function:
| Date Format | Output (as of August 15th 2024, 8:41 PM IST) | Description |
|---|---|---|
| 'MMMM Do YYYY, h:mm:ss a' | August 15th 2024, 8:41:35 pm | Full date and time with month name, day of month with suffix, year, 12-hour clock, minutes, seconds, and AM/PM. |
| 'dddd' | Thursday | Day of the week. |
| 'MMM Do YY' | Abbreviated month name, day of month with suffix, and year in two digits. | |
| 'YYYY [escaped] YYYY' | 2024 escaped 2024 | Year with custom text insertion. |
| '' (empty string) | 2024-08-15T20:41:35+05:30 | Default ISO 8601 format (date and time with timezone offset). |
| 'LT' | 8:41 PM | Localized time. |
| 'LTS' | 8:41:35 PM | Localized time with seconds. |
| 'L' | 08/15/2024 | Localized short date. |
| 'l' | 8/15/2024 | Localized short date without leading zeros. |
| 'LL' | August 15, 2024 | Localized long date. |
| 'll' | Aug 15, 2024 | Localized long date with abbreviated month. |
| 'LLL' | August 15, 2024 8:41 PM | Localized long dates with time. |
| 'lll' | Aug 15, 2024 8:41 PM | Localized long date with time and abbreviated month. |
| 'LLLL' | Thursday, August 15, 2024 8:41 PM | Localized long date with day of the week and time. |
| 'llll' | Thu, Aug 15, 2024 8:41 PM | Localized long date with abbreviated day of the week, month, and time. |
toFixed
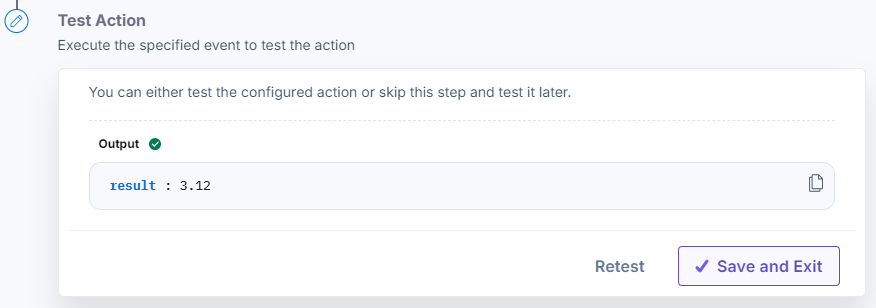
Use this function to return a decimal value truncated to the specified number of decimal places, without rounding.
Example: [[toFixed 3.15656 2]].
In the above example:
- toFixed is the helper function
- 3.15656 is the decimal value
- 2 is the specified number of decimal places to which the output will be displayed
Here’s a screenshot that shows the input:
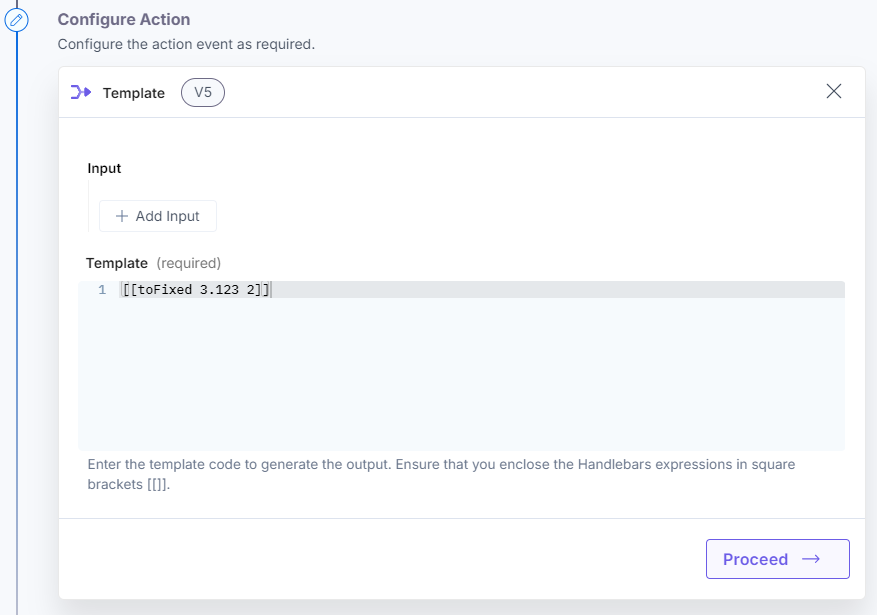
Here’s a screenshot that shows the output:
encodeURI
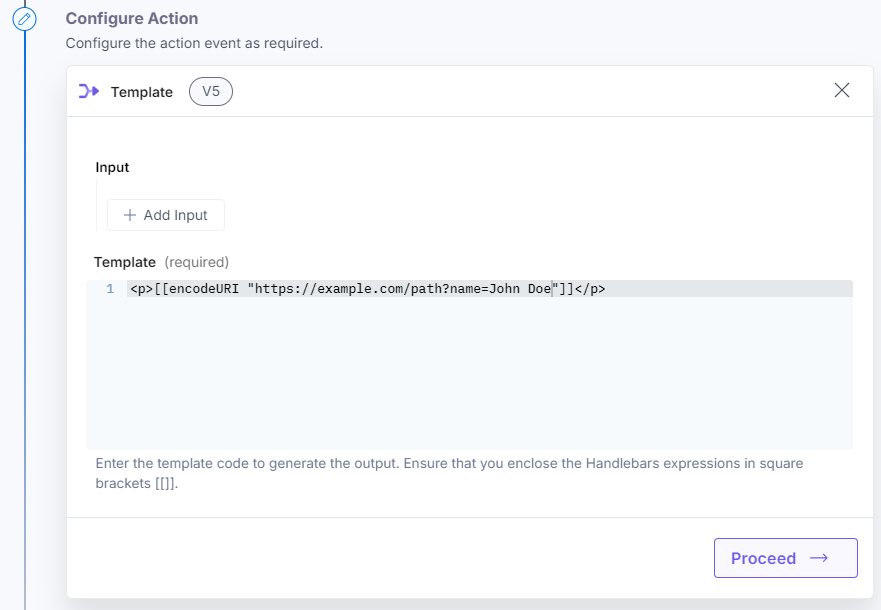
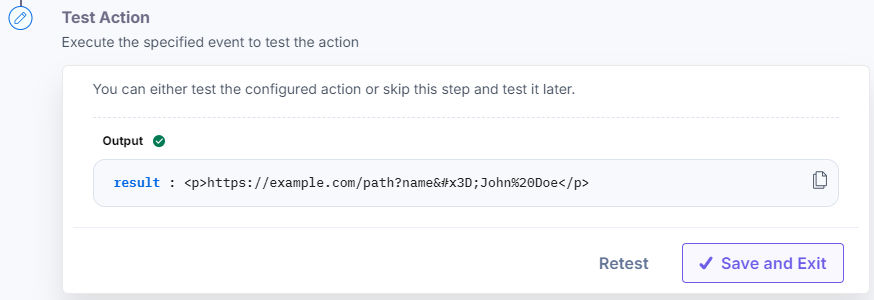
Use this function to encode the junk data and space in the URL.
Example: [[encodeURI “URL”]].
In the above example:
- encodeURI is the helper function
- URL is the specified URL to encode
Here’s a screenshot that shows the input:
Here’s a screenshot that shows the output:
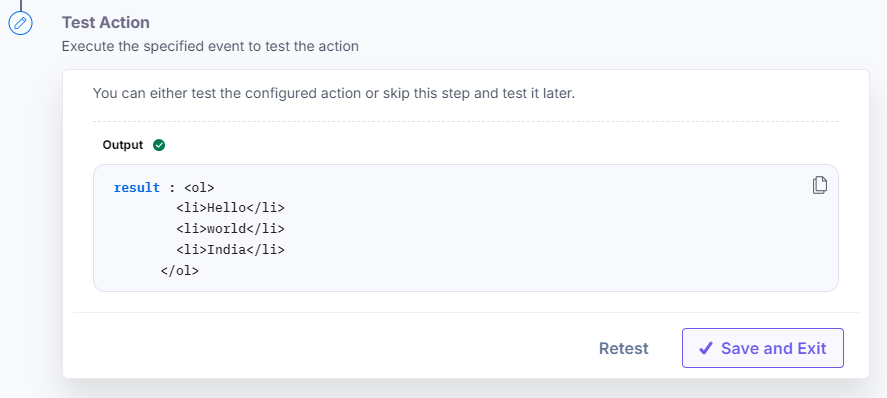
ol
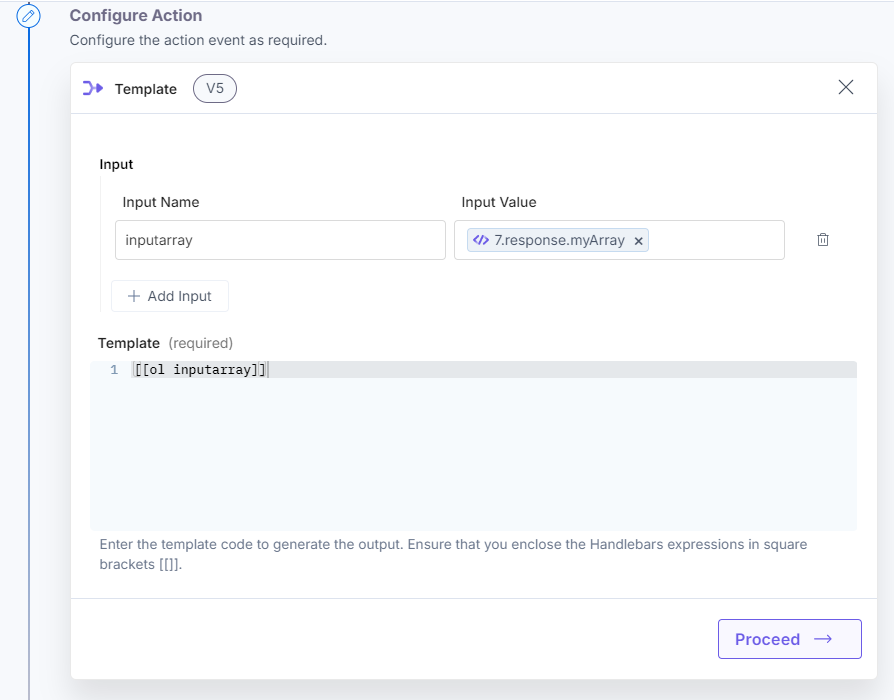
Use this function to return the ordered list.
Example: [[ol array_of_strings]].
In the above example:
- ol is the helper function
- array_of_strings is the array of strings
Here’s a screenshot that shows the input:
Here’s a screenshot that shows the output:
ul
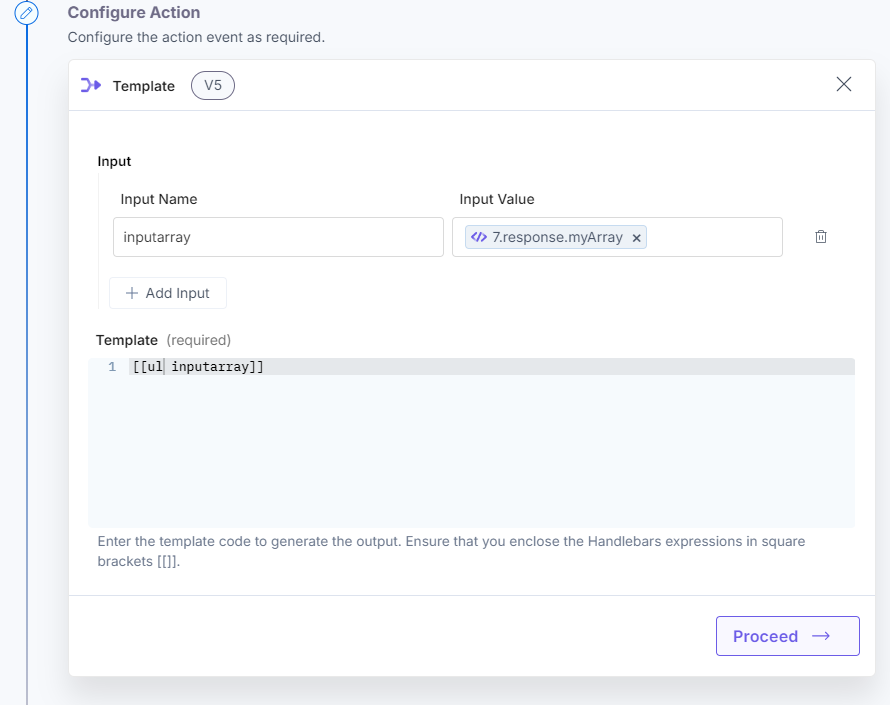
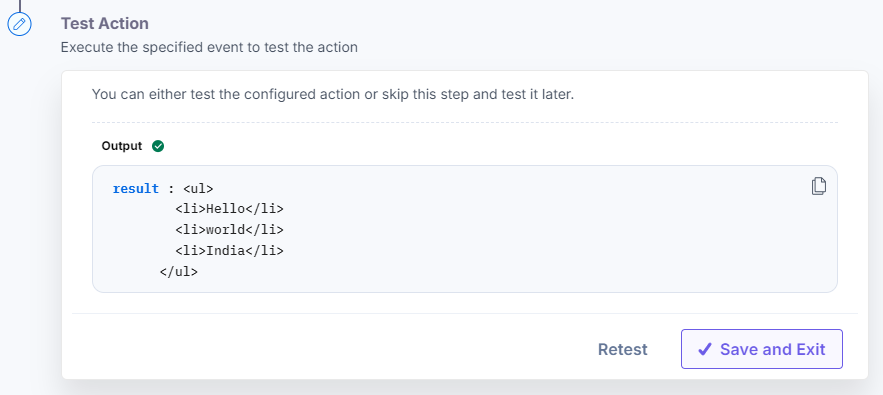
Use this function to return the unordered list.
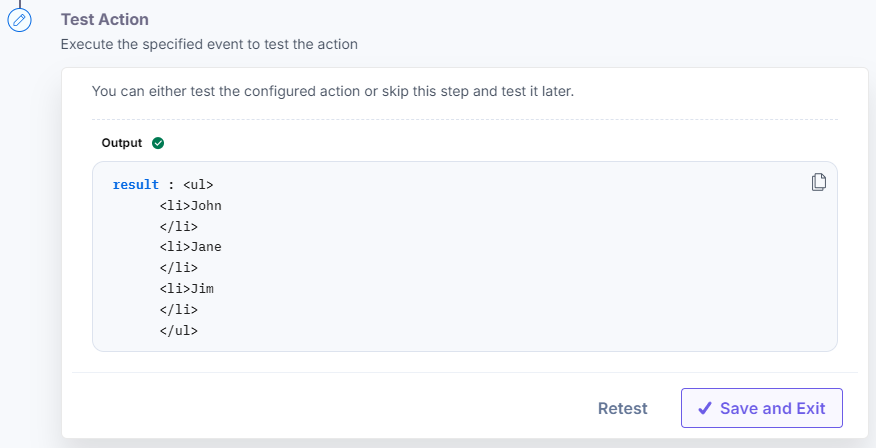
Example: [[ul array_of_strings]].
In the above example:
- ul is the helper function
- array_of_strings is the array of strings
Here’s a screenshot that shows the input:
Here’s a screenshot that shows the output:
list
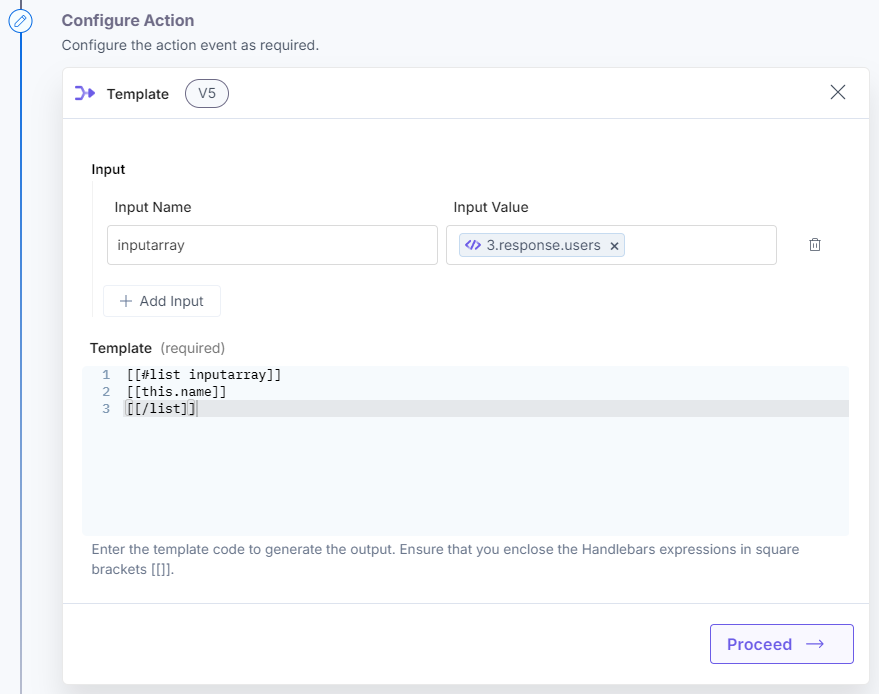
Use this function to return the fetched array of objects.
Example: [[#list array_name]] [[this.name]] [[/list]].
In the above example:
- #list is the helper function
- array_name fetches the array of objects from the previous step
- this.name points to the attributes of the array.
- [/list] indicates the end of list
Here’s a screenshot that shows the input:
Here’s a screenshot that shows the output:
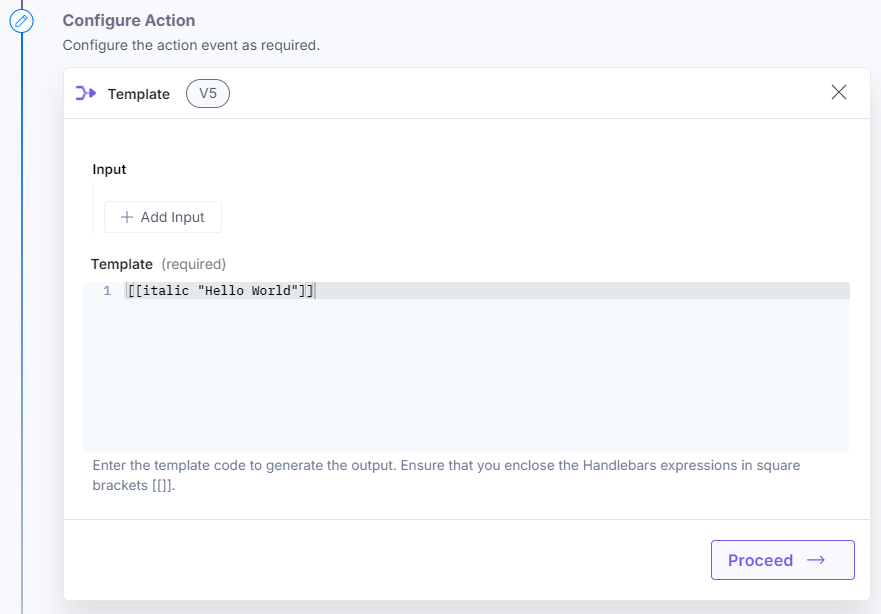
italic
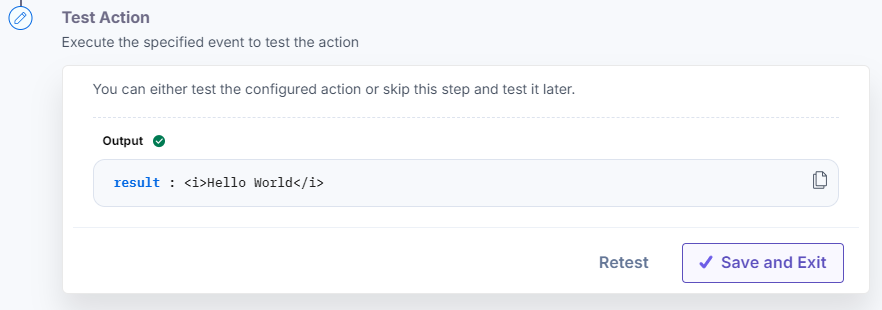
Use this function to return the string in italic format.
Example: [[italic “Hello World”]].
In the above example:
- italic is the helper function
- Hello World is the string which you want to return in italic format
Here’s a screenshot that shows the input:
Here’s a screenshot that shows the output:
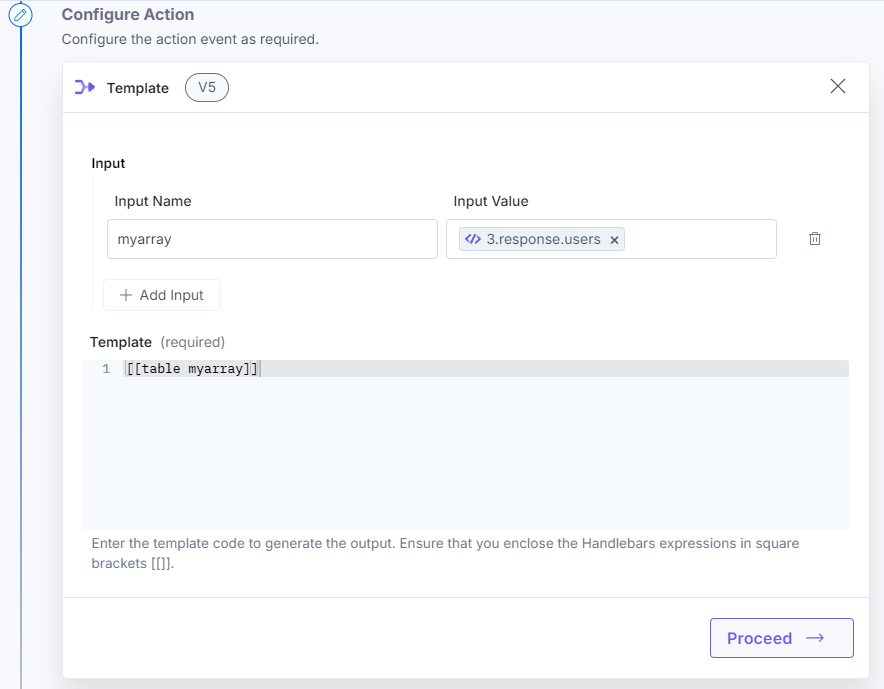
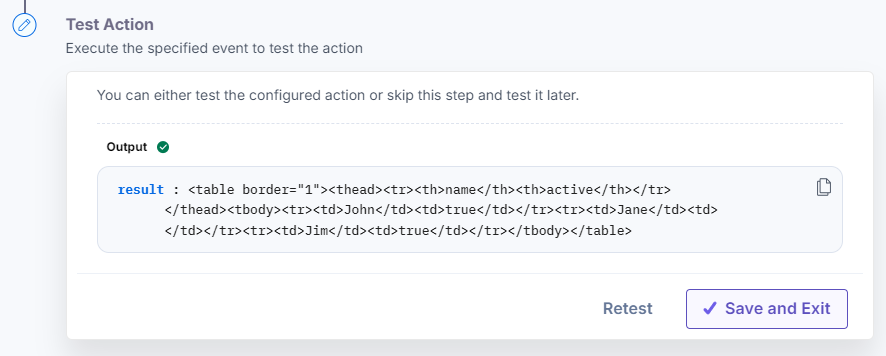
table
Use this function to return the array in tabular format.
Example: [[table array_name]].
In the above example:
- table is the helper function
- array_name is the array of objects
Here’s a screenshot that shows the input:
Here’s a screenshot that shows the output:
Note: You will get the Inline helper ‘xyz’ not found error if any pre-defined class is not found/present.
Let's explore the helper functions that are a part of the Transform action, but can also be implemented within the Template action.
capitalize
Use this function to convert the first letter or character of the input data into the capital (upper) case.
Example: [[capitalize “hello world”]].
In the above example:
- capitalize is the helper function
- hello world is the string which you want to convert in capitalized format
Here’s a screenshot that shows the input:

Here’s a screenshot that shows the output:

upperCase
Use this function to convert the input text into upper case.
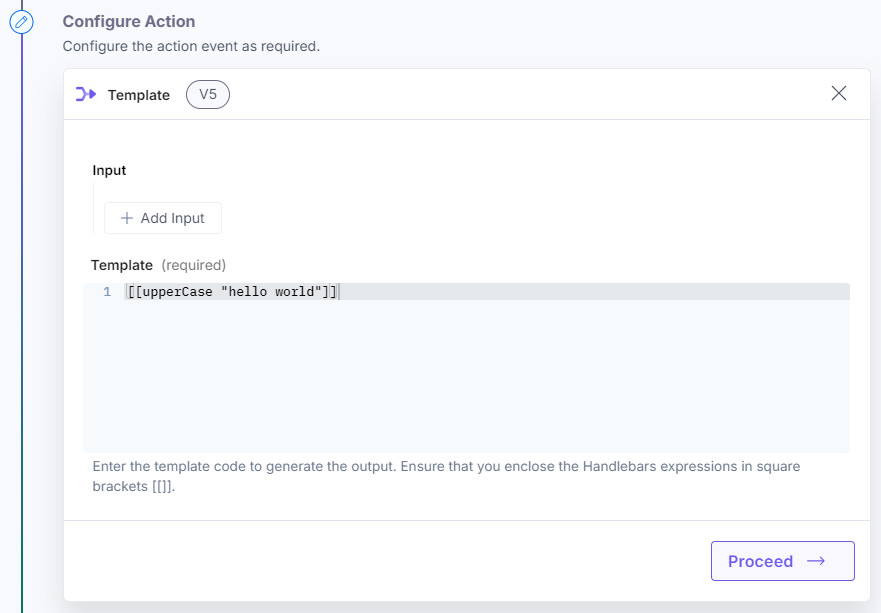
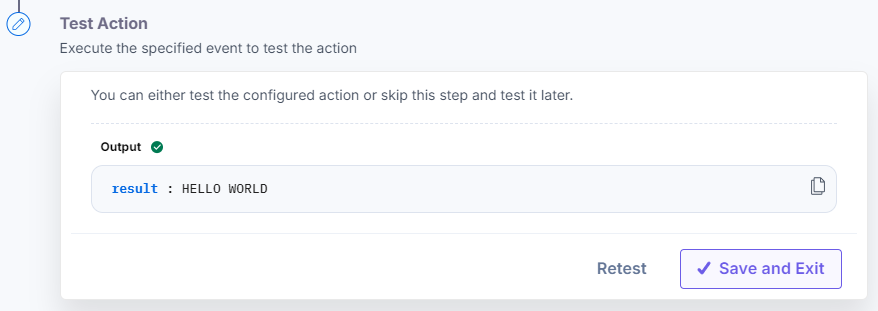
Example: [[upperCase “hello world”]].
In the above example:
- upperCase is the helper function
- hello world is the string which you want to convert in uppercase format
Here’s a screenshot that shows the input:
Here’s a screenshot that shows the output:
lowerCase
Use this function to convert the input text into lower case.
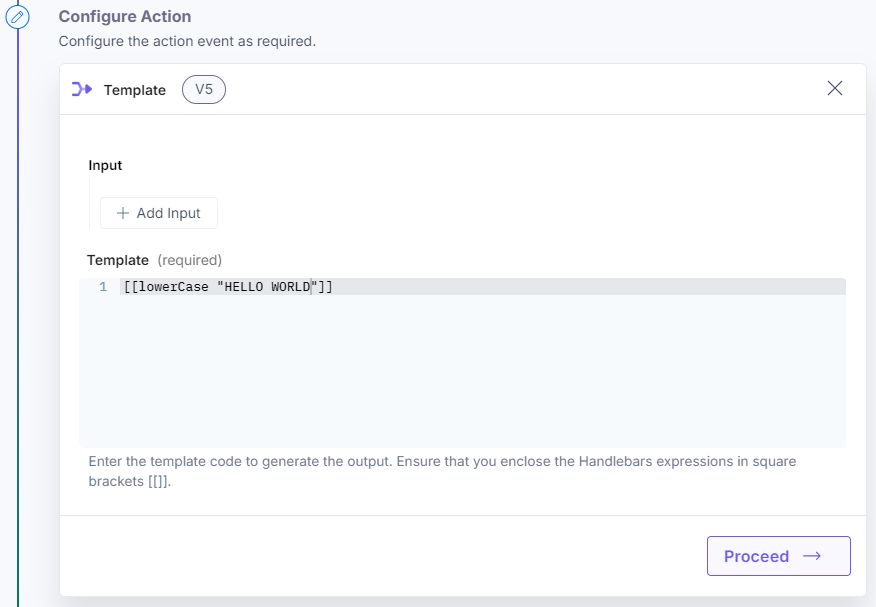
Example: [[lowerCase “HELLO WORLD”]].
In the above example:
- lowerCase is the helper function
- HELLO WORLD is the string which you want to convert in lowercase format
Here’s a screenshot that shows the input:
Here’s a screenshot that shows the output:
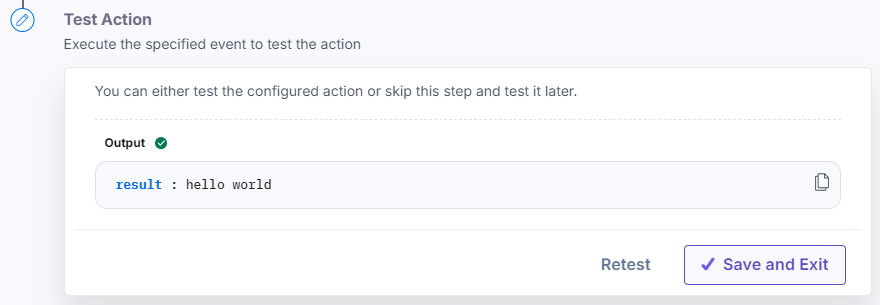
camelCase
Use this function to convert the input text into the camel case.
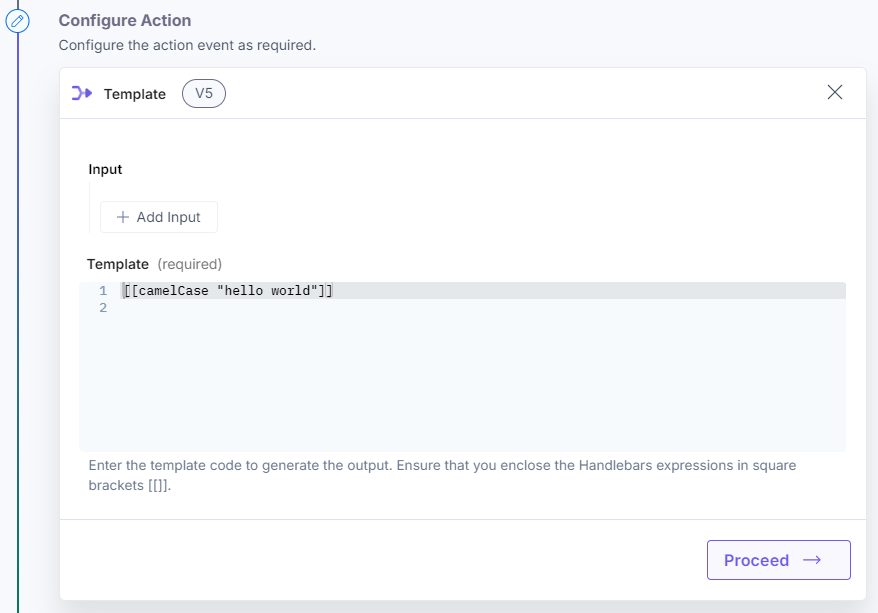
Example: [[camelCase “hello world”]].
In the above example:
- camelCase is the helper function
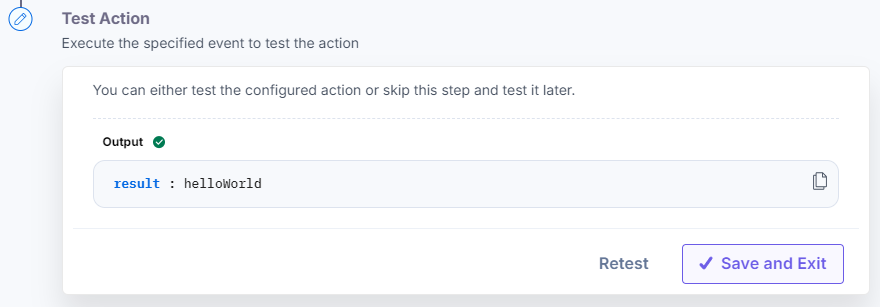
- Hello world is the string which you want to convert in camelcase format
Here’s a screenshot that shows the input:
Here’s a screenshot that shows the output:
kebabCase
Use this function to convert the input text into the kebab case.
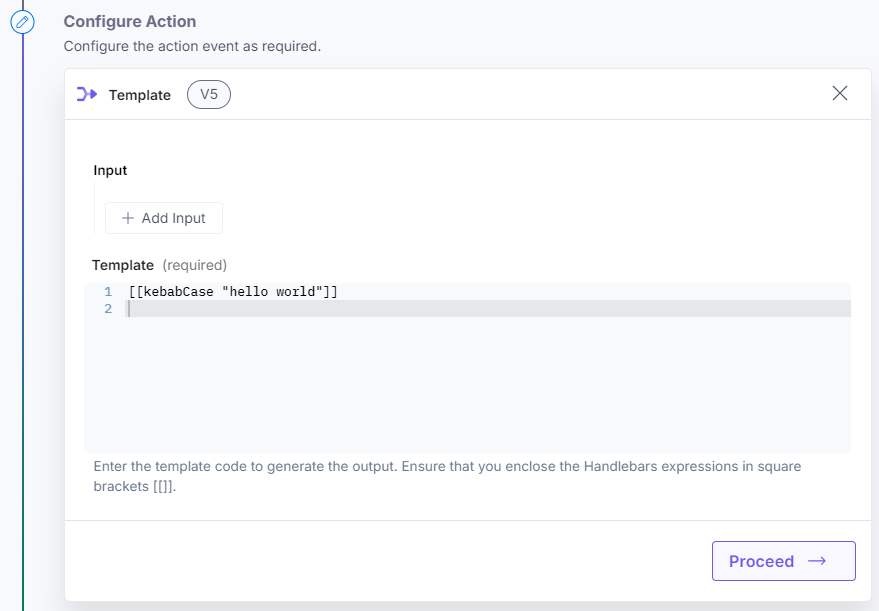
Example: [[kebabCase “hello world”]].
In the above example:
- kebabCase is the helper function
- hello world is the string which you want to convert in kebabcase format
Here’s a screenshot that shows the input:
Here’s a screenshot that shows the output:
snakeCase
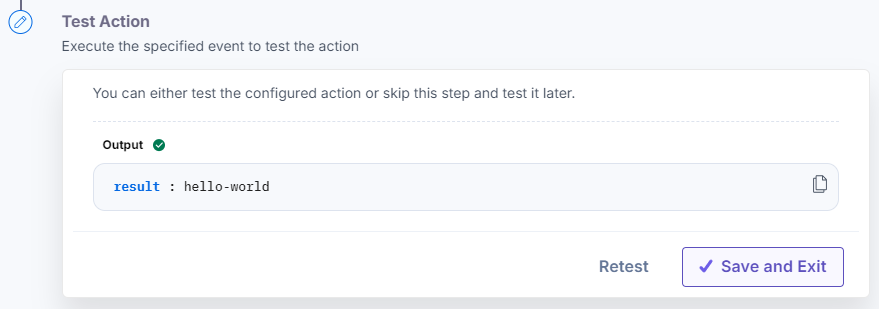
Use this function to convert the input text into the snake case.
Example: [[snakeCase “hello world”]].
In the above example:
- snakeCase is the helper function
- hello world is the string which you want to convert in snakecase format
Here’s a screenshot that shows the input:
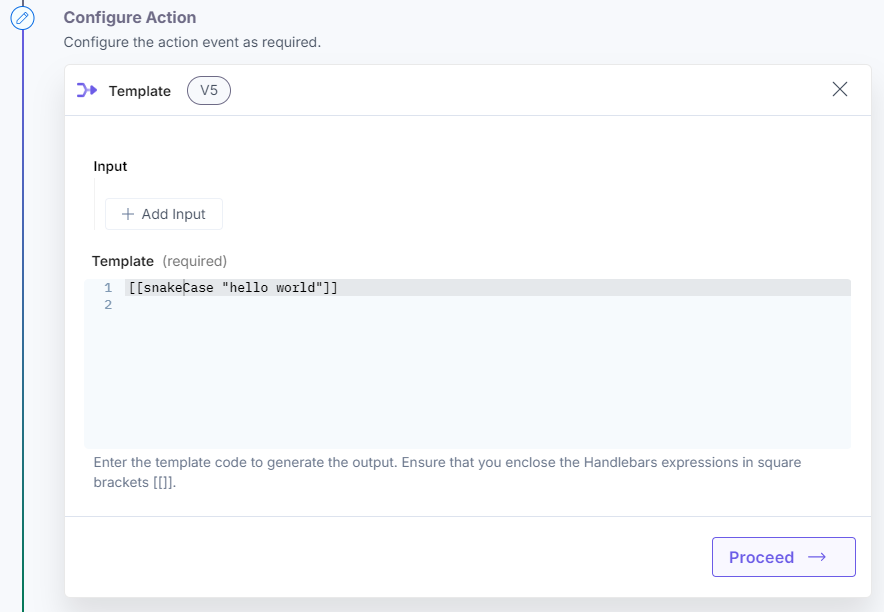
Here’s a screenshot that shows the output:

replace
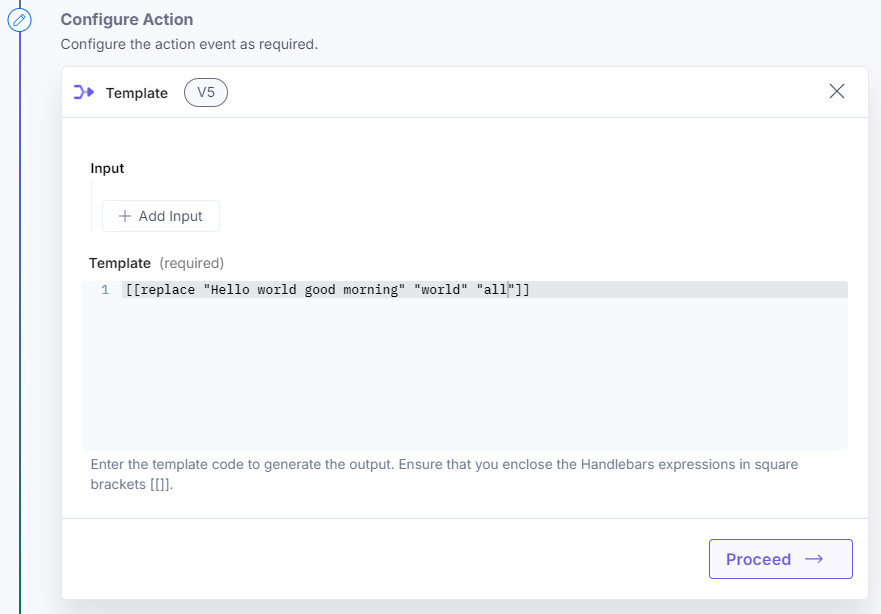
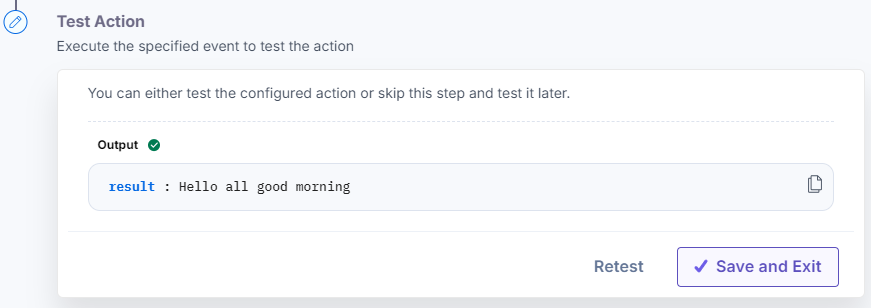
Use this function to replace any character, word, or string given in the 2nd argument with the 3rd argument.
Example: [[replace “input string”, “one char, one word or string”, “with this string”]].
Note: The replace modifier can only replace the first occurrence of a character/word/string.
In the above example:
- replace is the helper function
- Input string is the string you want to modify
- one char, one word, or string is the character, word, or string that you want to replace
- with this string is the new string that will replace the specified part of the input string
Here’s a screenshot that shows the input:
Here’s a screenshot that shows the output:
replaceAll
Use this function to replace all the characters, words, or strings given in the 2nd argument with the 3rd argument.
Example: [[replaceAll data, “one char, one word or string”, “with this string”]].
Note: The replaceAll modifier will replace multiple occurrences of a character/word/string with the same pattern.
In the above example:
- replaceAll is the helper function
- data is the string you want to modify
- one char, one word, or string is the character, word, or string that you want to replace
- with this string is the new string that will replace the specified part of the input string
Here’s a screenshot that shows the input:
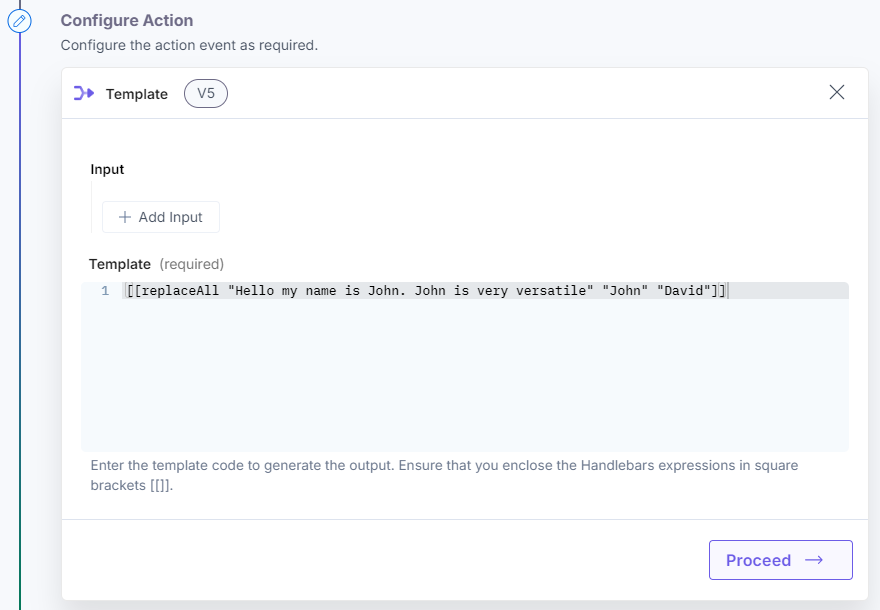
Here’s a screenshot that shows the output:
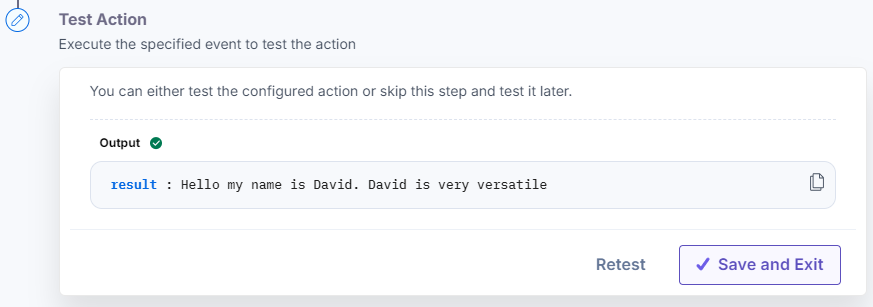
uniqueItems
Use this function to remove duplicate items and return unique values from an array.
Example: [[uniqueItems myarray]].
In the above example:
- uniqueItems is the helper function
- myarray is the array of strings
Here’s a screenshot that shows the input:
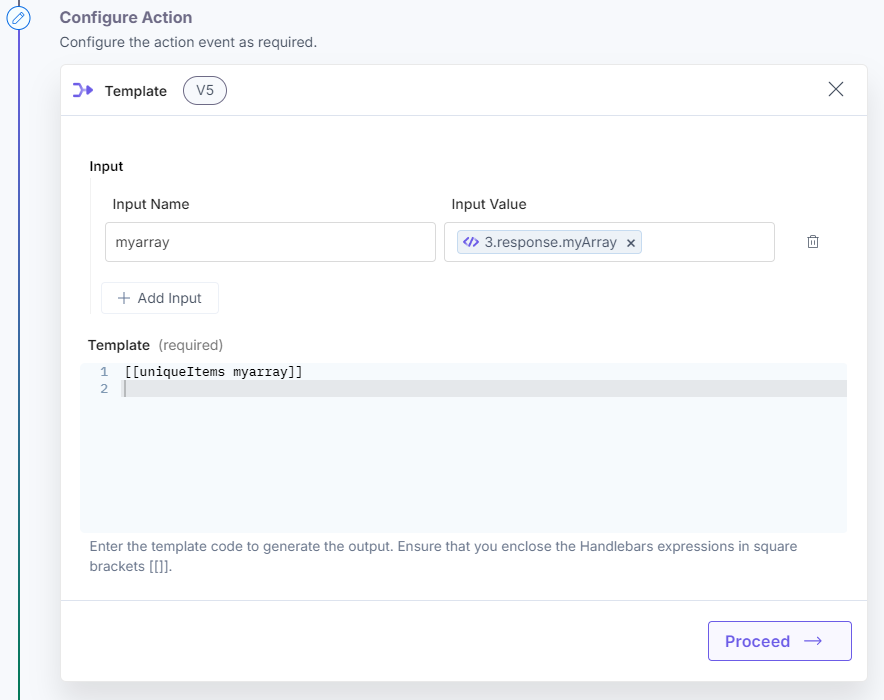
Here’s a screenshot that shows the output:
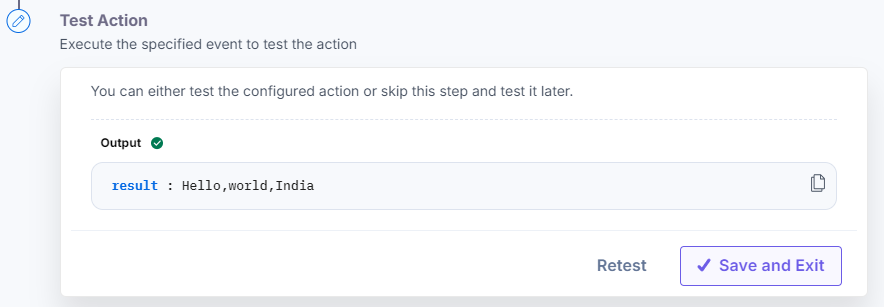
escape
Use this function to escape HTML characters.
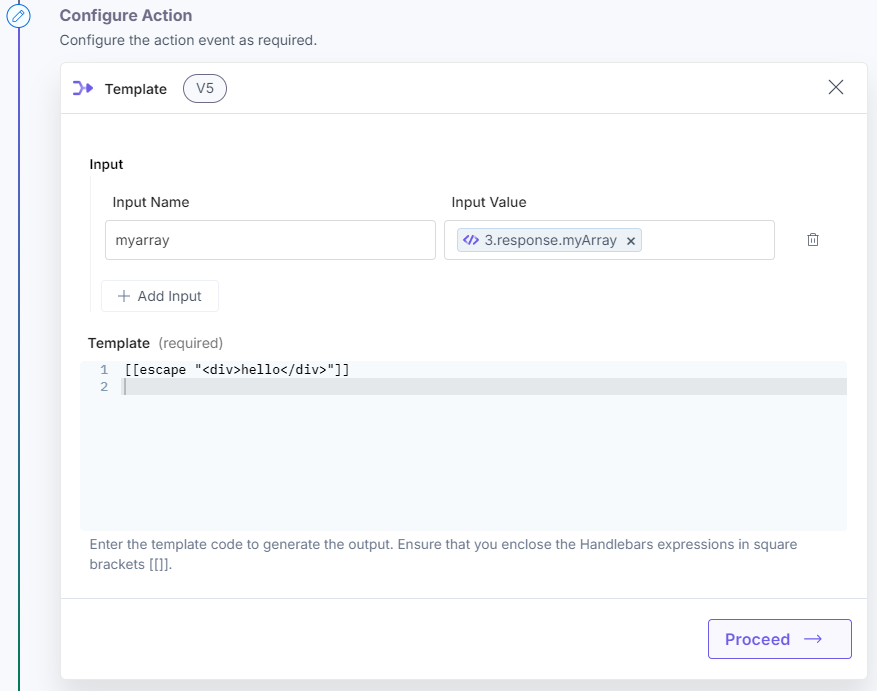
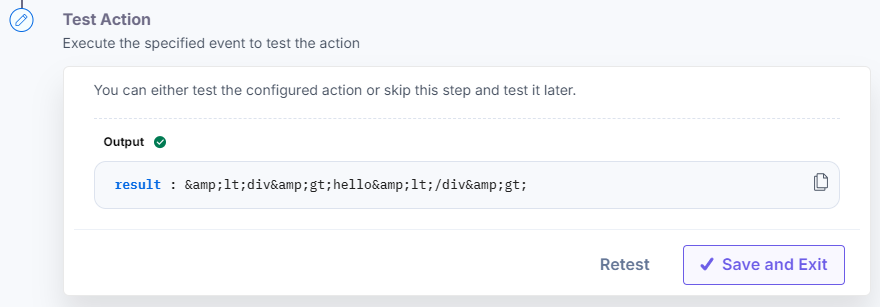
Example: [[escape “<data input>”]].
In the above example:
- escape is the helper function
- <data input> is the input HTML
Here’s a screenshot that shows the input:
Here’s a screenshot that shows the output:
split
Use this function to split the text into an array.
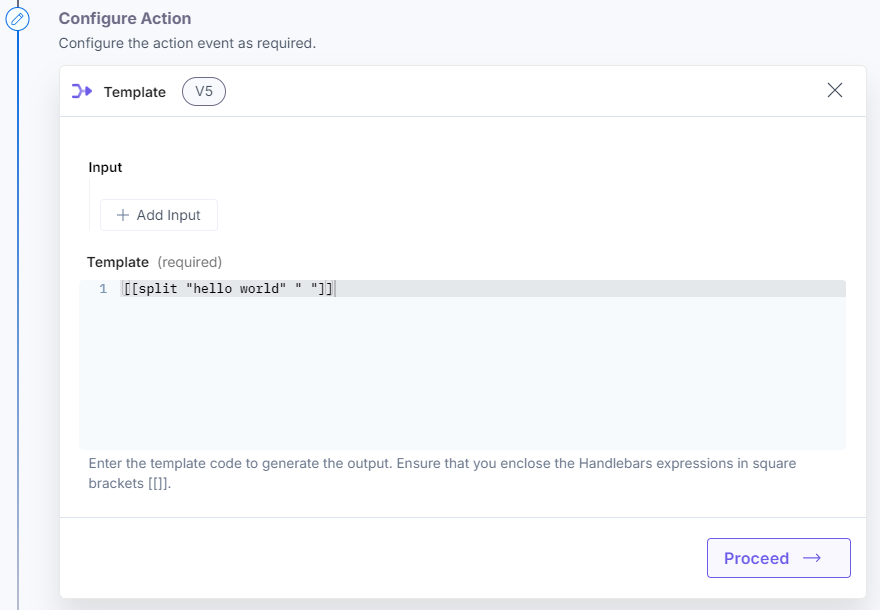
Example: [[split “data-input” , “-”]].
In the above example:
- split is the helper function
- data-input is the input string
- “ ” is the character to split the data input
Here’s a screenshot that shows the input:
Here’s a screenshot that shows the output:

join
Use this function to join all items of an array to make a single string.
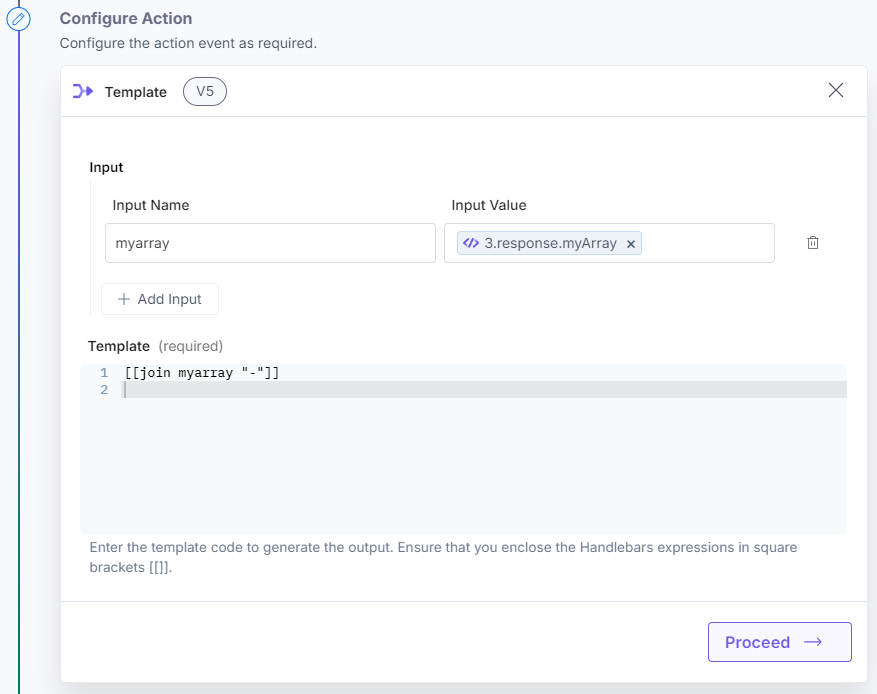
Example: [[join myarray, “-”]].
In the above example:
- join is the helper function
- myarray is the array of strings
- “-” is the character to join all the items of the array
Here’s a screenshot that shows the input:
Here’s a screenshot that shows the output:
sum
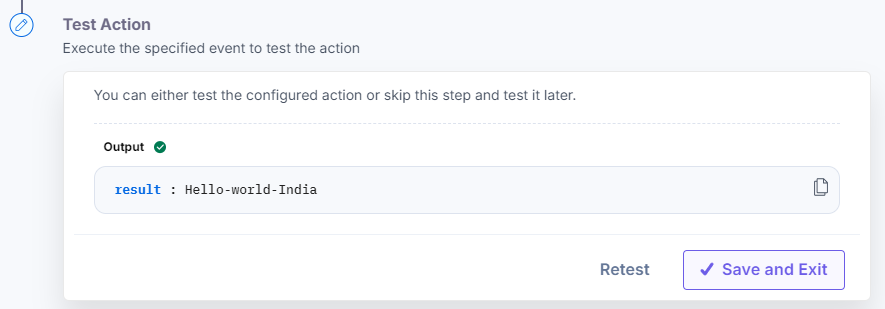
Use this function to perform the addition of all numbers.
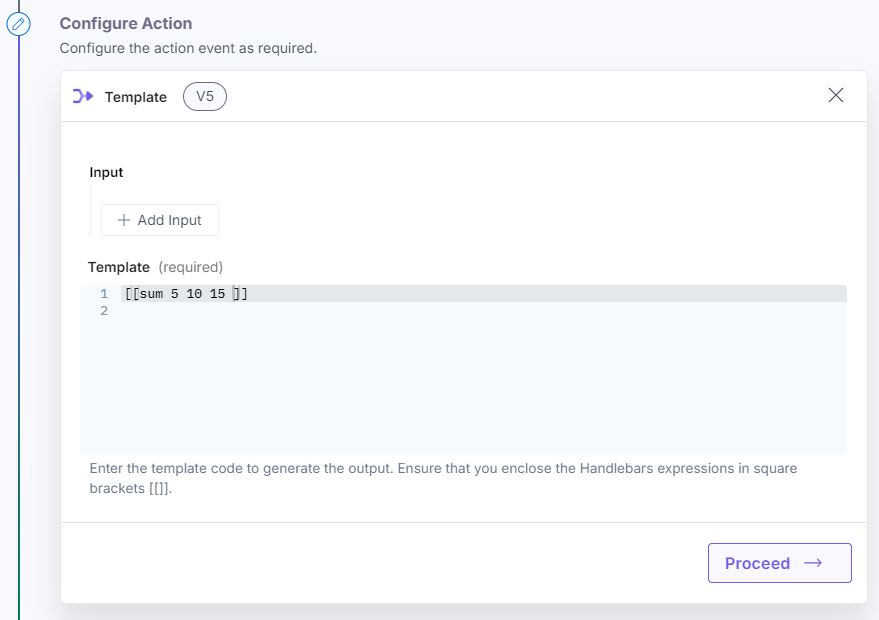
Example: [[sum 5 10 15]].
In the above example:
- sum is the helper function
- 5, 10, 15 are the integer values to be summed up
Here’s a screenshot that shows the input:
Here’s a screenshot that shows the output:

random
Use this function to generate random numbers from a specified range.
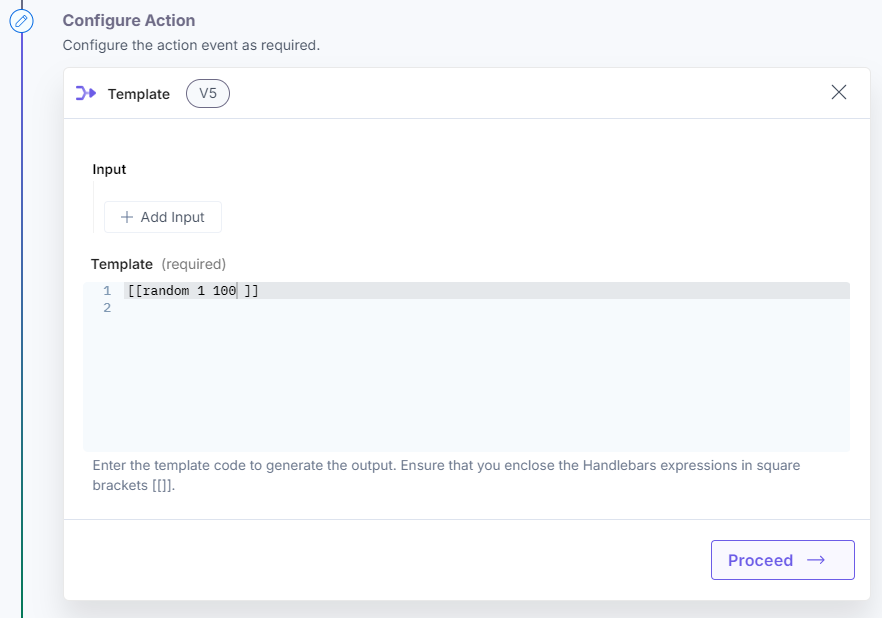
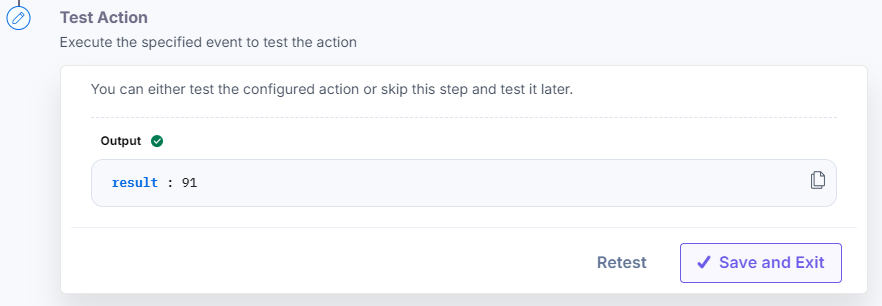
Example: [[random 1 100]].
In the above example:
- random is the helper function
- 1 100 are the integer values to fetch a random value
Here’s a screenshot that shows the input:
Here’s a screenshot that shows the output:
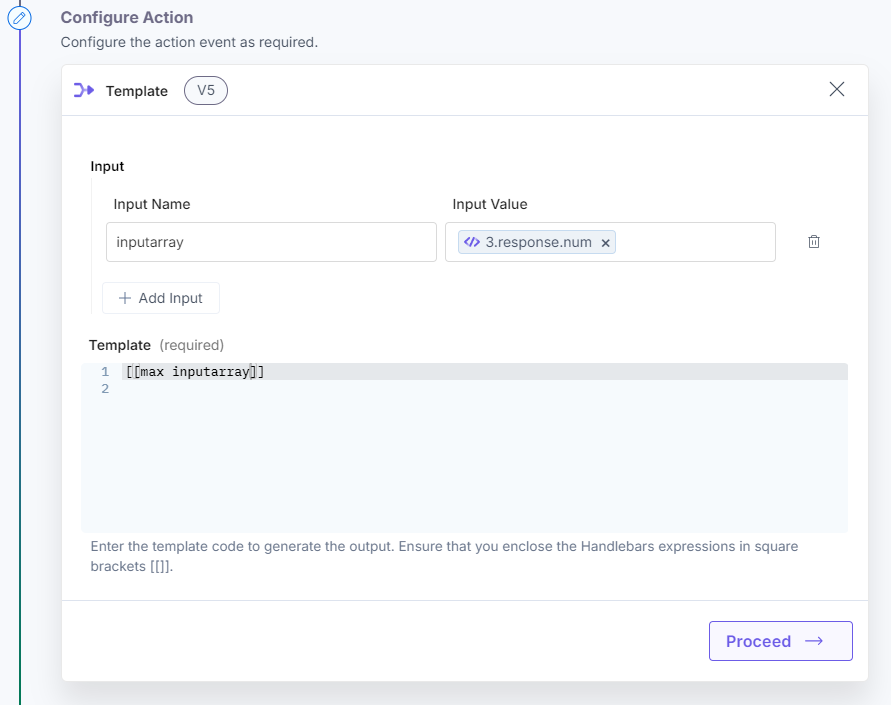
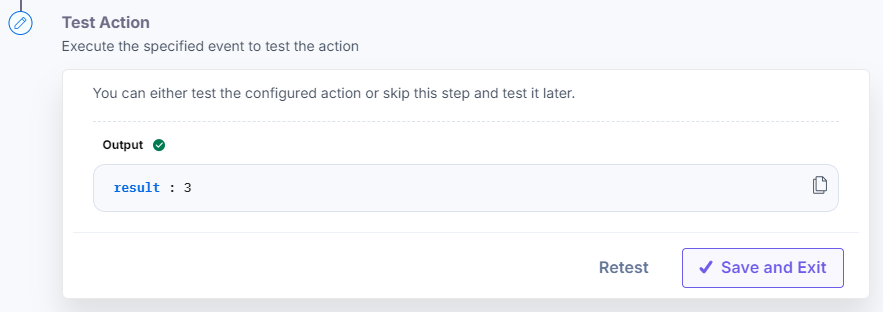
max
Use this function to retrieve the largest number from an array.
Example: [[max inputarray]].
In the above example:
- max is the helper function
- inputarray is the array of numbers
Here’s a screenshot that shows the input:
Here’s a screenshot that shows the output:
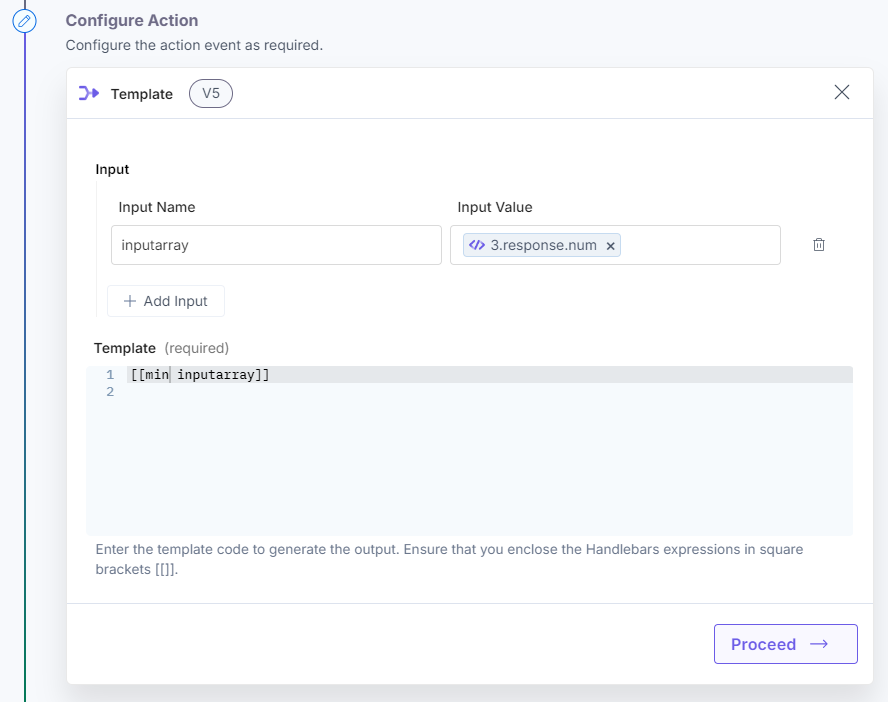
min
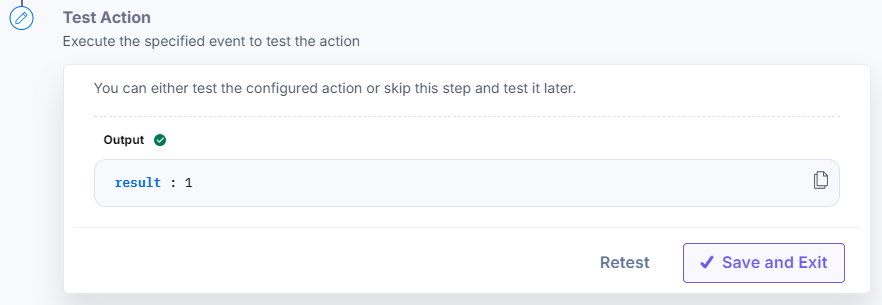
Use this function to retrieve the smallest number from an array.
Example: [[min inputarray]].
In the above example:
- min is the helper function
- inputarray is the array of numbers
Here’s a screenshot that shows the input:
Here’s a screenshot that shows the output:
size
Use this function to retrieve the size of an array.
Example: [[size inputarray]].
In the above example:
- size is the helper function
- inputarray is the array of numbers
Here’s a screenshot that shows the input:
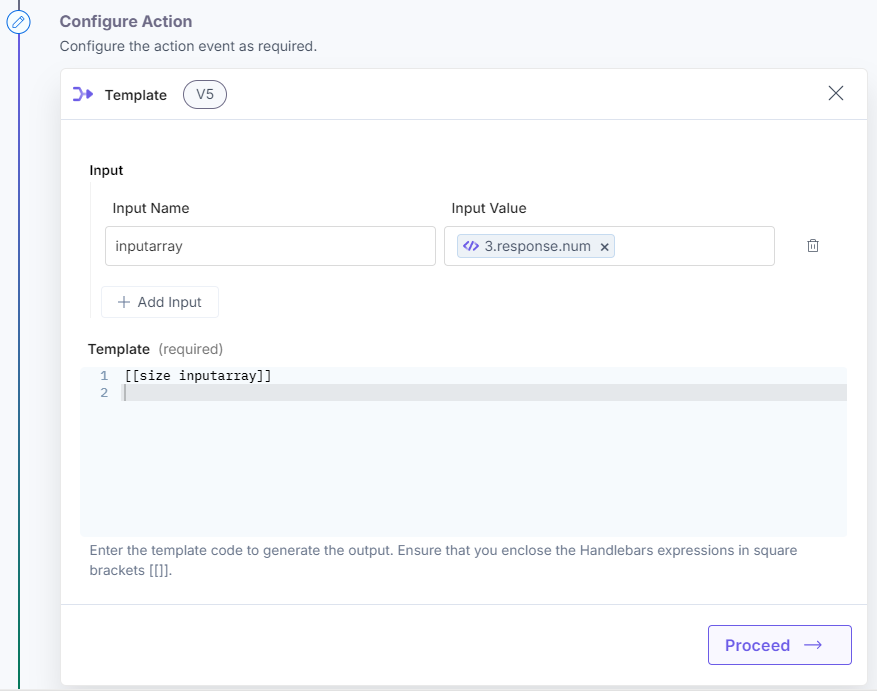
Here’s a screenshot that shows the output:
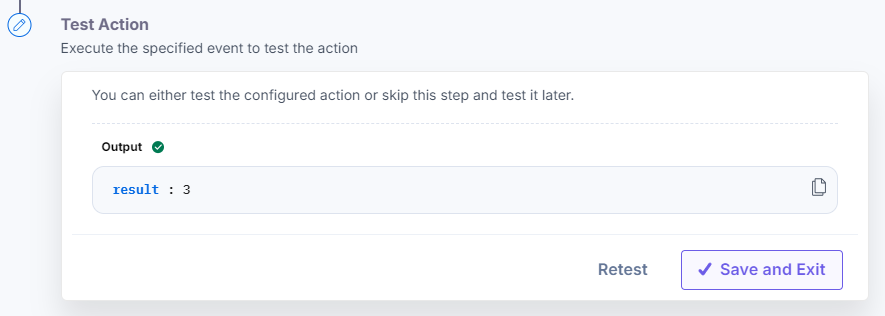
now
Use this function to retrieve the current timestamp.
Example: [[now toISO]].
Options: toISO | toDate | toGMT | toUTC | toTime
In the above example:
- now is the helper function
- toISO is the time format in ISO 8601
Here’s a screenshot that shows the input:

Here’s a screenshot that shows the output:
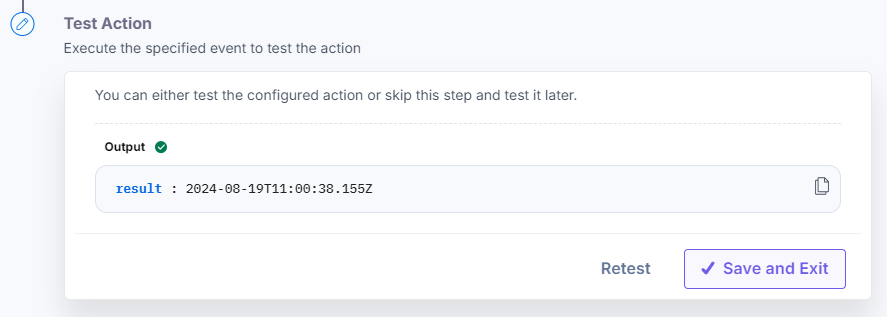
jsonStringify
Use this function to stringify an array. JSON Stringify is a method used to convert a JavaScript object, array, or other value into a JSON-formatted string.
Example: [[jsonStringify myarray]].
In the above example:
- jsonStringify is the helper function
- myarray is an object
Here’s a screenshot that shows the input:
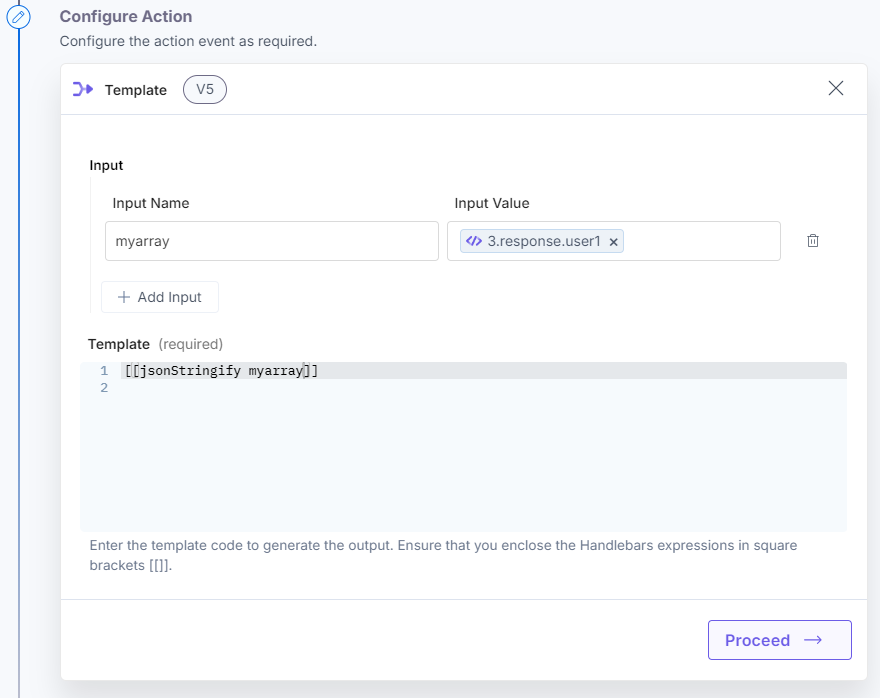
Here’s a screenshot that shows the output:
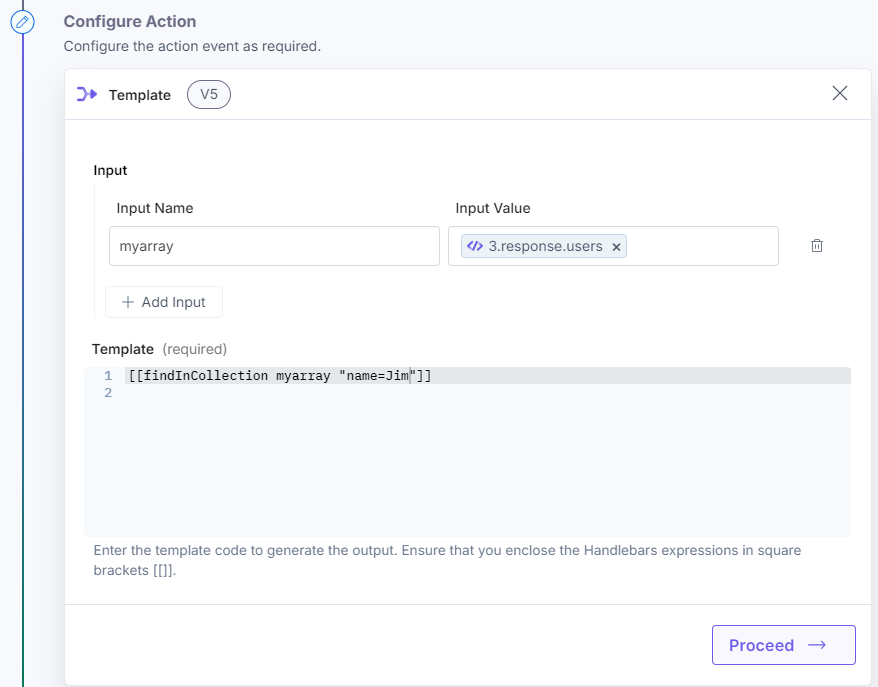
findInCollection
Use this modifier to search and return the objects based on the specified criteria.
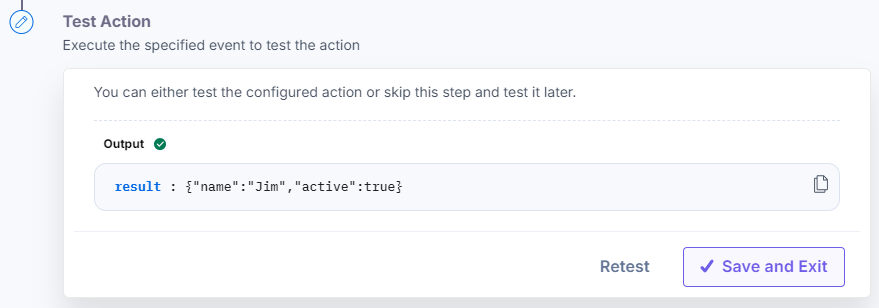
Example: [[findInCollection inputarray, “name=Jim”]].
In the above example:
- findInCollection is the helper function
- inputarray is the array of objects
- name=Jim is the filter criteria to return the object data
Here’s a screenshot that shows the input:
Here’s a screenshot that shows the output:
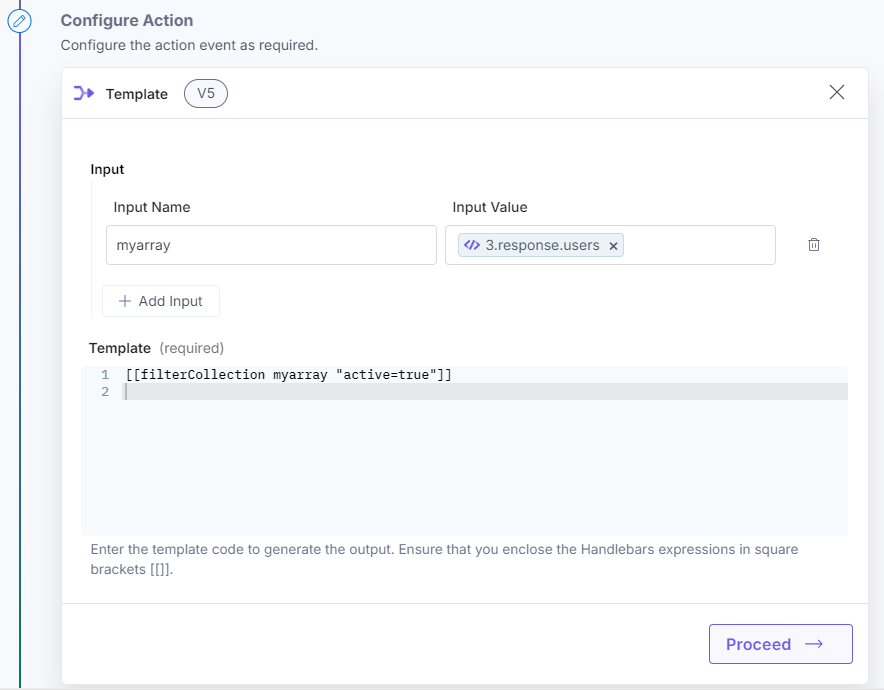
filterCollection
Use this modifier to filter an array and remove all objects that don't match the condition.
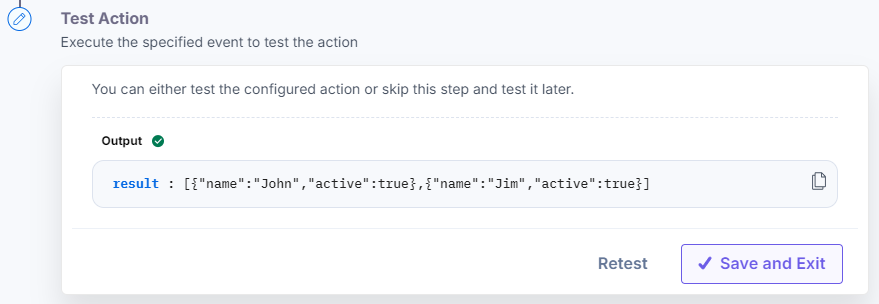
Example: [[filterCollection myarray "active=true"]].
In the above example:
- filterCollection is the helper function
- myarray is the array of objects
- active=true is the filter criteria to return the object data
Here’s a screenshot that shows the input:
Here’s a screenshot that shows the output:
trim
Use this function to remove whitespace characters from the beginning and end of the string. This includes tab, space, null byte, new line, and carriage return.
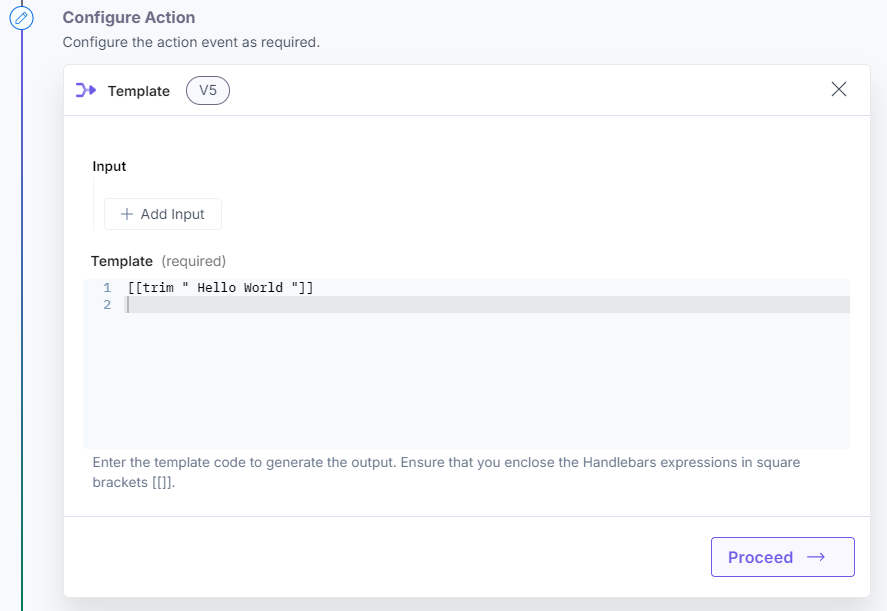
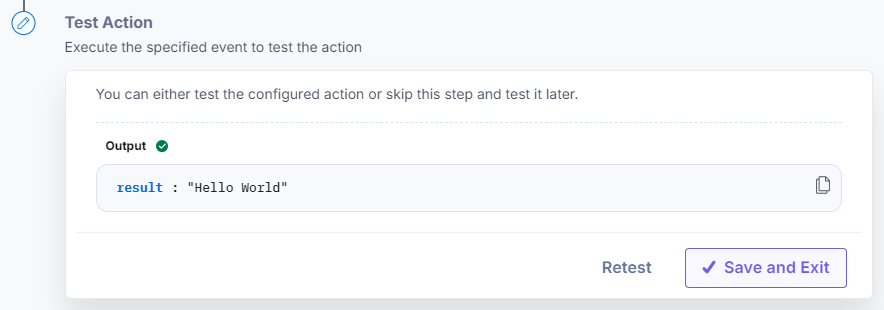
Example: [[trim “ Hello World ”]].
In the above example:
- trim is the helper function.
- Hello World is the input string.
Here’s a screenshot that shows the input:
Here’s a screenshot that shows the output:
truncate
Use this function to reduce the length of a string to a specific number of characters or words using ellipses or word-break options.
Note: The boolean value (true or false) indicates whether you want to break the word. True means you do want to break the word, while false means you do not. Note that a space following the word is considered a break. For instance, with a boolean value of true, 'hello world' would break after 'hello'.
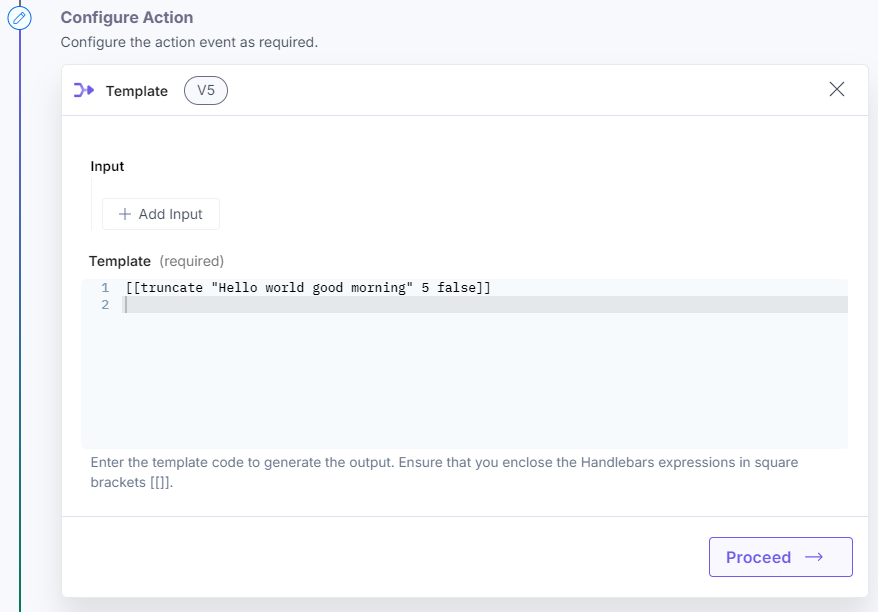
Example: [[truncate string,number of characters,”ending string”, “word break”]].
In the above example:
- truncate is the helper function
- string is the input string
- number of characters is the limit to reduce the input string length
- ending string is the special character or ellipses used to end the string
- word break specified as true/false to break the word
Note: If the limit for the number of characters is more than that of the string, the output will contain the complete string without ellipses.
Here’s a screenshot that shows the input:
Here’s a screenshot that shows the output:


.svg?format=pjpg&auto=webp)


.svg?format=pjpg&auto=webp)
.svg?format=pjpg&auto=webp)
.svg?format=pjpg&auto=webp)
.svg?format=pjpg&auto=webp)


